Table of Contents
Advertisement
Quick Links
Advertisement
Table of Contents

Related Manuals for Rice Lake Dyna-Link 2 MSI-7300


Summary of Contents for Rice Lake Dyna-Link 2 MSI-7300
- Page 1 MSI-7300 Dyna-Link 2 Tension Dynamometer Technical Manual PN 152160 Rev D...
- Page 2 All information contained within this publication is, to the best of our knowledge, complete and accurate at the time of publication. Rice Lake Weighing Systems reserves the right to make changes to the technology, features, specifications and design of the equipment without notice.
-
Page 3: Table Of Contents
Course descriptions and dates can be viewed at www.ricelake.com/training or obtained by calling 715-234-9171 and asking for the training department. © Rice Lake Weighing Systems. All rights reserved. Printed in the United States of America. Specifications subject to change without notice. - Page 4 7.5 Firmware Update Procedure ............32 Specifications ..........................33 Rice Lake continually offers web-based video training on a growing selection of product-related topics at no cost. Visit www.ricelake.com/webinars...
-
Page 5: Introduction
RF remote display allows tension monitoring from a distance and adds the ability to print and store data. Manuals can viewed or downloaded from the Rice Lake Weighing Systems website at www.ricelake.com Warranty information can be found on the website at www.ricelake.com/warranties 1.1 Features... -
Page 6: Safety
Do not make alterations or modifications to the dynamometer or the shackles. Do not use improperly rated or sized shackles. Use only Rice Lake recommended shackles. Do not remove or obscure warning labels. Replace labels when worn. Contact MSI for replacement labels. -
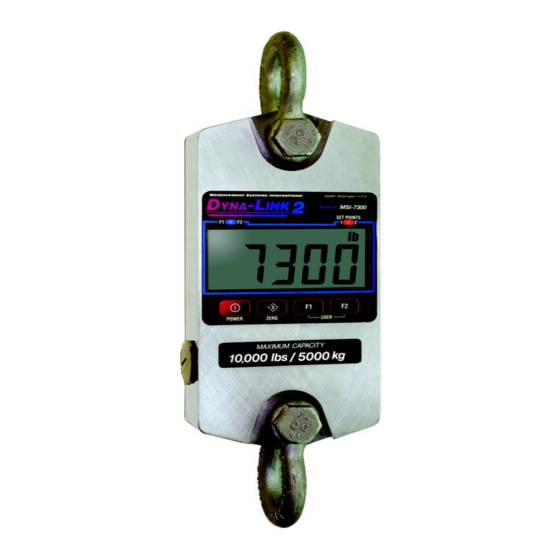
Page 7: Display
1.3 Display 12 13 Figure 1-1. Dyna-Link 2 Front Panel Item Description F1 and F2 LEDs – indicate the function of the associated F-key is active. Example: In peak hold mode the associated LED will blink whenever a new peak reading is captured. Setpoints –... -
Page 8: Available Configurations
1.4 Available Configurations Part No. Description Dyna-Link 2 Digital Tension Dynamometer 139162 MSI-7300 1000 Lb Final Assembly 139163 MSI-7300 2500 Lb Final Assembly 139164 MSI-7300 5000 Lb Final Assembly 139165 MSI-7300 10000 Lb Final Assembly 139166 MSI-7300 25000 Lb Final Assembly 139167 MSI-7300 50000 Lb Final Assembly 139168... -
Page 9: Options
MSI-7300 Transport Case For Use With 25k And 50k DynaLink 2 Digital Tension Dynamometers 145073 MSI-7300 Shipping Crate For Use With 100k Dyna Link 2 Digital Tension Dynamometers 139470 Cable Assy Heavy Duty Serial Dyna-Link 2 MSI-7300 162899 MSI-Scoreboard 4in Red 7001 RF AC Power 162897... -
Page 10: Operation
Operation This section includes the basic operation of the Dyna-Link 2. 2.1 Power Turn on the Dyna-Link 2 by pressing . The LCD displays all segments for a display test and the software POWER version number will briefly display. When is displayed, the unit is ready for use. 2.2 Zero Press to remove small deviations in zero when the Dyna-Link 2 is unloaded. -
Page 11: Installation
NiMH Cells in C and D sizes have a lower capacity then the Alkaline C and D sizes. Rice Lake Weighing Systems recommends having two sets of NiMH batteries, so one set can be charging while the other is in use. -
Page 12: Setup
4.0 Setup This section describes parameter settings on the Dyna-Link 2. Use the following keys for navigating through the menus when setting up the Dyna-Link 2. 1. Press simultaneously to enter setup menu. 2. Press to scroll through the parameters or settings. 3. -
Page 13: Function Keys
Parameter Settings Description Unit Weight Units – sets the weight units displayed. See Section 4.7 on page 14. MTon b.LiFE Battery Life – sets the options for standard or extended battery life. See Section 4.8 on page 15. Table 4-1. -
Page 14: Total
4.2.3 Total 1. Ensure the total mode has been programmed in the setup menu. If this has not been setup the assigned to F-Key will not work. TOTAL 2. Program an . See Section 4.2 on page 9. F-key Total 3. -
Page 15: 2-Units/ 5-Units
4.2.7 2-Units/ 5-Units Program an to either . See Section 4.2 on page 9. F-key 2-UNIT 5-UNIT Press the to switch the force units between lb and kg. 2-UNIT F-key Press the to scroll through all available units: lb, kg, tons (U.S. short), metric tons, and kilonewtons. 5-UNIT F-key 4.2.8 Hi-Res Program an... -
Page 16: Setpoints
4.4 Setpoints The Dyna-Link 2 supports two setpoints. Common uses of set points are for warnings or process control. The unit comes standard with two red LED outputs for a triggered set point. There is an audible output option that is triggered by setpoint 1. -
Page 17: Total
4.5 Total For the accumulation of multiple weighments, the Total function uses the displayed load, so gross and net readings can be added into the same total. There are four modes of totalizing, a manual and three auto modes. All modes require that the weight on the scale return below 0.5% (relative to full scale) of Gross Zero Net Zero before the next weighment can be added. -
Page 18: Filter
4.6 Filter Changing the filter settings allows the Dyna-Link 2 to adjust to situations where there is a lot of movement in the lift or the crane structure. If the reading is not stable, it can often be improved by increasing the filter setting. Settling time will be longer as the filter setting is increased. -
Page 19: Battery Life
If the Dyna-Link 2 Calibration was originally in tons or metric tons, the 2Unit setting will switch from tons to metric tons instead of lb/kg. 4.8 Battery Life In Long battery life mode, the system is placed into a sleep state for several seconds at a time if there is no change in tension. -
Page 20: Calibration
5.0 Calibration The Dyna-Link 2 is calibrated using standard precision test weights. It is required that the weight used is at least 10% of full capacity in order to achieve rated accuracy. Example: Use at least a 500kg test weight to calibrate a 5000kg capacity unit. The Dyna-Link 2 supports load cell linearization with up to four span points that can be calibrated in any order. -
Page 21: Initial Calibration
4. Press to set the zero calibration point. If the zero is in range, will display momentarily, then is displayed. If the calibration point is not within the limits, the display will read FAIL and the procedure will need to be repeated. -
Page 22: Guidelines For Capacity And Resolution
7. Press . The current capacity is displayed. 8. Enter a different capacity by: • Pressing to move the cursor position and change the number. • With the desired number displayed, press to save the number. • Press to move the cursor to the next position. •... -
Page 23: C-Cal Calibration
5.3 C-Cal Calibration When adequate test weights are not available, the Dyna-Link 2 can be calibrated using a cal number calibration which is referred to as C-Cal. To use C-Cal, a factory generated C-Cal number must be known. Replacement load cells for the Dyna-Link 2 have the C-Cal value stamped on the serial number label. -
Page 24: Calibration Setup Menu
5.4 Calibration Setup Menu The calibration setup menu contains the and the . Additional menus will Standard Menu Auto Zero Maintenance Menu display depending on the main setup menu when Legal-for-Trade settings are used. Parameter Selections Description Industrial Standard Settings Industrial The common setting for the MSI-7300. -
Page 25: Zero On Power-Up (0.P-Up)
5. Press . The current setting displays. 6. Press to scroll to 7. Press to select desired setting. displays. twice to store settings. displays briefly and the Dyna-Link 2 returns to the weigh mode. 8. Press 5.4.3 Zero on Power-up (0.P-UP) Set to on to perform a zero each time the Dyna-Link 2 is time the powered on. -
Page 26: Communication
Communication The Dyna-Link 2 can communicate with peripheral devices using RS-232 or 802.15.4 wireless. Only one communications type can exist at a time. The RS-232 port located on the bottom side of the Dyna-Link 2 can be used for setup and calibration using a computer and the ScaleCore Connect Software (available Online). Parameter Parameter Description... -
Page 27: Printer
6.1 Printer The RS-232 comm port is capable of outputting tension data. All the weight modes the Dyna-Link 2 can measure are available in user formatted form. The control mode program is what causes the Dyna-Link 2 to print. 6.1.1 Standard Print Strings The following commands can be used to format gross, net and other print formats. -
Page 28: Rf Option
• Press to save the number. • Repeat until all desired numbers have been entered. 5. Press displays. 6. Press to enter print control. The last saved control mode will display. 7. Press until the desired print control mode is displayed. displays. -
Page 29: 802.15.4 Rf Network
It may be necessary to disconnect the shield drain wire at the D-9 connector frame to prevent ground loops. Ground loops can cause unstable readings. In extreme cases it may be necessary to use an opto-isolated RS-232 interface. Figure 6-1. Serial Cable Schematic, DCE Configuration for Connecting to a Computer Figure 6-2. - Page 30 8. Press to scroll through the numbers and press to select the desired number. Any value of SCID from 1 - 254 is acceptable, however, Rice Lake Weighing Systems recommends a value from 20-30. If a wrong value is input, press to step back one digit and reenter the number.
-
Page 31: Setup Multiple Sensor Network
Setup Multiple Sensor Network The MSI-8000/8000HD Remote Display can monitor up to four load sensors. The sensors can be read individually, in pairs or summed. (Sum) All (Sum) All SC 0 SC 1 SC 3 SC 0 SC 1 SC 2 SC 0 SC 1 SC 2... -
Page 32: Maintenance And Troubleshooting
Dyna-Link 2 increment d. It is also possible to increase the motion window. Contact Rice Lake Weighing Systems if there is a problem getting the Dyna- Link 2 to zero, tare, or total due to stability issues. -
Page 33: Error Codes
Press to return to weigh mode. The Service Counters are safety warning features, only Rice Lake Technicians can reset these. WARNING In some circumstances, a thorough load train inspection may be necessary to ensure user safety. Reference the Crane Scale Safety and Periodic Maintenance manual for proper loading techniques to improve the safety and longevity of the crane scale, available online and is included on the CD shipped with the scale. -
Page 34: Mechanical Dimensions
Mechanical Dimensions C = DIA. 7300 E = LOAD CELL BODY WIDTH AT MAXIMUM CAPACITY SHACKLE 5000 lbs / 2500 KG INTERFACE. Figure 7-1. Mechanical Dimensions Approx Capacity Shipping Shackle 1000 lb 8.0 in 13.53 in .75 in 5 in .99 in 1.69 in 1.75 in... -
Page 35: Standard Capacities And Resolution
7.4 Standard Capacities and Resolution The Dyna-Link 2 has a safe mechanical overload of 200% of capacity. Overloads greater than 200% may WARNING result in physical damage to the link. The ultimate overload is rated to 500%-700% of capacity. At ultimate overload, structural failure and dropped loads may occur. -
Page 36: Firmware Update Procedure
The latest firmware code is available from the Rice Lake service department and can be emailed on request. The firmware version is displayed when the Dyna-Link 2 is turned on in the form of 01-04 (individual unit version will vary). Most firmware updates do not require a recalibration. -
Page 37: Specifications
Specifications Power Battery Operated Alkaline cells can be replaced with rechargeable NiMH cells Operating Time Alkaline C cells >150 hours typical Alkaline D cells >300 hours typical Accuracy Rated accuracy ±0.1% of capacity Typical accuracy ±(0.1%+1d) of reading. d equals one displayable increment Resolution Standard 2000-2500 d... - Page 38 MSI-7300 Dyna-Link 2 Technical Manual...
- Page 40 Specifications subject to change without notice. Rice Lake Weighing Systems is an ISO 9001 registered company. 230 W. Coleman St. • Rice Lake, WI 54868 • USA U.S. 800-472-6703 • Canada/Mexico 800-321-6703 • International 715-234-9171 • Europe +31 (0)26 472 1319 www.ricelake.com...
Need help?
Do you have a question about the Dyna-Link 2 MSI-7300 and is the answer not in the manual?
Questions and answers