Table of Contents
Advertisement
Available languages
Available languages
Quick Links
Download this manual
See also:
Instruction Manual
Advertisement
Chapters
Table of Contents

Subscribe to Our Youtube Channel
Related Manuals for JANE EXO BASIC


Summary of Contents for JANE EXO BASIC
- Page 1 español / english / français italiano / polski / Русский...
- Page 3 español english français italiano polski Русский...
-
Page 13: Table Of Contents
ÍNDICE Instrucciones generales A-Partes de la silla EXO BASIC B-Partes de su automóvil Prestaciones de su silla EXO BASIC 1 Instalación con anclajes isofix + support leg SEMI-UNIVERSAL 2 Instalación con cinturón de tres puntos 3 Instalación del bebé en el asiento 4 Regulación del arnés... - Page 14 Su nuevo EXO BASIC de JANÉ es un asiento Es muy importante que lea atentamente estas diseñado para proteger al niño en el automóvil instrucciones antes de usar la silla EXO BASIC desde los 9 meses aproximadamente (desde 9 por primera vez. Asegúrese que todos aquellos Kg.
-
Page 15: Instrucciones Generales
• JANÉ recomienda sustituir su asiento EXO BASIC por uno nuevo cuando haya sido sometido a vio- lentas tensiones después de un accidente. • Compruebe que todos los cinturones están en su correcta posición y debidamente ajustados a su EXO BASIC. Vigile que ningún cinturón esté enroscado. Debe hacer entender al niño que bajo ningún concepto manipule los cinturones o los enganches del mismo. • Esta silla está concebida para su uso en el automóvil, por lo que no se debe usar fuera del mismo. -
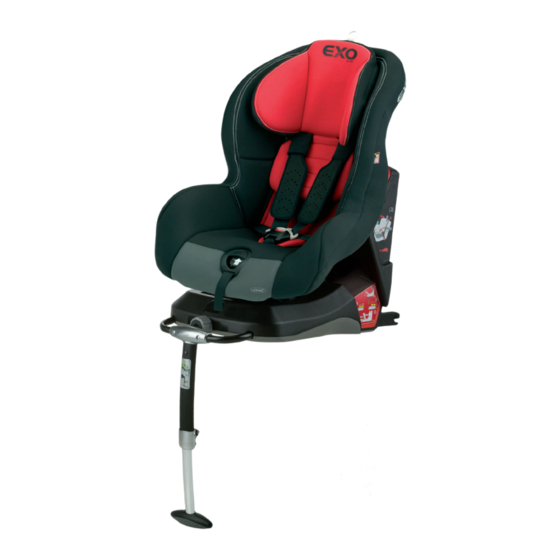
Page 16: A-Partes De La Silla Exo Basic
A - Partes de la silla EXO BASIC 1_ Peana, base 12_ Pomo regulación Isofix 2_ Asiento 13_ Paso cinturón abdominal automóvil 3_ Cabezal 14_ Bloqueo cinturón hombros 4_ Tirador ajuste altura cabezal 15_ Palanca regulación reclinado 5_ Hebilla 5 puntos 16_ Compartimiento instrucciones 6_ Tensor arnés... -
Page 17: B-Partes De Su Automóvil
Cinturón de tres puntos de anclaje. Consta de Cinturón de dos puntos de anclaje. ATENCIÓN. dos partes bien diferenciadas: No se puede instalar la silla EXO BASIC con este tipo de cinturones. Parte sub-abdominal o de hombros, que des- de la hebilla pasa por el pecho y los hombros. -
Page 18: Prestaciones De Su Silla Exo Basic
Prestaciones de su silla EXO BASIC La silla EXO BASIC ha sido diseñada con los últimos avances en materia de seguridad y confort: se exige utilizar este material en el área de la 1. EXO BASIC puede instalarse con cinturones... - Page 19 Instalación de la silla en el automóvil: El asiento EXO BASIC se debe instalar en el SENTIDO DE LA MARCHA. Preferentemente en los asientos traseros y nunca en asientos dotados con Air-Bag frontal. Si quiere instalar la silla con los anclajes ISOFIX, asegúrese que la plaza donde va a instalarla dispone de los anclajes.
-
Page 20: Instalación Con Anclajes Isofix + Support Leg Semi-Universal
1 Instalación con anclajes ISOFIX + support leg. SEMI-UNIVERSAL Junto a las instrucciones, encontrará una lista de vehículos que determina qué modelos son aptos para la instalación del conjunto SEMI-UNIVERSAL. Si su coche no aparece en la lista póngase en contacto con el vendedor. -
Page 21: Instalación Con Cinturón De Tres Puntos
2 Instalación con cinturón de tres puntos Coloque la silla EXO BASIC en la posición Deslice la cinta de hombros del cinturón del más reclinada (ver apartado 5, reclinado de la automóvil por la pinza (14) de la parte alta del silla). -
Page 22: Regulación Del Arnés
Compruebe con el niño correctamente sentado en la silla, la posición adecuada de las cintas de hom- bros. Éstas deben estar ligeramente por encima de los hombros del bebé. EXO BASIC dispone de 5 posiciones de cinturón, al ajustar la altura se desplaza el cabezal. Para cambiar la altura siga los... -
Page 23: Atención
ATENCIÓN • No deje nunca al niño solo. ridad del sistema. • Cualquier alteración o adición al dispositivo • Compruebe que la silla ha sido colocada co- sin la oportuna autorización de JANÉ puede rrectamente. alterar gravemente la seguridad del sistema de • Asegúrese que el cinturón no ha quedado retención. pillado entre los asientos abatibles o puertas. • No seguir cuidadosamente las instrucciones • NO utilizar la silla en el sentido de la marcha para el correcto uso del sistema de retención para bebés de menos de 9 Kg. -
Page 24: Recomendaciones
RECOMENDACIONES • Guarde este libro de instrucciones para futu- aunque no se esté utilizando, ya que en caso de ras consultas. Llévelo siempre en su comparti- accidente podría resultar despedido provocan- miento situado en el lateral de la base (17). do daños a los ocupantes del vehículo. • Asegúrese de que dentro del automóvil, tan- • Recuerde no usar el asiento EXO BASIC en to el equipaje como cualquier otro objeto sus-... -
Page 25: Mantenimiento
MANTENIMIENTO No exponga el tapizado al sol durante largos de la silla. Abrir el velcro de la parte central y periodos. Mientras la silla no esté en uso cú- retirar el tapizado. brala o guárdela en el compartimiento porta Lavar con una temperatura nunca superior a equipajes. - Page 26 El registro le permitirá informarse, si es necesario, Quedan excluídos de la presente garantía aque- de la evolución y mantenimiento de su producto.
- Page 27 TABLE OF CONTENTS General Instructions A-Parts of the EXO BASIC seat B-Parts of your vehicle Features of your EXO BASIC seat 1 Installation with the ISOFIX fasteners + the support leg. SEMI-UNIVERSAL 2 Installation with a three-point seat belt 3 Installing the baby in the seat...
- Page 28 Your new EXO BASIC from JANÉ is a seat desig- It is very important that you read these instruc- ned to protect the child in the car from approxi- tions carefully before using the EXO BASIC car mately 9 months (from 9 Kg. in weight) up to seat for the first time.
-
Page 29: General Instructions
GENERAL INSTRUCTIONS In the aim of suitably protecting the child and, ensuring his comfort and safety in the vehi- cle, it is important to respect the following instructions: • Your EXO BASIC seat can be installed on the front seat, if it does not have an Air Bag, or on the back seat of the vehicle. It is advisable to install it on the back seat. If you fit it onto the front seat of the vehicle, it must NOT be fitted with an AIR BAG or it must be disconnected. -
Page 30: A-Parts Of The Exo Basic Seat
A - Parts of your EXO BASIC seat 1_ Base 12_ Isofix adjustment handle 2_ Seat 13_ Vehicle abdominal seat belt guide 3_ Headrest 14_ Shoulder belt lock 4_ Lever to adjust the headrest height 15_ Lever to adjust the reclining angle... -
Page 31: B-Parts Of Your Vehicle
Three-point fastening seat belt. Consisting of Two-point fastening seat belt. WARNING. two distinguishable parts: The EXO BASIC seat can not be installed with this type of seat belt. Sub-abdominal or shoulder part, that goes from the buckle over the chest and the shoul- ISOfix fasteners. -
Page 32: Features Of Your Exo Basic Seat
Features of your EXO BASIC seat The EXO BASIC seat has been designed with the latest advances in safety and comfort: that this material only has to be used on the 1. EXO BASIC can be installed with three-point head area of the seat, your EXO BASIC uses it seat belts or ISOfix fasteners. - Page 33 Installing the seat in the vehicle: The EXO BASIC seat should be installed FACING FORWARDS. Preferably on rear seats and never on seats that are fitted with a frontal airbag. If you want to install the seat with the ISOFIX fasteners, make sure that the vehicle seat is fitted with the fasteners.
-
Page 34: Installation With The Isofix Fasteners + The Support Leg. Semi-Universal
1 Installation with the ISOFIX fasteners + the support leg. SEMI-UNIVERSAL Together with the instructions, you will find a list of vehicles that shows which models are compatible with SEMI-UNIVERSAL installation. If your car is not on the list get in touch with the retailer. For correct installation follow the steps below: Adjust the height of the support leg so that Extract the ISOfix fasteners (10) turning the... -
Page 35: Installation With A Three-Point Seat Belt
2 Installation with a three-point seat belt Place the EXO BASIC seat in the most recli- Slide the shoulder strap of the vehicle seat ned position (see section 5, reclining the seat). belt through the clip (14) on the top part of the Pass the three-point seat belt buckle between seat, only on the opposite side from the buckle. -
Page 36: Adjusting The Harness
When the child is sitting correctly in the seat, check that shoulder straps are in the right position. They should be slightly above the baby’s shoulders. EXO BASIC has 5 seat belt positions, on adjusting the height the headrest moves. To change the height, follow the steps below:... -
Page 37: Warning
WARNING • Check that the seat has been positioned co- • Never leave the child alone. rrectly. • Any alteration or addition to the product • Make sure that the seat belt has not got tra- without the express authorisation of JANÉ may pped between the folding seats or doors. seriously affect the safety of the retention sys- • DO NOT use the seat facing forwards for ba- tem. bies that weigh less than 9 Kg. • If you do not carefully follow the instructions for the correct use of the retention system it may endanger your child’s safety. -
Page 38: Recommendations
RECOMMENDATIONS • Keep this instruction booklet for future re- as in the event of an accident it could be flung ference. Always store it in the compartment about causing injury to the occupants of the found on the side of the base (17). vehicle. -
Page 39: Maintenance
MAINTENANCE Undo the Velcro on the central part and take Do not expose the upholstery to sunlight for the upholstery off. long periods of time, while the seat is not in Wash at a temperature that does not exceed use cover it up or store it in the luggage com- partment. - Page 40 This registration means we can inform you, if ...
- Page 41 Instructions Générales A-Lexique du siège EXO BASIC B-Lexique de votre automobile Les atouts de votre siège EXO BASIC 1 Installation des ancrages ISOFIX + support leg. SEMI-UNIVERSEL 2 Installation avec ceinture à 3 points 3 Installation du bébé dans le siège 4 Réglage du harnais...
- Page 42 (poids:18 kg.). aussi familiarisées avec sa correcte installation et utilisation. On c’est rendu compte qu’un EXO BASIC a passé avec succés les tests les plus fort pourcentage d’utilisateurs de sièges auto exigeants en matière de sécurité et répond à la n’installent pas correctement le siège.
-
Page 43: Instructions Générales
ECE/16 ou autres normes équivalentes. Ne pas utiliser avec une ceinture à deux points d’ancrage. • Tous les dispositifs de sécurité ne sont pas exactement identiques, c’est la raison pour laquelle nous vous conseillons d’essayer votre EXO BASIC dans l’automobile où il sera installé. • Il est important de ne pas utiliser de produits de seconde main, car JANÉ ne peut garantir une totale sécurité que pour les articles achetés par le premier acheteur. -
Page 44: A-Lexique Du Siège Exo Basic
A - Lexique du siège EXO BASIC 1_ Socle, base 12_ Molette de réglage Isofix 2_ Siège 13_ Guide sangle abdominale automobile 3_ Appui-tête 14_ Blocage sangle d’épaules 4_ Système de réglage hauteur appui-tête 15_ Manette de réglage inclinaison 5_ Boucle harnais de sécurité à 5 points... -
Page 45: B-Lexique De Votre Automobile
B - Lexique de votre automobile Ceinture à 3 points d’ancrage. Deux parties Ceinture à 2 points d’ancrage. ATTENTION: bien différenciées: On ne peut pas installer le siège-auto EXO BASIC avec ce type de ceintures. Partie sous-abdominale ou des épaules, qui part de la boucle et passe par la poitrine et les Ancrages ISOfix. -
Page 46: Les Atouts De Votre Siège Exo Basic
Les atouts de votre siège EXO BASIC Le siège EXO BASIC a été conçu selon les dernières avancées en matière de sécurité et de confort: l’utilisation de ce matériau ne soit exigée que 1. EXO BASIC peut être installé avec les cein- pour la zone de la tête, votre EXO BASIC en... - Page 47 Installation du siège dans l’automobile: Le siège EXO BASIC doit être installé dans le SENS DE LA MARCHE. De préférence sur les sièges arrière et jamais sur un siège doté d’un AirBag frontal. Si vous voulez installer le siège avec les ancrages ISO- FIX, vous devez vérifier que la place où...
-
Page 48: Installation Des Ancrages Isofix + Support Leg. Semi-Universel
1 Installation des ancrages ISOFIX + support leg. SEMI-UNIVERSEL Avec les instructions, vous trouverez une liste des véhicules qui détermine les modèles qui sont ap- tes pour l’installation de l’ensemble SEMI-UNIVERSEL. Si votre voiture n’apparait pas sur cette liste, mettez-vous en contact avec le vendeur. Pour une installation correcte, suivez les étapes suivantes: Enlevez les ancrages ISOfix (10) en faisant Ajustez la hauteur du support leg pour que... -
Page 49: Installation Avec Ceinture À 3 Points
2 Installation avec ceinture à 3 points Installez le siège EXO BASIC dans la posi- Faites passer la sangle d’épaule de la ce- tion la plus basse (voir chapitre 5, inclinaison inture de l’automobile dans la pince (14) de la du siège). -
Page 50: Réglage Du Harnais
Vérifiez avec l’enfant correctement assis dans le siège, la position adéquate pour les sangles des épaules. Ces dernières doivent passer légèrement au-dessus des épaules du bébé. EXO BASIC dispose de 5 positions de ceinture, lorsqu’on ajuste la hauteur l’appui-tête se déplace. Pour changer la hauteur, suivez les étapes suivantes:... -
Page 51: Attention
être remplacé par une autre non agréée, car cette dernière fait partie • Une détérioration du dispositif, un ajout ou intégrante du dispositif de sécurité. une modification quelconque sans l’autorisa- tion de JANE peut altérer gravement la sécurité • Assurez-vous que le siège-auto a été correc- de ce système de retenue. tement installé. • Ne pas suivre attentivement les instructions • Vérifiez que la ceinture n’est pas restée coin-... -
Page 52: Recommandations
(17). • Souvenez-vous qu’on ne doit pas utiliser le siège-auto EXO BASIC dans les autos avec un • Vérifiez qu’à l’intérieur de l’automobile, air-bag frontal, à moins de pouvoir le décon- l’équipement comme tout autre objet suscep- tible de pouvoir blesser en cas d’accident, est... -
Page 53: Entretien
ENTRETIEN velcro situé sur la partie centrale et retirer la Ne laissez pas la housse exposée en plein so- housse. leil durant une longue période, lorsque vous Ne jamais laver à une température supérieure n’utilisez pas le siège recouvrez-le ou rangez- à... - Page 54 L’enregistrement vous permettra de vous infor- Sont exclues de la présente garantie les défectuo- mer, si nécessaire, sur l’évolution et l’entretien...
- Page 55 INDICE Istruzioni generali A-Parti del seggiolino EXO BASIC B-Parti della vostra auto Prestazioni del vostro seggiolino EXO BASIC 1 Installazione con ancoraggi ISOFIX + support leg. SEMI-UNIVERSALE 2 Installazione con cintura a tre punti 3 Collocazione del bebè nel seggiolino 4 Regolazione dell’imbragatura...
- Page 56 Il vostro nuovo EXO BASIC di JANÉ è un seggio- È molto importante leggere attentamente le lino auto disegnato per proteggere il bambino presenti istruzioni prima di utilizzare il seggio- a partire dai 9 mesi circa (9 Kg. di peso) fino lino EXO BASIC per la prima volta.
-
Page 57: Istruzioni Generali
• JANÉ raccomanda di sostituire il seggiolino EXO BASIC per uno nuovo nel caso in cui sia stato sotto- posto a violente tensioni dopo un incidente. • Controllare che tutte le cinture si trovino nella loro corretta posizione e debitamente allacciate al vostro EXO BASIC. Verificare che nessuna cintura sia attorcigliata. Bisogna far comprendere al bambi- no che non deve in nessun caso manipolare le cinture o gli agganci delle stesse • Questo seggiolino è stato creato per essere usato esclusivamente nell’auto, non deve essere usato fuori dalla stessa. -
Page 58: A-Parti Del Seggiolino Exo Basic
A- Parti del seggiolino EXO BASIC 1_ Pedana, base 12_ Pomello regolazione Isofix 2_ Seduta 13_ Passante cintura addominale auto 3_ Poggiatesta 14_ Blocco cinture pettorali 4_ Tirante regolazione altezza poggiatesta 15_ Leva regolazione reclinazione 5_ Fibbia 5 punti 16_ Scompartimento istruzioni... -
Page 59: B-Parti Della Vostra Auto
B- Parti della vostra auto Cintura a tre punti di ancoraggio. Consta di due Cintura a due punti di ancoraggio. ATTEN- parti ben differenziate: ZIONE. Non si può installare il seggiolino EXO BASIC con questo tipo di cinture. Parte sub-addominale o delle spalle, che dal- la fibbia passa per il petto e le spalle. -
Page 60: Prestazioni Del Vostro Seggiolino Exo Basic
Prestazioni del vostro seggiolino EXO BASIC Il seggiolino EXO BASIC è stato disegnato grazie agli ultimi avanzi in materia di sicurezza e comfort: bligatorio utilizzare questo materiale solo nella 1. Il seggiolino EXO BASIC è stato disegnato zona della testa, il seggiolino EXO BASIC ne è... - Page 61 Installazione del seggiolino nell’automobile: Il seggiolino EXO BASIC deve essere installato nella DIREZIONE DI MARCIA. Preferibilmente sui sedili posteriori e mai su sedili dotati di Air-Bag frontale. Se si desidera installare il seggiolino con i fissaggi ISOFIX, assicurarsi che il posto in cui sarà installato disponga dei fissaggi adeguati.
-
Page 62: Installazione Con Ancoraggi Isofix + Support Leg. Semi-Universale
1 Installazione con ancoraggi ISOFIX + support leg. SEMI-UNIVERSALE Insieme alle istruzioni, troverà una lista di veicoli che indica quali modelli sono adatti per l’installazione del set SEMI-UNIVERSALE. Se il suo veicolo non compare nella lista, si metta in contatto con il riven- ditore. -
Page 63: Installazione Con Cintura A Tre Punti
2 Installazione con cintura a tre punti Portare il seggiolino EXO BASIC nella posi- Far passare la parte pettorale della cintura zione più reclinata (vedi paragrafo 5, reclina- del veicolo attraverso la pinza (14) della parte zione del seggiolino). Far passare la fibbia delle... -
Page 64: Regolazione Dell'imbragatura
Con il bambino correttamente seduto sul seggiolino, verificare la posizione adeguata delle cinture pettorali. Devono trovarsi leggermente al di sopra delle spalle del bambino. EXO BASIC dispone di 5 posizioni delle cinture. Per regolare l’altezza spostare il poggiatesta compiendo le seguenti ope- razioni: Tirare l’anello situato sul poggiatesta (4),... -
Page 65: Attenzione
ATTENZIONE • Non lasciare mai il bambino da solo. sere sostituito con un altro che non sia quello • Qualsiasi alterazione o aggiunta al disposi- originale, giacché forma parte integrante delle tivo senza l’opportuna autorizzazione di JANÉ caratteristiche di sicurezza del sistema. può alterare gravemente la sicurezza del siste- • Comprovare che il seggiolino sia stato collo- ma di ritenuta. -
Page 66: Raccomandazioni
RACCOMANDAZIONI • Conservare questo libretto d’istruzioni per mente fissato con le cinture di sicurezza, anche future consultazioni. Tenerlo sempre nel suo nel caso in cui non si stia utilizzando, infatti, in compartimento situato nella parte laterale de- caso d’incidente, potrebbe urtare violentemen- lla base (17). -
Page 67: Manutenzione
MANUTENZIONE Non esporre il rivestimento al sole durante Lavare a una temperatura non superiore a lunghi periodi, quando non si usa il seggiolino 30°C. coprirlo o conservarlo nel portabagagli. Per montare di nuovo il rivestimento seguire gli Lavare le parti di plastica con acqua tiepida stessi passi al contrario. - Page 68 JANÉ, è molto importante in caso di reclami sarà necessario presentarlo al compilare il modulo di registrazione che troverà negozio dove è stato acquistato il prodotto per sul sito www.jane.es dimostrare la validità della garanzia. La registrazione le consentirà di essere informato, ...
- Page 69 SPIS TRESCI Ogólne Instrukcje A-Części fotelika EXO BASIC B-Części pojazdu Właściwości fotelika EXO BASIC 1 Instalacja za pomocą zaczepów + support leg. System CZĘŚCIOWO UNIWERSALNY 2 Instalacja za pomocą trzypunktowego pasa bezpieczeństwa 3 Zapięcie dziecka w foteliku 4 Regulowanie pasków...
- Page 70 Państwa nowy EXO BASIC firmy JANÉ to fo- Bardzo ważne jest, by przed pierwszym telik chroniący dziecko podczas jazdy samo- użyciem fotelika EXO BASIC uważnie prze- chodem, przeznaczony dla dzieci w wieku czytali Państwo niniejszą instrukcję. Prosi- od około 9 miesięcy (od 9 kg wagi) do około my upewnić...
-
Page 71: Ogólne Instrukcje
• Należy sprawdzić, czy wszystkie pasy bezpieczeństwa znajdują się we właściwej pozycji i czy odpowiednio przylegają do fotelika EXO BASIC. Należy się upewnić, czy żaden z pasów nie jest poskręcany. Należy wytłumaczyć dziecku, że w żadnym wypadku nie może ruszać pasów bezpieczeństwa lub ich zapięć. -
Page 72: A-Części Fotelika Exo Basic
A- Części fotelika EXO BASIC 1_ Stelaż, podstawa 12_ Pokrętło do regulacji Isofix 2_ Siedzisko 13_ Opaska na biodrowy pas bezpieczeństwa 3_ Zagłówek pojazdu 4_ Uchwyt do regulacji wysokości zagłówka 14_ Blokada pasa barkowego 5_ Zapięcie pięciopunktowe 15_ Płytka do regulacji ustawienia fotelika 6_ Napinacz pasków... -
Page 73: B-Części Pojazdu
B- Części pojazdu Trzypunktowy pas bezpieczeństwa. Składa Dwupunktowy pas bezpieczeństwa. UWA- się z dwóch części: GA. Nie można instalować fotelika EXO BA- SIC z pasami bezpieczeństwa tego typu. Część górna lub barkowa, która wycho- dzi ze sprzączki i opasuje klatkę piersiową Uchwyty ISOfix. -
Page 74: Właściwości Fotelika Exo Basic
Właściwości fotelika EXO BASIC Fotelik EXO BASIC został wyposażony w najnowocześniejsze osiągnięcia w dziedzinie bezpieczeństwa i komfortu: 4. Wnętrze fotelika jest pokryte materia- 1.Fotelik EXO BASIC może być mocowany łem absorbującym uderzenia. Chociaż za- za pomocą trzypunktowych pasów bezpie- stosowanie tego materiału jest wyłącznie czeństwa lub zaczepów ISOfix. - Page 75 Instalowanie fotelika w samochodzie: Fotelik EXO BASIC powinien być instalowany W KIERUNKU JAZDY. Zaleca się instalowanie fotelika na tylnich siedzeniach i nigdy nie należy go instalować na siedzeniach wyposażonych w przednią poduszkę powietrzną. Jeśli chcą Państwo zainstalować fotelik za pomocą zaczepów ISOFIX, należy się...
-
Page 76: Instalacja Za Pomocą Zaczepów + Support Leg. System Częściowo Uniwersalny
1 Instalacja za pomocą zaczepów + support leg. System CZĘŚCIOWO UNIWERSALNY Do niniejszej instrukcji została dołączona lista pojazdów określająca, w których modelach możliwa jest instalacja zespołu z systemem CZĘŚCIOWO UNIWERSALNYM. Jeśli Państwa poja- zdu nie ma na tej liście, proszę skontaktować ze sprzedawcą. W celu poprawnej instalacji należy postępować... -
Page 77: Instalacja Za Pomocą Trzypunktowego Pasa Bezpieczeństwa
2 Instalacja za pomocą trzypunktowego pasa bezpieczeństwa Umieścić fotelik EXO BASIC w najbardziej Przeciągnąć pas barkowy pasa bezpie- rozwartej pozycji (patrz punkt 5, regulacja czeństwa przez zacisk (14) w górnej części oparcia). Przeciągnąć sprzączkę trzypunk- siedzenia, zlokalizowany po przeciwnej towego pasa bezpieczeństwa pomiędzy stronie niż... -
Page 78: Regulowanie Pasków
Sprawdzić, czy dziecko siedzi w foteliku we właściwej pozycji i skontrolować prawidłowe ustawie- nie pasków barkowych. W/w paski powinni znajdować się nieco ponad ramionami niemowlęcia. EXO BASIC posiada 5 pozycji pasków, podczas regulacji ich wysokości zmienia się pozycja zagłówka. Aby zmienić ustawienie zagłówka, należy postępować wg poniższych wskazówek: Wysunąć... -
Page 79: Uwaga
UWAGA • Nigdy nie należy pozostawiać dzieci bez który nie może zostać zastąpiony nieorygi- opieki. nalnym pokrowcem, ponieważ stanowi on • Wszelkie zmiany lub akcesoria do urzą- integralną część właściwości ochronnych dzenia nieautoryzowane przez JANÉ mogą systemu. poważnie naruszyć zabezpieczenia systemu •... -
Page 80: Zalecenia
• Fotelik EXO BASIC powinien być odpowiednio zamocowany za pomocą pasa bezpieczeństwa,... -
Page 81: Konserwacja
KONSERWACJA Nie wystawiać pokrowca na działanie promieni Rozpiąć pokrowiec w środkowej części i słonecznych przez dłuższy okres czasu, jeśli fo- ściągnąć go. telik nie jest używany w danej chwili przykryć Prać w temperaturze nieprzekraczającej 30ºC. go lub schować go do bagażnika. Aby ponownie założyć... - Page 82 JANÉ, prosimy o wypełnienie tawienie w miejscu zakupu produktu. formularza rejestracyjnego znajdującego się na Gwarancja nie obejmuje wad lub uszkodzeń stronie www.jane.es powstałych wyniku nieodpowiedniego Po rejestracji będą Państwo mogli śledzić użytkowania artykułu lub niestosowania się do nowości związane z Państwa produktem oraz,...
- Page 83 СОДЕРЖАНИЕ Общая Инструкция A-Устройство Автокресла ЕXO BASIC B-Части салона вашего автомобиля Особенности Вашего Кресла ЕXO BASIC 1 Установка с креплениями ISOFIX + опорная стойка ПОЛУУНИВЕРСАЛЬНАЯ 2 Установка с трехточечным ремнем безопасности 3 Усадить ребенка в кресло 4 Отрегулировать плечевые ремни по высоте 5 Регулировка...
- Page 84 это кресло, разработаноe для защиты ные инструкции перед установкой кресла в автомобиле ребенка от 9 месяцев (вес EXO BASIC в первый раз. Убедитесь, что все ребенка от 9 кг) и примерно до 4 лет (вес взрослые, которые когда-нибудь будут поль- ребенка...
-
Page 85: Общая Инструкция
Чтобы обеспечить максимальную безопасность ребенка и его комфорт в автомоби- ле, необходимо соблюдать следующую инструкцию: • Ваше кресло EXO BASIC может быть установлено как на переднем, если оно не оборудо- вано воздушной подушкой безопасности, так и на заднем сиденье автомобиля. В большин- стве... -
Page 86: A-Устройство Автокресла Еxo Basic
A- УСТРОЙСТВО АВТОКРЕСЛА ЕХО BASIC 1_ Основание, база 12_ Ручка регулировки Isofix 2_ Кресло 13_ Метки для автомобильного поясного ремня 3_ Подголовник 14_ Блокиратор плечевого ремня безопасности 4_ Регулятор высоты подголовника 15_ Рычаг, регулирующий наклон 5_ Пряжка 5 точек 16_ Отсек для хранения инструкций 6_ Натяжное... -
Page 87: B-Части Салона Вашего Автомобиля
B- Части салона вашего автомобиля Ремень безопасности с креплением в трех Ремень безопасности с креплением в точках. Состоит из двух частей: двух точках. ВНИМАНИЕ. Нельзя устанав- ливать кресло ЕХО BASIC на пассажир- Ремень безопасности с креплением в ском месте, оборудованном ремнями без- трех... -
Page 88: Особенности Вашего Кресла Еxo Basic
Кресло ЕХО BASIC было сконструировано, учитывая последние достижения в области безопасности и комфорта: удара. Несмотря на то, что требуется ис- 1. EXO BASIC можно устанавливать при пользовать данный материал только в помощи трехточечного ремня безопасно- области головы, Ваше кресло EXO BASIC сти... - Page 89 Установка кресла в автомобиле: Кресло EXO BASIC должно устанавливаться по ходу движения автомобиля. Предпочтитель- но на задних сиденьях и никогда не устанавливайте кресло на переднем сиденье, оборудо- ванном воздушной подушкой безопасности, если она не отключена. Если Вы хотите устано- вить кресло с креплением ISOFIX, убедитесь, что место где Вы собираетесь установить его...
-
Page 90: Установка С Креплениями Isofix + Опорная Стойка Полууниверсальная
1 Установка с креплениями ISOFIX + опорная стойка ПОЛУУНИВЕРСАЛЬНАЯ Вместе с инструкциями Вы найдете перечень автомобилей, в которых можно устанавливать ПО- ЛУУНИВЕРСАЛЬНУЮ систему. Если Вашего автомобиля нет в этом списке, свяжитесь с продавцом. Для правильной установки выполняйте следующие шаги: Отрегулируйте высоту опорной стойки, Извлеките... -
Page 91: Установка С Трехточечным Ремнем Безопасности
2 Установка с трехточечным ремнем безопасности Установите кресло EXO BASIC в положе- Проденьте плечевой автомобильный ре- ние наибольшего наклона (смотреть раздел мень в зажим (14) верхней части сидения, 5, наклон кресла). Пропустите пряжку трех- только со стороны противоположной пряж- ке. Закройте зажим. -
Page 92: Отрегулировать Плечевые Ремни По Высоте
должны находится немного выше плечей. С ребенком, сидящим в кресле, проверьте правильное положение плечевых ремней. Плечевые ремни должны находиться немного выше плечей ребенка. EXO BASIC име- ет 5 положений ремня, при регулировке высоты перемещается подголовник. Установите подголовник (3) в поло- Потяните... -
Page 93: Внимание
• Любое изменение или добавление в являющейся оригинальной, поскольку устройство без соответствующего раз- обивка является составной частью си- решения JANE может серъезно нару- стемы безопасности сиденья. шить систему безопасности сиденья. • Проверьте, что кресло установлено • Несоблюдение инструкции по пра- правильно. -
Page 94: Рекомендации
либо вред во время аварии, закреплены должным образом или находятся в на- ности, если она не отключена или не дежном месте. дезактивирована, об этом Вы должны получить консультацию у изготовителя • Кресло EXO BASIC должно быть на- или продавца Вашего автомобиля. дежно пристегнуто ремнями безопас-... -
Page 95: Уход
УХОД Не оставлять обивку надолго под пря- Стирать при температуре не выше 30º C. Чтобы надеть чехол выполняйте все в мыми солнечными лучами. Если Вы не обратном порядке. пользуетесь креслом, накройте его или храните в багажном отделении. Детали из пластика мойте теплым В... - Page 96 для предъявления в магазине, где Вы очень важно чтобы Вы заполнили реги- приобрели изделие, для подтверждения страционный талон, который Вы найдете на странице www.jane.es юридической силы в случае любой рекла- мации. Регистрация позволит Вам получать ин- Данная гарантия не распространяется на...
- Page 97 924 98 31 94 local comercial N 2 35010 Cadoneghe (Padova) POLSKA Tel. 91 763 22 38 Tel. 049 8874950 BARCELONA www.jane.pl Fax. 049 8879280 C/ Del Lliri. 5 y 7 MÁLAGA jane@euro-trade.pl info@jane-italy.com Tel. 93 285 05 13 C/ Antonio Martelo, 2-4 Tel.012 61 44 151...
- Page 98 JANÉ, S.A. Pol. Industrial Riera de Caldes C/Mercaders, 34-08184 Palau Solità i Plegamans (BARCELONA) SPAIN Telf. +34 93 703 18 00 - Fax: +34 93 703 18 04 - email: info@jane.es - www.jane.es IM-1476-01...
Need help?
Do you have a question about the EXO BASIC and is the answer not in the manual?
Questions and answers