
Subscribe to Our Youtube Channel
Related Manuals for Fujioh FR-HS1870


Summary of Contents for Fujioh FR-HS1870
- Page 1 Operating/installation manual FR-HS1870/1890 Please read this manual carefully before using this appliance...
- Page 3 Dear Customer ●Thank you for selecting this Fujioh product. ●Please read this manual carefully before installing and operating this appliance, and retain it for future reference. ●Any malfunctions, accidents or damages occurring as a result of noncompliance with the content and precautions stated in this manual shall not be covered by the company’s scope of warranty,...
-
Page 4: Table Of Contents
Table of Contents Safety Precautions Vent System Requirements Name of parts List of Included Items Switch Installation Diagram Installation instructions 6.7.8 Electrical Connection Maintenance Cleaning Troubleshooting Other Information ... -
Page 5: Safety Precautions
■ Safety Precautions Do not connect the appliance if there are obvious signs of transportation damage. Read this user manual thoroughly before attempting to use this appliance. Installation and repair should be attempted only by qualified technical personnel. ... -
Page 6: Vent System Requirements
If the supply cord is damaged, it must be replaced by the manufacturer, its Service agent or similarly qualified persons in order to avoid a hazard. There shall be adequate ventilation of the room when the cooker hood is used at the same time as appliances burning gas or other fuels (not applicable to appliances that only dis-charge the air back into he room);... -
Page 7: Name Of Parts
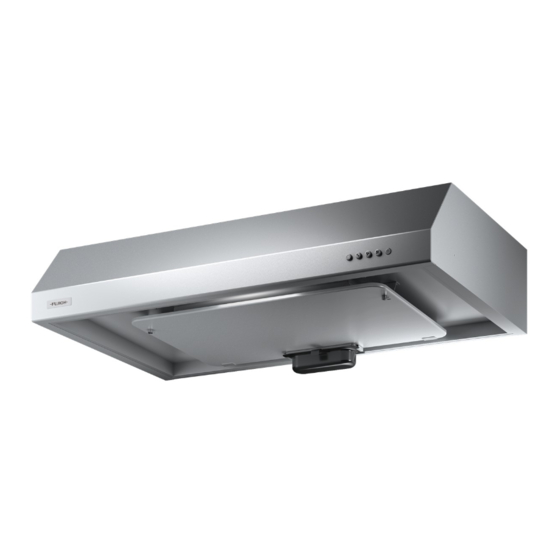
Name of Parts Exhaust Outlet L Hanger Body Fan Assembly Oil Panel Air Deflector Filter Rectifier Panel Oil Tray Where any parts of the actual product differ from the drawing, the actual parts shall prevail as the correct parts. -
Page 8: List Of Included Items
List of Included Items Please check all following items in a box and ensure that there are no missing or damaged parts after opening. Name Quantity Main unit Rectifier panel Oil tray L Hanger Exhaust outlet Plastic expansion pipe Wall screw ST5×40 Screw of exhaust outlet M4×8 Distance washer... -
Page 9: Installation Diagram
Blower Off Button (I) Off switch for the blower. Push the button in to turn the blower OFF. Blower On and Speed Buttons (II, III, IV) Button (II) operates the blower on LOW speed. Push button (III) for MEDIUM speed. Push button (IV) for HIGH speed. -
Page 10: Installation Instructions
Installation instructions Installation (First Method) Please install the equipment as following steps. A. To take out wall screw (4×ST5×40) B. To drill holes in the wall according to drawing and knock-in plastic expansion pipe and twist the wall screw in it C. - Page 11 Installation(Second Method) Customer also can install the equipment as following steps A.To drill holes in the cupboard according to drawing B.To take out machine screw(M6×30) C.To twist the screws into the appliance through the cupboard...
-
Page 12: Electrical Connection
Connect φ 150 flexible tube duct or the like with the exhaust outlet. Make the exhaust outlet secure and air-tight using non-flammable tape such as aluminium tape, etc. (not supplied) Flexible duct Taping with non-flammable materials (Aluminium tape etc.) Electrical Connection Before completing any connection, make sure the house voltage corresponds with the voltage indicated on the label affixed inside the hood. -
Page 13: Maintenance
Maintenance (1) To ensure safety, unplug the unit from the power source before maintenance. (2) Never allow the motor and electrical parts to get wet! (3) Do not leave the stove on when not in use or flaming. Do not allow the stove flames to directly burn the cooker hood. -
Page 14: Cleaning
Cleaning 1. Hood surface cleaning After each use wipe the cooker hood’s external surface with a soft cloth. 2. Oil tray cleaning It is recommended drain oil from oil tray regularly. 3. Rectifier panel and Filter cleaning It is recommended that it be cleaned once a month. Always use both hands to carefully grasp all parts being removed to prevent them from falling and becoming damaged. -
Page 15: Troubleshooting
Troubleshooting In the event of any uncertainties or questions regarding repairs, please consult the shop where you purchased this product. Please stop using the cooker hood if it is not functioning normally. The cooker hood must not be dismantled or repaired by an untrained service technician! Symptoms Possible Cause... -
Page 16: Other Information
Other Information ■ Specification Power Rated Voltage Speed Frequency Air Flow Sound Consumption (Hz) (m3/h) (db) * with 2 watts for lamp Circuit Diagram... -
Page 17: Service And Warranty
Service and Warranty ■ When requesting repair: ●If any abnormality occurs while the cooker hood is in operation, switch off the cooker hood to run, check the following points, disconnect the power plug from the receptacle and consult the shop from which you have purchased your cooker hood. (1) Whether the fuse in the circuit breaker has been burnt out? (2) Whether the power plug is not in proper contact with the receptacle? When consulting the shop, inform the shop the... - Page 19 使用說明書 FR-HS1870/1890 使用前請仔細閱讀說明書...
- Page 21 親愛的用戶: 感謝您選購 Fujioh 的產品。 在安裝使用前,請您詳細閱讀本說明書,並妥善保存。 由於未遵守本說明書的內容和注意事項,而引起的任何故障、 事故、 損失均不在本公司的保修範圍內,廠家也不承擔任何相關責任。 請妥善保管好附件中所有的檔和購機發票,以備查閱。 請您注意: FUJIOH INTERNATIONAL TRADING PTE.LTD.保留對該使用及安裝說 明書中有內容的最終解釋權。如有變更,請恕不另行通知。 建議 吸油煙機若長期不使用,請將電源插頭從插座中拔出來。 新吸油煙機的包裝 請以環保的方式處置這些包裝材料,保持一個良好的環境。請勿 讓兒童玩耍塑膠薄膜和包裝箱,這可能會產生窒息事故,所以請 讓包裝材料遠離兒童,包裝材料不是玩具。 舊吸油煙機的處理 當舊的吸油煙機無法再使用時,建議處理成無法再次使用的狀態 後進行丟棄。...
- Page 22 目錄 安全預防措施 排煙系統需求 部件說明 配件名稱 開關說明 安裝圖 6.7.8 安裝說明 電的連接 保養 清潔 故障排除 其他資訊 服務和保修...
-
Page 23: 安全預防措施
■ 安全預防措施 若產品有明顯因運輸造成損壞的跡象,請勿將產品通電。 請在使用產品之前詳細閱讀本手冊。 安裝和修理只能由合資格的技術人員進行。 改變本產品的任何部份都是危險的。 如果沒有採取適當的安全措施,製造商拒絕承擔責任。 請確保在有持續的、良好通風條件的地方安裝本產品。 除非燃氣灶的安裝說明明確要求加大距離以外,本產品底部和 料理臺頂部距離應不低於75釐米。如煤氣灶安裝說明規定了較 大的安裝距離,對此應予考慮。 請使用接連地線的插座。 在接通電源之前,請檢查您所在地域的電壓與本產品電壓是否匹 配。 本產品的電線顏色: 藍色 零線 棕色 火線 不得使用多個電器並聯和延長使用電線。電荷超載可能會引起火 災。 請確保電源線不受任何熱源影響、不受尖銳物體穿刺。 在進行任何清潔或維護工作之前,應關掉電器和拔下插頭。 本電器不適用於具有生理、感官或心理能力較差,或缺乏經驗和 知識的人(包括兒童)使用,除非有人對其安全負責的人使用器 具進行監督或指示。應該對兒童進行監督,以確保他們不玩耍本 產品。... -
Page 24: 排煙系統需求
排煙系統需求 請確定適合您的排煙模式。煙霧應由排出至戶外,煙管可以排布於牆 壁或屋頂中。請勿將排煙口設置在閣樓或其他密閉區域 排風管應儘量短,一般不超過 1.5m,轉彎半徑盡可能大 應使用標準且規格一致的煙管,請勿連續接兩個拐角。需用膠袋封住 煙管介面,煙管在牆上或地板的出口處,應斂縫封堵 在進行切割煙管之前,確保在牆壁或地板上有適當的空間。除非絕對 必要,切勿切割托梁或牆釘。如果必須切割托梁或牆釘,那麼必須建 造一個支撐架。... -
Page 25: 部件說明
部件名稱 排氣口 L 型掛具 主體 風機組件 油面板 LED 燈 導風板 過濾網 整流板 油杯 如果實際產品的任何部分與圖紙不同,則實際零件應以正確的零件為准。... -
Page 26: 配件名稱
配件列表 請檢查箱內的所有物品,確保打開後沒有丟失或損壞的部件。 序號 名稱 數量 主體 整流板 油杯 L 型掛具 排氣口 塑膠膨脹管 牆釘 ST5×40 排氣口螺絲 M4×8 牆釘墊片 說明書 開關說明 本吸油煙機含有三擋速度控制 使用低速慢煮,中速烹飪。 使用高速以油炸或重油烹飪。 本吸油煙機還配置了燈光可以照亮你需要的光亮的烹飪位置... -
Page 27: 安裝圖
電機關閉鍵(I) 這是風機的關閉按鈕,按下風機關閉 風機開啟速度鍵(II, III, IV) 按鈕(II)低速運轉風機 中速按鈕(III) 高速按鈕(IV) 燈光開關鍵 (V) 燈的開關,按一下燈光亮起,再次按下燈光關閉 安裝圖... -
Page 28: 安裝說明
安裝說明 吸油煙機的安裝(第一種方式) 請按以下步驟安裝吸油煙機 A.拿出牆釘(4×ST5×40) B.按圖紙在牆上鑽孔並敲入塑膠膨脹管並鎖入上方的牆釘 C.拆下油面板 D.取下5 根螺絲並取出內板 E.從吸油煙機上取下固定L 型掛具的螺絲(4×M4×16) F.將L 型掛具放在吸油煙機上並鎖緊螺絲 G.將吸油煙機掛在牆釘上並鎖緊牆釘(2×ST5×40) H.將牆釘穿過墊片並通過葫蘆孔固定在牆上 I.根據C.項和D.項,將内板和油面板裝回吸油煙機... - Page 29 吸油煙機的安裝(第二種方式) 您也可以按以下步驟安裝吸油煙機 A.按照圖紙在櫥櫃頂部鑽孔 B.從吸油煙機頂部取下頂板螺釘(M6×30) C.透過櫥櫃頂部講螺絲擰入吸油煙機...
-
Page 30: 電的連接
連接 ∅ 150 伸縮管等到排氣口。 用阻燃密封帶,如鋁帶等(不提供)密封保證排氣口的安全。 伸縮管 阻燃金屬帶(鋁帶等) 電的連接 在接電之前,請確認生活電壓與本吸油煙機標籤上的電壓相匹配。 最好請有資質的技術人員來接電 安裝插頭 插座請使用規定的標準插座。 如果您打算將其直接連接到電源插座上, 則拆卸插頭並安裝一個經批 准的雙極開關,最小接觸口不少於 3mm。 如果插頭不能插入插座時的, 則需要安裝一個不少於 3mm 的最小接觸 開口的經認證的雙極開關。 沒有插頭 安裝一個經認證的插頭或雙極開關,其最小接觸開口不小於 3mm 製造商對用戶未遵守上述指示而引起的任何問題概不負責。... - Page 31 保養 1. 為確保安全,在維修保養前請拔掉插頭。 2. 嚴禁電機和電元器件進水! 3. 禁止燃氣灶空燒及鍋中燃火;禁止爐火直接烘烤吸油煙機。 4. 及時清除油杯內積存的油污,在拆卸油杯時,雙手抓住油杯的兩 端下拉即可。 5. 吸油煙機在爐灶消耗煤氣或其他燃料時使用, 房間必須通風良好。 6. 照明燈損壞時,請更換同類型燈泡,額定功率不大於1瓦特。 7. 如果電源線損壞,為避免危險,必須由製造商、其維修部或類似 部門的專業人員更換。 8. 如果不按說明書規定的方法清洗吸油煙機有火災風險。 9. 清理時注意防止金屬刃口傷手;清洗時請使用中性洗滌劑和軟布 軟刷,禁止使用有機溶劑。 10. 拆下的零件輕放,以免產品變形、表面刮花。 11. 非專業人士禁止拆修!...
- Page 32 清潔 1. 清潔吸油煙機表面 每次使用完成後,用軟布擦拭吸油煙機的外表面。 2. 清洗油杯 建議按照油杯上的油量指示定期清理積油。 3. 清洗整流板及過濾網 建議每月清潔一次。 在拆卸各零部件時,用雙手抓住零部件,防止掉落損壞。 請注意整流板內積存的油污掉落。...
-
Page 33: 故障排除
故障排除 有不明之處或有維修方面的問題時, 請您向購買本產品的商店進行諮詢。 發現吸油煙機有異常現象,請停止使用。非專業人員禁止拆修! 故障現象 可能原因 如何解決 檢查插頭是否插入插座 吸油煙機未工作 沒有供電 檢查主要開關是否開啟 風量低 過濾網油污過重 清潔過濾網並晾乾裝回 電機運轉卻沒有風量 葉輪故障 請聯繫客服 高溫保護判定系統啟動 廚房通風不足 開啟一段時間後, 電機停止運轉 吸油煙機與爐灶距離過近 距離應在75 釐米以上 油污滴到爐灶上 油污長時間沒有清理 清潔過濾網和油杯 噪音 有雜物干擾葉輪 請聯繫客服 LED 燈不工作 LED 燈損壞 請聯繫客服... -
Page 34: 其他資訊
其他資訊 ■ 規格 額定電壓 頻率 消耗功率 風量 噪聲 檔位 (Hz) (m3/h) (db) 高 中 低 高 中 低 高 中 低 * 消耗功率含照明燈 2W 電路圖... -
Page 35: 服務和保修
服務和保修 ■ 需要維修時: 當吸油煙機運行時出現任何異常,請關掉開關,檢查以下各點, 從插座上拔掉電源插頭,與您購買吸油煙機的銷售店聯繫查詢。 1. 斷路器中的保險絲是否已被燒毀? 2. 電源插頭是否正確地插在插座上? 在與銷售店查詢時,請知會需 要修理的吸油煙機類型/型號以及購買日期。 最短維修配件提供期限為吸油煙機停止生產後 5 年。 維修配件是指維持吸油煙機性能的配件。但是,具有相同功能的 維修配件或更換配件將繼續提供 4 年。 維修後功能可以得以維持,竭誠為您提供維修服務。 吸油煙機中使用的零部件可能會因改善性能而變更,恕不另行通知。 一切翻譯以英文版本為准。... - Page 36 全球網站 東南亞地區總部...
Need help?
Do you have a question about the FR-HS1870 and is the answer not in the manual?
Questions and answers