Table of Contents
Advertisement
Quick Links
English page 1~20
Safety Precautions ..................2~4
Precautions on Use......................4
Preparation ..............................5~7
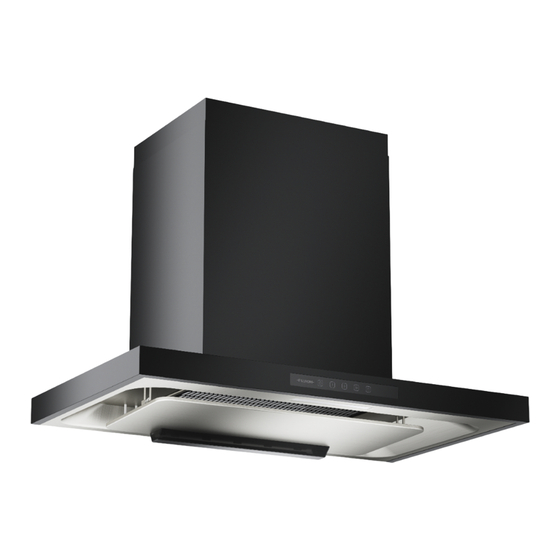
Name of Parts ..............................5
Switch ......................................6~7
Installation .............................8~12
before Installation ...................8~9
Installing the cooker hood ....10~12
Operation Check ........................12
To the sales shop/installer:
After installation, please
provide this Manual to the
user without fail.
Cooker Hood
FR-ST2190VP
FR-ST2190VP-15
Installation/Operation Manual
酒悶嶄猟 21 ~ 40 匈
TABLE OF CONTENTS
Thank you very much for purchasing our cooker hood.
Please read this Manual thoroughly before installing/operating the
cooker hood.
Keep this Manual properly for future reference after reading.
繁體中文 41 ~ 60 頁
Maintenance ........................13~15
Precautions for Maintenance ......13
to be Cleaned .....................13~15
Cleaning .....................................15
Other Information .................16~18
Specifi cations .............................16
Circuit Diagram ..........................17
Service and Warranty.................18
1F02 2782
*1F022782*
Advertisement
Chapters
Table of Contents

Subscribe to Our Youtube Channel
Related Manuals for Fujioh FR-ST2190VP


Summary of Contents for Fujioh FR-ST2190VP
-
Page 1: Table Of Contents
Cooker Hood FR-ST2190VP FR-ST2190VP-15 Installation/Operation Manual 繁體中文 41 ~ 60 頁 English page 1~20 酒悶嶄猟 21 ~ 40 匈 TABLE OF CONTENTS Safety Precautions ....2~4 Maintenance ......13~15 Precautions on Use......4 Precautions for Maintenance ..13 Preparation ......5~7 Detaching/Attaching of Parts to be Cleaned .....13~15 Name of Parts ......5... -
Page 2: Safety Precautions
Safety Precautions Read the following Safety Precautions before installation and operation, and use the cooker hood properly and securely. These Safety Precautions are for correct operation of the product, preventing any harm or damage to yourself or others. These Safety Precautions are classified into 2 categories ("WARNING" and "CAUTION") depending on their hazard and severity. - Page 3 WARNING Attention to Always perform exhaust adjustments. adjustment The product is not intended for use by persons (including children) with reduced physical, sensory or mental capabilities, or lack of experience or knowledge, unless they are under the Supervision supervision or guidance of a specially assigned person who is responsible for their safety.
-
Page 4: Precautions On Use
CAUTION Prohibited Never put anything on the cooker hood. from Placing Otherwise, it may result in fire hazards, machine failure or injury due to detachment. Objects Always wear gloves during maintenance. Wear gloves Otherwise, the user may be injured by sharp edges or corners. Replace ... -
Page 5: Preparation
Installation screw (∅3×8) Connecting the exhaust port and the exhaust pipe Oil tray Collect used oil The following is only applicable to FR-ST2190VP-15 Duct reducer (∅180-∅150) Connecting the exhaust pipe and the exhaust hose Soft tape Sealing the exhaust port and the exhaust pipe... -
Page 6: Switch
Switch Off Switch Press down this switch to immediately turn off the impeller. * The lights will still remain ON. Press to turn them off. Switch locking (disable all functions) To lock switches Beep twice Press for 3s. Press and hold --- When the unit “beeps”... - Page 7 Light switch Beep Press this switch to turn on/off the light. Operation and airflow switches (low, medium, high) When pressing down this switch, the switch will light up, and the airflow can be adjusted. (Low) ..For low amount of smoke, or quiet operation.
-
Page 8: Installation
Installation Preparation and Check before Installation CAUTION 1. Install the cooker hood carefully and avoid any contact with any metal parts (the metal lattice in the wall or the like) of the building. 2. Never embed the body of the cooker hood in the wall. Otherwise, it may result in the electric leakage of the unit. - Page 9 Confirmation of the installation location (Unit: mm) Exhaust pipe Ceiling Ceiling Exhaust pipe Top view Attaching exhaust port Align the exhaust port with the screw hole on the top of Installation screw the cooker hood and secure with 4 installation screws (M4u16) (M4×16) (See figure on the right).
-
Page 10: Installing The Cooker Hood
Installing the cooker hood 1) Secure the mounting bracket and duct cover fixing Duct cover bracket on the wall with 6 washer-head wood screws fixing bracket (∅5.1×45) (as shown below). When using plastic expansion pipes, use a drill with a Washer-head wood screw ∅8mm bit to drill holes in the wall. - Page 11 (Only applicable to FR-ST2190VP-15) 1) The upper and lower ends of the duct reducer (∅180-∅150) shall be attached with a soft tape Soft tape Duct reducer and then connected to the exhaust pipe. ‡180-‡150 Exhaust pipe 2) Using a non-flammable tape (such as...
-
Page 12: Operation Check
9) Securely hang the left and right hooking bracket Hanging bracket at the rear of the rectifier panel on the hanging Hooking bracket bracket ( ① ) of the cooker hood. 10) Support the rectifier panel with both hands and lift the front end upwards until a “snap”... -
Page 13: Maintenance
Maintenance Clean the cooker hood frequently as it will become very dirty (Especially, clear the fan guard at least once a month. For a family cooking at least twice a day, clean the fan guard once every two weeks). If the cooker hood is left unattended for a long time, a large amount of oil will accumulate and become hardened grease, which is difficult to remove. - Page 14 Rectifier Panel Detaching 1)Support the rectifier panel with both hands and slightly push it upwards. Press the left and right Fixing arresters of the rectifier panel for detaching ( ① ). bracket Press the locking device Slightly raise Rectifier panel 2) Support the rectifier panel with both hands to slowly detach it ( ②...
-
Page 15: Cleaning
Attaching 1) Securely hang the left and right suspenders at the Hanging bracket rear of the rectifier panel on the hanging bracket Hooking bracket ( ① ) of the cooker hood. 2) Support the rectifier panel with both hands and lift the front end upwards until a “snap”... -
Page 16: Other Information
Other Information Specifications FR-ST2190VP Rated Voltage (V) Speed Rated Frequency (Hz) Power Consumption (W) Air Flow (m Noise (dB) Boost Mode 1200 1080 Boost Mode 1300 1180 with 3.5 watts for lamp FR-ST2190VP-15 Rated Voltage (V) Speed Rated Frequency (Hz) Power Consumption (W) -
Page 17: Circuit Diagram
Circuit Diagram 50Hz 220V/230V/240V AC 13A 3 pin plug (Type-BF) Capacitor Connector Motor 9.0 µF 450 V (3P) 220 V White Blue 50 Hz Brown Orange Brown Green/Yellow Blue Purple Blue Connector Brown Black Black Black power source (6P) Connector Connector Connector Control panel... -
Page 18: Service And Warranty
Service and Warranty When requesting after-sales service: • If any abnormality occurs while the cooker hood is in operation, switch the cooker hood off and check the following: (1) Whether the fuse in the breaker has been burnt out? (2) Whether the power plug is not in proper contact with the socket? If none of the above causes are the problem, disconnect the power plug from the socket and consult the shop from which you have purchased your cooker hood. - Page 19 Memo...
- Page 21 簾 嗟 冖 字 FR-ST2190VP FR-ST2190VP-15 芦廾式荷恬返過 朕 村 芦畠廣吭並㍻ .......22~23 略 擦 ........33~35 聞喘倬岑 .........24 略擦廣吭並㍻ .........33 彈 姥 ........25~27 蛍宣 / 芦廾勣賠牢何周 ... 33~35 賠 準 ..........35 何周兆各 .........25 凪麿佚連 ......36~38 荷恬梓囚 ........26~27 芦 廾 ........28~32 号 鯉 ..........36 窮揃夕...
-
Page 22: 芦畠廣吭並
■ 芦畠廣吭並㍻ 芦廾式聞喘云恢瞳念,哘堋響參和芦畠廣吭並㍻,參宴屎鳩、芦畠仇芦廾簾嗟冖字。 宸乂芦畠廣吭並㍻崋壓屎鳩芦廾云恢瞳,參契斤徭失賜麿繁夛撹裡⑫賜彬墾。功象裡⑫來才鱒墾殻業, 芦畠廣吭並㍻蛍葎 " 少御 " 才 " 廣吭 " 曾倖吉雫。 喇噐宸乂廣吭並㍻斤噐芦畠崛購嶷勣,咀緩暦駅紗參 廣吭旺冢鯉嚠參恆便。 芦 燕幣氏擬崑嶷寄 燕幣氏擬崑繁附 少 御 廣 吭 畠 繁附彬蘭。 彬墾賜麗瞳鱒撒。 廣 吭 少 御 並 ㍻ 泌惚壓階狛 4 凛俗夥賜伴付夥俗 炭賑亶息扮,冢鋤荷恬簾嗟冖字 4 凛俗夥 冢鋤荷恬... - Page 23 廣 吭 僉夲釈耕議了崔,昔耕芦廾云 輝簾嗟冖字屎挫了噐感醤貧圭扮, 廣吭芦廾 廣吭芦廾 恢瞳。 感醤議貧円垉嚥簾嗟冖字和円垉岻 寂議鉦宣哘葎 650mm~850mm。 倦夸字悶渠鯛繍氏夛撹彬墾。 泌惚感醤聞喘傍苧慕号協阻厚寄寂 鉦,夸駅倬紗參深打。 芦 畠 廣 僅蝕窮坿扮,哘提廖窮坿峨遊議 萩齢壓簾嗟冖字貧慧崔販採麗瞳。 提廖窮坿峨 鋤峭慧崔 遊議極何偉 吭 極何繍峨遊偉渠,音勣廡性窮㌔。 倦夸氏夛撹諮墻、絞嬾,賜咀麗瞳 麗瞳 渠峨遊 倦夸氏聞窮㌔鞭鱒,旺辛嬬哈軟諮 渠鯛遇夛撹彬墾。 並 墻賜窮似。 ㍻ 隠劍才略擦扮暦駅忌貧垢恬返耗。 海扮寂音聞喘扮,暦駅繍窮坿峨 忌垢恬返耗 倦夸氏瓜錫費議円叔皿彬。...
-
Page 24: 聞喘倬岑
聞喘倬岑 聞喘搭眇匂醤扮,暦駅塰佩簾嗟冖字。 倦夸,簾嗟冖字辛嬬氏咀梁業奐互遇夛撹鱒撒賜絞嬾。 萩齢壓隆慧崔販採匂醤議秤趨和聞喘伴賑夥。 芦 倦夸,字附辛嬬氏咀鞭犯遇夛撹絞嬾。 畠 聞喘窮甘俗扮,簾嗟冖字議簾嗟冖來嬬辛嬬氏咀迦欠議唹㍊遇㊧樋。 廣 緩翌,泌惚壓詰梁訳周和聞喘簾嗟冖字,夸凪燕中侘撹潤其。 吭 緩扮,哘繍簾嗟冖字価蔽孤昌朔壅嚠聞喘。 並 契峭腎距岷俊患欠。 ㍻ 倦夸,凪簾嗟冖來嬬辛嬬氏週詰。 喩凪頁輝窮甘俗叱窄短嗤恢伏議貧幅賑送扮,簾嗟冖字宴載否叟壓蝕姓議腎寂嶄鞭欺唹㍊。 壓簾嗟冖字塰佩狛殻嶄,哘廣吭隠隔措挫議宥欠桟廠。 壓簾嗟冖字斤中議能悶貧哘藻嗤怎校議序欠笥,賜繍型寂議壇不不嬉蝕。 倦夸,簾嗟冖來嬬辛嬬受樋,賜辛嬬恢伏呟械夐咄、尅強。 犯邦匂哘嚥簾嗟冖字隠隔 500 mm 參貧議鉦宣。 喇噐犯邦匂巓律梁業熟互,咀緩哘嚥簾嗟冖字隠隔 500 mm 參貧議鉦宣。 俳齢繍簾嗟冖字芦廾壓犯邦匂議貧圭。倦夸,簾嗟冖字辛嬬氏咀梁業奐互遇夛撹鱒撒賜絞嬾。 萩齢壓屁送医介和議秤趨和聞喘簾嗟冖字。 倦夸,簾嗟冖來嬬辛嬬咀緩遇週詰。 侃尖系簾嗟冖字扮,遍枠侃尖撹音嬬聞麿繁写偬嬬校聞喘議彜蓑岻朔卿虹。... -
Page 25: 何周兆各
180 mm) 電賑砿(翌侘 — 貧廾蔑孛 — 和廾蔑孛 航抗 傅航恢瞳 本創湯嬪砿 耕協航抗式廾蔑孛航抗 ∅ 5.1×45) 究筈直苔某( 耕協航抗式廾蔑孛航抗 廾蔑孛航抗 耕協貧廾蔑孛 峠遊苔某(M4×8) 耕協貧廾蔑孛 電賑笥 銭俊麼字揖電賑砿 芦廾苔某(M4×16) 銭俊麼字揖電賑笥 ∅ 3×8) 芦廾苔某( 銭俊電賑笥嚥電賑砿 嗟鵜 鹿函聞喘狛朔議嗟 參和叙㍉ FR-ST2190VP-15 ∅ ∅ 廬算砿 ( 180- 150) 喘噐銭俊電賑砿嚥電賑罷砿 罷畜撃揮 畜撃電賑笥揖電賑砿... -
Page 26: 荷恬梓囚
荷恬梓囚 彈 姥 購液梓囚 梓和緩囚朔,匐態氏軸震唯峭垢恬。 ※ 孚苧音氏購液。梓 購液孚苧。 ■梓囚迄協(購液畠何荷恬孔嬬) ●迄協梓囚俶勣 梓和 隔偬 3 昼嶝。 --- 輝字悶窟竃“砧砧”蕗扮,梓囚迄協。 --- 匐態唯廬,孚苧購液。 揖 住札描妨。 岻翌議販採囚 。 迄協彜蓑梓和茅 --- 夸窟竃“砧砧砧”議少御蕗。 菊梓 乏會描妨。 --- 匐態嚥孚苧菊音垢恬。 ●盾迄俶勣 隔偬 3 昼岷欺字悶壅業窟竃 梓和 “砧―”議㍊蕗。 盾迄朔萩暦駅功象俶勣,嶷仟斤孚苧、 塰廬、欠楚俳算囚序佩荷恬。 ※ 迄協荷恬萩暦駅壓搭眇潤崩, 簾嗟冖字割蛍絶抜朔序佩。... - Page 27 孚苧梓囚 喘噐蝕尼式購液孚苧。 塰廬、欠楚俳算梓囚(詰亀、嶄亀、互亀) 彈 梓和緩囚朔,梓囚菊疏軟,欠楚俳算。 姥 (詰亀) ..冖楚弌扮。錬李涙蕗塰廬扮。 (嶄亀) ..噸宥塰廬。 (互亀) ..冖楚謹扮。錬李酔堀算賑扮。 ●卯慨塰廬蝕兵 塰廬嶄、海梓蝕購 (3 昼嶝) ,軸蝕兵卯慨塰廬。 塰廬 5 蛍嶽朔卦指 (互亀) 。 --- 卯慨塰廬嶄菊 描妨。 ●盾茅卯慨塰廬 卯慨塰廬嶄梓和 議販匯蝕購賜海梓蝕購 (3 昼嶝) ,軸盾茅卯慨塰廬、卦指宥械塰廬庁塀。 議販匯菊泣疏。 ※ 卯慨塰廬嶄梓 ,軸唯峭塰廬。 ■譜協 3 蛍决扮塰廬 梓和塰廬嶄泣疏議欠楚蝕購,譜協 3 蛍决扮 塰廬。...
-
Page 28: 芦廾念議彈姥才殊臥
■ 芦 廾 芦廾念議彈姥才殊臥 廣 吭 1. 芦廾簾嗟冖字扮哘弌伉女風,參窒俊乾秀廏麗議署奉何周(能謁吉更周坪何議署奉利) 。 2. 俳齢繍簾嗟冖字議字附托噐能謁岻嶄,倦夸氏夛撹字附息窮。 芦 3. 簾嗟冖字電竃議賑悶音哘電欺喘噐電竃伴付炭賑賜凪麿伴創議冖零聞喘議犯冖祇嶄(乎訳音 聞喘噐委賑悶電指片坪議簾嗟冖字) 。 廾 4. 輝簾嗟冖字屎挫了噐感醤貧圭扮, 感醤議貧円垉嚥簾嗟冖字和円垉岻寂議鉦宣哘葎 650mm~850mm。 泌惚感醤聞喘傍苧慕号協阻厚寄寂鉦, 夸駅倬紗參深打。 5. 聞喘錐業弌噐簾嗟冖字議伴賑夥。 6. 閲窒聞喘号鯉窟伏延強議簾嗟冖字,箭泌,個算梓泥。 7. 萩齢繍簾嗟冖字芦廾壓咳物議仇圭賜咳物議型寂嶄,倦夸氏夛撹窮似賜鱒墾。 8. 萩齢繍簾嗟冖字芦廾壓桟廠梁業階狛 40 ℃議仇圭,倦夸氏夛撹絞嬾。 9. 芦廾簾嗟冖字扮,勣忌挫垢恬返耗,參窒彬式褒返。 10. 泌惚窮坿㌔鞭鱒,駅倬喇崙夛斌、捲暦旗尖字更賜揖吉彿鯉議繁埀嚠參厚算,參窒夛撹裡⑫。 殊臥芦廾燕中議膿業 芦廾燕中駅倬嗤怎校議膿業栖屶嚇簾嗟冖字。哘繍簾嗟冖字芦廾壓嬬校昔耕隔消仇屶嚇凪嶷楚議了崔。 (嶷楚:31 kg)... - Page 29 鳩範芦廾了崔 (汽了:mm) 芦 廾 芦廾電賑笥 歌深嘔夕,繍電賑笥議迅斤彈簾嗟冖字競何議苔某迅, M4 16 壅喘 4 薪芦廾苔某(M4×16)紗參耕協。 廣 吭 芦廾電賑笥扮,哘廣吭飢賑医議蝕尼圭㏍。 泌惚芦廾嗤列,辛嬬氏夛撹電賑音芥、呟械夐咄吉。...
-
Page 30: 芦廾簾嗟冖字
芦廾簾嗟冖字 1) 究筈直苔某(∅5.1×45)6 功(歌深和夕)繍航抗式廾 蔑孛航抗耕協壓能中。 ※ 泌惚艇聞喘本創湯嬪砿,萩塘栽喘 ∅8 mm 号鯉怺遊壓 ‡5.1 45 能貧怺迅。迅岷抄 8 mm 侮 55 mm 參貧。 芦 廾 2) 繍恢瞳航壓航抗貧。 3) 葎閲窒恢瞳貫航抗貧用鯛,萩壓 ※ 何(歌深貧夕) ∅5.1 45 喘 1 功究筈直苔某(∅5.1×45)耕協。 ※ 泌惚艇聞喘本創湯嬪砿,匆萩揖貧峰荷恬匯劔壓能中 貧耕協究筈直苔某。 4) 繍電賑砿議 4 倖郵軟斤彈電賑笥議郵軟、峨秘,梓剃 扮寞圭㏍待廬強。... - Page 31 (叙㍉ FR-ST2190VP-15) 1) 廬算砿(∅ ∅180 - ∅150)議貧極嚥和極蛍艶娚薮 罷畜撃揮壅嚥電賑砿銭俊。 ‡180-‡150 芦 廾 2) 聞喘怦伴揮(匯違偏魁㈹弁汰揮吉) ,委電賑砿嚥 廬算砿、廬算砿嚥電賑罷砿議光銭俊何頼畠畜撃、 音藻某坐血篭。 ‡180-‡150 7) 聞和廾蔑孛廼秘欺簾嗟冖字競中議控菓坪。 ※ 芦廾扮廣吭音勣鱒彬云恢瞳。 8) 繍貧廾蔑孛錆崛貧圭,航壓廾蔑孛航抗貧, 喘 2 功峠遊苔某(M4×8)貫凪迦圭耕協。 M4 8...
-
Page 32: 塰佩殊臥
9) 繍屁送医朔極議恣嘔航諏何鳩糞虚航壓簾嗟冖字 議虚桟何( ① ) 。 10) 褒返匯円嚇廖屁送医、匯円㏍貧訟軟念極岷欺窟 竃“瀁琲”蕗、繍凪耕協( ② ) 。 芦 廾 11) 芦廾朔,貧和性強匯和屁送医、鳩範凪音氏用鯛。 廣 吭 葎閲窒咀迄協音怎遇哈窟議耕周用鯛,萩暦駅隠屬屁 送医瓜釈糞耕協。 12) 繍嗟鵜芦廾壓屁送医貧。 繍嗟鵜議 2 侃郵竃何斤彈屁送医議芦廾迅峨秘, ㏍朔錆強、耕協。 塰佩殊臥 繍蛍窮徒王崛“蝕”議了崔,序佩編塰佩。泌採荷恬梓囚嚥鳩範塰廬彜蓑萩歌深及 26, 27 匈。 ■ 云簾嗟冖字塰廬扮,光亀匐態頁倦屎械垢恬。 ■ 頁倦窟竃呟械夐咄式呟械尅強。... -
Page 33: 朕 村 略
■ 略 擦 喇噐簾嗟冖字載否叟現彭嗟麟,咀緩哘将械賠準簾嗟冖字(喩凪頁契擦利,哘崛富耽埖賠準匯肝。 斤噐耽爺恂曾禽傾參貧議社優遇冱,哘崛富耽曾巓賠準匯肝契擦利。 ) 。 泌惚簾嗟冖字海扮寂音賠準,繍氏持詔寄楚嗟麟,侘撹載佃肇茅議嗟妛啣翠。 嗟鵜、簾嗟冖字膨巓、屁送医泌惚嗤嗟麟扮,萩耽肝式扮賠牢。 (賠牢炎彈:埃耽埖匯肝) 略擦廣吭並㍻ 略 ・ 賠準簾嗟冖字念,暦駅貫峨恙貧偉和窮坿峨遊,賜購液僅窮匂。 擦 ・ 葎芦畠軟需,賠準契擦利吉何周扮,哘兵嶮忌挫〟什返耗。 ・ 喩凪哘弌伉,契峭繍邦特欺窮字、蝕購、俊峨周岻窃議窮賑何周貧。 萩齢壓窮賑何周貧島備販採窃侏議牢脚卑匣。倦夸氏夛撹絞嬾。 ・ 萩齢喘幗泌蓮瞥質岻窃議卑質、廿嗟、砺高頚吉賠準与那燕中、嗟中医吉, 倦夸氏聞宸乂何蛍払肇高夾賜夛撹肯裁。 ・ 萩齢喘啣谷泡岻窃議麗瞳価牢光何周,倦夸氏聞何周鞭鱒。 ・ 泌惚音梓孚傍苧慕号協圭隈賠牢,簾嗟冖字嗤軟諮議裡⑫。 蛍宣 / 芦廾勣賠牢何周 萩梓孚嚥介亢扮㌢郡議化帶斤光倖巣何周序佩芦廾。 亢和嗟鵜 葎閲窒嗟鵜嶄議嗟吝竃,萩隠隔凪邦峠蓑貫字悶議抗徨 貧亢和。 芦廾扮萩繍嗟鵜航壓航抗貧,旺容崛字悶議恷侮侃。 廣 吭 功象艇聞喘彜趨議音揖,氏嗤涙鹿嗟⑬℡窟伏,旺掲呟械。... - Page 34 屁送医 ■亢 和 1) 喘褒返嚇廖屁送医,不裏㏍貧容儿、梓儿屁送医 恣嘔侃議崙強諏、亢和( ① ) 。 略 擦 2) 喘褒返嚇廖屁送医、揖扮蛸蛸仇繍凪亢和( ② ) 。 3) 壓嘔和夕侭幣了崔訟軟屁送医朔極,貫簾嗟冖字 虚桟何亢和( ③ ) 。 ※ 萩匯協揖扮亢和恣嘔 2 侃。倦夸氏夛撹署奉巣周 延侘。 廣 吭 亢和扮屁送医貧嗤辛嬬嗤嗟持贋,萩廣吭嗟嵎砧鯛。 賠準屁送医扮,廣吭音勣聞屁送医喜諏何式屁送医 虚航署奉巣周延侘。 泌惚延侘,辛嬬擬崑屁送医音嬬壅肝芦廾。...
-
Page 35: 賠 準
■芦 廾 1) 繍屁送医朔極議恣嘔航諏何鳩糞虚航壓簾嗟冖字 議虚桟何( ① ) 。 2) 褒返匯円嚇廖屁送医、匯円㏍貧訟軟念極岷欺窟 竃“瀁琲”蕗、繍凪耕協( ② ) 。 芦廾朔,貧和性強匯和屁送医、鳩範凪音氏用鯛。 廣 吭 略 葎閲窒咀迄協音怎遇哈窟議耕周用鯛,萩暦駅隠屬屁 送医瓜釈糞耕協。 擦 賠 準 嗟鵜、簾嗟冖字膨巓、契擦利、屁送医 繍償嗤嶄來牢脚質議価下邸孤,喘凪価蔽簾嗟冖字議膨巓才屁送医,牢昌朔, 萩聞喘物下徙聾価昌參閲窒牢脚質議火藻、恷朔壅喘孤下範寔価昌邦徼。 廣 吭 哘壓峠鵡議燕中賠準屁送医,參窒窟伏延侘。... -
Page 36: 凪麿佚連
凪麿佚連 号 鯉 FR-ST2190VP 駆協窮儿 (V) 亀了 駆協撞楕 (Hz) ㍾債孔楕 (W) 欠楚 (m 夐蕗 (dB) 卯慨 1200 互亀 1080 嶄亀 詰亀 卯慨 1300 互亀 1180 嶄亀 凪 詰亀 麿 ㍾債孔楕根孚苧菊 3.5W 佚 連 FR-ST2190VP-15 駆協窮儿 (V) 亀了 駆協撞楕 (Hz) ㍾債孔楕... -
Page 37: 窮揃夕
窮揃夕 50Hz 220V/230V/240V AC (Type-BF) 9.0 µF 450 V (3P) 220 V 50 Hz (6P) 凪 (2P) (3P) (3P) 麿 佚 連 (8P) -
Page 38: 俐尖嚥隠俐
俐尖嚥隠俐 賦萩略俐 : 壓荷恬狛殻嶄泌惚窟伏呟械 , 哘羨軸購渠簾嗟冖字序佩殊臥 : 隠⑫某頁倦匪僅阻? 窮坿峨遊嚥峨恙議銭俊頁倦屎鳩? 飛鳩範音頁貧峰諒籾,萩羨軸偉和窮坿峨遊 , 嚥輝兜杭択云字扮議㈹弁斌選狼。 嚥㈹弁斌選狼扮 , 俶傍苧恢瞳侏催式杭択晩豚。 云侏催字唯峭伏恢朔挽辛戻工略俐侭俶來嬬何周議恷詰隠屬豚葎 5 定。 ● years 凪 麿 佚 來嬬何周頁峺略隔簾嗟冖字屎械聞喘孔嬬侭駅俶議児云何周。 連 斤噐㌢揖窃侏辛札算何周議戻工隠屬豚辛壅决海 4 定。 壓斤聞喘音恢伏唹㍊議念戻和,厘断繍梓孚艇議勣箔僉喘宸乂何周序佩略俐。 葎戻互簾嗟冖字來嬬 , 嗤辛嬬壓音圓枠宥岑議秤趨和序佩恢瞳何周議厚仟。 ●... - Page 39 姥 梨...
- Page 41 吸 油 煙 機 FR-ST2190VP FR-ST2190VP-15 安裝及操作手冊 目 錄 安全注意事項 ....42~43 維 修 ......... 53~55 使用須知 ....... 44 維修注意事項 ......53 準 備 ......... 45~47 分離/安裝要清洗配件 ..53~55 清 潔........55 零件�� ....... 45 其他資訊 ......56~58 操作按鍵 ......46~47 安 裝 ......... 48~52 規 格........56 電路圖 ........
-
Page 42: 安全注意事項
■ 安全注意事項 安裝及使用本產品前,應閱讀以下安全注意事項,以便正確、安全地安裝吸油煙機。 這些安全注意事項旨在正確安裝本產品,以防對自己或他人造成危險或傷害。根據危險性和損害程度, 安全注意事項分為 “警告” 和 “注意” 兩個等級。由於這些注意事項對於安全至關重要,因此務必加以注 意並嚴格予以遵守。 安 警 告 注 意 表示會導致重大 表示會導致人身 全 人身傷亡。 傷害或物品損壞。 注 意 警 告 事 項 如果在超過 4 個煮食爐或燃燒器 煤氣洩漏時,嚴禁操作吸油煙機 少於 4 個 嚴禁操作 的上部安裝吸油煙機。 的開關。 燃燒器 否則會造成煤氣爆炸。 ... - Page 43 注 意 選擇堅固的位置,牢固安裝本 當 吸 油 煙 機 正 好 位 於 爐 具 上 注意安裝 注意安裝 產品。 方 時, 爐 具 的 上 邊 緣 與 吸 油 否則機體掉落將會造成傷害。 煙 機 下 邊 緣 之 間 的 距 離 應 為 650mm~850mm。...
-
Page 44: 使用須知
使用須知 使用烹飪器具時,務必運行吸油煙機。 否則,吸油煙機可能會因溫度增高而造成損壞或故障。 請勿在未放置任何器具的情況下使用煮食爐。 安 否則,機身可能會因受熱而造成故障。 全 注 使用電磁爐時,吸油煙機的吸油煙性能可能會因側風的影響而削弱。 此外,如果在低溫條件下使用吸油煙機,則其表面形成結露。 意 此時,應將吸油煙機擦拭乾淨後再予使用。 事 項 防止空調直接吹風。 否則,其吸油煙性能可能會降低。 尤其是當電磁爐幾乎沒有產生的上升氣流時,吸油煙機便很容易在開放式空間中受到影響。 在吸油煙機運行過程中,應注意保持良好的通風環境。 在吸油煙機對面的牆體上應留有足夠的進風口,或將房間的門稍稍打開。 否則,吸油煙性能可能減弱,或可能產生異常噪音、振動。 熱水爐應與吸油煙機保持 500mm 以上的距離。 由於熱水爐周圍溫度較高,因此應與吸油煙機保持 500mm 以上的距離。 切勿將吸油煙機安裝在熱水爐的上方。否則,吸油煙機可能會因溫度增高而造成損壞或故障。 請勿在整流板拆下的情況下使用吸油煙機。 否則,吸油煙性能可能因此而降低。 處理舊吸油煙機時,確保棄置前已不能運作。... - Page 45 180mm) — ∅ 上裝飾喉通 — 下裝飾喉通 — 掛鉤 懸掛產品 塑料膨脹管 固定掛鉤及裝飾喉通掛鉤 墊圈木螺絲( 5.1×45) 固定掛鉤及裝飾喉通掛鉤 ∅ 裝飾喉通掛鉤 固定上裝飾喉通 平頭螺絲(M4×8) 固定上裝飾喉通 排氣口 連接主機同排氣管 安裝螺絲(M4×16) 連接主機同排氣口 安裝螺絲( 3×8) 連接排氣口與排氣管 ∅ 油杯 收集使用過後的油 以下僅限 FR-ST2190VP-15 轉換管 ( 180- 150) 用於連接排氣管與排氣軟管 ∅ ∅ 軟密封帶 密封排氣口同排氣管...
-
Page 46: 操作按鍵
操作按鍵 準 備 關閉按鍵 按下此鍵後,風機會即刻停止工作。 ※ 照明不會關閉。按 關閉照明。 ■按鍵鎖定(關閉全部操作功能) ●鎖定按鍵需要 按下 持續 3 秒鐘。 嗶嗶 持續按下 (約�秒鐘) --- 當機體發出 “嗶嗶” 聲時,按鍵鎖定。 按鍵鎖定時表示狀態 --- 風扇停轉,照明關閉。 --- 同 交互閃爍。 交互閃爍 鎖定狀態按下除 之外的任何鍵。 按鍵處於鎖定狀態,按除“關閉” --- 則發出 “嗶嗶嗶” 的警告聲。 外的按鍵時,機體表示狀態 燈按 順序閃爍。 嗶嗶嗶 --- 風扇與照明燈不運作。... - Page 47 照明關閉 嗶 用於開啟及關閉照明。 運轉、風量切換按鍵(低檔、中檔、高檔) 準 按下此鍵後,按鍵燈亮起,風量切換。 備 (低檔) ..煙量小時。希望無聲運轉時。 (中檔) ..普通運轉。 嗶 (高檔) ..煙量多時。希望快速換氣時。 ●爆炒運轉開始 運轉中、長按高檔 (3 秒鐘) ,即開始爆炒運轉。 運轉 5 分種後返回 (高檔) 。 嗶 --- 爆炒運轉中燈 閃爍。 持續按下 (約�秒鐘) ●解除爆炒運轉 爆炒運轉中按下 的任一開關或長按開關 嗶 (3 秒鐘) ,即解除爆炒運轉、返回通常運轉模式。 --- 的任一燈點亮。...
-
Page 48: 安裝前的準�和檢查
■ 安 裝 安裝前的準備和檢查 注 意 1. 安裝吸油煙機時應小心謹慎,以免接觸建築物的金屬零件(牆壁等構件內部的金屬網) 。 安 2. 切勿將吸油煙機的機身埋於牆壁之中,否則會造成機身漏電。 3. 吸油煙機排出的氣體不應排到用於排出燃燒煤氣或其他燃料的煙霧使用的熱煙道中(不適用 裝 於可將氣體釋放至室內的吸油煙機) 。 4. 當 吸 油 煙 機 正 好 位 於 爐 具 上 方 時, 爐 具 的 上 邊 緣 與 吸 油 煙 機 下 邊 緣 之 間 的 距 離 應 為 650mm~850mm。如果爐具使用說明書規定更大間距,則必須加以考慮。... - Page 49 確認安裝位置 (單位:mm) 排氣管 吊頂 吊頂 排氣管 安 裝 外表圖 安裝排氣口 參考右圖,將排氣口的孔對準吸油煙機頂部的螺絲孔, 安裝螺絲 再用 4 顆安裝螺絲(M4×16)加以固定。 (M4×16) 排氣口 注 意 安裝排氣口時,應注意活門片的開啟方向。 如果安裝有誤,可能會造成排氣不暢、異常噪音等。...
-
Page 50: 安裝吸油煙機
安裝吸油煙機 1) 墊圈木螺絲(∅5.1×45)6 根(參考下圖)將掛鉤及 裝飾喉通掛鉤固定在牆面。 裝飾喉通掛鉤 墊圈木螺絲 ※ 如果您使用塑料膨脹管,請配合用 ∅8mm 規格鑽頭 (∅5.1×45) 在牆上鑽孔。孔直徑 8mm 深 55mm 以上。 掛鉤 安 ※部 裝 2) 將產品掛在掛鉤上。 拉緊固定 墊圈木螺絲 3) 為避免產品從掛鉤上脫落,請在 ※ 部(參考上圖) (∅5.1×45) 用 1 根墊圈木螺絲(∅5.1×45)固定。 ※ 如果您使用塑料膨脹管,也請同上述操作一樣在牆 面上固定墊圈木螺絲。 4) 將排氣管的 4 個凸起對準排氣口的凸起、插入, 排氣管 按逆時針方向略轉動。... - Page 51 (僅限 FR-ST2190VP-15) 1) 轉換管(∅180-∅150)的上端與下端分別粘貼 軟密封帶再與排氣管連接。 軟密封帶 轉換管 (∅∅ 1 80 -∅∅ 1 50) 排氣管 安 裝 2) 使用阻燃帶(一般市場銷售鋁帶等) ,把排氣管 與轉換管、轉換管與排氣軟管的各連接部完全 阻燃帶 (銷售鋁帶等) 密封、不留絲毫縫隙。 轉換管 (∅∅ 1 80- ∅∅ 1 50) 7) 使下裝飾喉通嵌入到吸油煙機頂面的溝槽內。 ※ 安裝時注意不要損傷本產品。 下裝飾喉通 8) 將上裝飾喉通滑至上方,掛在裝飾喉通掛鉤 平頭螺絲 上, 用 2 根平頭螺絲(M4×8)從其側方固定。...
-
Page 52: 運行檢查
9) 將整流板後端的左右掛扣部確實吊掛在吸油煙機的 吊卡 吊環部( ① ) 。 搭扣 ① 10) 雙手一邊撐住整流板、一邊向上舉起前端直到發出 “咔嚓” 聲、將其固定( ② ) 。 安 ② 裝 閉合 11) 安裝後,上下拉動一下整流板、確認其不會脫落。 注 意 為避免因鎖定不足而引發的組件脫落,請務必確認 整流板已穩妥固定。 確認已經鎖定 12) 將油杯安裝在整流板上。 將油杯的 2 處凸出部對準整流板的安裝孔插入, 向後滑動、固定。 掛鉤 運行檢查 將分電盤撥至 “開” 的位置,進行試運行。如何操作按鍵與確認運轉狀態請參考第 46 ~ 47 頁。 ■ 測試吸油煙機運轉時,各檔風扇是否正常工作。 ■ 是否發出異常噪音及異常振動。... -
Page 53: 維修注意事項
■ 維 修 由於吸油煙機很容易附著油污,因此應經常清潔吸油煙機(尤其是過濾網,應至少每月清潔一次。 對於每天做兩頓飯以上的家庭而言,應至少每兩週清潔一次過濾網。 ) 。 如果吸油煙機長時間不清潔,將會積聚大量油污,形成很難去除的油脂硬塊。 油杯、吸油煙機四周、整流板如果有油污時,請每次及時清洗。 (清洗標準:約每月一次) 維修注意事項 維 · 清潔吸油煙機前,務必從插座上拔出電源插頭,或關閉斷電器。 修 · 為安全起見,清潔過濾網等零件時,應始終戴好橡膠手套。 · 尤其應小心,防止將水潑到電機、開關、接插件之類的電氣零件上。 請勿在電氣零件上噴灑任何類型的洗滌溶液。否則會造成故障。 · 請勿用諸如稀釋劑之類的溶劑、汽油、拋光粉等清潔塗層表面、油面板等, 否則會使這些部分失去光澤或造成刮痕。 · 請勿用硬毛刷之類的物品擦洗各零件,否則會使零件受損。 · 如果不按照說明書規定方法清洗,吸油煙機有起火的危險。 分離/安裝要清洗配件 請按照與拆卸時相反的步驟對各個零件進行安裝。 卸下油杯 為避免油杯中的油溢出,請保持其水平態從機體的鉤子 上卸下。 安裝時請將油杯掛在掛鉤上,並推至機體的最深處。 注 意 根據您使用狀況的不同,會有無集油現象發生,並非異常。 掛鉤... - Page 54 整流板 ■卸 下 1) 用雙手撐住整流板,稍微向上推壓、按壓整流板 固定卡 左右處的鎖扣、卸下( ① ) 。 ① 按壓閉鎖裝置 稍加抬起 維 整流板 修 2) 用雙手撐住整流板、同時慢慢地將其卸下( ② ) 。 吊卡 3) 在右下圖所示位置舉起整流板後端,從吸油煙機 吊環部卸下( ③ ) 。 搭扣 ③ ※ 請一定同時卸下左右 2 處。否則會造成金屬零件 變形。 注 意 ② 打開 卸下時整流板上有可能有油積存,請注意油污滴落。 清潔整流板時,注意不要使整流板搭扣部及整流板 吊掛金屬零件變形。 如果變形,可能導致整流板不能再次安裝。 整流板搭扣部 整流板吊掛金屬零件...
-
Page 55: 清 潔
■安 裝 1) 將整流板後端的左右掛扣部確實吊掛在吸油煙機的 吊卡 吊環部( ① ) 。 搭扣 2) 雙手一邊撐住整流板、一邊向上舉起前端直到發出 “咔嚓” 聲、將其固定( ② ) 。 ① 安裝後,上下拉動一下整流板、確認其不會脫落。 維 注 意 ② 閉合 修 為避免因鎖定不足而引發的組件脫落,請務必確認 整流板已穩妥固定。 確認已經鎖定 清 潔 油杯、吸油煙機四周、過濾網、整流板 將浸有中性洗滌劑的擦布擰乾,用其擦拭吸油煙機的四周和整流板,洗淨後, 請使用濕布仔細擦淨以避免洗滌劑的殘留、最後再用乾布認真擦淨水漬。 注 意 應在平坦的表面清潔整流板,以免發生變形。 中性洗滌劑... -
Page 56: 其他資訊
其他資訊 規 格 FR-ST2190VP 額定電壓 (V) 檔位 額定頻率 (Hz) 耗電功率 (W) 風量 (m 噪音 (dB) 爆炒 1200 高檔 1080 中檔 低檔 爆炒 1300 高檔 1180 其 中檔 他 低檔 資 消耗功率含照明燈 3.5W 訊 FR-ST2190VP-15 額定電壓 (V) 檔位 額定頻率 (Hz) 耗電功率... -
Page 57: 電路圖
電路圖 50Hz 220V/230V/240V AC 13A 三相插頭 (Type-BF) 電容器 接插件 電機 9.0 µF 450 V (3P) 白 紅 藍 220 V 紅 50 Hz 棕 橙 棕 綠/黃 M 藍 紫 藍 紅 紅 紅 + 接插件 LED 電源 棕 黑 黑... -
Page 58: 維修和保
維修和保養 申請維修: 在操作過程中如果發生異常,應立即關掉吸油煙機進行檢查: 保險絲是否熔斷了? 電源插頭與插座的連接是否正確? 若確認不是上述問題,請立即拔出電源插頭,與當初購買本機時的銷售商聯繫。 與銷售商聯繫時,需說明產品型號及購買日期。 本型號機停止生產後仍可提供維修所需性能零件的最低保證期為 5 年。 ● 其 years 他 資 性能零件是指維持吸油煙機正常使用功能所必需的基本零件。 訊 對於相同類型可互換零件的提供保證期可再延長 4 年。 在對使用不產生影響的前提下,我們將按照您的要求選用這些零件進行維修。 為提高吸油煙機性能,有可能在不預先通知的情況下進行產品零件的更新。 ●... - Page 59 備 忘...
- Page 60 全球網站 東南亞地區總部...
Need help?
Do you have a question about the FR-ST2190VP and is the answer not in the manual?
Questions and answers