Table of Contents
Advertisement
Congratulations on purchasing the best network controlled power
switch available. This manual covers two models, iBoot-G2+ and
iBoot-G2S. This manual refers to the iBoot-G2+ and notes the
changes for the iBoot-G2S.
Web Setup and Control: Simple browser interface for one click
reboot and all configuration.
iBoot Cloud Service: Control all your iBoots from a single sign-on.
Eliminates port-forwarding and security issues.
Telnet: setup and control of all fuctions. Allows easy scripting.
Network Switch: Built-in 2 Port 10/100 Network Switch (iBoot-G2S
only). Eliminates need for extra router port and simplifies installation.
Expansion: Add low cost iBoot-EXP units for up to three outlets
controlled.
I/O Control: Control or Monitor your own digital Inputs and Outputs.
Use inputs to control the local AC outlet.
AutoPing: Automatic monitoring and action for failed equipment.
Graceful Shutdown: attempt a soft shutdown or reboot before
controlling power.
Disable Off: To prevent accidental off state of an outlet.
Event Scheduling: Power actions on regular intervals. (14 events)
Management Utility: Easy Setup, Firmware upgrades and Reset to
Factory Default
Easy Software Integration: Use the DxP Protocol to build your own
custom applications.
Control Software: Create batch files or Shortcuts to control power.
URL control: Create your own website link to control power.
1.
Table of Contents .................................... 1
2.
Important Safety Instructions .................. 2
3.
General Description ................................ 3
4.
Hardware Installation .............................. 5
5.
Initial Configuration ................................. 9
6.
Web Browser Operation ........................ 11
7.
Web Setup ............................................ 15
1. Table of Contents
8.
9.
10. DxP Protocol ......................................... 38
11. Firmware Upgrades ............................... 38
12. Troubleshooting .................................... 39
13. Specifications ........................................ 40
14. Technical Support and Warranty .......... 41
Web Enabled Power Switch
Models: iBoot-G2S
iBoot-G2+
iBoot-G2+
iBoot-G2S
iBoot Cloud Service .............................. 27
Command Line Interface ....................... 29
August 2018
Advertisement
Table of Contents

Related Manuals for Dataprobe iBoot-G2S


Summary of Contents for Dataprobe iBoot-G2S
-
Page 1: Table Of Contents
August 2018 Congratulations on purchasing the best network controlled power switch available. This manual covers two models, iBoot-G2+ and iBoot-G2S. This manual refers to the iBoot-G2+ and notes the changes for the iBoot-G2S. Web Setup and Control: Simple browser interface for one click reboot and all configuration. -
Page 2: Important Safety Instructions
Do not use the telephone to report a gas leak in the vicinity of the leak. Do not exceed the maximum output rating of the auxiliary power receptacle. Save These Instructions V180817w iBoot-G2+ / iBoot-G2S Page 2... -
Page 3: General Description
A simple Web browser interface makes it easy to control power from anywhere in the world with a click of a mouse. iBoot-G2+ also supports Telnet for text commands as well as Dataprobe’s Exchange Protocol (DxP) for interfacing to a variety of Dataprobe products and custom software development. - Page 4 GPIO information across the network. DxP protocol is available from Dataprobe’s website, allowing you to create programs to monitor and control any Dataprobe DxP enabled device, or exchange status and control between devices across the network. 2 Inputs and 2 Outputs as GPIO...
-
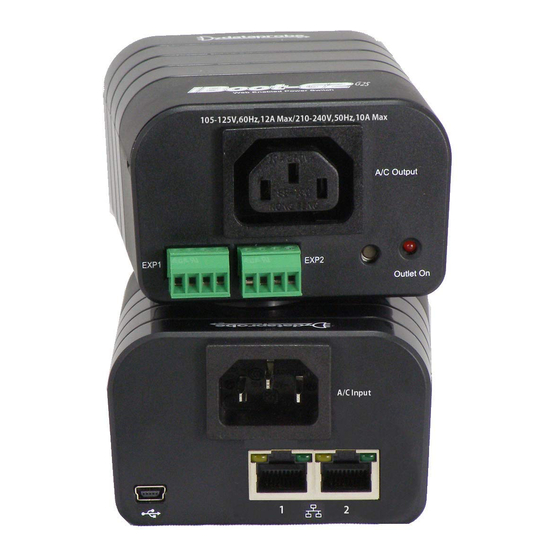
Page 5: Hardware Installation
10/100 Ethernet connections. The built in two port unmanaged switch allows uplink and downlink connections to be made through the iBoot-G2S to be inserted into an existing cable run without the need for a separate switch. iBoot-G2S Either port can be connected to the uplink (network) or downlink (device). - Page 6 Command Output Input Expansion units (iBoot-Exp) are shipped with a cable for easy connection to the iBoot-G2+ . Maximum cable length is 1000 ft (305 m) using 22 AWG wire. iBoot-G2+ to iBoot-EXP Connections V180817w iBoot-G2+ / iBoot-G2S Page 6...
- Page 7 Control Panel > System > Device Manager > Ports (COM & LPT) The com port assigned will be USB Serial Port (COMn) The USB port can now be used with a standard Terminal Client (like HyperTerminal) to communicate directly with the iBoot-G2+. Dataprobe also provides a simple terminal program (EZ Term) at http://dataprobe.com/support-iboot-g2-plus V180817w...
- Page 8 Step 1 3. The unit is 3. Ready for ready for wall DIN rail mounting. mounting. 4. Use M3 or #4 screws for attachment to suitable surface V180817w iBoot-G2+ / iBoot-G2S Page 8...
-
Page 9: Initial Configuration
The Device Management Utility (DMU), program available online at http://dataprobe.com/support-iboot-g2-plus, provides the easiest means to find and configure your iBoot-G2+ for use. It can discover all the iBoots on your network, display the current IP address of each, and allow setting of any valid IP address. - Page 10 IP Address Successfully Set 5.3. Other ways to set the IP Address 1. Web Browser via the Set-up Page – see Network Settings section 7.3 2. Command Line Interface see iBoot-G2+ CLI Syntax section 9.2 V180817w iBoot-G2+ / iBoot-G2S Page 10...
-
Page 11: Web Browser Operation
The iBoot-G2+ automatically detects the screen size and adjusts the pages to look appropriate for the mobile browser. Setup options are available, however some settings will require the phone to be in portrait mode to be programmed. V180817w iBoot-G2+ / iBoot-G2S Page 11... - Page 12 Main outlet. Expansion ports 1 and 2 are displayed below in an External I/O section with a status of Open or Closed for the Input and Output of each. A button toggles the status of the output for Exp1 and Exp2. V180817w iBoot-G2+ / iBoot-G2S Page 12...
- Page 13 The status to change the outlet to: 0 = Off ; 1 = On ; 2 = Query only, no outlet change <time> = The amount of time to cycle <user> = user or admin depending on password used V180817w iBoot-G2+ / iBoot-G2S Page 13...
- Page 14 <location id> <Main status>,<Exp1 status>,<Exp2 status> The full http response is <!DOCTYPE html PUBLIC "-//W3C//DTD XHTML 1.0 Transitional//EN" "http://www.w3.org/TR/xhtml1/DTD/xhtml1-transitional.dtd"> <html xmlns="http://www.w3.org/1999/xhtml"> <head> <meta http-equiv="Content-Type" content="text/html; charset=utf-8" /> <title>iBoot Status</title> </head> <body> <locationID>iBoot-G2-Plus</locationID> <status>ON,ON,ON</status> </body> </html> V180817w iBoot-G2+ / iBoot-G2S Page 14...
-
Page 15: Web Setup
Independent I/O: Inputs and outputs are used as status and control not associated with power outlets. Power Control: For use with external switches to provide manual power control. Features are dependent on which mode is selected V180817w iBoot-G2+ / iBoot-G2S Page 15... - Page 16 Dataprobe external relay module to allow relay control of those devices. The input status can also be used to contol Dataprobe devices that support DxP protocol.
- Page 17 By using both inputs, one set for On and the other for Off, you can use a three position switch to create a wired Remote On - Off switch. Allowing local control as well as the remote network control methods. Input Connections to Switches for Power Control V180817w iBoot-G2+ / iBoot-G2S Page 17...
- Page 18 Telnet Port: This setting is used to allow access to the iBoot-G2+ via telnet by ports other than standard 23. DxP Port: This setting is used to allow access to the iBoot-G2+ via Dataprobe Exchange Protocol (DxP) using ports other than standard 9100. see DxP Protocol section Enable DxP Control: This setting enables external devices to control the iBoot-G2+ via DxP protocol.
- Page 19 DST Start: These settings will signify the start time for Daylight Savings Time Default is 2 Sunday of March at 02:00 DST Stops: These settings will signify the stop time for Daylight Savings Time Default is 1 Sunday of November at 02:00 V180817w iBoot-G2+ / iBoot-G2S Page 19...
- Page 20 Addresses, which can be AND or OR linked so that both (AND) or either (OR) need to fail in order to take the selected action. AutoPing 2 and AutoPing 3 are independent single address functions. V180817w iBoot-G2+ / iBoot-G2S Page 20...
- Page 21 The number of (Cycle) Times times the iBoot-G2+ will cycle is set by the Times setting. To have the iBoot cycle power 3 times to get the system to respond again, set the Times to 3. V180817w iBoot-G2+ / iBoot-G2S Page 21...
- Page 22 Fail Counter: Enter the number of times (1-99) the heartbeat needs to fail before the selected action is taken. When the fail counter is reached, the heartbeat action will be triggered. V180817w iBoot-G2+ / iBoot-G2S Page 22...
- Page 23 Repeat: Set the repeat multiplier, if desired. Set the number from 0 to 999 and either Days, Hours, or Minutes. To have the schedule repeat every two days, set this number to 2. To run only once, set this to 0. V180817w iBoot-G2+ / iBoot-G2S Page 23...
- Page 24 Passwords can be up to 20 characters long and are case sensitive. Enter the current password then the new password twice to confirm. Default Credentials Role Username (fixed) Password (user set) Administrator admin admin User user user V180817w iBoot-G2+ / iBoot-G2S Page 24...
- Page 25 Command Line Interface (CLI) control will not process “set outlet off” If cloud control is enabled, the Off command will not be processed. Disabled When the feature is disabled, all the modes that can turn the power off will be available and functioning. V180817w iBoot-G2+ / iBoot-G2S Page 25...
- Page 26 This means access using http://iboot-g2p-fa80 should work, or a renamed myiboot would be accessible as http://myiboot . To make use of llmnr, you must choose a name with no space or special caracters. ( dashes are allowed ) V180817w iBoot-G2+ / iBoot-G2S Page 26...
-
Page 27: Iboot Cloud Service
Go to the Advanced Network Setup page Check Enable Cloud Services, and Save: Within 30 seconds, an 8 character activation code will appear. This code is also a hotlink to the Cloud Service. V180817w iBoot-G2+ / iBoot-G2S Page 27... - Page 28 Account: Display and edit account information and obtain account access history. Help: Links to the iBoot Cloud Forum and Dataprobe support pages. e. Control Power from the Cloud The status screen will detail all the iBoots registered with the cloud.
-
Page 29: Command Line Interface
Windows 10 does not include a pre-installed telnet or serial client. You must enable them within Windows, or use available alternate programs. Dataprobe has developed a free telnet and serial utility called EZ Terminal. Download is available here: dataprobe.com/support/shared/ezterm.exe 9.1. - Page 30 This command sets the initial state of the individual Last name > initial state <on | off | last> outlets when the iBoot-G2+ is powered up or rebooted. get initial state Displays initial state for all outlets V180817w iBoot-G2+ / iBoot-G2S Page 30...
- Page 31 <main | exp1 | exp2> This command sets the shutdown delay in seconds shutdowndelay <0-999> set gsd <main | exp1 | exp2> rebootdelay This command sets the reboot delay in seconds <0-999> V180817w iBoot-G2+ / iBoot-G2S Page 31...
- Page 32 Independent I/O. set expansion <exp1|exp2> password This command sets the DxP command password. This <20 characters> command takes effect only when expansion mode is Independent I/O. V180817w iBoot-G2+ / iBoot-G2S Page 32...
- Page 33 CLI will protect against all 3 from being set to 0. set dxp control <enable/disable> This command allows the main and expansion ports to Disabled be controlled using Dataprobe Exchange Protocol (DxP) commands. set dxp query <enabled/disable> This command allows the status of the main and...
- Page 34 <1 | 2 | 3> restart <1-999> After an autoping has been triggered, this command sets the time, in seconds before the autoping will resume. (added delay after cycle complete) V180817w iBoot-G2+ / iBoot-G2S Page 34...
- Page 35 Auto Login will not requie any username or password for user functions. set password <user | admin> <old> <new> This command is used to set the password of either user <repeat> the user or administrator. admin V180817w iBoot-G2+ / iBoot-G2S Page 35...
- Page 36 This command is used to set the scheduled action. set event <1-14> outlet <main | exp1 | This command select which outlet will be triggered exp2> del event <1-14> This command deletes the scheduled action. V180817w iBoot-G2+ / iBoot-G2S Page 36...
- Page 37 Reboot Required > This is the prompt that will be displayed whenever there have been changes made that require a reboot. This prompt will remain the active prompt until the iBoot-G2+ has been rebooted. V180817w iBoot-G2+ / iBoot-G2S Page 37...
-
Page 38: Dxp Protocol
DxP Protocol iBoot-G2+ supports the Dataprobe Exchange Protocol (DxP) for inter device communications and to allow software developers to integrate Dataprobe product into custom applications. Using the DxP protocol, the developer can: Turn on and off power to the Main and Expansion Outlets or External Outputs ... -
Page 39: Troubleshooting
Hold in while and Recovery Mode. Allows upload of new Power up the firmware to the current IP Address. Will iBoot recover to the Factory default IP Address 192.168.1.254 if the database has been corrupted. V180817w iBoot-G2+ / iBoot-G2S Page 39... -
Page 40: Specifications
Dual 10/100 Unshielded Twisted Pair Ethernet Jacks. IP Addressed, DHCP assigned or Static Internal HTTP Web Server Telnet Server USB: Com port 9600bps. 8 data bits. No parity. 1 Stop bit. No Flow Control. V180817w iBoot-G2+ / iBoot-G2S Page 40... -
Page 41: Technical Support And Warranty
90 days, whichever is greater. If Purchased from Dataprobe Inc.; Service under this Warranty is obtained by shipping the product (with all charges prepaid) to the address below. Seller will pay return shipping charges within the United States. Call Dataprobe Technical Service to receive a Return Materials Authorization (RMA) Number prior to sending any equipment back for repair.
Need help?
Do you have a question about the iBoot-G2S and is the answer not in the manual?
Questions and answers