Table of Contents
Advertisement
Table of Contents
1.1
1.2
1.2.1
1.2.2
1.2.3
1.2.4
1.2.5
1.2.6
1.2.7
1.2.8
1.2.9
1.2.10
1.2.11
1.2.12
1.2.13
1.2.14
1.2.15
1.2.16
1.2.17
1.2.18
1.2.19
1.2.20
1.3
1.3.1
1.3.2
1.3.2.1
1.3.3
1.3.3.1
1.3.3.1.1
1.3.3.2
1.3.4
1.3.4.1
1.3.4.2
1.3.5
1.3.5.1
1.3.5.2
1.3.5.3
1.3.6
1.3.7
1
Advertisement
Table of Contents

Related Manuals for Banana Pi BPI-M1


Summary of Contents for Banana Pi BPI-M1
-
Page 1: Table Of Contents
Table of Contents BPI-M1 BPI-M1 hardware BPI-M1 hardware interface 1.2.1 BPI-M1 hardware spec 1.2.2 BPI-M1 GPIO Pin define 1.2.3 BPI-M1 SD card slot 1.2.4 BPI-M1 GigE LAN 1.2.5 BPI-M1 HDMI interface 1.2.6 BPI-M1 IR interface 1.2.7 BPI-M1 CAN Bus 1.2.8 BPI-M1 Camera interface 1.2.9 BPI-M1 RGB DSI interface 1.2.10 BPI-M1 SATA interface 1.2.11 BPI-M1 MIC 1.2.12 BPI-M1 Audio 1.2.13 BPI-M1 3.7V lithium battery interface 1.2.14 BPI-M1 OTG interface 1.2.15 BPI-M1 UART interface 1.2.16 BPI-M1 DC Power interface 1.2.17 BPI-M1 schematic diagram 1.2.18 BPI-M1 DXF and 3D design 1.2.19... - Page 2 OpenSuse 1.3.8 Bananian Linux 1.3.9 OpenMediaVault 1.3.10 Armbian Linux 1.3.11 Gentoo Linux 1.3.12 RaspBSD on BPI-M1 1.3.13 CentOS 7 Linux for BPI 1.3.14 lakka.tv 1.3.15 DietPi 1.3.16 FreeBSD/NetBSD 1.3.17 Reference documents BPI-M1 linux-sunxi wiki 1.4.1 NetBSD\/evbarm on Allwinner Technology SoCs 1.4.2 Arch linux wiki for BPI-M1 1.4.3 Nas for BPI 1.4.4 Building the cluster on BPI 1.4.5 How to booting from SSD using Lubuntu \/ Raspbian 1.4.6 banana pi books 1.4.7 Linux mainlining effort 1.4.8 Allwinner chip documents 1.4.9 All Banana Pi SBC Comparison All banana pi product BPI 4.0 customized Server...
-
Page 3: Bpi-M1
BPI-M1 banana pi BPI-M1 BPI-M1 is an Open Source hardware platform. Banana PI BPI-M1 a dual core, which is much better than the Raspberry Pi. The Banana Pi BPI-M1 hardware runs Android, Debian Linux, Ubuntu Linux, OpenSuse linux and images that run on the Raspberry Pi B and Cubieboard. Banana PI BPI-M1 has a Gigabit Ethernet port and a SATA Socket. It can run with Android 4.2.2 smoothly. The size of Banana PI M1 is about the same size as a credit card, It can easily run games as it supports 1080P high definition video output. The GPIO is compatible with Raspberry Pi and can run Raspberry Pi images directly. forum: http://www.banana-pi.org forum: http://www.bananapi.com product: http://www.banana-pi.com easy to buy a sample :... -
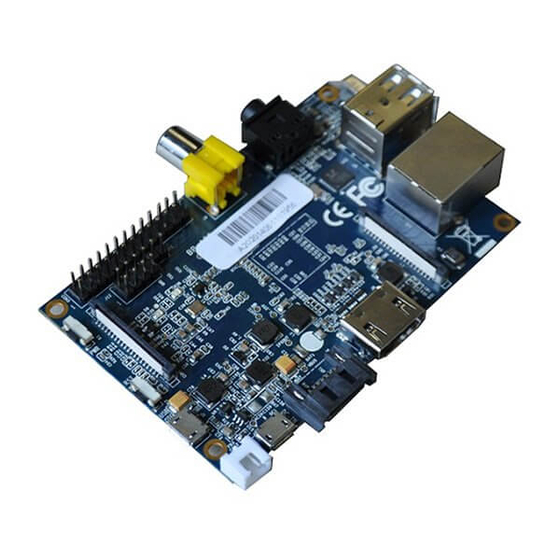
Page 4: Bpi-M1 Hardware
BPI-M1 hardware BPI-M1 Hardware BIP-M1 with 26 PIN BPI-M1+ with 40 pin and support WIFI onboard... - Page 5 BPI-M1 hardware...
-
Page 6: Bpi-M1 Hardware Interface
BPI-M1 hardware interface BPI-M1 hardware interface Hardware interface:... - Page 7 BPI-M1 hardware interface...
- Page 8 BPI-M1 hardware interface hardware interface:...
-
Page 9: Bpi-M1 Hardware Spec
BPI-M1 hardware spec Hardware specification A20 ARM Cortex™-A7 Dual-Core ARM Mali400MP2Complies with OpenGL ES 2.0/1.1 Memory (SDRAM) 1GB DDR3 (shared with GPU) Onboard Storage SD (Max. 64GB) / MMC card slot UP to 2T on 2.5 SATA disk Onboard Network 10/100/1000 Ethernet RJ45,optional WIFI Video Input A CSI input connector allows for the connection of a designed camera module Video Outputs HDMI, CVBS , LVDS/RGB Audio Output 3.5 mm Jack and HDMI Power Source 5 volt via MicroUSB(DC In Only) and/or MicroUSB (OTG) USB 2.0 Ports 2 (direct from Allwinner A20 chip) Reset button: Next to MicroUSB connector,Power button: Next to Reset button,Boot button Buttons (Optional): Behind HDMI connector GPIO(2X13) pin GPIO,UART,I2C bus,SPI bus with two chip selects,CAN bus,ADC,PWM,+3.3v,+5v,ground. Power Key & RJ45 Remote IR (Optional) Android 4.2, Linux etc. OS Product size 92 mm × 60mm Weight working -15~75℃ temperature range... -
Page 10: Bpi-M1 Gpio Pin Define
BPI-M1 GPIO Pin define banana pi BPI-M1 26 PIN GPIO define Banana Pi BPI-M1 has a 26-pin GPIO header that matches that of the Model A and Model B Raspberry Pi. Following is the Banana Pi GPIO Pinout: Note: 5V1,5V2 only support output,not support input CSI Camera Connector specification:... - Page 11 BPI-M1 GPIO Pin define CSI Camera Connector The CSI Camera Connector is a 40-pin FPC connector which can connect external camera module with proper signal pin mappings. The pin definitions of the CSI interface are shown as below. This is marked on the Banana Pi board as “CON1″. CSI Pin Pin Name GPIO CON1 P01 LINEINL CON1 P02 LINEINR CON1 P03 VCC-CSI CON1 P04 ADC_X1 CON1 P05 CON1 P06 ADC_X2 CON1 P07 FMINL CON1 P08 ADC_Y1 CON1 P09 FMINR CON1 P10 ADC_Y2 CON1 P11 CON1 P12 CSI-FLASH PH17 CON1 P13 LRADC0 CON1 P14 TWI1-SDA PB19 CON1 P15 LRADC1 CON1 P16 TWI1-SCK PB18...
- Page 12 BPI-M1 GPIO Pin define CON1 P35 CSI-IO0 PH11 CON1 P36 CON1 P37 CON1 P38 IPSOUT CON1 P39 CON1 P40 IPSOUT LVDS specification LVDS (LCD display interface) The LVDS Connector is a 40-pin FPC connector which can connect external LCD panel (LVDS) and touch screen (I2C) module as well. The pin definitions of this connector are shown as below. This is marked on the Banana Pi board as “CON2″. LVDS Pin Pin Name Multiplex Function Select GPIO Multi 1 Multi 2 CON2 P01 IPSOUT(5V output) CON2 P02 TWI3-SDA CON2 P03 IPSOUT(5V output) CON2 P04 TWI3-SCK CON2 P05 CON2 P06 LCD0-IO0 CON2 P07 LCDIO-03 PH12 CON2 P08 LCD0-IO1 CON2 P09 LCD0-D0...
- Page 13 BPI-M1 GPIO Pin define CON2 P26 LCD0-D23 PD23 CON2 P27 LCD0-D9 LVDS0-VN3 CON2 P28 LCD0-D22 PD22 CON2 P29 LCD0-D10 PD10 CON2 P30 LCD0-D21 PD21 CON2 P31 LCD0-D11 PD11 CON2 P32 LCD0-D20 PD20 CON2 P33 LCD0-D12 PD12 CON2 P34 LCD0-D19 PD19 CON2 P35 LCD0-D13 PD13 CON2 P36 LCD0-D18 PD18 CON2 P37 LCD0-D14 PD14 CON2 P38 LCD0-D17 PD17...
- Page 14 BPI-M1 GPIO Pin define...
-
Page 15: Bpi-M1 Sd Card Slot
BPI-M1 SD card slot BPI-M1 SD card slot BPI-M1+ have support a SD card slot. you can burn image to SD card ,and use it boot BPI-M1 same as raspberry pi. -
Page 16: Bpi-M1 Gige Lan
BPI-M1 GigE LAN BPI-M1 GigE RJ45 LAN BPI-M1 have one GigE LAN port. use RTL8211E chip on board... -
Page 17: Bpi-M1 Hdmi Interface
BPI-M1 HDMI interface BPI-M1 HDMI interface BPI-M1 has a standard HDMI 1.4 interface. so We can use HDMI-to-HDMI cable to connect BPI-M1 to the display monitor that has HDMI interface. But If the display monitor doesn't have HDMI interface,only VGA or DVI port. We should use HDMI-to-VGA or HDMI-to-DVI cable to connect the BPI-M1 to the display monitor. Note: if the HDMI-to-VGA/DVI cable is a bad quality cable,it will go wrong on the monitor display. please choose a good quality cable for BPI-M1... -
Page 18: Bpi-M1 Ir Interface
BPI-M1 IR interface BPI-M1 IR interface BPI-M1 support IR interface on board. you can use it as remote control. How to use IR interface test on bananian image: 1,install lirc apt-get install lirc apt-get install evtest 2,edit /etc/lirc/hardware.conf as below: nano /etc/lirc/hardware.conf # /etc/lirc/hardware.conf # Arguments which will be used when launching lircd LIRCD_ARGS="--uinput" #Don't start lircmd even if there seems to be a good config file #START_LIRCMD=false #Don't start irexec, even if a good config file seems to exist. #START_IREXEC=false #Try to load appropriate kernel modules LOAD_MODULES=true # Run "lircd --driver=help" for a list of supported drivers. DRIVER="UNCONFIGURED" # usually /dev/lirc0 is the correct setting for systems using udev DEVICE="/dev/input/event0" MODULES="sunxi-ir" ctrl+O save and ctrl+x exit. 3,test lirc service lirc start 4 test remote-control unit evtest choose "0" must xunxi-ir... - Page 19 BPI-M1 IR interface please note:value 0 value 1 press is:1,unpress is:0...
-
Page 20: Bpi-M1 Can Bus
BPI-M1 CAN Bus BPI-M1 CAN Bus In order to port can4linux to the BananaPi, the CAN module description is needed from the A20 hardware manual. can4linux is a character-driver-based Linux driver used already on desktop PCs and embedded platforms like Freescale FlexCAN (the i.MX series of micro controllers) or Xiliny Zynq. There is a more detailed document about CAN on the A20 at https://dl.linux-sunxi.org/A20/CAN%20Bus1.pdf This is a tutorial for using CAN BUS on bananapi with bananian 15-01 Thank selqcir share this example: Download and install "bananian-1501.img" into 8 GB SDCard. Expand the root file system using "bananian-config" Install missing package: apt-get install git apt-get update apt-get upgrade reboot Get last bananian available, and continu to install missing package: git clone https://github.com/Bananian/linux-bananapi apt-get install build-essential u-boot-tools uboot-mkimage apt-get install libusb-1.0-0 libusb-1.0-0-dev git wget fakeroot kernel-package zlib1g-dev libncurses5-dev apt-get install subversion Build kernel: cd linux-bananapi make menuconfig Exit without saving when menu appears zcat /proc/config.gz > /root/linux-bananapi/.config make uImage modules make INSTALL_MOD_PATH=output modules_install At this step, kernel should be compiled and "Module.symvers" should be available Then rename modules and firmware provide by Bananian, and replace by the new one. mv /lib/modules /lib/modules.old mv /lib/firmware /lib/firmware.old mv /root/linux-bananapi/output/lib/modules /lib/modules mv /root/linux-bananapi/output/lib/firmware /lib/firmware Same for uImage: mount /dev/mmcblk0p1 /mnt cd /mnt mv uImage uImage.old mv /root/linux-bananapi/arch/arm/boot/uImage /mnt reboot Create link for further build:... - Page 21 BPI-M1 CAN Bus cd /lib/modules/3.4.104/ ln -s /root/linux-bananapi build cd ~ Get Can4Linux and build it: svn checkout https://svn.code.sf.net/p/can4linux/code/trunk can4linux-code cd /root/can4linux-code/can4linux/ make TARGET=BANANAPI Install module for each startup of the board: insmod can4linux.ko cp can4linux.ko /lib/modules/3.4.104/kernel/net/can/ depmod -A -v modprobe -v can4linux echo "" >> /etc/modules ; echo "can4linux" >> /etc/modules reboot Build CAN example apt-get install swig apt-get install python-dev cd can4linux-code/can4linux-examples/ Update CAN speed and device in file "pyCan-example.py" # setting the device number device = 0 defaultBaudrate = '250' Connect CAN transceiver and CAN bus, and check with for example: python pyCan-example.py That's all With this method, kernel version is "Linux bananapi 3.4.104" instead of "Linux bananapi 3.4.104+", because i was unable to find same sources than Bananian 15-01 , but CAN bus work ! Feel free to comment or update.
-
Page 22: Bpi-M1 Camera Interface
BPI-M1 Camera interface BPI-M1 Camera interface BPI-M1 CSI Camera Connector is a 40-pin FPC connector which can connect external camera module with proper signal pin mappings. The pin definitions of the CSI interface are shown as below. This is marked on the Banana Pi board as “CSI”. CSI pin define: please see: BPI-M1 GPIO pine define BPI-M1 CSI camera accessories https://bananapi.gitbooks.io/bpi-accessories/content/bpim1m1+m2camera.html... -
Page 23: Bpi-M1 Rgb Dsi Interface
BPI-M1 RGB DSI interface BPI-M1 RGB DSI interface RGB DSI (Display Serial Interface): The display Connector is a 40-pin FPC connector which can connect external LCD panel (RGB DSI) and touch screen (I2C) module as well. The pin definitions of this connector are shown as below. This is marked on the Banana Pi board as “DSI”. DSI pin define: please see: BPI-M1 GPIO pine define BPI-M1 LCD touch panel accessories https://bananapi.gitbooks.io/bpi-accessories/content/bpi70lcdtouchpanel.html note:the touch panel accessories support RGB interface and MIPI interface ,when you use BPI-M1, please choose RGB interface. -
Page 24: Bpi-M1 Sata Interface
BPI-M1 SATA interface BPI-M1 SATA interface BPI-M1 support sata interface and onboard power port. you can use sata line connect your hardisk on BPI-M1. Note: if you use 3.5 big hardisk ,you may need power with outside power. on board power can not support enough current... -
Page 25: Bpi-M1 Mic
BPI-M1 MIC BPI-M1 MIC thank chaos.dennis do this test: i write about this, because i found very few sources and had to tumble a lot around to get it working. This is a quick walk through to give you a hint where to start. I asume for simplicity that you stay always in /root directory as root user. If something fails, look if the files are written and paths are right. It is adressed for more advanced users who know what they are basically doing. This is done with bananian 15.08 on Kernel 3.4. Other kernels < 4.4 do not work. It is a headless server with no HDMI pluged in. A. Basic Setup Install alsa (renove pulseaudio if present): # apt-get install alsa-base alsa-utils Configure asound.conf # nano /etc/asound.conf Should look like: pcm.!default { type hw card 0 # for headphone, turn 1 to 0 device 0 ctl.!default { type hw card 0 # for headphone, turn 1 to 0 Shutdown, make a cold boot Call the alsamixer # alsamixer Press F5. Your channels should be setup like the attached file at the bottom of this post, or compare it to amixer output: # amixer Simple mixer control 'Master',0 Capabilities: pvolume pvolume-joined Playback channels: Mono Limits: Playback 0 - 63 Mono: Playback 45 [71%] Simple mixer control 'Master Capture Mute',0 Capabilities: pswitch pswitch-joined Playback channels: Mono Mono: Playback [off] Simple mixer control 'LineL',0 Capabilities: pswitch pswitch-joined Playback channels: Mono... - Page 26 BPI-M1 MIC Mono: 7 [100%] Simple mixer control 'Mic Input Mux',0 Capabilities: volume volume-joined Playback channels: Mono Capture channels: Mono Limits: 0 - 15 Mono: 15 [100%] Simple mixer control 'Mic Power',0 Capabilities: pswitch pswitch-joined Playback channels: Mono Mono: Playback [on] Simple mixer control 'Mic1 Boost',0 Capabilities: pswitch pswitch-joined Playback channels: Mono Mono: Playback [on] Simple mixer control 'Mic1 gain',0 Capabilities: volume volume-joined Playback channels: Mono Capture channels: Mono Limits: 0 - 3 Mono: 3 [100%] Simple mixer control 'Mic2 Boost',0 Capabilities: pswitch pswitch-joined Playback channels: Mono Mono: Playback [on] Simple mixer control 'Mic2 gain',0 Capabilities: volume volume-joined Playback channels: Mono Capture channels: Mono Limits: 0 - 7 Mono: 0 [0%] Simple mixer control 'MicL',0 Capabilities: volume volume-joined Playback channels: Mono Capture channels: Mono Limits: 0 - 3 Mono: 1 [33%] Simple mixer control 'MicR',0 Capabilities: volume volume-joined...
- Page 27 BPI-M1 MIC Simple mixer control 'LINEIN APM',0 Capabilities: volume volume-joined Playback channels: Mono Capture channels: Mono Limits: 0 - 7 Mono: 7 [100%] Simple mixer control 'Ldac Left Mixer',0 Capabilities: pswitch pswitch-joined Playback channels: Mono Mono: Playback [on] Simple mixer control 'Ldac Right Mixer',0 Capabilities: pswitch pswitch-joined Playback channels: Mono Mono: Playback [on] Simple mixer control 'Left Capture Mute',0 Capabilities: pswitch pswitch-joined Playback channels: Mono Mono: Playback [on] Simple mixer control 'MIC output volume',0 Capabilities: volume volume-joined Playback channels: Mono Capture channels: Mono Limits: 0 - 7 Mono: 7 [100%] Simple mixer control 'Rdac Right Mixer',0 Capabilities: pswitch pswitch-joined Playback channels: Mono Mono: Playback [on] Simple mixer control 'Right Capture Mute',0 Capabilities: pswitch pswitch-joined Playback channels: Mono Mono: Playback [on] This step is critical. One false muted channel and you are out of the game. Test recording. # arecord -L Should show a device. # arecord -f S16_LE -r 44100 -t wav test.wav Should make kind of Sound. Stop it with ctr-c and check the file. B. SoX Recording / Streaming Install SoX Sox gives you tools like: sox, rec and play. I would suggest you install it on the...
- Page 28 BPI-M1 MIC Client: # netcat <banana ip> 9000 | vlc Works? Great! Live listening is important to play around and test the mic. Listen and record at same time # rec -c 2 -C 64 -t mp3 - | tee test.mp3 | netcat -l -p 9000 Poor man's streaming server # apt-get install openbsd-inetd tcpd Edit config file: # nano /etc/inetd.conf Insert this at the end: 9000 stream tcp nowait nobody /usr/bin/tail tail -f /test.mp3 Restart service # service openbsd-inetd restart Start recording on banana: # rec -c 2 -C 64 /test.mp3 Connect via client: # netcat <banana ip> 9000 | vlc - C. Advanced Recording Devide recording and postprocessing in two parts # rec -t raw - remix - | sox -t raw -r 48000 -c 1 -b 16 -e signed-integer - -t mp3 -c 1 -C 32 test.mp3 Recording: -t raw - forward raw input to pipe remix - Mix the two channels to one Encoding: -t raw -r 48000 -c 1 -b 16 -e signed-integer - tell sox what kind of strean comes from stdin -t mp3 -c 1 -C 32 test.mp3 and what goes out Note that it is switched to mono from here with -c 1 and the mp3 bitrate is cut in half. Live listening to the strean does not work anymore, i asume it is because of the non regulare output from pipeing and processing in a second step. Reduce noise The mic input is pretty bad, lot of white noise. Sox can deal with it. Make a sample "silent" file:...
- Page 29 BPI-M1 MIC # rec -t raw test.raw remix - trim 0 10 trim 0 10 record 10 seconds Test it at client pc: # play -r 48000 -c 1 -b 16 -e signed-integer test.raw Create profile file: # sox -r 48000 -c 1 -b 16 -e signed-integer test.raw -n trim 0 2 noiseprof raw-profile Record with noise canceld # rec -t raw - remix - noisered raw-profile 0.2 | sox -t raw -r 48000 -c 1 -b 16 -e signed-integer - -t mp3 -c 1 -C 32 test.mp3 Play with the factor of 0.2 to regulate the intensity of cancellation. D. Record 24/7 My goal of this..Create a script: # nano /root/record.sh Insert the following: #!/bin/bash # send sigterm and wait for exit of the process function stop() { kill $@; while kill -0 $@; do sleep 1; done; } function log() { echo $(date +%T) $@; } log "Stopping previus recording" stop `pidof rec` &> /dev/null DATE=`date "+%Y.%m.%d"` log "Recording $DATE.mp3" rec -q -t raw - remix - noisered /root/raw-profile 0.2 | \ sox -v 2.0 -t raw -r 48000 -c 1 -b 16 -e signed-integer - \ -t mp3 -r 22050 -c 1 -C -9.2 /root/$DATE.mp3 log "Done $DATE.mp3" Recording: -q less output Encoding: -v 2.0 Make the input stream louder -r 22050 encode to a lower sample rate -C -9.2 Create a low quality VBR mp3 Fileszie ~100mb per day. If you want smaller files, a 8000 sanple rate gives you a gsm grade quality. A very good article to sample rate: http://wiki.audacityteam.org/wiki/Sample_Rates Make it executable...
- Page 30 BPI-M1 MIC # chmod +x record.sh Edit crontab: # env EDITOR=nano crontab -e Insert at the end the following: PATH=/usr/local/bin:/usr/local/sbin:/sbin:/usr/sbin:/bin:/usr/bin 0 0 * * * /root/record.sh >> /root/record-mic.log A new recording should start every day at midnight.
-
Page 31: Bpi-M1 Audio
BPI-M1 Audio BPI-M1 Audio Banana pi BPI-M1 support two audio device HDMI and headphone How to choose HDMI or headphone for audio output sudo nano /etc/asound.conf pcm.!default { type hw card 0 //If you want to set HDMI as output ,turn 0 to 1. device 0 ctl.!default { type hw card 0 //If you want to set HDMI as output ,turn 0 to 1. Plug in the headphone and type speaker-test -twav -c2 The sound "sound left,sound right,sound left" will output from headphone. sudo apt-get install espeak espeak "hello" //say: hello espeak "hello_bananapi" //say: hello banana pi Run the sound volume controler,you can see sudo alsamixer... -
Page 32: Bpi-M1 3.7V Lithium Battery Interface
BPI-M1 3.7V lithium battery interface BPI-M 3.7V lithium battery interface 1,Battery interface of BPI-M1: use way same as BPI-M3. https://bananapi.gitbooks.io/bpi-m3/content/bpim3lithiumbatteryinterface.html... -
Page 33: Bpi-M1 Otg Interface
BPI-M1 OTG interface BPI-M1 OTG interface banana pi BPI-M1 have 1 OTG port on board. Note: you also can use OTG port power BPI-M1... -
Page 34: Bpi-M1 Uart Interface
BPI-M1 UART interface BPI-M1 UART interface BPI-M1 have 4 UART port on board. How to use serial port with minicom. 1 use ssh connect to BPI-M1 and install minicom sudo apt-get install minicom 2 choose serial port minicom -s Uart port for BPI-M1... - Page 35 BPI-M1 UART interface now , we test UART2 ,setting as below: save:...
- Page 36 BPI-M1 UART interface exit, minicom runing: check Uart number: dmesg | grep ttyS* so you can see UART0 is ttyS1 3 you can use windows hyperterminal or putty on you PC,and setting the right Uart number.
- Page 37 BPI-M1 UART interface 4,test function: BPI-M1 send "hello, pc" BPI-M1 receive " hello Ok"...
- Page 38 BPI-M1 UART interface 5 you can use the same way to test UART3(ttyS2)、UART7(ttyS3).so all is working fine.
- Page 39 BPI-M1 UART interface...
-
Page 40: Bpi-M1 Dc Power Interface
BPI-M1 DC Power interface BPI-M1 DC Power interface BPI-M1 DC power is micro USB interface. you need use 5V/2A micro USB power adapter. -
Page 41: Bpi-M1 Schematic Diagram
BPI-M1 schematic diagram BPI-M1 schematic diagram You can refer to the contents of our forum from this link: Google driver File name:BPI-M1 schematic.pdf... -
Page 42: Bpi-M1 Dxf And 3D Design
BPI-M1 DXF and 3D design BPI-M1 DXF and 3D design banana pi BPI-M1 have public DXF file and 3D design file ,so user can DIY case by theyself. BPI-M1 DXF file download link: Google driver BPI-M1 3D design file download link: Google driver... -
Page 43: Bpi-M1 Ce Fcc Rohs Certification
BPI-M1 CE FCC RoHS Certification BPI-M1 CE FCC RoHS Certification All the products Banana pi release go through strictly controlled process from developing,testing,manufacturing to certification. We put quality first, users can mass produce their products using our boards directly, we've been dedicating to providing the most cost performance products. BPI-M1 CE Certification BPI-M1 FCC Certification... - Page 44 BPI-M1 CE FCC RoHS Certification BPI-M2 RoHS Certification...
- Page 45 BPI-M1 CE FCC RoHS Certification...
-
Page 46: Bpi-M1 Software
BPI-M1 software BPI-M1团队设计的优秀的... -
Page 47: Bpi-M1 Quick Start
BPI-M1 quick start BPI-M1 quick start Step 1: Get what you need First time to enjoy your Banana Pi, you need at least the accessories in the table below. Item Minimum recommended specification & notes SD card is optional. If need to boot form SD card, Minimum size 8GB, class 10 (the class MicroSD card indicates how fast the card is). We recommend using branded SD cards as they are more reliable. avHDMI(Full HDMI to HDMI lead (for HD TVs and monitors with HDMI input).OR HDMI to DVI lead sized) to HDMI (for monitors with DVI input). / DVI lead Any standard USB keyboard and mouse should work. keyboards or mice that take a lot Keyboard and of power from the USB ports, however, may need a powered USB hub. This may include mouse some wireless devices. Networking is optional, although it makes updating and getting new software for your Ethernet cable Banana Pi much easier. Micro USB A good quality, USB Power supply that can provide at least 5V/2A is essential.OTG also power adapter can power the board, but it is not recommended. Audio lead You can choose a 3.5mm jack audio led to connect to audio port to get stereo audio. (Optional) Mobile Hard You can choose to connect a mobile hard disk to USB port to store more files. disk (Optional) Base you need below:... - Page 48 BPI-M1 quick start Step 2: Download the relevant Image file: Please visit our webmaster: www.banana-pi.org to download image, banana pi all image can be download form this web. Step3: Prepare your SD card for the Banana Pi In order to enjoy your Banana Pi BPI-M3, you will need to install an Operating System (OS) onto an SD card. Instructions below will teach you how to write an OS image to your SD card under Windows os and Linux os. 1.Insert your SD card into your computer. The size of SD should be larger than the OS image size, generally 8GB or greater. 2.Format the SD card. Format your SD under Windows os : Download the a SD card format tool such as SD Formatter from https://www.sdcard.org/downloads/formatter_4/eula_windows/ *Unzip the download file and run the setup.exe to install the tool on your machine. *In the "Options" menu, set "FORMAT TYPE" option to QUICK, "FORMAT SIZE ADJUSTMENT" option to "ON".
- Page 49 BPI-M1 quick start *Check that the SD card you inserted matches the one selected by the Tool. *Click the “Format” button. Format your SD under Linux os : *Run fdisk –l command to check the SD card node. *Run sudo fdisk /dev/sdx command to delete all partition of SD card. *Run mkfs –t vfat /dev/sdx command to format the entire SD card as FAT. (x should be replaced according to your SD card node) 3,Download the OS image from Download district(http://www.banana-pi.org) 4.Unzip the download file to get the OS image. Windows: Right click on the file and choose “Extract all”. Linux: Run unzip [downloaded filename] command. 5.Write the image file to the SD card. Android image 5.1 You need to use Phoenix Card to make the SD card. Download the Phoenix Card from https://drive.google.com/open? id=0BzoTh3Vdt47ffi1ld0RuWXhUVzdYdjFjaHEtMlNQWVFTRmIxcC1OQnczSTV6OGRZWGplNU0 5.2 Run PhoenixCard.exe, Press “Disk Check” and select disk of SD Card.
- Page 50 BPI-M1 quick start 5.3 Press “Image File” and Select system.img. 5.4 Press “Burn” to start upgrading, Upgraded complete, Press “Exit”.
- Page 51 BPI-M1 quick start Linux image: 5.6 burun Linux image under Windows os: *Download a tool that can wirte image to SD card, such as Win32 Diskimager from: http://sourceforge.net/projects/win32diskimager/files/Archive/ *Open the unzipped image file *Click Write button. Wait patiently to successfully complete writing. 5.7 burun Linux image under Linux os: *Run fdisk –l command to check the SD card node. *Run dd if=[imagename] of=/dev/sdx command to write image file to SD card. Wait patiently to successfully complete writing. Step4: Set up your Banana Pi M1 According to the set up diagram below, you can easily set up your Banana Pi. 1. Insert the written-image SD card that to the SD card spot on the left side edge of the underside of the board.
- Page 52 BPI-M1 quick start 2. 2.On the bottom "edge" in the middle of the board is the HDMI Type A (Full sized) port.Just connect any HDMI cable from the board to your TV or HDMI Monitor. 3. Plug a USB keyboard and mouse into the USB slots located on the right edge. 4. Just under the USB ports on the right edge is the Ethernet connector for anyone who wants to plug the Banana Pi into a wired network. 5. 5.Finally, at the very left of the bottom edge is the USB power connector. Plug in a regulated power supply that is rated at 5V ±5% / 2000mA (or 2A). Any number bigger than 700 mA will also work. Avoid using the smaller chargers used for small GSM phones, as these are often unregulated, even if they claim "5V 1A", they may do "5V" and may do "1A", but not at the same time! If all goes well, the Banana Pi will boot in a few minutes. The screen will display the OS GUI. Step5: Shut down your Banana Pi BPI-M1 You can use the GUI to shut down the Banana Pi safely. Also you can run the command in the terminal: sudo halt sudo shutdown –h This will shut down the PI safely, (just use the power key to turn off might damage the SD-cards file system).After that you can press the power key for 5 seconds to turn it off. If all is well ,so you can use banana pi BPI-M1 now.
-
Page 53: Android Software
Android software Android software Banana pi BPI-M1 support android 4.2 and android 4.4. Image download link: http://www.banana-pi.org/download.html... -
Page 54: Android Mattrix Xbmc/Kodi Image - V3.1
Android Mattrix XBMC\/KODI Image - V3.1 Android Mattrix XBMC/KODI Image - V3.1 share by mattrix It's been a long time coming, but I finally got around to creating a new XBMC Image Here are the main features: Latest KODI 14.0 Auto-setup of KODI, MX Player & SMB Wrapper Autostart KODI on boot SMB Wrapper to allow playback of Network files 720p & 1080p Versions Available HIDRaw and Joystick Drivers + XPAD module loaded on boot Both images playback videos fine, but the 720p image is quite a bit faster in the GUI. The latest KODI is now capable of playing back most videos I tried natively. However, it is still using quite a bit of CPU and may not playback everything. I therefore decided to use MX Player for playback for a more consistent user experience. V3.1 720p (297 MB) https://mega.nz/#!uIxBFbYY!NAlXzkLFpvEkgevM3VyHfYK6ZKfVW7MJPcAtPtqEhOc 1080p (297 MB) https://mega.nz/#!WIhUSJZA!RfpRGGHn6L0HQF2gdDlYqQtOs-DwVNLBVVrQxltqJGw INSTRUCTIONS: Unzip image & burn with PhoenixCard Boot, and then wait..(about 1-2 mins) KODI will automatically start (signalling the end of the installation process) That's it. If using 1080p version, exit KODI and set 1080P in Android Display settings KODI is setup to use SMB Wrapper / MX Player for network files and to use MX Player for any local files. You can easily edit or remove the playercorefactory.xml file in sdcard/Android/data/org.xbmc.kodi/files/.kodi/userdata folder. To disable KODI autostart, remove sdcard/Android/data/mattrix/autostartkodi Here are the changes: Changes 02/01/2015 (3.1): Updated to Kodi 14.0 Replace XBMC Wrapper with SMB Wrapper Changes 13/11/2014 (3.0): Update XBMC to latest Kodi Remove "allow unverified apps" popup on boot Add HDIRaw and Joystick drivers Load xpad module on boot Fix "Mobile Networks" settings option doesn't work Changes 11/11/2014 (2.0): Latest 3.4.39 Kernel Automated setup on first boot (no copying / pasting needed - just ready to roll) Autoboot into XBMC Added XBMC Wrapper App to wrap network files as HTTP streams... - Page 55 Android Mattrix XBMC\/KODI Image - V3.1 Removed SuperSu App (this can be added via Playstore if required) Set CPU frequency settings on boot Changes (Initial Release - 1.0): Rooted SD Card Storage Mount Fix Set to stock Android Launcher Ethernet Default to ON Remove all apps (can be added back via PlayStore if required) Add XBMC App Add MX Player Add SuperSu App Give it a go and let me know any suggestions / problems! This looks promising http://forum.kodi.tv/showthread.php?tid=155526&page=2449 Thanks, Matt...
-
Page 56: Linux Software
Linux software Linux software Banana pi have support raspbian, ubuntu,debian..linux os. image download link: http://www.banana-pi.org/download.html Note: you need download BPI-M1 image. -
Page 57: Linux Kernel 3.4 Image
Linux kernel 3.4 image Linux kernel 3.4 BPI-M1/BPI-M1 Plus/BPI-R1 Ubuntu 16.04 image 2018-01-04 2018-01-06-ubuntu-16.04-mate-desktop-v1.0-bpi-m1-m1p-r1-sd-emmc.img.zip Google Drive: https://drive.google.com/file/d/12WI1B8QW\_e5LF9zy1gNb324T29GoviCT/view?usp=sharing Baidu cloud: https://pan.baidu.com/s/1slmNj6P MD5: 8a85fecbc680c998a84ae783208ecd36 BPI-M1/M1+ new image: ubuntu-mate-16.04-desktop- armhf-raspberry-pi-bpi-m1-m1p-r1-sd-emmc 2016-07-21 based on ubuntu 16.04 mate from https://ubuntu-mate.org/download/ 2. BPI-M1 / BPI-M1P / BPI-R1 u-boot-2016.05, kernel 3.4.112 (based on armbian's build) 3. username & password: pi/bananapi , root/bananapi 4. support HDMI 1080P & 720P(default) 5. support GMAC 6. support WIFI 7. support SATA 8. support bpi-bootsel cmd can switch to (bpi-m64 & bpi-m3 & bpi-m2 & bpi-m2p & bpi-m1-m1p-r1) 9. support boot.scr (boot.cmd) to fatload script.bin & uImage & uInitrd 10. support boot.scr to set video 1080P & 720P & 480P ... 11. based on armbian's build env. & rootfs, thanks for armbian (http://www.armbian.com) 12. github from https://github.com/igorpecovnik/lib by armbian's work 13. special thanks for linux-sunxi's work (https://linux-sunxi.org) - Page 58 14. support video play 1080p with vdpau (mpv) 15. support GPU Mali (glmark2-es2) 16. support nodejs 17. support node-red 18. thanks to ubuntu-mate.org Google Drive: https://drive.google.com/file/d/0B_YnvHgh2rwjY0VlUGdobzFtdk0/view?usp=sharing MD5: 155f072da499a7c523b7394f77dd9def discuss on forum: http://forum.banana-pi.org/t/bpi-m1-m1-new-image-ubuntu-mate-16-04-desktop-armhf-raspberry-pi-bpi-m1-m1p-r1-sd- emmc-2016-07-21/2051 BPI-M1/M1+ new image:edu-ubuntu-mate-1604-preview- bpi-m1-m1p-r1.img 2016-07-19 2016-07-19-edu-ubuntu-mate-1604-preview-bpi-m1-m1p-r1.img.zip 1. based on ubuntu 16.04 mate from bpi-m3-mate (http://opensource.ntpc.edu.tw/) 2. BPI-M1 / BPI-M1P / BPI-R1 u-boot-2016.05, kernel 3.4.112 (based on armbian's build) 3. username & password: pi/bananapi , root/bananapi 4. support HDMI 1080P & 720P(default) 5. support GMAC 6. support WIFI 7. support SATA 8. support bpi-bootsel cmd can switch to (bpi-m64 & bpi-m3 & bpi-m2 & bpi-m2p & bpi-m1-m1p-r1) 9. support boot.scr (boot.cmd) to fatload script.bin & uImage & uInitrd 10. support boot.scr to set video 1080P & 720P & 480P ... 11. based on armbian's build env. & rootfs, thanks for armbian (http://www.armbian.com)
- Page 59 Linux kernel 3.4 image 12. github from https://github.com/igorpecovnik/lib by armbian's work 13. special thanks for linux-sunxi's work (https://linux-sunxi.org) 14. support video play 1080p with vdpau (mpv, vlc, smplayer) 15. support GPU Mali (glmark2-es2) 16. support nodejs 17. support node-red 18. included many apps for edu 19. support scratch 2 online with scratchx 20. special thanks to the team of http://opensource.ntpc.edu.tw/ info: need >= 16GB SD Google Drive: https://drive.google.com/file/d/0B_YnvHgh2rwjUXZmZTh3ZG5LTEU/view?usp=sharing MD5: 37d6599eac4daced375fba8fa58dc1d5 discuss on forum: http://forum.banana-pi.org/t/bpi-m1-m1-new-image-edu-ubuntu-mate-1604-preview-bpi-m1-m1p-r1-img-2016-07-19/2042 BPI-M1/M1+ new image: Kanux-Beta-3.3.0-preview-bpi- m1-m1p-r1.img 2016-07-15 2016-07-15-Kanux-Beta-3.3.0-preview-bpi-m1-m1p-r1.img.zip 1. based on KANO OS Beta 3.3.0 (support rpi3 rpi2 rpi1) 2. BPI-M1 / BPI-M1P / BPI-R1 u-boot-2016.05, kernel 3.4.112 (based on armbian's build) 3. username & password: pi/bananapi , root/bananapi 4. support HDMI 1080P & 720P(default) 5. support GMAC 6. support WIFI...
- Page 60 Linux kernel 3.4 image 7. support SATA 8. support bpi-bootsel cmd can switch to (bpi-m64 & bpi-m3 & bpi-m2 & bpi-m2p & bpi-m1-m1p-r1) 9. support boot.scr (boot.cmd) to fatload script.bin & uImage & uInitrd 10. support boot.scr to set video 1080P & 720P & 480P ... 11. based on armbian's build env. & rootfs, thanks for armbian (http://www.armbian.com) 12. github from https://github.com/igorpecovnik/lib by armbian's work 13. special thanks for linux-sunxi's work (https://linux-sunxi.org) 14. thanks for Kano Developers's work(http://developers.kano.me/downloads/) 15. thanks for raspberry.org's work Google Drive: https://drive.google.com/file/d/0B_YnvHgh2rwjaXQtVGUtbFplTUU/view?usp=sharing MD5: 1951f3abc0a54675d9bbbac387760e4e discuss on forum: http://forum.banana-pi.org/t/bpi-m1-m1-new-image-kanux-beta-3-3-0-preview-bpi-m1-m1p-r1-img-2016-07-15/2024 BPI-M1 new image:raspbian-jessie-bpi-m1-m1p-r1.img 2016-07-13 2016-07-13-raspbian-jessie-bpi-m1-m1p-r1.img.zip 1. based on RASPBIAN JESSIE 2016-05-27(support rpi3 rpi2 rpi1) 2. BPI-M1 / BPI-M1P / BPI-R1 u-boot-2016.05, kernel 3.4.112 (based on armbian's build) 3. username & password: pi/bananapi , root/bananapi 4. support HDMI 1080P & 720P(default) 5. support GMAC 6. support WIFI 7. support SATA 8. support bpi-bootsel cmd can switch to (bpi-m64 & bpi-m3 & bpi-m2 & bpi-m2p & bpi-m1-m1p-r1)
- Page 61 Linux kernel 3.4 image 10. support boot.scr to set video 1080P & 720P & 480P ... 11. based on armbian's build env. & rootfs, thanks for armbian (http://www.armbian.com) 12. github from https://github.com/igorpecovnik/lib by armbian's work 13. special thanks for linux-sunxi's work (https://linux-sunxi.org) 14. thanks for raspberry.org's work(https://www.raspberrypi.org/downloads/raspbian) 15. support node-red Google Drive: https://drive.google.com/file/d/0B_YnvHgh2rwjdTh5ZnVZam1rb0E/view?usp=sharing MD5: 156b09907586ea9e86481bda73f4254f discuss on forum: http://forum.banana-pi.org/t/bpi-m1-m1-new-image-raspbian-jessie-bpi-m1-m1p-r1-img-2016-07-13/2010 BPI-M1 new image:Raspbian-lite-bpi-m1-m1p-r1.img 2016-07-12 2016-07-12-raspbian-lite-bpi-m1-m1p-r1.img.zip 1. based on RASPBIAN JESSIE LITE 2016-05-27(support rpi3 rpi2 rpi1) 2. BPI-M1 / BPI-M1P / BPI-R1 u-boot-2016.05, kernel 3.4.112 (based on armbian's build) 3. username & password: pi/bananapi , root/bananapi 4. support HDMI 1080P & 720P(default) 5. support GMAC...
- Page 62 Linux kernel 3.4 image 6. support WIFI 7. support SATA 8. support bpi-bootsel cmd can switch to (bpi-m64 & bpi-m3 & bpi-m2 & bpi-m2p & bpi-m1-m1p-r1) 9. support boot.scr (boot.cmd) to fatload script.bin & uImage & uInitrd 10. support boot.scr to set video 1080P & 720P & 480P ... 11. based on armbian's build env. & rootfs, thanks for armbian (http://www.armbian.com) 12. github from https://github.com/igorpecovnik/lib by armbian's work 13. special thanks for linux-sunxi's work (https://linux-sunxi.org) 14. thanks for raspberry.org's work(https://www.raspberrypi.org/downloads/raspbian) Google Drive: https://drive.google.com/file/d/0B_YnvHgh2rwjRXRuWHJ5V3BJTmc/view?usp=sharing MD5: 302063f7417079390da79334258dd538 discuss on forum: http://forum.banana-pi.org/t/bpi-m1-m1-new-image-raspbian-lite-bpi-m1-m1p-r1-img-2016-07-12/2003 BPI-M1/BPI-M1+ New Image:ubuntu-16.04-xenial- minimal-preview-bpi-m1-m1p-r1.img 2016-07-10 1. based on ubuntu 16.04 xenial ubuntu-minimal. 2. BPI-M1 / BPI-M1P / BPI-R1 u-boot-2016.05, kernel 3.4.112 (based on armbian's build) 3. username & password: pi/bananapi , root/bananapi 4. support HDMI 1080P & 720P(default) 5. support GMAC 6. support WIFI (module only, no wireless tools) 7. support SATA 8. support bpi-bootsel cmd can switch to (bpi-m64 & bpi-m3 & bpi-m2 & bpi-m2p & bpi-m1-m1p-r1)
- Page 63 Linux kernel 3.4 image 10. support boot.scr to set video 1080P & 720P & 480P ... 11. based on armbian's build env. & rootfs, thanks for armbian (http://www.armbian.com) 12. github from https://github.com/igorpecovnik/lib by armbian's work 13. special thanks for linux-sunxi's work (https://linux-sunxi.org) Google Drive: https://drive.google.com/file/d/0B_YnvHgh2rwjUXFrU0ZDX3Z2NlE/view?usp=sharing MD5: b900b9ba3b0f664a2cfae1fa1146b2fa discuss on forum: http://forum.banana-pi.org/t/bpi-m1-bpi-m1-new-image-ubuntu-16-04-xenial-minimal-preview-bpi-m1-m1p-r1-img-2016-07- 10/1990...
-
Page 64: Compulsive Modification Of Hdmi Output Resolution
Linux kernel 3.4 image Compulsive modification of HDMI output resolution... -
Page 65: Linux Mainline Kernel Image
Linux mainline kernel image Linux mainline kernel image BPI-M1/M1+ new image:Fedora-SoaS-armhfp-24-1.2- sda.raw-preview-bpi-m1.img 2016-08-11 2016-08-11-Fedora-SoaS-armhfp-24-1.2-sda.raw-preview-bpi-m1.img.zip 1. based on Fedora-SoaS-armhfp-24-1.2-sda.raw.xz (from https://arm.fedoraproject.org/) 2. BPI-M1 u-boot-2016.05, kernel 4.6.5 / 4.5.5(default) 3. username & password: pi/bananapi , root/bananapi 4. support HDMI 720P & 1080P(default) 5. support GMAC 6. support SATA 7. support extlinux.conf to select kernel 4.5.5 or 4.6.5 8. thanks to fedora's work (https://arm.fedoraproject.org/) ref. https://fedoraproject.org/wiki/Architectures/ARM Google Drive: https://drive.google.com/file/d/0B_YnvHgh2rwjQWdXY0s3NlBfb0E/view?usp=sharing MD5: 781b8e33047439f74801224b27571d5d BPI-M1 new image:Fedora-Mate-armhfp-24-1.2-sda.raw- nodered-preview-bpi-m1 2016-8-10 2016-08-10-Fedora-Mate-armhfp-24-1.2-sda.raw-nodered-preview-bpi-m1.img.zip... - Page 66 Linux mainline kernel image 1. based on Fedora-Mate-armhfp-24-1.2-sda.raw.xz (from https://arm.fedoraproject.org/) 2. BPI-M1 u-boot-2016.05, kernel 4.6.5 / 4.5.5(default) 3. username & password: pi/bananapi , root/bananapi 4. support HDMI 720P & 1080P(default) 5. support GMAC 6. support SATA 7. support extlinux.conf to select kernel 4.5.5 or 4.6.5 8. thanks to fedora's work (https://arm.fedoraproject.org/) ref. https://fedoraproject.org/wiki/Architectures/ARM 10. support nodejs 11. support nodered Google Drive: https://drive.google.com/file/d/0B_YnvHgh2rwjM19qQ0tlZDJrdUU/view?usp=sharing MD5: 04919cfc9c259a6846442643d26d2855 discuss on forum: http://forum.banana-pi.org/t/bpi-m1-m1-new-image-fedora-mate-armhfp-24-1-2-sda-raw-nodered-preview-bpi-m1-2016-8- 10/2118 BPI-M1 new image:openSUSE-Tumbleweed-ARM-JeOS- bananapi.armv7l-2016.06.12-Build2.11-nodered-preview- bpi-m1 2016-8-10 2016-08-10-openSUSE-Tumbleweed-ARM-JeOS-bananapi.armv7l-2016.06.12-Build2.11-nodered-preview-bpi-m1.img.zip...
- Page 67 Linux mainline kernel image 1. based on openSUSE-Tumbleweed-ARM-JeOS-bananapi.armv7l-2016.06.12-Build2.11.raw.xz (from http://download.opensuse.org/ports/armv7hl/factory/images/) 2. BPI-M1 u-boot-2016.07, kernel 4.7.0 3. username & password: pi/bananapi , root/bananapi 4. support GMAC 5. support SATA 6. support boot.scr (boot.script) to load zImage & fdtfile & initrd 7. thanks to opensuse's work (https://www.opensuse.org/) ref. https://en.opensuse.org/Portal:ARM 9. support nodejs 10. support nodered Google Drive: https://drive.google.com/file/d/0B_YnvHgh2rwjQmh5MnpQb3VCX00/view?usp=sharing MD5: d3d16b5871ead878473c8058b54eb9e6 discuss on forum: http://forum.banana-pi.org/t/bpi-m1-m1-new-image-opensuse-tumbleweed-arm-jeos-bananapi-armv7l-2016-06-12-build2- 11-nodered-preview-bpi-m1-2016-8-10/2119...
-
Page 68: Bpi-M1 Wiringpi
BPI-M1 WiringPi BPI-M1 WiringPi BPI WiringPi support all raspberry pi module and all banana pi module :BPI-M1,BPI-M1+,BPI-R1,BPI-M2,BPI-M2+,BPI-M2 Ultra,BPI-M2 Magic,BPI-M3,BPI-M64 https://github.com/BPI-SINOVOIP/WiringPi https://github.com/BPI-SINOVOIP/WiringPi/tree/master/wiringPi/board install BPI-M1 WiringPi: 1,Download WiringPi from github For BPI-M1 git clone https://github.com/BPI-SINOVOIP/BPI-WiringPi.git -b BPI_M1 2,Installation: cd BPI-WiringPi chmod +x ./build sudo ./build 3,test wiringPi is install success gpio -v gpio readall... - Page 69 BPI-M1 WiringPi 4,create new : blink.c #include <wiringPi.h> int main(void) wiringPiSetup() ; pinMode (0, OUTPUT) ; for(;;) digitalWrite(0, HIGH) ; delay (500) ; digitalWrite(0, LOW) ; delay (500) ; compile and run it: gcc -Wall -o blink blink.c -lwiringPi runing it: sudo ./blink BPI have many extend board support WiringPi. so you can free DIY by youself: more about BPI extend board,please see: https://bananapi.gitbooks.io/bpi-accessories/content/...
-
Page 70: Wiringpi Python
WiringPi python WiringPi python for BPI-M1 With all the hard work being done by the BPI team, BPI Github now officially releases BPI-WiringPi2-Python. We've customized WiringPi for BPI products with the latest WiringPi2-Python version, V1.1.1 Source on github: https://github.com/BPI-SINOVOIP/BPI-WiringPi2-Python Test:... - Page 71 WiringPi python Discuss on forum: http://forum.banana-pi.org/t/do-you-develop-apps-with-python-banana-pi-gpio-python-test-is-ok-code-uploaded-to- github/276...
-
Page 72: Pi4J Project
Pi4J Project Pi4J Project Java API for accessing GPIO, PWM, I2C, SPI, UART The Pi4J Project now includes support for BPI-M1 and BPI-M1+! This support has just been added and only cursory tests performed, so lets call it experimental for now, but I welcome you guys to try it out and let me know if you run into any trouble. You must use the Pi4J v1.1-SNAPSHOT builds until v1.1 gets released. You can manually download the JARs in ZIP or the installable .DEB package from this page: http://pi4j.com/download.html Support includes Java programatic access and control of GPIO inputs/outputs, PWM, I2C, SPI, and UART (serial). There is no documentation yet specifically for the Banana platforms, but apart from a few subtle differences in configuring a platform and pin/bus addressing, its basically the same. Perhaps better than documentation ... there are a number of examples (sample code) included in the build and available in the GitHub repo specific to each Banana platform: BananaPi Examples: https://github.com/Pi4J/pi4j/tree/develop/pi4j-example/src/main/java/bananapi BananaPro (BPI-M1+) Examples https://github.com/Pi4J/pi4j/tree/develop/pi4j-example/src/main/java/bananapro Other notes: You don't have to install and compile WiringPi/WiringBP seperately! The Pi4J core JAR includes all the native libraries it needs to communicate with the hardware embeded in the JAR. -
Page 73: Openwrt
OpenWRT OpenWRT OpenWRT have support BPI-M1,BPI-M1+,BPI-R1 BPI-R1_OpenWrt_V4.0 MD5: CB597EE79A6E27630AD7F903D23C4A7B http://pan.baidu.com/s/1mg8Gjna https://drive.google.com/file/d/0B3EGHv0FSPOGeHJNdmVXS3UtMUU/view?usp=sharing source Code on github: https://github.com/BPI-SINOVOIP/BPI-OpenWRT... -
Page 74: Officeal Openwrt
Officeal OpenWRT Officeal OpenWRT WIFI for Officeal OpenWRT https://wiki.openwrt.org/toh/lemaker/bananapi image download https://downloads.openwrt.org/chaos_calmer/15.05/sunxi/generic/uboot-sunxi-Bananapi/ OpenWRT have support many allwinner chip . so easy to use it on banana pi Allwinner Sun4i/5i/6i/7i/9i (sunxi) Various vendors are offering development boards / single-board computer based on the Allwinner SoCs. These are running various flavors of the A1x, A20, A31, and soon H3 SoCs, with different buildouts. The mach is called "sunxi". For some specs rather see Allwinner_Technology#A-Series. more please see: https://wiki.openwrt.org/doc/hardware/soc/soc.allwinner.sunxi?s[]=banana&s[]=pi... -
Page 75: How To Build Openwrt Image From Github
How to build OpenWRT image from github How to build OpenWRT image from github we test it with deepin2014(base on ubuntu14.04) 1,install depend package : apt-get install subversion build-essential libncurses5-dev zlib1g-dev gawk git ccache gettext libssl-dev xsltproc unz ip subversion file 2,get openwrt source code git clone https://github.com/BPI-SINOVOIP/BPI-OpenWRT.git 3,enter openwrt dir: cd BPI-OpenWRT 4,update package and install ./scripts/feeds update -a ./scripts/feeds install -a 5 Enter the customization interface: please choose your need: Target System default is BananaPi,its the only choice on that matte.,Please change the device selection under Target Profile. The OpenWrt image supports M1, M1+ and R1. example : i need web and add chinese support LuCI—> 1. Collections ---> <*> luci add Luci support ,it mean web GUI support,it is defaultes LuCI—>2. Modules ---> <*> luci-i18n-chinese add chinese also you can choose others. - Page 76 How to build OpenWRT image from github 6 Make ,you can add V=s to see more message ,also add -j4 to use quad core to work . make when compile finish bin/sunxi/ dir have a image,file name:openwrt-sunxi-BPI-XX-sdcard-vfat-ext4.img,i compile is BPI- R1,so name is :openwrt-sunxi-BPI-R1-sdcard-vfat-ext4.img, 7, use USB Image Tool(http://www.alexpage.de/) burn image to sd,insert BPI and booting it. 8 running : 9 Kernel booting message display: [ 0.000000] Booting Linux on physical CPU 0x0 [ 0.000000] Linux version 3.18.19 (charli@charli-pc) (gcc version 4.8.3 (OpenWrt/Linaro GCC 4.8-2014.04 unknown) ) #3 SMP PREEMPT Mon Aug 24 22:13:58 CST 2015 [ 0.000000] CPU: ARMv7 Processor [410fc074] revision 4 (ARMv7), cr=10c5387d [ 0.000000] CPU: PIPT / VIPT nonaliasing data cache, VIPT aliasing instruction cache [ 0.000000] Machine model: BPI R1 [ 0.000000] Memory policy: Data cache writealloc [ 0.000000] On node 0 totalpages: 260096 [ 0.000000] free_area_init_node: node 0, pgdat c0503740, node_mem_map ef00a000 [ 0.000000] Normal zone: 1520 pages used for memmap [ 0.000000] Normal zone: 0 pages reserved [ 0.000000] Normal zone: 194560 pages, LIFO batch:31 [ 0.000000] HighMem zone: 512 pages used for memmap [ 0.000000] HighMem zone: 65536 pages, LIFO batch:15 [ 0.000000] psci: probing for conduit method from DT. [ 0.000000] psci: Using PSCI v0.1 Function IDs from DT [ 0.000000] PERCPU: Embedded 9 pages/cpu @eefe1000 s6272 r8192 d22400 u36864 [ 0.000000] pcpu-alloc: s6272 r8192 d22400 u36864 alloc=9*4096 [ 0.000000] pcpu-alloc: [0] 0 [0] 1 [ 0.000000] Built 1 zonelists in Zone order, mobility grouping on. Total pages: 258576 [ 0.000000] Kernel command line: console=ttyS0,115200 earlyprintk rootwait root=/dev/mmcblk0p2 [ 0.000000] PID hash table entries: 4096 (order: 2, 16384 bytes) [ 0.000000] Dentry cache hash table entries: 131072 (order: 7, 524288 bytes) [ 0.000000] Inode-cache hash table entries: 65536 (order: 6, 262144 bytes) [ 0.000000] Memory: 1025388K/1040384K available (3811K kernel code, 169K rwdata, 1068K rodata, 200K init, 606K bss , 14996K reserved, 262144K highmem) [ 0.000000] Virtual kernel memory layout: [ 0.000000] vector : 0xffff0000 - 0xffff1000 ( 4 kB) [ 0.000000] fixmap : 0xffc00000 - 0xffe00000 (2048 kB) [ 0.000000] vmalloc : 0xf0000000 - 0xff000000 ( 240 MB) [ 0.000000] lowmem : 0xc0000000 - 0xef800000 ( 760 MB)
- Page 77 How to build OpenWRT image from github [ 0.000000] pkmap : 0xbfe00000 - 0xc0000000 ( 2 MB) [ 0.000000] modules : 0xbf000000 - 0xbfe00000 ( 14 MB) [ 0.000000] .text : 0xc0008000 - 0xc04cbef4 (4880 kB) [ 0.000000] .init : 0xc04cc000 - 0xc04fe000 ( 200 kB) [ 0.000000] .data : 0xc04fe000 - 0xc0528738 ( 170 kB) [ 0.000000] .bss : 0xc0528738 - 0xc05c0048 ( 607 kB) [ 0.000000] SLUB: HWalign=64, Order=0-3, MinObjects=0, CPUs=2, Nodes=1 [ 0.000000] Preemptible hierarchical RCU implementation. [ 0.000000] RCU restricting CPUs from NR_CPUS=4 to nr_cpu_ids=2. [ 0.000000] RCU: Adjusting geometry for rcu_fanout_leaf=16, nr_cpu_ids=2 [ 0.000000] NR_IRQS:16 nr_irqs:16 16 [ 0.000000] Architected cp15 timer(s) running at 24.00MHz (phys). [ 0.000009] sched_clock: 56 bits at 24MHz, resolution 41ns, wraps every 2863311519744ns [ 0.000022] Switching to timer-based delay loop, resolution 41ns [ 0.000352] sched_clock: 32 bits at 24MHz, resolution 41ns, wraps every 178956969942ns [ 0.000510] sched_clock: 32 bits at 160MHz, resolution 6ns, wraps every 26843545593ns [ 0.000673] Console: colour dummy device 80x30 [ 0.000702] Calibrating delay loop (skipped), value calculated using timer frequency.. 48.00 BogoMIPS (lpj=240000) [ 0.000718] pid_max: default: 32768 minimum: 301 [ 0.000824] Mount-cache hash table entries: 2048 (order: 1, 8192 bytes) [ 0.000837] Mountpoint-cache hash table entries: 2048 (order: 1, 8192 bytes) [ 0.001454] CPU: Testing write buffer coherency: ok [ 0.001761] /cpus/cpu@0 missing clock-frequency property [ 0.001778] /cpus/cpu@1 missing clock-frequency property [ 0.001791] CPU0: thread -1, cpu 0, socket 0, mpidr 80000000 [ 0.001847] Setting up static identity map for 0x40011b68 - 0x40011b9c [ 0.060422] CPU1: Booted secondary processor [ 0.060466] CPU1: thread -1, cpu 1, socket 0, mpidr 80000001 [ 0.060535] Brought up 2 CPUs [ 0.060557] SMP: Total of 2 processors activated (96.00 BogoMIPS). [ 0.060564] CPU: All CPU(s) started in HYP mode. [ 0.060569] CPU: Virtualization extensions available. [ 0.064967] VFP support v0.3: implementor 41 architecture 2 part 30 variant 7 rev 4 [ 0.065370] pinctrl core: initialized pinctrl subsystem [ 0.065762] regulator-dummy: no parameters [ 0.071879] NET: Registered protocol family 16 [ 0.072229] DMA: preallocated 256 KiB pool for atomic coherent allocations [ 0.111482] reg-fixed-voltage ahci-5v: could not find pctldev for node /soc@01c00000/pinctrl@01c20800/ahci_pwr_pin @0, deferring probe [ 0.111521] platform ahci-5v: Driver reg-fixed-voltage requests probe deferral [ 0.111550] reg-fixed-voltage usb1-vbus: could not find pctldev for node /soc@01c00000/pinctrl@01c20800/usb1_vbus_ pin@0, deferring probe...
- Page 78 How to build OpenWRT image from github [ 0.133939] VFS: Disk quotas dquot_6.5.2 [ 0.134207] Dquot-cache hash table entries: 1024 (order 0, 4096 bytes) [ 0.135970] squashfs: version 4.0 (2009/01/31) Phillip Lougher [ 0.135994] jffs2: version 2.2 (NAND) (SUMMARY) (LZMA) (RTIME) (CMODE_PRIORITY) (c) 2001-2006 Red Hat, Inc. [ 0.136719] msgmni has been set to 1490 [ 0.138903] bounce: pool size: 64 pages [ 0.138931] io scheduler noop registered [ 0.138946] io scheduler deadline registered [ 0.138996] io scheduler cfq registered (default) [ 0.139318] platform 1c13400.phy: Driver sun4i-usb-phy requests probe deferral [ 0.142025] sun7i-a20-pinctrl 1c20800.pinctrl: initialized sunXi PIO driver [ 0.184985] Serial: 8250/16550 driver, 8 ports, IRQ sharing disabled [ 0.187319] console [ttyS0] disabled [ 0.207743] 1c28000.serial: ttyS0 at MMIO 0x1c28000 (irq = 33, base_baud = 1500000) is a U6_16550A [ 0.828354] console [ttyS0] enabled [ 0.854828] 1c28c00.serial: ttyS1 at MMIO 0x1c28c00 (irq = 36, base_baud = 1500000) is a U6_16550A [ 0.886744] 1c29c00.serial: ttyS2 at MMIO 0x1c29c00 (irq = 52, base_baud = 1500000) is a U6_16550A [ 0.899279] platform 1c50000.ethernet: Driver stmmaceth requests probe deferral [ 0.906754] ehci_hcd: USB 2.0 'Enhanced' Host Controller (EHCI) Driver [ 0.913282] ehci-platform: EHCI generic platform driver [ 0.918683] platform 1c14000.usb: Driver ehci-platform requests probe deferral [ 0.926000] platform 1c1c000.usb: Driver ehci-platform requests probe deferral [ 0.933320] ohci_hcd: USB 1.1 'Open' Host Controller (OHCI) Driver [ 0.939546] ohci-platform: OHCI generic platform driver [ 0.944901] platform 1c14400.usb: Driver ohci-platform requests probe deferral [ 0.952185] platform 1c1c400.usb: Driver ohci-platform requests probe deferral [ 0.959587] usbcore: registered new interface driver usb-storage [ 0.965867] mousedev: PS/2 mouse device common for all mice [ 0.971551] 1c22800.lradc supply vref not found, using dummy regulator [ 0.978474] input: 1c22800.lradc as /devices/soc@01c00000/1c22800.lradc/input/input0 [ 0.991771] axp20x-regulator axp20x-regulator: regulators node not found [ 0.998630] LDO1: 1300 mV [ 1.001767] LDO2: at 3000 mV [ 1.005157] LDO3: at 2275 mV [ 1.008294] LDO4: at 2800 mV [ 1.011695] LDO5: at 2800 mV [ 1.015085] DCDC2: at 1400 mV [ 1.018533] DCDC3: at 1250 mV [ 1.021668] axp20x 0-0034: AXP20X driver loaded [ 1.027508] sunxi-wdt 1c20c90.watchdog: Watchdog enabled (timeout=16 sec, nowayout=0) [ 1.036066] sunxi-mmc 1c0f000.mmc: No vqmmc regulator found [ 1.041994] sunxi-mmc 1c0f000.mmc: Got CD GPIO...
- Page 79 How to build OpenWRT image from github [ 1.331456] ehci-platform 1c14000.usb: EHCI Host Controller [ 1.337154] ehci-platform 1c14000.usb: new USB bus registered, assigned bus number 1 [ 1.345031] ehci-platform 1c14000.usb: irq 71, io mem 0x01c14000 [ 1.364665] ehci-platform 1c14000.usb: USB 2.0 started, EHCI 1.00 [ 1.370952] usb usb1: New USB device found, idVendor=1d6b, idProduct=0002 [ 1.377753] usb usb1: New USB device strings: Mfr=3, Product=2, SerialNumber=1 [ 1.384988] usb usb1: Product: EHCI Host Controller [ 1.389862] usb usb1: Manufacturer: Linux 3.18.19 ehci_hcd [ 1.395353] usb usb1: SerialNumber: 1c14000.usb [ 1.400464] hub 1-0:1.0: USB hub found [ 1.404250] hub 1-0:1.0: 1 port detected [ 1.408963] ehci-platform 1c1c000.usb: EHCI Host Controller [ 1.414564] ehci-platform 1c1c000.usb: new USB bus registered, assigned bus number 2 [ 1.422482] ehci-platform 1c1c000.usb: irq 72, io mem 0x01c1c000 [ 1.444681] ehci-platform 1c1c000.usb: USB 2.0 started, EHCI 1.00 [ 1.450961] usb usb2: New USB device found, idVendor=1d6b, idProduct=0002 [ 1.457766] usb usb2: New USB device strings: Mfr=3, Product=2, SerialNumber=1 [ 1.464991] usb usb2: Product: EHCI Host Controller [ 1.469865] usb usb2: Manufacturer: Linux 3.18.19 ehci_hcd [ 1.475355] usb usb2: SerialNumber: 1c1c000.usb [ 1.480460] hub 2-0:1.0: USB hub found [ 1.484246] hub 2-0:1.0: 1 port detected [ 1.488775] ohci-platform 1c14400.usb: Generic Platform OHCI controller [ 1.495451] ohci-platform 1c14400.usb: new USB bus registered, assigned bus number 3 [ 1.503327] ohci-platform 1c14400.usb: irq 96, io mem 0x01c14400 [ 1.568861] usb usb3: New USB device found, idVendor=1d6b, idProduct=0001 [ 1.575669] usb usb3: New USB device strings: Mfr=3, Product=2, SerialNumber=1 [ 1.582883] usb usb3: Product: Generic Platform OHCI controller [ 1.588814] usb usb3: Manufacturer: Linux 3.18.19 ohci_hcd [ 1.594296] usb usb3: SerialNumber: 1c14400.usb [ 1.599360] hub 3-0:1.0: USB hub found [ 1.603146] hub 3-0:1.0: 1 port detected [ 1.607711] ohci-platform 1c1c400.usb: Generic Platform OHCI controller [ 1.614350] ohci-platform 1c1c400.usb: new USB bus registered, assigned bus number 4 [ 1.622242] ohci-platform 1c1c400.usb: irq 97, io mem 0x01c1c400 [ 1.688838] usb usb4: New USB device found, idVendor=1d6b, idProduct=0001 [ 1.695643] usb usb4: New USB device strings: Mfr=3, Product=2, SerialNumber=1 [ 1.702858] usb usb4: Product: Generic Platform OHCI controller [ 1.708790] usb usb4: Manufacturer: Linux 3.18.19 ohci_hcd [ 1.714271] usb usb4: SerialNumber: 1c1c400.usb [ 1.719358] hub 4-0:1.0: USB hub found [ 1.723148] hub 4-0:1.0: 1 port detected...
- Page 80 How to build OpenWRT image from github [ 7.313783] EXT4-fs (mmcblk0p2): re-mounted. Opts: (null) [ 7.324800] procd: - early - [ 7.327825] procd: - watchdog - [ 8.196631] procd: - ubus - [ 9.200629] procd: - init - [ 9.740779] NET: Registered protocol family 10 [ 9.750621] ip6_tables: (C) 2000-2006 Netfilter Core Team [ 9.781222] Loading modules backported from Linux version master-2015-03-09-0-g141f155 [ 9.789242] Backport generated by backports.git backports-20150129-0-gdd4a670 [ 9.797957] ip_tables: (C) 2000-2006 Netfilter Core Team [ 9.808055] nf_conntrack version 0.5.0 (16024 buckets, 64096 max) [ 9.895305] xt_time: kernel timezone is -0000 [ 9.909554] cfg80211: Calling CRDA to update world regulatory domain [ 9.916314] cfg80211: World regulatory domain updated: [ 9.921471] cfg80211: DFS Master region: unset [ 9.926943] cfg80211: (start_freq - end_freq @ bandwidth), (max_antenna_gain, max_eirp), (dfs_cac_time) [ 9.936834] cfg80211: (2402000 KHz - 2472000 KHz @ 40000 KHz), (N/A, 2000 mBm), (N/A) [ 9.944963] cfg80211: (2457000 KHz - 2482000 KHz @ 40000 KHz), (N/A, 2000 mBm), (N/A) [ 9.952992] cfg80211: (2474000 KHz - 2494000 KHz @ 20000 KHz), (N/A, 2000 mBm), (N/A) [ 9.961171] cfg80211: (5170000 KHz - 5250000 KHz @ 80000 KHz), (N/A, 2000 mBm), (N/A) [ 9.969328] cfg80211: (5250000 KHz - 5330000 KHz @ 80000 KHz, 160000 KHz AUTO), (N/A, 2000 mBm), (0 s) [ 9.978922] cfg80211: (5490000 KHz - 5730000 KHz @ 160000 KHz), (N/A, 2000 mBm), (0 s) [ 9.987125] cfg80211: (5735000 KHz - 5835000 KHz @ 80000 KHz), (N/A, 2000 mBm), (N/A) [ 9.995867] cfg80211: (57240000 KHz - 63720000 KHz @ 2160000 KHz), (N/A, 0 mBm), (N/A) [ 10.033695] PPP generic driver version 2.4.2 [ 10.039216] NET: Registered protocol family 24 [ 10.057795] rtl8192cu: Chip version 0x11 [ 10.148074] rtl8192cu: MAC address: ac:a2:13:5c:96:bf [ 10.153232] rtl8192cu: Board Type 0 [ 10.164227] rtl_usb: rx_max_size 15360, rx_urb_num 8, in_ep 1 [ 10.170284] rtl8192cu: Loading firmware rtlwifi/rtl8192cufw_TMSC.bin [ 10.177753] ieee80211 phy0: Selected rate control algorithm 'rtl_rc' [ 10.179863] usbcore: registered new interface driver rtl8192cu [ 11.862773] random: nonblocking pool is initialized [ 14.869421] b53_common: found switch: BCM53125, rev 4 [ 14.899568] RX IPC Checksum Offload disabled [ 14.916057] No MAC Management Counters available [ 14.921020] IPv6: ADDRCONF(NETDEV_UP): eth0: link is not ready [ 16.864711] stmmaceth 1c50000.ethernet eth0: Link is Up - 1Gbps/Full - flow control off [ 16.872809] IPv6: ADDRCONF(NETDEV_CHANGE): eth0: link becomes ready [ 220.810635] IPv6: ADDRCONF(NETDEV_UP): br-lan: link is not ready [ 221.264426] rtl8192cu: MAC auto ON okay!
-
Page 81: Lamobo Openwrt Image
Lamobo Openwrt image Lamobo Openwrt image OpenWrt firmware for BPI-R1 is updated, it support by Lamobo. This firmware is built based on the OpenWrt master branch r42830. Q&A I am a new BPI-R1 user, how to use this firmware? 1. For a new user, we recommend to use the ready configured firmware. please download it from forum download page: http://elastos.org/elorg_common/Lamobo-R1/2015-01-12/openwrt-sunxi-Lamobo-R1-sdcard-vfat-ext4.img 2. BPI-R1 accepts TF-card. Make sure your TF-card is bigger than 512MB. Using below command to generate a bootable TD-card: $ sudo dd if=openwrt-sunxi-BPI-R1-sdcard-vfat-ext4-configured.img of=/dev/sdX bs=1MB 3. Notes for the ready configured firmware: The login username/password are root/root. The software installation source has been set to “http://elastos.org/elorg_common/Lamobo-R1/2015-01-12/”. For details please refer “/etc/opkg.conf”. If you like to install your R1 from chaos. Router address is: 10.0.1.1 If I want to use the original firmware, what can I do? 1. The original firmware is built directly from source code. It almost does not install software, except OpenWrt base software. Please download it from:elastos.org/elorg_common/Lamobo-R1/2015-...sdcard-vfat-ext4.img. 2. Prepare a TTL thread for to connent OpenWrt bash terminal. 3. Connect to OpenWrt terminal throught TTL thread, modify OpenWrt packages source. All Of OpenWrt packages is released on: elastos.org/elorg_common/Lamobo-R1/2014-01-12/packages. You can change opkg.conf(/etc/opkgopkg.conf) content to below: src/gz chaos_calmer_base http://elastos.org/elorg_common/Lamobo-R1/2014-01-12/packages/base src/gz chaos_calmer_luci http://elastos.org/elorg_common/Lamobo-R1/2014-01-12/packages/luci src/gz chaos_calmer_management http://elastos.org/elorg_common/Lamobo-R1/2014-01-12/packages/management src/gz chaos_calmer_packages http://elastos.org/elorg_common/Lamobo-R1/2014-01-12/packages/packages src/gz chaos_calmer_routing http://elastos.org/elorg_common/Lamobo-R1/2014-01-12/packages/routing src/gz chaos_calmer_telephony http://elastos.org/elorg_common/Lamobo-R1/2014-01-12/packages/telephony And then, update opkg database: $ opkg update 4. Install OpenWrt packages. The below packages are needed: $ opkg install kmod-b53 $ opkg install kmod-rtl* $ opkg install hostapd $ opkg install wpa-supplicant... - Page 82 Lamobo Openwrt image config switch ‘eth0′ option enable ’1′ option enable_vlan ’1′ option reset ’1′ config interface ‘lan’ option proto ‘static’ option ipaddr ’10.0.1.1′ option netmask ’255.255.255.0′ option defaultroute ’0′ option peerdns ’0′ option nat ’1′ option ifname ‘eth0.1′ option type ‘bridge’ config switch_vlan option device ‘eth0′ option ports ’0 1 2 4 8t’ option vlan ’1′ config interface ‘wan’ option ifname ‘eth0.2′ option proto ‘dhcp’ config switch_vlan option device ‘eth0′ option vlan ’2′ option ports ’3 8t’ start router web server: $ /etc/init.d/uhttpd start $ /etc/init.d/uhttpd enable That’s all. Good luck! forum discuss link: http://www.bananapi.com/index.php/forum/general/417-banana-pi-bpi-r1-openwrt-image-2-0-release-note#1229 Wiki link: http://wiki.geiges.net/doku.php?id=openwrt_bpi-r1...
-
Page 83: Asterisk For Voip
Asterisk for VOIP Asterisk for VOIP Asterisk is a software implementation of a telephone private branch exchange (PBX); it was created in 1999 by Mark Spencer of Digium. Like any PBX, it allows attached telephones to make calls to one another, and to connect to other telephone services, such as the public switched telephone network (PSTN) and Voice over Internet Protocol (VoIP) services. Its name comes from the asterisk symbol: Source: Wikipedia https://en.wikipedia.org/wiki/Asterisk_%28PBX%29 Asterisk is like a box of Legos for people who want to create communications applications. It includes all the building blocks needed to create a PBX, an IVR system, a conference bridge and virtually any other communications app you can imagine. Source: Official Asterix Website:http://www.asterisk.org/ Banana Pi is a single-board computer built with ARM Cortex-A7 Dual-core (Allwinner A20 based) CPU and Mali400MP2 GPU, and open source software, Banana Pi can serve as a platform to make lots of applications for different purposes. This is a project dedicated to Asterisk and FreePBX running on the banana pi. more message ,please visit: http://dostmuhammad.com/asterix-for-banana-pi-freepbx-img-file-for-banana-pi-included/ http://www.banana-pi.org download webpage also have image download. -
Page 84: Arch Linux
Arch Linux Arch Linux Arch Linux have official support BPI-M1,BPI-M1+ Image download and wiki page: https://wiki.archlinux.org/index.php/Banana_Pi... -
Page 85: Opensuse
OpenSuse OpenSuse Installing the openSUSE Tumbleweed Image Download the latest image at http://download.opensuse.org/ports/armv7hl/tumbleweed/images/ and choose: 1. JeOS image for a minimal system openSUSE-Tumbleweed-ARM-JeOS-bananapi.armv7l-1.12.1-*.raw.xz' or 2. Once kernel support for the Mali GPU has been implemented, graphical options will be published as well. As root extract the image onto your SD-Card (replace sdX with the device name of your SD-Card). WARNING: all previous data on the SD-Card will be lost. xzcat [image].raw.xz | dd bs=4M of=/dev/sdX; sync Insert the SD-Card with the openSUSE image into your Banana Pi. Connect the Banana Pi to your PC via serial port. Power on the Banana Pi. Walk through the first boot steps on the serial console. Have a lot of fun... more please see : https://en.opensuse.org/HCL:BananaPi... -
Page 86: Bananian Linux
Bananian Linux Bananian Linux Bananian new version update(2016-04-23) latest version (Debian 8/Jessie) bananian-latest.zip (158 MB) version: 16.04 (released 2016-04-23) default login: root / pi SHA1: 99fdb18175c32b4c7d57ce970acb3837a17a439c SHA256: 8123d538c365553a0225f00746650044e72c8444b6b7b43d64ecb1eef517ae9f Release notes: [Kernel] provide Linux 4.4.x packages [Userland] package bananian-update as a .deb file [General] Kernel Update Script and other stuff as an apt repository [Kernel] enable audio on Linux 4.x [Hardware] Fixed: bananian-hardware does not work on Linux 4.x [Userland] Introduce "bananian-settings" [Kernel] Update Kernel 3.4.x to 3.4.111 [Kernel] Division by zero in kernel. (3.4.90+) [Hardware] update FAQ, pmutemp and soctemp related to Kernel 4.x [General] Update U-Boot [Kernel] Removing 4.2 kernel packages result in unbootable system [Userland] rsyslog spams logs with "rsyslogd-2007: action ..." [Kernel] HDMI output turns off on inactivity [Kernel] Support for 8 channels hdmi more information,please bananian official website: https://www.bananian.org/download the team of the Bananian Linux project is pleased to announce the release of Bananian Linux 16.04 for Banana Pi (and family). This update improves mainline Linux kernel support (4.4.x) along with a lot of bugfixes and minor improvements. We are supporting the Banana Pi, Banana Pi M1+, BPI-R1 and some other A20 boards with just one single image. The Banana Pi M2 requires a separate image which also has been updated. See https://www.bananian.org/hardware for more information. Existing Bananian installations can easily be upgraded without losing any data or settings. For a list of all changes see the Bananian 16.04 changelog: https://dev.bananian.org/changelog_page.php?version_id=13 To get Bananian 16.04: In order to download Bananian 16.04, visit: https://www.bananian.org/download Users of Bananian 14.09 or later can upgrade their existing installation using 'bananian-update'. Users of Bananian 14.08, see: https://www.bananian.org/upgrade... - Page 87 Bananian Linux About Bananian Bananian Linux is a pre-installed Debian 8 image optimized for Banana Pi. It uses the official Debian Jessie armhf repositories with a kernel and bootmanager (u-boot), customized for Banana Pi. It supports the Banana Pi (M1, M1+), Banana Pro, BPI-R1 and some other A20 boards with just one single image. A separate image for the Banana Pi M2 is also available. The main focus is to provide a lightweight headless platform for home servers, small webservers, cloud hosting, Linux based wifi access points, router, NAS systems, monitoring devices, etc. Bananian Linux is a pre-installed Debian 8 image optimized for Banana Pi. It uses the official Debian Jessie armhf repositories with a kernel and bootmanager (u-boot), customized for Banana Pi. A Debian 7/Wheezy image (Bananian 15.04) is also available and maintained. We support the Banana Pi (M1, M1+), Banana Pro and BPI-R1 with just one single image. The main focus is to provide a lightweight headless platform for home servers, small webservers, ownCloud hosting, Linux based wifi access points, router, NAS systems, monitoring devices, etc. Official web for image download and support: https://www.bananian.org/...
-
Page 88: Openmediavault
OpenMediaVault OpenMediaVault for BPI-M1 OpenMediaVault is a next generation Network Attached Storage (NAS) solution based on Debian Linux (BanaNAS based on Raspbian). It contains services like SSH, (S)FTP, SMB/CIFS, DAAP media server, RSync, BitTorrent client and many more. Thanks to the modular design of the framework ,it can be enhanced using various plug-ins. website link: http://www.openmediavault.org/ Image for Banana Pi is based on Debian/Linux. Image already have instaled OpenMediaVault software and includes omv- extras.org reposytory for larger base of plugins. System image requires at least 8GB SD card. Download link: for Banana Pi BPI-M1 http://simplenas.com/download/banana-pi-m1 for Banana pi BPI-M1+ http://simplenas.com/download/banana-m1p discuss forum: http://forums.openmediavault.org/index.php/Thread/5667-OMV-on-Banana-Pi-BanaNAS/... -
Page 89: Armbian Linux
Armbian Linux Armbian Linux Armbian Linux have official support BPI-M1,BPI-M1+,BPI-M2,BPI-M2+,BPI-R1 Image download and armbian forum page: http://www.armbian.com/download/ armbian github link: https://github.com/igorpecovnik/lib... -
Page 90: Gentoo Linux
Gentoo Linux Gentoo Linux Gentoo Linux have officeal support banana pi BPI-M1, so you also can use on BPI-M1+,and BPI-R1, all is base on allwinner A20 chip. Gentoo Linux official WiKi https://wiki.gentoo.org/wiki/Banana_Pi_the_Gentoo_Way... -
Page 91: Raspbsd On Bpi-M1
RaspBSD on BPI-M1 RaspBSD on BPI-M1 RaspBSD is a volunteer project headed by FreeBSD Committer Brad Davis (brd@). The Goal of this project is to build images easily useable by anyone. Sometimes that means images preloaded with different packages to help new users get started. Initially they will start off pretty basic, but will expand in different directions to support different goals. Initial goals include Education and Entertainment. All of our images are built using publicly available tools and any enhancements will be pushed upstream. If you like what we are doing, please consider donating to the FreeBSD Foundation Image for banana pi BPI-M1 http://raspbsd.org/bananapi.html... -
Page 92: Centos 7 Linux For Bpi
CentOS 7 Linux for BPI CentOS 7 Linux for BPI CentOS 7 is now available for ARM devices Karanbir Singh from the CentOS team had the great pleasure of announcing the general availability of the CentOS 7 Linux operating system for the ARM hardware architecture. At the moment of writing this article, the CentOS developers didn't write any release notes on their website about what new features and optimizations have been implemented in the ARM port of the latest CentOS 7 Linux operating system, except for the very brief announcement posted on their Twitter account. We were only giving access to the download links, and based on the name of the binary images we can tell you that CentOS 7 Linux will now work on various AMv7 devices, but pre-built binary images are available only for the popular Raspberry Pi 2, Banana Pi, and CubieTruck single-board computers (SBCs). What's new in CentOS 7 build 1511 Last week, we reported new on the CentOS 7 build 1511 rolling release, which brought a assorted new features, software updates and enhancements, such as Kerberos HTTP proxy for identity management, ECC support for TLS connections in OpenJDK 7, networking stack improvements, as well as updates to the Atomic packages. Additionally, the new CentOS 7 build included support for TLS 1.1, TLS 1.2 and EC ciphers in various pre-installed packages, full support for the virt-v2v command-line tool, nanosecond timestamps support in tcpdump, the GNOME 3.14 and KDE 4.14 desktop environments, X.Org Server 1.17 display server, LibreOffice 4.3.7 office suite, and OpenLDAP 2.4.40 open source LDAP implementation. This being said, we believe that the new CentOS 7 Linux for ARM devices port includes most of the aforementioned features. You can download CentOS 7 for Raspberry Pi 2, Banana Pi, and CubieTruck right now via our website or the project's FTP servers, from where you can also get the 64-bit Live GNOME, Live KDE, Net Install, and Minimal ISOs. image download http://mirror.centos.org/altarch/7/isos/armhfp/12... -
Page 93: Lakka.tv
lakka.tv lakka.tv for banana pi Lakka is a lightweight Linux distribution that transforms a small computer into a full blown game console. and lakka.tv have official support banana pi image download : http://www.lakka.tv/get/linux/bpi/... -
Page 94: Dietpi
DietPi DietPi | Minimal image at its core Highly optimized minimal Debian OS DietPi is extremely lightweight at its core, our images start at 400MB in size (3x lighter than 'Raspbian Lite'). With features of low process/memory footprint and DietPi-RAMlog installed by default, DietPi allows you to get the maximum performance from your device. Now it support banana pi BPI-M1 more please see DietPi official: http://dietpi.com/ Source code on github: https://github.com/Fourdee/DietPi... -
Page 95: Freebsd/Netbsd
FreeBSD/NetBSD FreeBSD on Allwinner (sunxi) systems for banana pi Banana pi as the official partner of Allwinner , must banana pi product use Allwinner chip design . such as A20/A31S/H3/H2+/A64/A83T , and FreeBSD have support many Allwinner . so easy to use on banana pi board. Allwinner A20 (sun7i), a dual-core Cortex-A7 BPI-M1/BPI-M1+/BPI-R1 Allwinner A31 and A31s (sun6i), a quad-core Cortex-A7 BPI-M2 Allwinner A64 (sun50i), a quad-core Cortex-A53 BPI-M64 Allwinner A83T (sun8i), an octa-core Cortex-A7 BPI-M3 Allwinner H3 (sun8i), a quad-core Cortex-A7 **BPI-M2+/BPI-M2+ EDU/** https://wiki.freebsd.org/FreeBSD/arm/Allwinner... -
Page 96: Reference Documents
Reference documents Reference documents... -
Page 97: Bpi-M1 Linux-Sunxi Wiki
BPI-M1 linux-sunxi wiki linux-sunxi wiki lemaker banana pi is same as banana pi BPI-M1 http://linux-sunxi.org/LeMaker_Banana_Pi... -
Page 98: Netbsd/Evbarm On Allwinner Technology Socs
NetBSD\/evbarm on Allwinner Technology SoCs NetBSD/evbarm on Allwinner Technology SoCs NetBSD is a free, fast, secure, and highly portable Unix-like Open Source operating system. It is available for a wide range of platforms, from large-scale servers and powerful desktop systems to handheld and embedded devices. Its clean design and advanced features make it excellent for use in both production and research environments, and the source code is freely available under a business-friendly license. NetBSD is developed and supported by a large and vivid international community. Many applications are readily available through pkgsrc, the NetBSD Packages Collection NetBSD 7.0 has support for A20 and A31 SoCs. NetBSD -current adds support for A80 SoCs. more please see: https://wiki.netbsd.org/ports/evbarm/allwinner/#index1h1... -
Page 99: Arch Linux Wiki For Bpi-M1
Arch linux wiki for BPI-M1 Arch linux wiki for BPI-M1 https://wiki.archlinux.org/index.php/Banana_Pi... -
Page 100: Nas For Bpi
Nas for BPI Nas for BPI Overview NAS is defined as a special kind of private data storage server, including storage device (such as disk arrays, CD/DVD drives, tape drives, or removable storage medium) and embedded system software, can provide a cross-platform file sharing function. more please see: https://www.hackster.io/jeffbaocai/bananapi-pro-nas-0815dc?ref=platform&ref_id=8064_popular___&offset=3... -
Page 101: Building The Cluster On Bpi
Building the cluster on BPI Building the cluster on BPI Building the cluster Building the rack I built a rack for the Banana Pi boards using blanking plates for mains sockets, and four large bolts. I made a wooden template from a piece of MDF, and used the template to drill holes in each of the banking plates. I drilled small holes for plastic PCB supports which I use to hold each board in place. The bolts are inserted through the holes at the corners of the blanking plates, and held in place with glue. more please see: https://www.hackster.io/Penguinfly/banana-pi-cluster-47d566... -
Page 102: How To Booting From Ssd Using Lubuntu / Raspbian
How to booting from SSD using Lubuntu \/ Raspbian How to booting from SSD using Lubuntu / Raspbian Banana PI – Set up Lubuntu / Raspbian on a SATA SSD/HD After a year of using a class10 SD card, I started to get some i/o errors… So decided to start taking advantage of one of the nicest features banana Pi has: SATA port + SATA power supply. I had no idea of where to begin… So Googled it. Found 3 sites that more or less described how to proceed, but both where for Raspbian only and dead ended me along the way. Hope this guide helps other bananians using Lubuntu to achieve your goal! more documents,please see this link: http://nload.net/how-to-banana-pi-booting-from-ssd-using-lubuntu-raspbian/... -
Page 103: Banana Pi Books
banana pi books banana pi books Banana Pi Cookbook https://www.packtpub.com/hardware-and-creative/banana-pi-cookbook/?utm_source=SI- www.bananapi.com&utm_medium=pod&utm_campaign=1783552441 Learning Banana Pi https://www.packtpub.com/hardware-and-creative/learning-banana-pi/?utm_source=SI- www.bananapi.com&utm_medium=pod&utm_campaign=1785289306... -
Page 104: Linux Mainlining Effort
Linux mainlining effort Linux mainlining effort The purpose of this page is to try and define sub-goals and milestones for the mainlining effort, containing goals and sub- goals with milestones for adding Allwinner support in the upstream mainline Linux Kernel. It is very important to note that this is intended as a rough set of minimal goals - it is not meant to collide with the huge effort of rewriting major drivers! more ,please see link: http://linux-sunxi.org/Linux_mainlining_effort... -
Page 105: Allwinner Chip Documents
Allwinner chip documents Allwinner chip documents allwinner chip online datasheet and documents: http://dl.linux-sunxi.org/... -
Page 106: All Banana Pi Sbc Comparison
All Banana Pi SBC Comparison All Banana Pi SBC Comparison Banana Pi series comparison_20170612 Banana Pi series comparison_20170612 excel file download: https://drive.google.com/file/d/0B4PAo2nW2KfnUlVfQ2NQRTF2b2M/view?usp=sharing Banana Pi series comparison_20170612 pdf file download: https://drive.google.com/file/d/0B4PAo2nW2KfnaG8zdXBhUThUYXc/view?usp=sharing... -
Page 107: All Banana Pi Product
All banana pi product All banana pi product banana pi BPI-M1 allwinner A20 dual core single board computer gitbook online datasheet:https://bananapi.gitbooks.io/bpi-m1/content/en/ banana pi BPI-M1+(BPI-M1+ plus) allwinner A20 dual core single board computer gitbook online datasheet:https://bananapi.gitbooks.io/bpi-m1-bpi-m1-plus-/content/en/ banana pi BPI-M2 allwinner A31s quad core single board computer gitbook online datasheet:https://bananapi.gitbooks.io/bpi-m2/content/en/ banana pi BPI-M2+(BPI-M2 Plus)allwinner H3 quad cord single board computer gitbook online datasheet:https://bananapi.gitbooks.io/bpi-m2-/content/en/ banana pi BPI-M2 Ultra allwinner R40 quad core single board computer gitbook online datasheet:https://bananapi.gitbooks.io/bpi-m2-ultra/content/ Banana pi BPI-M3 allwinner A83T (R58 H8) octa-core single board computer gitbook online datasheet:https://bananapi.gitbooks.io/bpi-m3/content/en/ banana pi BPI-M64 allwinner A64 64 bit single board computer gitbook online datasheet:https://bananapi.gitbooks.io/bpi-m64/content/en/ banana pi BPI-R1 allwinner A20 dual core smart router board gitbook online datasheet:https://bananapi.gitbooks.io/bpi-r1/content/en/ banana pi BPI-D1 open source IP camera board gitbook online datasheet:https://bananapi.gitbooks.io/bpi-d1/content/en/ banana pi BPI-G1 open source IoT development board gitbook online datasheet:https://bananapi.gitbooks.io/bpi-g1/content/en/ banana pi BPI Accessories gitbook online datasheet:https://bananapi.gitbooks.io/bpi-accessories/content/en/ BPI Open debugger burn development tool board gitbook online datasheet:https://bananapi.gitbooks.io/bpi-open-debugger-burn-board/content/en/... -
Page 108: Bpi 4.0 Customized Server
BPI 4.0 customized Server BPI 4.0 customized Server BPI 4.0 customized Server Having been doing R&D in embeded systems for more than 12 years. Our experienced teams are able to help you to carry out your dream. Whether you want to customize banana pi or want to design a computer from scratch, we got you covered. Also, our modern ISO factory spans over 10,000 square meters can help you mass manufacture products to hit the market Our factory:Sinovoip In order to meet the companys development needs, and further production capacity and product quality. Sources Communication shareholders decided to invest in new plant to build their own, the new factory site is located in manholes and covers an area of more than 10000 square meters,equipped with full range of production equipment and high quality technical management personnel . We have complete SMT production lines, plug-ins production line, assembly line, production line testing. your Idea, we will help you optimize and design. your Design, we will help you bring it to live. your Product, we will help you mass produce it. Customize Pi If you want to tailor your Banana pi to your specific use or to minimize the cost for mass production purpose, you are coming the right place. We provide the customization service of banana pi such as remove/add headers or connectors,change component layout,add/remove components,change interfaces etc. Start from scratch (ODM) An idea flashes through your mind in your dreams or a solution bearing in your mind for a long time, which you think would turn out to be great gadget to hit the market, but you are worrying about how to start and realize it without R&D and manufacturing, now that's no longer a trouble to you. Taking advantage of our expertise,we provide full ODM service for... - Page 109 BPI 4.0 customized Server you. We let you have your sample products from scratch within 45 days. Don't wait,come to realize your dreams. Have a prototype (OEM) You are an expert, you designed a wonderful device that most people would want to have it, you knew it quite well that your success is just around the corner. The only last step is to produce it,but without manufactruing capability..., no problem, let us carry you through. Our 13 years of SCM experience and mass manufacturing facilities enable you free from quality issue,delivery...
- Page 110 BPI 4.0 customized Server...
Need help?
Do you have a question about the BPI-M1 and is the answer not in the manual?
Questions and answers