Table of Contents
Advertisement
BPI-M2 Software
Linux Software
Linux kernel 3.3
mainline Linux
Table of Contents
1.1
1.2
1.2.1
1.2.2
1.2.3
1.2.4
1.2.5
1.2.6
1.2.7
1.2.8
1.2.9
1.2.10
1.2.11
1.2.12
1.2.13
1.2.14
1.2.15
1.2.16
1.2.17
1.2.18
1.3
1.3.1
1.3.2
1.3.2.1
1.3.2.1.1
1.3.2.1.2
1.3.2.2
1.3.2.2.1
1.3.2.2.1.1
1.3.2.2.2
1.3.2.2.2.1
1.3.2.2.2.2
1.3.2.2.3
1.3.2.2.4
1.3.2.2.5
1.3.3
1.3.4
1.4
1.4.1
1
Advertisement
Table of Contents

Related Manuals for Banana Pi BPI-M2 Series


Summary of Contents for Banana Pi BPI-M2 Series
-
Page 1: Table Of Contents
Table of Contents Introduction BPI-M2 hardware BPI-M2 Hardware interface 1.2.1 BPI-M2 hardware spec 1.2.2 BPI-M2 GPIO Pin define 1.2.3 BPI-M2 micro SD card slot 1.2.4 BPI-M2 GigE LAN 1.2.5 BPI-M2 WIFI interface 1.2.6 BPI-M2 wifi antenna slot 1.2.7 BPI-M2 USB interface 1.2.8 BPI-M2 HDMI interface 1.2.9 BPI-M2 Camera interface 1.2.10 BPI-M2 RGB DSI interface 1.2.11 BPI-M2 IR interface 1.2.12 BPI-M2 OTG interface 1.2.13 BPI-M2 CE FCC RoHS Certification 1.2.14 BPI-M2 3.7V lithium battery interface 1.2.15 BPI-M2 DC Power interface 1.2.16 BPI-M2 schematic diagram 1.2.17 BPI-M2 DXF and 3D design 1.2.18 BPI-M2 software BPI-M2 quick start 1.3.1 BPI-M2 Software... - Page 2 BPI-M2 Building a Minimal System 1.4.2 Reference documents BPI-M2 linux-sunxi wiki 1.5.1 A31 Manual build howto 1.5.2 NetBSD/evbarm on Allwinner Technology SoCs 1.5.3 Linux mainlining effort 1.5.4 Allwinner chip documents 1.5.5 All Banana Pi SBC Comparison All banana pi product BPI 4.0 customized Server...
-
Page 3: Introduction
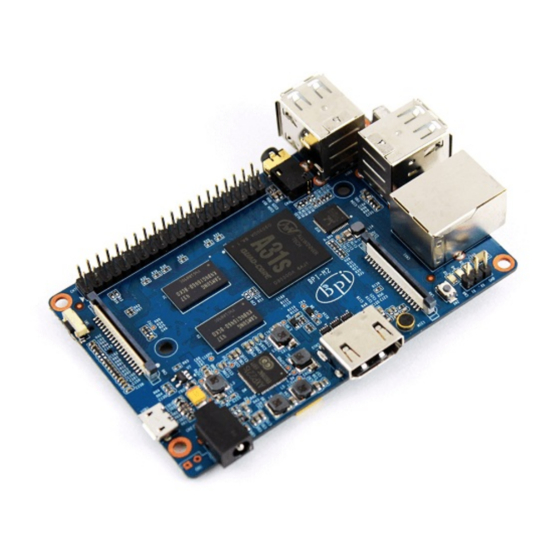
Introduction Banana pi BPI-M2 Banana PI BPI-M2 is the open source hardware platform,Banana PI BPI-M2 is an quad core version of Banana Pi ,Banana PI BPI-M2 is the quad core more better than the Banana Pi BPI-M1,it support WIFI on board. use Alliwnner A31S chip on board. Banana Pi BPI-M2 series run Android,Debian linux,Ubuntu linux, Raspberry Pi image and others image. Banana PI PBI-M2 hardware: 1Ghz ARM7 quad-core processor, 1GB DDR3 SDRAM, Banana PI BPI-M2 with Gigabit ethernet port, It can run with Android 4.4 smoothly. The size of Banana PI BPI-M2 same as banana pi M1, it can easily run with the game it support 1080P high definition video output, the GPIO compatible with Raspberry Pi B+ and can support raspbian Image Note: Banana Pi BPI-M2 not support sata port, so you need use USB for hardisk forum: http://www.banana-pi.org forum: http://www.bananapi.com produce: http://www.banana-pi.com... -
Page 4: Bpi-M2 Hardware
BPI-M2 Hardware interface BPI-M2 hardware interface:... - Page 5 BPI-M2 Hardware interface...
- Page 6 BPI-M2 Hardware interface...
-
Page 7: Bpi-M2 Hardware Spec
BPI-M2 hardware spec BPI-M2 hardware spec:... -
Page 8: Bpi-M2 Gpio Pin Define
BPI-M2 GPIO Pin define BPI-M2 GPIO Pin define Banana Pi has a 40-pin GPIO header that matches that of the Model B+ Raspberry Pi. Following is the Banana Pi GPIO Pinout: GPIO Pin Name Default Function Function2:GPIO CN7-P01 VCC-3V3 CN7-P02 VCC-DC CN7-P03 TWI2-SDA PH19 CN7-P04 VCC-DC CN7-P05 TWI2-SCK PH18 CN7-P06 CN7-P07 PWM1-P CN7-P08 UART5_TX CN7-P09 CN7-P10 UART5_RX CN7-P11 UART2_RX CN7-P12 PWM1-N PH10 CN7-P13 UART2_TX CN7-P14 CN7-P15 UART2_CTS CN7-P16 PWM2-P PH11... - Page 9 BPI-M2 GPIO Pin define CN7-P17 VCC-3V3 CN7-P18 PWM2-N PH12 CN7-P19 SPI1_MOSI PG15 CN7-P20 CN7-P21 SPI1_MISO PG16 CN7-P22 UART2_RTS CN7-P23 SPI1_CLK PG14 CN7-P24 SPI1_CS0 PG13 CN7-P25 CN7-P26 SPI1_CS1 PG12 CN7-P27 TWI3-SDA CN7-P28 TWI3-SCK CN7-P29 I2S-MCLK CN7-P30 CN7-P31 I2S-BCLK CN7-P32 I2S-DI CN7-P33 I2S-LRCK CN7-P34 CN7-P35 I2S-DO0 CN7-P36 UART5_RTS...
- Page 10 BPI-M2 GPIO Pin define CN6-P10 AFVCC-CSI CN6-P11 CN6-P12 CSI-IO0 CN6-P13 LRADC0 CN6-P14 TWI0-SDA PH15 CN6-P15 MIC-MBIAS CN6-P16 TWI0-SCK PH14 CN6-P17 CSI-D4 CN6-P18 CSI0-STBY-EN PH27 CN6-P19 CSI-D5 CN6-P20 CSI-PCLK CN6-P21 CSI-D6 PE10 CN6-P22 CSI0-PWR-EN PG18 CN6-P23 CSI-D7 PE11 CN6-P24 CSI-MCLK CN6-P25 CSI-D8 PE12 CN6-P26 CSI0-RESET# PH26 CN6-P27...
- Page 11 BPI-M2 GPIO Pin define CN9-P02 TWI1-SDA PH15 CN9-P03 IPSOUT CN9-P04 TWI1-SCK PH16 CN9-P05 CN9-P06 TP-INT CN9-P07 LCD-PWR-EN CN9-P08 TP-RST CN9-P09 LCD0-D00 CN9-P10 LCD0-PWM PH13 CN9-P11 LCD0-D01 CN9-P12 LCD0-BL-EN CN9-P13 LCD0-D02 CN9-P14 LCD0-DE PD25 CN9-P15 LCD0-D03 CN9-P16 LCD0-VSYNC PD27 CN9-P17 LCD0-D04 CN9-P18 LCD0-HSYNC PD26 CN9-P19 LCD0-D05 CN9-P20...
- Page 12 BPI-M2 GPIO Pin define CN9-P40 LCD0-D16 PD16 UART Pin specification: The header CON4 is the UART interface. For developers of Banana Pi, this is an easy way to get the UART console output to check the system status and log message. CN8 Pin Name Default Function GPIO CN8 P03 UART0-TXD PH20 CN8 P02 UART0-RXD PH21 CN8 P01 GND ...
-
Page 13: Bpi-M2 Micro Sd Card Slot
BPI-M2 micro SD card slot BPI-M2 micro SD card slot BPI-M1+ have support a TF card slot. you can burn image to TF card ,and use it boot BPI-M1+ same as raspberry pi. Note: support 8G 16G 32G 64G please choose class 10 TF card for banana pi. -
Page 14: Bpi-M2 Gige Lan
BPI-M2 GigE LAN BPI-M2 GigE LAN Banana PI BPI-M2 with one Gigabit ethernet port,use RTL8211E chip on board. -
Page 15: Bpi-M2 Wifi Interface
BPI-M2 WIFI interface BPI-M2 WIFI interface BPI-M2 support AP6181 wifi module on board. it support 802.11/b/g/n wifi. use SDIO interface ,not connect with USB... -
Page 16: Bpi-M2 Wifi Antenna Slot
BPI-M2 wifi antenna slot BPI-M2 wifi antenna slot banana pi BPI-M2 have support ap6212 wifi&BT module onboard BPI-M2 have wifi antenna slot on board wifi extend antenna slot spec: so you can use 3DB/5DB wifi antenna on BPI-M2... -
Page 17: Bpi-M2 Usb Interface
BPI-M2 USB interface BPI-M2 USB interface BPI-M2 have 4 USB 2.0 interface on board.so you can connect Keyboard,mouse, USB camera and ... on BPI-M2... -
Page 18: Bpi-M2 Hdmi Interface
BPI-M2 HDMI interface BPI-M2 HDMI interface BPI-M2 has a standard HDMI 1.4 interface. so We can use HDMI-to-HDMI cable to connect BPI-M2 to the display monitor that has HDMI interface. But If the display monitor doesn't have HDMI interface,only VGA or DVI port. We should use HDMI-to-VGA or HDMI-to-DVI cable to connect the BPI-M2 to the display monitor. Note: if the HDMI-to-VGA/DVI cable is a bad quality cable,it will go wrong on the monitor display. please choose a good quality cable for BPI-M2... -
Page 19: Bpi-M2 Camera Interface
BPI-M2 Camera interface BPI-M2 Camera interface BPI-M2 CSI Camera Connector is a 40-pin FPC connector which can connect external camera module with proper signal pin mappings. The pin definitions of the CSI interface are shown as below. This is marked on the Banana Pi board as “CSI”. CSI pin define: please see: BPI-M2 GPIO pine define BPI-M2 CSI camera accessories https://bananapi.gitbooks.io/bpi-accessories/content/bpim1m1+m2camera.html... -
Page 20: Bpi-M2 Rgb Dsi Interface
BPI-M2 RGB DSI interface BPI-M2 RGB DSI interface RGB DSI (Display Serial Interface): The display Connector is a 40-pin FPC connector which can connect external LCD panel (RGB DSI) and touch screen (I2C) module as well. The pin definitions of this connector are shown as below. This is marked on the Banana Pi board as “DSI”. DSI pin define: please see: BPI-M2 GPIO pine define BPI-M2 LCD touch panel accessories https://bananapi.gitbooks.io/bpi-accessories/content/bpi70lcdtouchpanel.html note:the touch panel accessories support RGB interface and MIPI interface ,when you use BPI-M1, please choose RGB interface. -
Page 21: Bpi-M2 Ir Interface
BPI-M2 IR interface BPI-M2 IR interface BPI-M2 support IR interface on board. you can use it as remote control. -
Page 22: Bpi-M2 Otg Interface
BPI-M2 OTG interface BPI-M2 OTG interface banana pi BPI-M2 have 1 OTG port on board. Note: you also can use OTG port power BPI-M2... -
Page 23: Bpi-M2 Ce Fcc Rohs Certification
BPI-M2 CE FCC RoHS Certification BPI-M2 CE FCC RoHS Certification BPI-M2 CE Certification BPI-M2 FCC Certification... - Page 24 BPI-M2 CE FCC RoHS Certification BPI-M2 RoHS Certification...
- Page 25 BPI-M2 CE FCC RoHS Certification...
-
Page 26: Bpi-M2 3.7V Lithium Battery Interface
BPI-M2 3.7V lithium battery interface BPI-M2 3.7V lithium battery interface 1,Battery interface of BPI-M2: use way same as BPI-M3. https://bananapi.gitbooks.io/bpi-m3/content/bpim3lithiumbatteryinterface.html... -
Page 27: Bpi-M2 Dc Power Interface
BPI-M2 DC Power interface BPI-M2 DC Power interface BPI-M2 DC power port, you need use 5V/2A DC power adapter. Dc power size:... -
Page 28: Bpi-M2 Schematic Diagram
BPI-M2 schematic diagram BPI-M2 schematic diagram You can refer to the contents of our forum from this link: Google driver File name :BPI-M2-V3_1 20150123.pdf... -
Page 29: Bpi-M2 Dxf And 3D Design
BPI-M2 DXF and 3D design BPI-M2 DXF and 3D design banana pi BPI-M2 have public DXF file and 3D design file ,so user can DIY case by theyself. BPI-M2 DXF file download link: Google driver BPI-M2 3D design file download link: Google driver... -
Page 30: Bpi-M2 Software
BPI-M2 software BPI-M2 software... -
Page 31: Bpi-M2 Quick Start
BPI-M2 quick start BPI-M2 quick start Step 1: Get what you need First time to enjoy your Banana Pi, you need at least the accessories in the table below. Item Minimum recommended specification & notes SD card is optional. If need to boot form SD card, Minimum size 8GB, class 10 (the class MicroSD card indicates how fast the card is). We recommend using branded SD cards as they are more reliable. avHDMI(Full HDMI to HDMI lead (for HD TVs and monitors with HDMI input).OR HDMI to DVI lead sized) to HDMI (for monitors with DVI input). / DVI lead Any standard USB keyboard and mouse should work. keyboards or mice that take a lot Keyboard and of power from the USB ports, however, may need a powered USB hub. This may include mouse some wireless devices. Networking is optional, although it makes updating and getting new software for your Ethernet cable Banana Pi much easier. Micro USB A good quality, USB Power supply that can provide at least 5V/2A is essential.OTG also power adapter can power the board, but it is not recommended. Audio lead You can choose a 3.5mm jack audio led to connect to audio port to get stereo audio. (Optional) Mobile Hard You can choose to connect a mobile hard disk to USB port to store more files. disk (Optional) Base you need below:... - Page 32 BPI-M2 quick start Step 2: Download the relevant Image file: Please visit our webmaster: www.banana-pi.org to download image, banana pi all image can be download form this web. Step3: Prepare your SD card for the Banana Pi In order to enjoy your Banana Pi BPI-M3, you will need to install an Operating System (OS) onto an SD card or eMMC Flash. Instructions below will teach you how to write an OS image to your SD card or eMMC Flash under Windows and Linux. 1.Insert your SD card into your computer. The size of SD should be larger than the OS image size, generally 8GB or greater. 2.Format the SD card. Format your SD under Windows os : Download the a SD card format tool such as SD Formatter from https://www.sdcard.org/downloads/formatter_4/eula_windows/ *Unzip the download file and run the setup.exe to install the tool on your machine. *In the "Options" menu, set "FORMAT TYPE" option to QUICK, "FORMAT SIZE ADJUSTMENT" option to "ON".
- Page 33 BPI-M2 quick start *Check that the SD card you inserted matches the one selected by the Tool. *Click the “Format” button. Format your SD under Linux os : *Run fdisk –l command to check the SD card node. *Run sudo fdisk /dev/sdx command to delete all partition of SD card. *Run mkfs –t vfat /dev/sdx command to format the entire SD card as FAT. (x should be replaced according to your SD card node) 3,Download the OS image from Download district(http://www.banana-pi.org) 4.Unzip the download file to get the OS image. Windows: Right click on the file and choose “Extract all”. Linux: Run unzip [downloaded filename] command. 5.Write the image file to the SD card. Android image 5.1 You need to use Phoenix Card to make the SD card. Download the Phoenix Card from https://drive.google.com/open? id=0BzoTh3Vdt47ffi1ld0RuWXhUVzdYdjFjaHEtMlNQWVFTRmIxcC1OQnczSTV6OGRZWGplNU0 5.2 Run PhoenixCard.exe, Press “Disk Check” and select disk of SD Card.
- Page 34 BPI-M2 quick start 5.3 Press “Image File” and Select system.img. 5.4 Press “Burn” to start upgrading, Upgraded complete, Press “Exit”.
- Page 35 BPI-M2 quick start Linux image: 5.6 burun Linux image under Windows os: *Download a tool that can wirte image to SD card, such as Win32 Diskimager from: http://sourceforge.net/projects/win32diskimager/files/Archive/ *Open the unzipped image file *Click Write button. Wait patiently to successfully complete writing. 5.7 burun Linux image under Linux os: *Run fdisk –l command to check the SD card node. *Run dd if=[imagename] of=/dev/sdx command to write image file to SD card. Wait patiently to successfully complete writing. Step4: Set up your Banana Pi M2 According to the set up diagram below, you can easily set up your Banana Pi. 1. Insert the written-image SD card that to the SD card spot on the left side edge of the underside of the board.
- Page 36 BPI-M2 quick start 2. 2.On the bottom "edge" in the middle of the board is the HDMI Type A (Full sized) port.Just connect any HDMI cable from the board to your TV or HDMI Monitor. 3. Plug a USB keyboard and mouse into the USB slots located on the right edge. 4. Just under the USB ports on the right edge is the Ethernet connector for anyone who wants to plug the Banana Pi into a wired network. 5. 5.Finally, at the very left of the bottom edge is the USB power connector. Plug in a regulated power supply that is rated at 5V ±5% / 2000mA (or 2A). Any number bigger than 700 mA will also work. Avoid using the smaller chargers used for small GSM phones, as these are often unregulated, even if they claim "5V 1A", they may do "5V" and may do "1A", but not at the same time! If all goes well, the Banana Pi will boot in a few minutes. The screen will display the OS GUI. Step5: Shut down your Banana Pi You can use the GUI to shut down the Banana Pi safely. Also you can run the command in the terminal: sudo halt sudo shutdown –h This will shut down the PI safely, (just use the power key to turn off might damage the SD-cards file system).After that you can press the power key for 5 seconds to turn it off. If all is well ,so you can use banana pi M2 now.
-
Page 37: Android Software
Android software Android software Banana pi BPI-M2 support android 4.4. Image download link: http://www.banana-pi.org/download.html... -
Page 38: How To Build Android 4.4.2 Image For Bpi-M2
Android software How to build Android 4.4.2 Image for BPI-M2 1. Install the Linux system for building,'Ubuntu 12.04.x LTS'is recommended. 2. Install the needed software packages. sudo apt-get install python-software-properties sudo add-apt-repository ppa:webupd8team/java sudo apt-get update sudo apt-get install oracle-java6-installer sudo apt-get install libglapi-mesa:i386 sudo apt-get install git gnupg flex bison gperf build-essential zip curl libc6-dev libncurses5-dev:i386 x11proto -core-dev libx11-dev:i386 libreadline6-dev:i386 libgl1-mesa-glx:i386 libgl1-mesa-dev g++-multilib mingw32 tofrod os python-markdown libxml2-utils xsltproc zlib1g-dev:i386 sudo ln -s /usr/lib/i386-linux-gnu/mesa/libGL.so.1 /usr/lib/i386-linux-gnu/libGL.so sudo apt-get install uboot-mkimage sudo apt-get install xserver-xorg Do NOT reboot system during the process! (IMPORTANT!) 3. Download the latest source code pack from our developer website http://dev.banana-pi.org.cn .And unpack. 4.Building. Build for hdmi. Build for 7' LCD. ``` ./build_LCD.sh If you have finished building one of versions(hdmi OR LCD).Please run following commmand before building another! (IMPORTANT!) ./make_clean.sh For more information of buileding,pleace view 'Build_Code_Command.txt' in code package. discuss on forum: http://forum.banana-pi.org/t/how-to-build-android-4-4-2-image-for-bpi-m2/467... -
Page 39: Abd Driver
Android software ABD driver banana pi Android ADB Drive download link link; baidu download link: http://pan.baidu.com/s/1sj3eDJn google driver download link: https://drive.google.com/file/d/0B4PAo2nW2KfnWXFzRGdWOC1fU2c/view?usp=sharing... -
Page 40: Linux Kernel 3.3
Android software Linux kernel 3.3 2016-07-19-edu-ubuntu-mate-1604-preview-bpi- m2.img.zip 2016-07-19-edu-ubuntu-mate-1604-preview-bpi-m2.img.zip 1. based on ubuntu 16.04 mate from bpi-m3-mate (http://opensource.ntpc.edu.tw/) 2. BPI-M2 kernel 3.3 3. username & password: pi/bananapi , root/bananapi 4. support HDMI 1080P & 720P(default) 5. support GMAC 6. support WIFI 7. support bpi-bootsel cmd can switch to (bpi-m3 & bpi-m2 & bpi-m2p) 8. support uEnv.txt to fatload script.bin & uImage 9. support uEnv.txt to set video 1080P & 720P & 480P ... 10. support nodejs 11. support node-red 12. included many apps for edu 13. support scratch 2 online with scratchx 14. special thanks to the team of http://opensource.ntpc.edu.tw/ info: need >= 16GB SD Google Drive: https://drive.google.com/file/d/0B_YnvHgh2rwjUDhMaDctSDlkMU0/view?usp=sharing MD5: ca175a9e2dc05f0c00f70d193d8cc020... - Page 41 Android software Raspbian Jessie(debian 8) 2016-03-18 for BPI-M2 (20160408) 1. BPI-M2 kernel 3.3 2. username & password: pi/bananapi , root/bananapi 3. support HDMI 1080P & 720P(default) 4. support GMAC 5. support WIFI 6. support bpi-bootsel cmd can switch to (bpi-m3 & bpi-m2 & bpi-m2p) 7. support uEnv.txt to fatload script.bin & uImage 8. support uEnv.txt to set video 1080P & 720P & 480P ... 9. support node-red Google Drive: https://drive.google.com/file/d/0B_YnvHgh2rwjNk41T18zSERlcG8/view?usp=sharing MD5: 31143d36e091e72e9e496d80c563efc7 more image ,please see: http://www.banana-pi.org/m2-download.html...
-
Page 42: How To Building A Minimal System
Android software How to building a Minimal system for BPI-M2 1, Format microSD card Prepare one Class 10 SD card,and cut into two parts; the first partition is FAT32、the second partition is EXT4;but SD card’s front end should be reserve space more than 100MB which as Bootloader,Kernel storage area.we use Ubuntu provided by GParted tool to help us cut SD card. Front end reserve 100MB,first part file system is FAT32,space is 50MB Second partition file system is EXT4;size is remaining space from SD card 2,Install tool-chain udo apt-get install build-essential libncurses5-dev u-boot-tools qemu-user-static\ debootstrap git binfmt-support lib usb-1.0-0-dev pkg-config... - Page 43 Android software sudo apt-get install gcc-arm-linux-gnueabihf 3,To BPI-GitHub https://github.com/BPI-SINOVOIP/BPI-M2-bsp git clone https://github.com/BPI-SINOVOIP/BPI-M2-bsp.git After running,please switch to BPI-M2-bsp directory,run ./build.sh order to know support what development board currently: ./build can see BPI-M2 re-configuration profile; select the resolution what you want to compile the BPI-M2,it is assumed that BPI_M2_720P Select model what you need compile(Here suggest choose (1) option when you compile first time)
- Page 44 Android software 4,After compilation,can see produce new download folder under /BPI-M2-bsp 5,Go to ArmHf official website http://www.armhf.com/download/download Root File Systems-Debian Wheezy 7.5 6,Install Root File Systems extract the files which was download compressed to SD second partition EXT4; please note that the decompressed instructions sudo tar --strip-components=1 -pJxvf< file source > -C < Extract storage location > 7,Install BootLoader;please use order to see current SD card position sudo fdisk -l...
- Page 45 Android software After run order,can see the example SD card’s position in /dev/sdb Please refer to fourth tips,after compilation will have Bananapi folder;then youwill see bootload/ Kernel these file from download/BPI_M2_720P folder。Please write in former 100MB of SD card Individually。 sudo dd if=boot0_sdcard.fex of=${card} bs=1k seek=8 sudo dd if=u-boot.fex of=${card} bs=1kseek=19096 sudo dd if=sunxi_mbr.fex of=${card} bs=1k seek=20480 sudo dd if=bootloader.fex of=${card} bs=1k seek=36864 sudo dd if=env.fex of=${card}bs=1k seek=69632 sudo dd if=boot.fex of=${card} bs=1k seek=86016 Step 1: BPI-M2 we will use first partition FAT32 don’t need to copy any file,for compatible with Kernel4.1.X in the near future Step 2: Copy modules to Second partition EXT4 of lib catalog from /BPI-M2-bsp/download/BPI_M2_720P/lib directory Step 3:Please building wifi-firmware read’s directory (/system/vendor)and building Link from Second partition,because BPI-M2 loading bcmdhd.ko will go to relative path searching WiFi-firmware,so we need building one link: $sudo mkdir system $cd system $sudo mkdir vendor...
- Page 46 Android software Go to system/vendor directory building relative link $ sudo ln -s /lib/modules/3.11.0-15-generic/ modules 8.Finished above steps please insert maked-SD card into Banana Pi,please try to Boot。...
-
Page 47: Uboot
Android software uboot Patchwork [U-Boot,v2,2/2] sunxi: Add defconfig for the Sinovoip BPI-M2 boardlogin register mail settings more message: http://patchwork.ozlabs.org/patch/530737/... -
Page 48: Mainline Kernel
Android software mainline kernel... -
Page 49: Armbian Linux
Android software Armbian linux for BPI-M2 Armbian.org have image support BPI-M2 more please see: http://www.armbian.com/banana-pi-m2/... -
Page 50: Bananian Linux
Android software Bananian linux Bananian Linux is a pre-installed Debian 8 image optimized for Banana Pi/Pro. It uses the official Debian Jessie armhf repositories with a kernel and bootmanager (u-boot), customized for Banana Pi. A Debian 7/Wheezy image (Bananian 15.04) is also available and maintained. We support the Banana Pi (M1, M1+,M2), BPI-R1 with just one single image. The main focus is to provide a lightweight headless platform for home servers, small webservers, ownCloud hosting, Linux based wifi access points, router, NAS systems, monitoring devices, etc. Official web for image download and support: https://www.bananian.org/bananapi-m2... -
Page 51: Opensuse
Android software OpenSuse for BPI-M2 Banana Pi M2, runs on A31s quad-core CPU and has 1G RAM, powerful enough to run openSUSE Tumbleweed with Xfce Desktop. Here is how you can get openSUSE running on Banana Pi M2. Download the image https://sourceforge.net/projects/cyberorg-home/files/opensuse-arm/openSUSE-Tumbleweed-Bpi- M2-Xfce.tar.xz/download Extract the archive to get openSUSE-Tumbleweed-Bpi-M2-Xfce.img Dump openSUSE-Tumbleweed-Bpi-M2-Xfce.img on to a SD card (dd if=/path/to/openSUSE-Tumbleweed-Bpi-M2-Xfce.img of=/dev/sdX bs=4M; sync #replace /dev/sdX with your actual SD card device) In case you have a bigger SD card, use yast2 disk(partitioner) to “expand” the second partition. You can use yast’s package manager to install more software. The default password for root is linux, you may want to change that first thing after booting. Note: unable to get sound on this hardware, probably their kernel is missing sound related modules, if you figure out how to get sound working drop me a line so I can include it in next release.Everything else(wifi, hdmi out, USB ports etc) works well enough. more please see this link: https://lizards.opensuse.org/2015/12/03/banana-pi-m2-running-opensuse-tumbleweed/... -
Page 52: Openwrt
OpenWRT OpenWRT OpenWRT have support many allwinner chip . so easy to use it on banana pi Allwinner Sun4i/5i/6i/7i/9i (sunxi) Various vendors are offering development boards / single-board computer based on the Allwinner SoCs. These are running various flavors of the A1x, A20, A31, and soon H3 SoCs, with different buildouts. The mach is called "sunxi". For some specs rather see Allwinner_Technology#A-Series. more please see: https://wiki.openwrt.org/doc/hardware/soc/soc.allwinner.sunxi?s[]=banana&s[]=pi... -
Page 53: Bpi-M2 Wiringpi
BPI-M2 WiringPi BPI-M2 WiringPi install BPI-M2 WiringPi: 1,Download WiringPi from github For BPI-M2 git clone https://github.com/BPI-SINOVOIP/BPI-WiringPi.git -b BPI_M2 2,Installation: cd BPI-WiringPi chmod +x ./build sudo ./build 3,test wiringPi is install success gpio -v gpio readall 4,create new : blink.c... - Page 54 BPI-M2 WiringPi #include <wiringPi.h> int main(void) wiringPiSetup() ; pinMode (0, OUTPUT) ; for(;;) digitalWrite(0, HIGH) ; delay (500) ; digitalWrite(0, LOW) ; delay (500) ; compile and run it: gcc -Wall -o blink blink.c -lwiringPi runing it: sudo ./blink BPI have many extend board support WiringPi. so you can free DIY by youself: more about BPI extend board,please see: https://bananapi.gitbooks.io/bpi-accessories/content/...
-
Page 55: Bpi-M2 Source Code On Github
BPI-M2 source code on github BPI-M2 source code on github All newest source code have update on this github site. https://github.com/BPI-SINOVOIP/BPI-M2-bsp... -
Page 56: How To Setup Docker Env. To Build Github Source Code
How to setup docker env. to build github source code How to setup docker env. to build github source code how to setup docker env. to build banana pi github source code step 1: install docker https://docs.docker.com/engine/installation/linux/ubuntulinux/ step 2: docker run https://hub.docker.com/r/sinovoip/bpi-build/ $ do cker run -d -p 2222:22 -v /media:/media sinovoip/bpi-build:ubuntu12.04 on your host $ ssh -p 2222 root@127.0.0.1 //default passwd is root or (with --privileged can use /dev/loop for create img) $ docker run -d -p 3333:22 --privileged -v /media:/media sinovoip/bpi-build:ubuntu12.04 $ ssh -p 3333 root@127.0.0.1 //default passwd is root step 3: git clone # cd /media/XXX/your-source # git clone https://github.com/BPI-SINOVOIP/BPI-M3-bsp.git step 4: build # ./build.sh how to create your own env. to build the code step 1: git clone https://github.com/BPI-SINOVOIP/bpi-build.git step 2: vi Dockerfile step 3. vi build.sh step 4: ./build.sh why use docker env. to build banana pi source code 1. allwinner tools needs ubuntu12.04 with ia32-libs ... 2. user maybe use ubuntu 12.04 or 14.04 and newer like 16.04, the docker env. the same, even other linux like fedora opensuse archlinux .., or other os like macos , windows ... 3. build BPI-Mx-bsp env. than mainline kernel & uboot or android 4.X or android 5.X / 6.X not the same. -
Page 57: Bpi-M2 Building A Minimal System
BPI-M2 Building a Minimal System BPI-M2 Building a Minimal linux System document Google Download Link: https://drive.google.com/a/edu.52miku.tk/file/d/0B4l1r4Ltm446MFBvUkwtVU9lcmM/view Baidu Download Link: http://pan.baidu.com/s/1ntrHIh7... -
Page 58: Reference Documents
Reference documents Reference documents for BPI-M2... -
Page 59: Bpi-M2 Linux-Sunxi Wiki
BPI-M2 linux-sunxi wiki BPI-M2 linux-sunxi wiki http://linux-sunxi.org/Banana_Pi_M2... -
Page 60: A31 Manual Build Howto
A31 Manual build howto A31 Manual build howto This is currently a placeholder for an A31 specific rework of the Manual build howto. This page describes the process to combine Allwinners binary boot0, an SDK U-Boot, an SDK linux kernel and other bits together to create a useful SD-card from scratch, the basis for further hacking. This page is only suited for A31 and A31s based devices, please look under See also for other manual build howtos. We of course do not build a whole distribution, we only build U-Boot, the kernel and a handful of tools, and then use an existing rootfs to get a useful system. Depending on the rootfs size, you might want to use a 2GB or larger SD Card. SD- card partitioning and formatting will be taken care of later. link: http://linux-sunxi.org/A31_Manual_build_howto... -
Page 61: Netbsd/Evbarm On Allwinner Technology Socs
NetBSD/evbarm on Allwinner Technology SoCs NetBSD/evbarm on Allwinner Technology SoCs NetBSD is a free, fast, secure, and highly portable Unix-like Open Source operating system. It is available for a wide range of platforms, from large-scale servers and powerful desktop systems to handheld and embedded devices. Its clean design and advanced features make it excellent for use in both production and research environments, and the source code is freely available under a business-friendly license. NetBSD is developed and supported by a large and vivid international community. Many applications are readily available through pkgsrc, the NetBSD Packages Collection NetBSD 7.0 has support for A20 and A31 SoCs. NetBSD -current adds support for A80 SoCs. more please see: https://wiki.netbsd.org/ports/evbarm/allwinner/#index1h1... -
Page 62: Linux Mainlining Effort
Linux mainlining effort Linux mainlining effort The purpose of this page is to try and define sub-goals and milestones for the mainlining effort, containing goals and sub- goals with milestones for adding Allwinner support in the upstream mainline Linux Kernel. It is very important to note that this is intended as a rough set of minimal goals - it is not meant to collide with the huge effort of rewriting major drivers! more ,please see link: http://linux-sunxi.org/Linux_mainlining_effort... -
Page 63: Allwinner Chip Documents
Allwinner chip documents Allwinner chip documents allwinner chip online datasheet and documents: http://dl.linux-sunxi.org/... -
Page 64: All Banana Pi Sbc Comparison
All Banana Pi SBC Comparison All Banana Pi SBC Comparison... -
Page 65: All Banana Pi Product
All banana pi product All banana pi product banana pi BPI-M1 allwinner A20 dual core single board computer gitbook online datasheet:https://bananapi.gitbooks.io/bpi-m1/content/en/ banana pi BPI-M1+(BPI-M1+ plus) allwinner A20 dual core single board computer gitbook online datasheet:https://bananapi.gitbooks.io/bpi-m1-bpi-m1-plus-/content/en/ banana pi BPI-M2 allwinner A31s quad core single board computer gitbook online datasheet:https://bananapi.gitbooks.io/bpi-m2/content/en/ banana pi BPI-M2+(BPI-M2 Plus)allwinner H3 quad cord single board computer gitbook online datasheet:https://bananapi.gitbooks.io/bpi-m2-/content/en/ banana pi BPI-M2 Ultra allwinner R40 quad core single board computer gitbook online datasheet:https://bananapi.gitbooks.io/bpi-m2-ultra/content/ Banana pi BPI-M3 allwinner A83T (R58 H8) octa-core single board computer gitbook online datasheet:https://bananapi.gitbooks.io/bpi-m3/content/en/ banana pi BPI-M64 allwinner A64 64 bit single board computer gitbook online datasheet:https://bananapi.gitbooks.io/bpi-m64/content/en/ banana pi BPI-R1 allwinner A20 dual core smart router board gitbook online datasheet:https://bananapi.gitbooks.io/bpi-r1/content/en/ banana pi BPI-D1 open source IP camera board gitbook online datasheet:https://bananapi.gitbooks.io/bpi-d1/content/en/ banana pi BPI-G1 open source IoT development board gitbook online datasheet:https://bananapi.gitbooks.io/bpi-g1/content/en/ banana pi BPI Accessories gitbook online datasheet:https://bananapi.gitbooks.io/bpi-accessories/content/en/ BPI Open debugger burn development tool board gitbook online datasheet:https://bananapi.gitbooks.io/bpi-open-debugger-burn-board/content/en/... -
Page 66: Bpi 4.0 Customized Server
BPI 4.0 customized Server BPI 4.0 customized Server Having been doing R&D in embeded systems for more than 12 years. Our experienced teams are able to help you to carry out your dream. Whether you want to customize banana pi or want to design a computer from scratch, we got you covered. Also, our modern ISO factory spans over 10,000 square meters can help you mass manufacture products to hit the market Our factory:Sinovoip In order to meet the companys development needs, and further production capacity and product quality. Sources Communication shareholders decided to invest in new plant to build their own, the new factory site is located in manholes and covers an area of more than 10000 square meters,equipped with full range of production equipment and high quality technical management personnel . We have complete SMT production lines, plug-ins production line, assembly line, production line testing. your Idea, we will help you optimize and design. your Design, we will help you bring it to live. your Product, we will help you mass produce it. Customize Pi If you want to tailor your Banana pi to your specific use or to minimize the cost for mass production purpose, you are coming the right place. We provide the customization service of banana pi such as remove/add headers or connectors,change component layout,add/remove components,change interfaces etc. Start from scratch (ODM) An idea flashes through your mind in your dreams or a solution bearing in your mind for a long time, which you think would turn out to be great gadget to hit the market, but you are worrying about how to start and realize it without R&D and manufacturing, now that's no longer a trouble to you. Taking advantage of our expertise,we provide full ODM service for you. We let you have your sample products from scratch within 45 days. Don't wait,come to realize your dreams. - Page 67 BPI 4.0 customized Server Have a prototype (OEM) You are an expert, you designed a wonderful device that most people would want to have it, you knew it quite well that your success is just around the corner. The only last step is to produce it,but without manufactruing capability..., no problem, let us carry you through. Our 13 years of SCM experience and mass manufacturing facilities enable you free from quality issue,delivery...
Need help?
Do you have a question about the BPI-M2 Series and is the answer not in the manual?
Questions and answers