Truma CP plus VarioHeat Operating Instructions Manual
Hide thumbs
Also See for CP plus VarioHeat:
- Operating instructions manual (88 pages) ,
- Operating instructions manual (20 pages) ,
- Operating instructions manual (20 pages)
Table of Contents
Advertisement
Quick Links
Advertisement
Table of Contents

Related Manuals for Truma CP plus VarioHeat


Summary of Contents for Truma CP plus VarioHeat
- Page 1 Truma CP plus VarioHeat Operating instructions Page 2 To be kept in the vehicle!
-
Page 2: Table Of Contents
Air conditioning systems – shared use of IR remote control system (A) ................. 18 Troubleshooting guide, Truma E-Kit (E) ....... 18 and Truma CP plus VarioHeat control panel ......3 Display and control elements .......... 4 Rotary push button ............... 4 Back button ................4 Initial start-up .............. -
Page 3: Operating Instructions Intended Use
(no bidirectional communication). is in a technically perfect condition. – Only the time switch of the Truma CP plus VarioHeat control – Repairs must be carried out immediately. Only carry out panel may be used to clearly define the start and end time repairs yourself if the solution is described in the trouble- of a required period. -
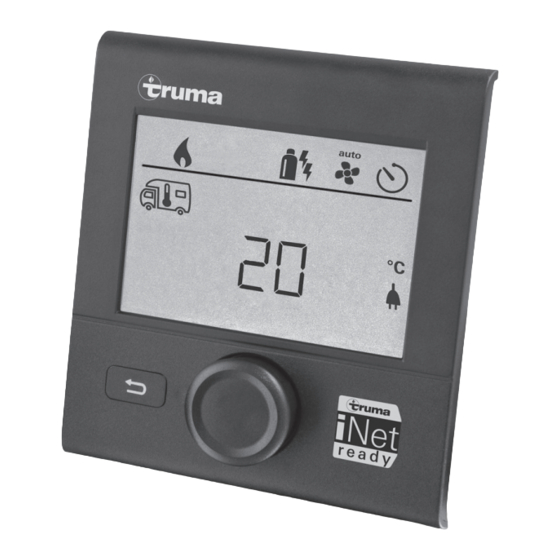
Page 4: Display And Control Elements
4 = Menu bar (lower) – Main switch function ON / OFF. 5 = 230 V mains supply indicator (power) – If an Truma iNet Box was recognised 6 = Time switch display while searching for an appliance, the 7 = Settings / Values... -
Page 5: Initial Start-Up
– Switch on power supply. 12 V for Truma CP plus VarioHeat order. The operating parameters are shown on the status control panel, Truma VarioHeat and Truma E-Kit and 230 V bar (2) and on the displays (5, 6). for air conditioning systems and Truma E-Kit. -
Page 6: App Mode In Conjunction With An Inet Box
(AC) using the rotary push button, depending on the – No operation of the air conditioning system. connected appliance. – No time switch function in the Truma CP plus VarioHeat – Tap rotary push button to confirm selection. control panel –... -
Page 7: Select Energy Type
The Truma E-Kit heats with max. 1800 W. Select energy type Select fan level Is displayed only if a Truma VarioHeat and a Truma E-Kit are both connected. With connected heating / air conditioning system – Select icon in menu bar (3) with rotary push button. -
Page 8: Set Time Switch
Fan level “BOOST” results in higher power consumption, higher noise level and increased motor wear. – Switch off the Truma CP plus VarioHeat control panel to prevent the heater being switched back on by the As soon as the heater is switched on (room temperature Truma App or the time switch (see “Switching on/off”). - Page 9 – When air conditioning systems are being operated, use Entering the end time only the time switch of the Truma CP plus VarioHeat – Set the hours then the minutes with the rotary push button. control panel to clearly define the start and end time for 24 h mode...
-
Page 10: Switch Lighting On / Off
– Tap the rotary push button to confirm the value. Fig. 19 Switch lighting on / off Only with Truma Aventa roof-mounted air conditioning sys- tems with Aventa air distributor (with integrated lighting). Fig. 17 – Select icon in menu bar (4) with rotary push button. -
Page 11: Set Time
Service menu 1. Calibrating the room temperature sensor of the heater (OFFSET) The room temperature sensor of the heater can be individually adjusted to the sensor’s installation situation. The setting can be Fig. 20 made in increments of 0.5 °C within the range of 5 °C to -5 °C. Example: Set time Set room temperature 23 °C;... - Page 12 – with good circulation and not on the vehicle ceiling. – “AC SET” appears in the Service menu. Truma dealers / Truma partners are trained in the correct in- – The automatic climate control function AUTO is stallation of the automatic climate control. You can find our blocked.
- Page 13 8. Showing the version number Display time in 12 h (a. m., p. m.) / 24 h mode. Display the version number of the heater, air conditioning system, Truma iNet Box, and Truma CP plus VarioHeat con- trol panel. Example: H 1.20.01 -> H = Appliance; 1.20.01 = Version number Fig.
-
Page 14: Special Displays
Truma App with iNet Box When a command is sent via the Truma APP from a mobile device, “APP” appears in the display. External control panel (CI-BUS) Fig. 31 After confirmation, the Truma CP plus VarioHeat control panel When a command is sent via an external control panel with initialises itself. -
Page 15: Warning / Error
Error remedied with the aid of the troubleshooting guide (from page 17 and ff). In the event of an error, the Truma CP plus VarioHeat control Returning to the settings level panel immediately jumps to the “Warning/Error” menu level – Tap the rotary push button or press the Back button. If the and displays the respective fault code. -
Page 16: Maintenance
– Press the Back button. range -25 °C to +60 °C Storage temperature range -25 °C to +70 °C In this case, the error in the Truma CP plus VarioHeat Interfaces control panel is not acknowledged and the warning Truma CP plus VarioHeat symbol (Figure 34 - 1) remains. The appliance remains in fault... -
Page 17: Troubleshooting Guide, Truma Varioheat (H)
Troubleshooting guide, Truma VarioHeat (H) Fault code Cause Remedy E 2 H Flame not recognised: E 16 H – Gas cylinder empty – Replace gas cylinder – Gas cylinder or quick-acting valve in the gas – Check gas supply and open valves supply line closed –... -
Page 18: Troubleshooting Guide, Truma Air Conditioning System (A)
– Restore 230 V operating voltage W 104 E – 230 V fuse defective – Replace 230 V fuse – Truma E-Kit has no 12 V power supply – Ensure 12 V power supply W 255 E – No connection between Truma E-Kit and –... - Page 19 Should problems occur, please contact the Truma Service Centre or one of our authorised service partners (see www.truma.com). In order to avoid delays, please have the unit model and serial number ready (see type plate). Service Truma Gerätetechnik GmbH & Co. KG Wernher-von-Braun-Straße 12...