Table of Contents
Advertisement
Quick Links
Advertisement
Table of Contents

Related Manuals for Elcometer 1620


Summary of Contents for Elcometer 1620
- Page 1 Elcometer 1620 Cupping Tester Operating Instructions...
- Page 2 Elcometer Limited. All other trademarks acknowledged. © Copyright Elcometer Limited. 2008-2013. All rights reserved. No part of this Document may be reproduced, transmitted, transcribed, stored (in a retrieval system or otherwise) or translated into any...
-
Page 3: Table Of Contents
CONTENTS Section Page About your tester ......... . 2 1.1 Standards. -
Page 4: About Your Tester
The amount of cupping is then read from a gauge mounted on the instrument. 1.1 Standards The Elcometer 1620 can be used in accordance with the following National and International Standards •... - Page 5 The Elcometer 1620 Cupping Tester is packed in a cardboard and foam package. Please ensure that this packaging is disposed of in an environmentally sensitive manner. Consult your local Environmental Authority for further guidance. To maximise the benefits of your new Elcometer 1620 please take some time to read these Operating Instructions.
-
Page 6: Getting Started
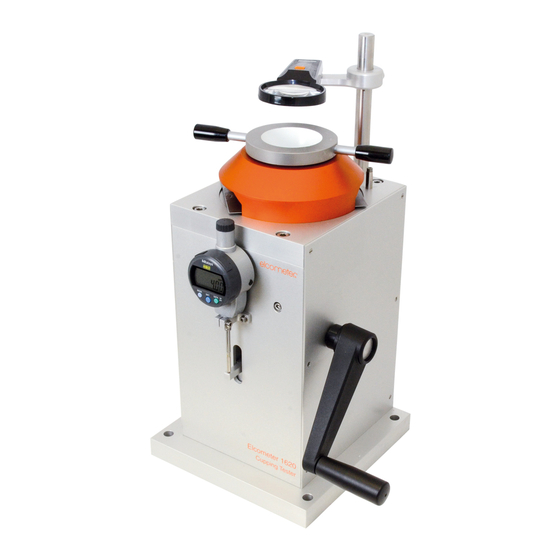
2 GETTING STARTED 2.1 The parts of your tester tightening Magnifying ring Glass chamber Crank Gauge 0.00 DATA MODE TOL. Figure 1. Parts of the tester 2.2 Installation Fasten the tester onto a rigid table. Four holes are provided in the mounting flange for this purpose. -
Page 7: Digital Gauge
2.3 Digital gauge The Elcometer 1620 is fitted with a digital gauge. To switch the gauge on, press the ON/OFF button. Press and hold to switch off. After changing the battery the gauge will need to be zeroed. To zero the gauge, see “Zeroing the gauge”... - Page 8 3. Place the sample to be tested in the die chamber and screw down the die tightening ring until the sheet is clamped firmly (see Figure 3). Figure 3. Metal sheet clamped in the die and ready for cupping test 4.
-
Page 9: Zeroing The Gauge
4 ZEROING THE GAUGE The tester is supplied from the Elcometer factory correctly set to zero and ready to use. If the gauge is removed, reset or the battery changed it must then be set to zero using the following procedure. - Page 10 4. Remove the gauge from the tester (unscrew the clamping screw), place the gauge into the gauge holder and tighten the retaining screw gently (see Figure 6). 0.00 MODE DATA Figure 6. 5. Place the gauge and holder into the aperture of the die tightening ring;...
- Page 11 8. Press SET. The display will show the previously set preset value and a flashing ‘P’. If the display shows ‘+0000.00’ press set to +0000.00 zero the display. If the display shows a preset value that is not zero refer to the Mitutoyo instructions supplied with the gauge to set the preset value to zero.
-
Page 12: Maintenance
Molykote™ grease, or equivalent. The tester does not contain any internal user-serviceable components. In the unlikely event of a fault, the Elcometer 1620 should be returned to your local Elcometer supplier or directly to Elcometer. The warranty will be invalidated if the gauge has been opened.
Need help?
Do you have a question about the 1620 and is the answer not in the manual?
Questions and answers