
Subscribe to Our Youtube Channel
Related Manuals for Concept Pro VHSDIR-812EXT-IP3M


Summary of Contents for Concept Pro VHSDIR-812EXT-IP3M
- Page 1 VHSDIR-812EXT-IP3M External IR Network High Speed Dome User Manual Issue V1.0 Date 01-03-2017...
-
Page 3: Precautions
External IR Network High Speed Dome Precautions User Manual Precautions Precautions Please be sure to fully understand this document before using this device, and strictly observe all rules in this document when using this device. Please also be sure installation of this device abides by local surveillance rules and regulations. Failure to correctly use electrical products may cause fire and severe injuries. - Page 4 External IR Network High Speed Dome Precautions User Manual Strictly conform to local electrical safety standards and use power adapters that are marked with the relevant LPS standard when installing and using this device. Otherwise, this device may be damaged. Only use accessories delivered with this device.
- Page 5 External IR Network High Speed Dome Precautions User Manual Special Announcement All complete products sold by the manufacturer are delivered along with name plates, operation instructions, and accessories after strict inspection. The manufacturer shall not be held responsible for counterfeit products. This manual may contain misprints, inaccurate technological information, or product function and operation descriptions that are slightly inconsistent with the actual product.
-
Page 6: Table Of Contents
External IR Network High Speed Dome Contents User Manual Contents Precautions ........................i 1 Overview ........................1 1.1 Hardware connection ......................1 1.2 Features ..........................3 2 Device Dimensions ....................4 3 Device Installation ....................5 3.1 Installation Preparation ..................... 5 3.2 Installing a Dome Camera .................... -
Page 7: Overview
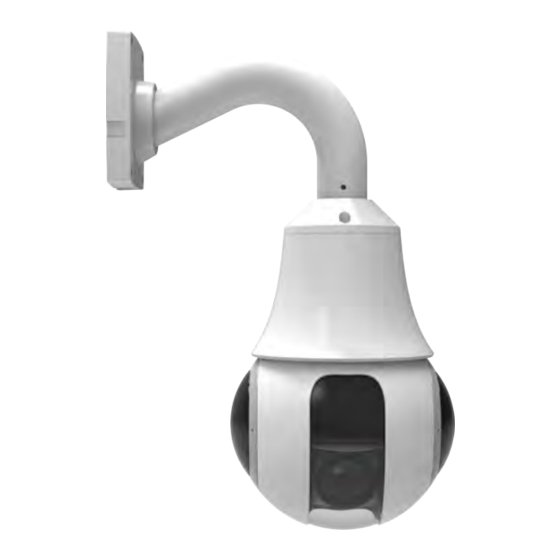
IR Network High Speed Dome 1 Overview User Manual Overview 1.1 Hardware Connection Figure 1-1 shows the appearance of the External IR Network High Speed Dome. Figure 1-1 External IR Network High Speed Dome Figure 1-2 & Figure 1-3 show the multi-head cable used by the dome camera. Table 1- 1 describes each connection of the multi-head cable. - Page 8 IR Network High Speed Dome 1 Overview User Manual Figure 1-3 Multi-head cable (optional) Table 1-1 Hardware port connection Color Function Description Network port Connects a standard Ethernet cable. DC 12V power supply Supplies power to the device. wire Yellow/ Grounding wire Green White...
-
Page 9: Features
IR Network High Speed Dome 1 Overview User Manual 1.2 Features Network Features Supports the complete TCP/IP protocol suite. Supports video, audio, and alarm data. Provides a built-in web browser and supports access using Microsoft Internet Explorer. Supports network data transmission and remote access. Supports Point-to-Point Protocol over Ethernet (PPPoE), Dynamic Host Configuration Protocol (DHCP), and Dynamic Domain Name System (DDNS). -
Page 10: Device Dimensions
IR Network High Speed Dome 2 Device Dimensions User Manual Device Dimensions Figure 2-1 shows the camera dimensions. Figure 2-1 Dimensions (unit: mm) V1.0 (01-03/2017) -
Page 11: Device Installation
IR Network High Speed Dome 3 Device Installation User Manual Device Installation 3.1 Installation Preparation When installing the camera, you may require the following tools and accessories listed in Table 3-1. You need to prepare only listed tools as other accessories are delivered with the camera. -
Page 12: Wall-Mounted Installation
IR Network High Speed Dome 3 Device Installation User Manual Open the dome cover with a screwdriver where the SD card installs on the bottom of the dome, remove the shake-proof metal block, and then re-tighten the cover . Prepare the bracket before installing the camera. 3.2.2 Wall-Mounted Installation Step 1 Please make the mark based on bracket size before drilling holes into the wall. - Page 13 IR Network High Speed Dome 3 Device Installation User Manual Figure 3-2 Thread all cables through the wall bracket Step 4 Attach the PTZ camera to the wall bracket and fit it into the connector. Then tighten the three screws to fix the connector and camera, shown in the Figure 3-3. Figure 3-3 Fix the bracket connector and PTZ camera together Step 5 Mount the PTZ dome camera to the wall, tighten the four screws on the bracket...
-
Page 14: Suspension Installation
IR Network High Speed Dome 3 Device Installation User Manual 3.2.3 Pendant Installation Step 1 Make marks based on suspension bracket size for drilling the hole. Drill four φ8 holes over 60 mm depth. The bracket installation size is shown in Figure 3-4. Figure 3-4 Bracket installation size Step 2 Insert the expansion bolts into the holes. -
Page 15: Celling-Mounted Installation
IR Network High Speed Dome 3 Device Installation User Manual Step 4 Attach the PTZ camera to the suspension bracket and fit it into the connector. Then tighten the four screws fixing the PTZ dome and bracket, shown in the Figure 3-6. Figure 3-6 Fix the suspension bracket and PTZ dome together Step 5 Mount the PTZ dome camera to the mounting surface and tighten the four... - Page 16 IR Network High Speed Dome 3 Device Installation User Manual Step 2 Insert the expansion bolts into the holes. Step 3 Thread all cables through the cable hole on the side of the celling bracket, as shown in the Figure 3-8. Figure 3-8 Thread the cables through the cable hole on the bracket Step 4 Attach the PTZ camera to the celling bracket and fit it into the connector.
-
Page 17: Quick Configuration
IR Network High Speed Dome 4 Quick Configuration User Manual Quick Configuration 4.1 Login and Logout You must use Internet Explorer 6 or a later version to access the web management system; otherwise, some functions may be unavailable. Login to the camera Step 1 Open the Internet Explorer, enter the IP address of IP camera (default value: 192.168.0.120) in the address box, and press Enter. - Page 18 IR Network High Speed Dome 4 Quick Configuration User Manual 1. Open Internet Explorer. Choose Tools > Internet Options > Security > Trusted sites > Sites. In the display dialog box, click Add, as shown in Figure 4-1. Figure 4-1 Adding a trusted site 2.
-
Page 19: Download The Right Control In The Internet Explorer
IR Network High Speed Dome 4 Quick Configuration User Manual Figure 4-2 Configuring ActiveX control and plug-ins 3. Download and install the player control as prompted. The login page is displayed when the control is loaded. 4.2.1 Download the right control in the Internet Explorer The live video page generates a message prompting users to click to play live video with ActiveX control to reduce latency. -
Page 20: Setting Local Network Parameters
IR Network High Speed Dome 4 Quick Configuration User Manual 4.3 Setting Local Network Parameters Description Local network parameters include: IP protocol IP address Subnet mask Default gateway Dynamic Host Configuration Protocol (DHCP) Preferred Domain Name System (DNS) server Alternate DNS server Procedure Step 1 Choose Device Configuration >... - Page 21 IR Network High Speed Dome 4 Quick Configuration User Manual Parameter Description Setting Subnet Mask Subnet mask of the network [Setting method] adapter. Enter a value manually. [Default value] 255.255.255.0 Default Gateway This parameter must be set if [Setting method] the client accesses the device Enter a value manually.
-
Page 22: Technical Specifications
IR Network High Speed Dome 5 Technical Specifications User Manual Technical Specifications Table 5-1 lists the technical specifications of the camera. Table 5-1 Technical specifications Items Parameters Details Camera Image sensor 1/2.8" CMOS Effective 2048(H)*1536(V) pixels Digital zoom Optical zoom Color: 0.01Lux Minimum illumination... - Page 23 IR Network High Speed Dome 5 Technical Specifications User Manual Items Parameters Details Pan/tilt Range Pan: 0°~360°endless; Tilt: -10°~90°auto flip Manual Pan: 0.01°/s -180°/s; Tilt: 0.01°/s -90°/s Control Speed Preset Speed Pan: 180°/s; Tilt: 90°/s <0.2° PTZ precision Proportional Rotation speed can be adjusted automatically according zoom to zoom multiples Number of...
- Page 24 IR Network High Speed Dome 5 Technical Specifications User Manual Items Parameters Details Video Video H.264(BP/MP/HP)/MJPEG encoding format Resolution 50Hz: 25fps 60Hz: 25fps Primary stream: 2048*1536, 1080P/720P Secondary stream: 640*360/D1/CIF/ VGA/QVGA Primary stream; 300W: 500kbps~12Mbps Frame rate Secondary stream: 100kbps~4Mbps Multi-stream Support for double stream Stream type...
- Page 25 IR Network High Speed Dome 5 Technical Specifications User Manual Items Parameters Details Storage Local storage Support for SD, SDHC card type Capacity Language English, Simplified Chinese, Spanish, Portuguese, Polish and Italian Management Management and maintenance via the web is not supported.
-
Page 26: Troubleshooting
IR Network High Speed Dome 6 Troubleshooting User Manual Troubleshooting Table 6-1 describes the common faults and solutions. Table 6-1 Common faults and solution Problems Possible Causes Remedies Power supply fault Replace power supply No action when Bad power supply connection Re-connect power is switched Transformer damaged... -
Page 27: A Lightning Proof And Surge Signal Proof
IR Network High Speed Dome A Lightning Proof and Surge Signal Proof User Manual Lightning Proof and Surge Signal Proof The product adopts TVS lightning proof technology to prevent damage by lightning strike below 1500 W and impulse signals such as surges; however, it is also necessary to abide by the following precautions to ensure electrical safety based on practical circumstances: Keep the communication cables at least 50 meters away from high voltage... -
Page 28: B Hazardous Substance Declaration
IR Network High Speed Dome B Hazardous Substance Declaration User Manual Hazardous Substance Declaration Hazardous Substance or Element Hexavalent Polybrominated Component Lead Mercury Cadmium Polybrominated Chromium Diphenyl Ethers (Hg) (Cd) Biphenyls (PBB) (Cr6+) (PBDE) (Pb) Structural × ○ ○ ○ ○...
Need help?
Do you have a question about the VHSDIR-812EXT-IP3M and is the answer not in the manual?
Questions and answers