
Related Manuals for Atlona Opus AT-OPUS-810M


Summary of Contents for Atlona Opus AT-OPUS-810M
- Page 1 Opus 4K HDR HDMI to HDBaseT Matrix Switcher AT-OPUS-810M Atlona Manuals AT-OPUS-68M 4K HDR Matrix Switcher Series AT-OPUS-46M...
- Page 2 Version Information Version Release Date Notes 10/18 Initial release 11/18 Added Front Panel Operation AT-OPUS-810M, AT-OPUS-68M, & AT-OPUS-46M...
- Page 3 Welcome to Atlona! Thank you for purchasing this Atlona product. We hope you enjoy it and will take a extra few moments to register your new purchase. Registration only takes a few minutes and protects this product against theft or loss. In addition, you will receive notifications of product updates and firmware.
- Page 4 Atlona requires that products returned are properly packed, preferably in the original carton, for shipping. Cartons not bearing a return authorization or case number will be refused. Atlona, at its sole discretion, reserves the right to reject any products received without advanced authorization. Authorizations can be requested by calling 1-877-536-3976 (US toll free) or 1-408- 962-0515 (US/international) or via Atlona’s website at www.atlona.com.
- Page 5 Damage, deterioration or malfunction resulting from the installation or removal of this product from any installation, any unauthorized tampering with this product, any repairs attempted by anyone unauthorized by Atlona to make such repairs, or any other cause which does not relate directly to a defect in materials and/or workmanship of this product.
- Page 6 9. Only use attachments/accessories specified by Atlona to avoid fire, shock, or other hazards. The information bubble is intended to alert the user to helpful or optional opera- tional instructions in the literature accompanying the product.
-
Page 7: Table Of Contents
Table of Contents Introduction Features Package Contents Panel Description Cable Recommendation Guidelines Installation Control Mounting Instructions Connection Instructions Connection Diagram Front Panel Operation Routing Basic Info Static DHCP EDID Copy Load WebGUI IR Remote Control Appendix Specifications AT-OPUS-810M, AT-OPUS-68M, & AT-OPUS-46M... -
Page 8: Introduction
18 Gbps. The Opus Series enables flexible routing to HDBaseT outputs plus two additional HDMI outputs, and is compatible with the Atlona AT-OPUS-RX receiver or AT-JUNO-451-HDBT switcher for transmission of HDMI, Ethernet pass-through, and bidirectional IR and RS-232 control signals up to 330 feet (100 meters) over CAT6a/7 cable. -
Page 9: Panel Description
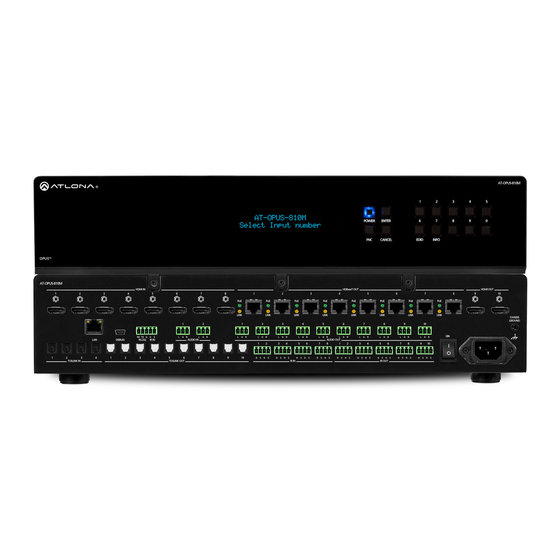
Panel Description AT-OPUS-810M POWER ENTER CANCEL EDID INFO OPUS AT-OPUS-810M HDMI IN HDBaseT OUT HDMI OUT LINK LINK LINK LINK LINK LINK LINK LINK CHASSIS GROUND DEBUG RS-232 IR IN AUDIO IN AUDIO OUT TOSLINK IN TOSLINK OUT IR IN IR OUT PWR: 100-240VAC 50/60Hz Function Buttons... -
Page 10: Cable Recommendation Guidelines
Cable Recommendation Guidelines Refer to the tables below for recommended cabling when using Altona products with HDBaseT. The green bars indicate the signal quality when using each type of cable. Higher-quality signals are represented by more bars. CAT5e CAT6 CAT6a CAT7 Core Shielding... -
Page 11: Installation
232 cable and connect as RX (receive), wire. Use with 3rd party control systems. For TX (transmit) and (Ground). easy termination, Atlona recommends using the 2 meter IR cable AT-LC-CS-IR-2M. 4-pin captive screw connectors have been included for IR routing. Each 4-pin connect will provide connection for 2 IR ports. -
Page 12: Mounting Instructions
Installation Mounting Instructions The AT-OPUS matrix can be mounted in a standard 19-inch rack or placed freestanding on top of a desk or table. Rack installation 1. Remove the front two case screws from the sides of the case. 2. Attach the included rack ears to each side of the AT-OPUS-810M using the case screws. A SS Po E Po E... - Page 13 Installation Surface mounting The OPUS matrix can be placed freestanding on top of a desk, a table, or in a cabinet. To prevent damage to the surfaces or unnecessary movement of the matrix, four feet have been included. 1. Turn the unit upside down. 2.
-
Page 14: Connection Instructions
Installation Connection Instructions 1. Connect up to 8 HDMI sources to the HDMI IN ports. 2. Connect up to 8 HDBaseT receivers (AT-OPUS-RX or AT-JUNO-451-HDBT) to the HDBaseT OUT ports. 3. Connect up to 2 local HDMI displays to the HDMI OUT ports. 4. -
Page 15: Front Panel Operation
Front Panel Operation The AT-OPUS front panel provides a way to quickly view current settings, set up routing, load/save EDIDs, and save/ recall current I/O routing. This will provide basic settings for use, view the webGUI section for more advanced set up and routing, or the IR Remote Control section for easy input and master volume control. -
Page 16: Info
Front Panel Operation 3. Select the # button that corresponds with the desired input. When successful, an input saved to outputs message will display. Info The Info function will display basic information for the unit: firmware version, IP address, IP port, and MAC address. 1. -
Page 17: Dhcp
Front Panel Operation DHCP If the IP has been set to static and it needs to be set back to DHCP, the same steps can be used to reset the IP mode. 1. Select the FNC button. 2. Press the # button that corresponds with IP selection on the unit. NOTE: The IP button is on a different number key for each unit, use button: 4 for the 810M, 4 for 68M, and 3 for 46M. - Page 18 Front Panel Operation 3. Select the 2 button to load an output EDID. 4. Select the # key that corresponds with the input to load an EDID to. 5. Press ENTER to bring up the EDID mode selection screen. ...
- Page 19 Front Panel Operation The front panel IR window can be turned on and off to ensure no stray IR signals from blasters are received. 1. Select the FNC button. 2. Press the 2 button to pull up the IR menu. ...
-
Page 20: Webgui
3. The AT-OPUS Login page will be displayed. 4. Enter the following information on the Login page. Login: admin Password: Atlona 5. Click the Login button. The info page will display, giving all the general information of the AT-OPUS. AT-OPUS-810M, AT-OPUS-68M, & AT-OPUS-46M... - Page 21 UI, HDMI, FW, and FPGA Firmware - The current matrix firmwares will display in these fields. Verify the latest firmware by checking the individual product pages under the Firmware tabs. https://atlona.com/product/AT-OPUS-46M/ - for the AT-OPUS-46M https://atlona.com/product/AT-OPUS-68M/ - for the AT-OPUS-68M https://atlona.com/product/AT-OPUS-810M/ - for the AT-OPUS-810M...
- Page 22 webGUI HDBaseT Receivers Link status - A red circle will display when no receiver is connected or it is receiving no signal. A green circle will display when there is a receiver connected. Firmware Updating WARNING: Power loss during the update process may damage devices and/or render the system non- functional.
- Page 23 webGUI Select Control from the Side menu. System Power - Toggles the unit between on and standby. IR - Turns the IR window on the front of the unit on and off. Key Lock - Lock and unlock the front panel keys. Factory Default - Select to set the unit back to the original factory settings.
- Page 24 webGUI 10 Select Users from the side menu. Users Additional Users - Add up to three additional users, each with individual passwords. Admin Password - Update the admin password for the matrix. Only the admin password may be changed, the username will remain admin.
- Page 25 webGUI 11 Select Log Data from the side menu. Log Data These sections will allow selections as to which specific items the unit will log, from FW update warnings, to video switching. The in-depth logs will allow for troubleshooting ease, should an issue occur. AT-OPUS-810M, AT-OPUS-68M, &...
- Page 26 webGUI 12 Select I/O Settings from the side menu. Input/Output Selection Default Routing - Press this button to reset all routing to the default settings which is input 1 to output 1, input 2 to output 2, etc., and audio ports to the corresponding HDMI input port. Ports 9 and 10 will follow ports 1 and 2 respectively (46M - ports 5 and 6 will follow port 1 and 2, 68M - ports 7 and 8 will follow ports 1 and 2).
- Page 27 webGUI 13 Select Route Memory from the side menu. Route Memory Memory Reset - Select this button to clear the currently saved route memories. Audio Follows Video - When selected, the audio selection will de-embed audio from the corresponding video output selection.
- Page 28 webGUI 14 Select EDID from the side menu. EDID Output - The ID field will display the current EDID name of the connected output, select the checkbox next to Memory # to save that EDID information to memory. Input EDID Selection - Use the drop down menu to select from default (highest common resolution between source and display), 16 internal EDIDs, and the previously saved EDIDs.
- Page 29 webGUI 15 Select HDBT Test from the side menu. HDBT Test Refresh Rate (ms) - Select the amount of time (in ms) for the OPUS to refresh its results of the HDBaseT signal test. Select between 500, 1000, 1500, 2000, and 3000 milliseconds. HDBT Zone - Use the drop down menu to select which HDBaseT output is being tested.
- Page 30 webGUI 16 Select Video from the side menu. Video Output Control Output Port - Future Feature. Input HDCP Status - Displays the current HDCP status of the output. The HDCP status states are: No Connection, HDCP 1.4, HDCP 2.2, and Non Compliant. AT-OPUS-810M, AT-OPUS-68M, &...
- Page 31 webGUI 17 Select Audio from the side menu. Equalizer Default Audio - Resets all the audio settings to factory default. Analog audio will be equalized to 0 on all 5 bands, master audio will be set back to -20 dB, and the Sub Volumes will all be set back to 0 dB. Analog Output - Select the analog audio output to adjust the 5 band equalization on.
-
Page 32: Ir Remote Control
AT-MRC AMS 2.0 For full configuration of the OPUS, AMS 2.0 is available from https://atlona.com/AMS for free. Two options can be used for installation: The free Linux based software download or the easy to install server hardware (AT-AMS-HW). Once AMS has been set up: 1. -
Page 33: Appendix
Appendix Specifications Ports HDMI IN/OUT Type A, 19-pin female, locking HDBaseT OUT RJ45 AUDIO IN/OUT Unbalanced, 3-pin captive screw RJ45 DEBUG Mini-USB RS-232 3-pin captive screw IR IN/OUT 2-pin captive screw TOSLINK IN/OUT S/PDIF, Optical fiber connector Video UHD/HD/SD 4096×2160@24/25/30/50/60Hz, 3840×2160@24/25/30/50/60Hz, 2048x1080p, 1080p@23.98/24/25/29.97/30/50/59.94/60Hz, 1080i@50/59.94/60Hz, 720p@50/59.94/60Hz, 576p, 576i, 480p, 480i VESA... - Page 34 Appendix Temperature Fahrenheit Celsius Operating 32 to 104 0 to 40 Storage -40 to 158 -40 to 70 Humidity (RH) 20% to 90%, non-condensing Power Consumption 160 W Idle Consumption 115 W Supply Internal, AC 100-240V 50/60Hz Dimensions Inches Milimeters H x W x D 3.47 x 17.24 x 11.79 88.1 x 438 x 299.5...
- Page 35 • 408.962.0515 • 877.536.3976 © 2018 Atlona Inc. All rights reserved. “Atlona” and the Atlona logo are registered trademarks of Atlona Inc. All other brand names and trademarks or registered trademarks are the property of their respective owners. Pricing, specifications and availability...
Need help?
Do you have a question about the Opus AT-OPUS-810M and is the answer not in the manual?
Questions and answers