Table of Contents
Advertisement
U S E R M A N U A L
TOTAL OXYGEN CONCENTRATOR
Federal (USA) law restricts this device to sale by or on the
order of a physician.
300 Held Drive
Northampton, PA 18067 USA
ISO 13485 Certified
Model: PM4400 Series
SAVE THESE INSTRUCTIONS
Read this manual before operating the device,
save this manual for future reference.
Tel: (+001) 610-262-6090
Fax: (+001) 610-262-6080
www.precisionmedical.com
Advertisement
Table of Contents
Troubleshooting

Related Manuals for Precision Medical EasyPulse PM4400 Series


Summary of Contents for Precision Medical EasyPulse PM4400 Series
- Page 1 U S E R M A N U A L TOTAL OXYGEN CONCENTRATOR Model: PM4400 Series SAVE THESE INSTRUCTIONS Federal (USA) law restricts this device to sale by or on the order of a physician. Read this manual before operating the device, save this manual for future reference.
- Page 2 LET’S GET STARTED We have referenced page numbers for details of each step if required QUICK SET-UP GUIDE Turn Control Knob to Connect Nasal Cannula to Prescribed Setting. Oxygen Outlet Fitting. (Ref. pg 12) (Ref. pg 10)
- Page 3 Place your EasyPulse TOC Insert Battery into in the area of intended back of EasyPulse TOC. use near a wall outlet. (Ref. pg 7) Connect AC Power Supply to EasyPulse TOC Receptacle. (Ref. pg 7) Connect AC Power Cord into AC Power Supply. Connect AC Power Cord to Wall Outlet.
-
Page 4: Table Of Contents
CONTENTS Receiving/Inspection ..................2 Indications for Use ..................2 Contraindications .................... 2 Read All Instructions Before Using ..............2 Explanation of Abbreviations ................2 Product Description ..................3 EasyPulse TOC System ................3 EasyPulse TOC Overview ................ 4 EasyPulse TOC User Interface ..............5 EasyPulse TOC Battery .................. -
Page 5: Receiving/Inspection
Provider. INDICATIONS FOR USE The Precision Medical Inc. TOC is indicated on a prescription basis for the administration of supplemental oxygen. It supplies a high concentration of oxygen and is used with a nasal cannula to channel oxygen from the TOC to the patient. -
Page 6: Product Description
PRODUCT DESCRIPTION EasyPulse TOC System The EasyPulse TOC comes with the following items. Item Description/Function EasyPulse TOC TOC with 1 to 5 Pulse Settings and 1/8 to 2 L/min Continuous Flow Settings (P/N PM4400) Accessory Bag Bag to carry all cords, extra batteries and other accessories (P/N 508301) AC Power Supply AC Power Supply with cord for attachment to TOC (P/N 508188) -
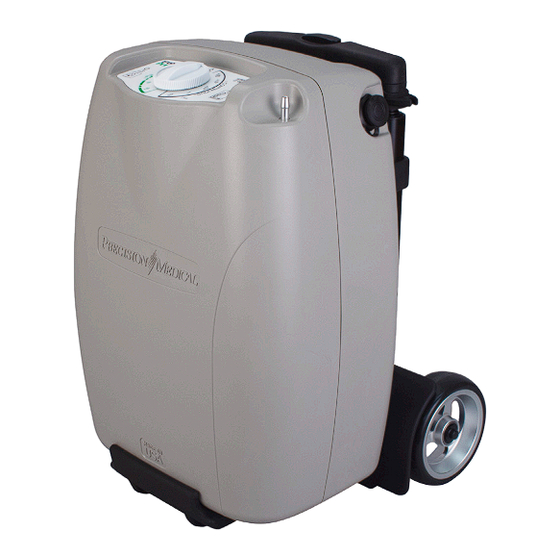
Page 7: Easypulse Toc Overview
EasyPulse TOC Overview Item Description/Function Oxygen Outlet Oxygen Outlet Connector for Patient Cannula Fitting Control Panel See EasyPulse TOC User Interface for detailed descriptions TOC Handle Integrated Handle for lifting TOC TOC Receptacle TOC Receptacle for AC Power Supply and with Dust Cap DC Power Cord attachments (see Charging (AC and DC Options) for detailed description) -
Page 8: Easypulse Toc User Interface
EasyPulse TOC User Interface Item Description/Function Oxygen Outlet Oxygen Outlet Connector for Patient Cannula Fitting Battery Indicator Shows state of battery charge (See Battery ID for details) Control Knob Starting at OFF position (12 o’clock): • Rotate counter-clockwise for 1 to 5 Pulse Mode Settings •... -
Page 9: Easypulse Toc Battery
EASYPULSE TOC BATTERY ENSURE BATTERY IS FULLY CHARGED PRIOR TO FIRST USE. NOTE: See initial charging instructions on back of Battery. (DO NOT use the DC Power Cord for initial charge.) Lithium Ion Battery Guidelines Proper Use: Storage: In order to prolong life of the battery, When storing for long periods of time it is best to charge the battery without use (>... -
Page 10: Battery Installation
BATTERY INSTALLATION Insert Battery into slot on the back of the TOC (insert until the bottom of the battery handle comes in contact with the TOC case). Insert Battery into slot Battery shown fully inserted CHARGING (AC AND DC OPTIONS) To prevent damage to the TOC, use only Precision Medical approved external power sources. -
Page 11: Charging Battery With Ac Power Supply
Charging Battery with AC Power Supply AC Power Supply: The AC Power Supply connects the TOC to a 100-240 VAC, 50/60 Hz wall outlet. The AC Power Supply converts AC voltage to DC voltage in order to power the TOC. The AC Power Supply allows for running the TOC and simultaneously charging the battery. -
Page 12: Charging Battery With Dc Power Cord
Charging Battery with DC Power Cord CAUTION • Ensure the automobile power socket and the Auto Accessory Plug connect properly. • When powering the TOC in an automobile, ensure the vehicle’s engine is running first, before connecting DC Power Cord into Auto 12 V Accessory Jack. Operating the TOC without the engine running may drain the vehicle’s battery. -
Page 13: Start Up Procedure
NOTE: The amount of power provided from the vehicle’s DC electrical outlet is limited, the power available to charge the Battery is determined by the extra power available based on the operating demands of the TOC. At high flow settings, the extra power available to charge the Battery may be limited and may increase the time to charge the Battery. - Page 14 START UP PROCEDURE (continued) CAUTION • Inspect the TOC for visual damage before use, DO NOT USE if damaged. • Ensure Battery is fully charged prior to first use. • To prevent damage to the TOC, DO NOT operate the TOC without the Air Inlet Filter or while the Air Inlet Filter is wet.
- Page 15 • Connect the end of a standard adult single lumen oxygen nasal cannula with a maximum length of 30 feet (9.1 m) to the TOC’s Oxygen Outlet Fitting. • NOTE: If using humidifier bottle, Precision Medical, Inc. highly recommends the PM500 Disposable Humidifier.
-
Page 16: Cart Overview
CART OVERVIEW Cart Handle Cart Handle extension and retraction Push Button Cart Release Button Attachment Pins TOC Support Tray Center Alignment Cart shown with Support Tray in storage position... -
Page 17: Toc Attachment To Cart
TOC ATTACHMENT TO CART Step 1 Step 2 Release TOC Support Tray by Swing TOC Support Tray down to grasping the side rails and pushing flat position. tray with thumbs. Side Rails Step 3 Set TOC on center of TOC Support Tray utilizing Center Alignment Rib. - Page 18 TOC ATTACHMENT TO CART (continued) Step 4 Tilt Cart forward until it stops. (Attachment pins will insert into Mounting Holes of TOC.) Pin in Mounting Hole Step 5 Tilt Cart Handle backwards until TOC locks into position. (Release Button will return to elevated Position.)
-
Page 19: Toc Detachment From Cart
TOC DETACHMENT FROM CART Step 1 Step 2 Push and hold Cart Release Tilt Cart forward until it stops. Button to deactivate lock-pin. Step 3 Hold TOC in position and allow Cart to tilt away from TOC. -
Page 20: Alarm / Indicators / Troubleshooting
ALARM / INDICATORS / TROUBLESHOOTING CAUTION Failure to resolve an alarm condition may cause the TOC to shut down. NOTE: To view the alarm fault code, remove the Air Inlet Filter located inside the TOC Handle. The code will be displayed in window. (Alarm fault code window “FC4”... -
Page 21: Operator's Position
When an alarm condition occurs, the user may press the Alarm Silence push button. Pressing the button will silence the alarm and transition the LED from a flashing state to a continuous on state; the auditory silence period is five (5) minutes. During this silence period, if the condition that created the alarm is rectified, the LED will extinguish. - Page 22 Low Priority Alarms: The following low priority alarm messages are accompanied by a double beep and a solid yellow light. Alarm Condition Fault Code(s) Possible Cause / Recommended Solution Battery Low (15%) Battery near depletion / Replace with charged battery or switch to alternate power source.
-
Page 23: Troubleshooting
2. Install charged Battery 3. Battery not seated 3. Ensure Battery if fully inserted into TOC correctly 4. Incorrect Battery 4. Use only Precision Medical Inc. Battery DC Power Mode 1. DC power cord not DC Power Mode (Auto Plug) connected correctly 1. -
Page 24: Troubleshooting (Continued)
1. Battery not seated 1. Ensure Battery is fully inserted into TOC correctly 2. Incorrect Battery 2. Use only Precision Medical Inc. Battery 3. Defective Battery 3. Replace with new Battery 4. TOC not connected 4. Ensure TOC is connected to a external power source. Verify to external power all connections are tight. -
Page 25: Cleaning, Care And Maintenance
CLEANING, CARE and MAINTENANCE CAUTION • Prior to cleaning, ensure the TOC is turned off, unplug any external power sources and remove Battery. • DO NOT disassemble or attempt to repair. There are no user serviceable parts inside. Contact your Provider and/or Healthcare Professional for service. -
Page 26: Specifications
• Gas volume and flowrate specifications for gas delivered to the patient are expressed at ATPD (ambient temperature and pressure, dry). For technical specifications call Precision Medical or visit www.precisionmedical.com Dimensions: Height: 14.63 in (37.16 cm) Width: 10.50 in (26.67 cm) -
Page 27: Volatile Organic Compound (Voc) And Particulate Requirements
Operating Environment Ranges Temperature: TOC: 41°F to 104°F (5°C to 40°C) Humidity: 0% to 95%, non-condensing but not requiring a water vapour partial pressure greater than 50 hPa Atmospheric Pressure: 700 hPa to 1060 hPa Altitude: 0 to 10,000 ft (0 to 3048 m) Shipping and Storage Environmental Ranges Temperature: -4˚F to 140˚F (-20˚C to 60˚C) Humidity: 0% to 95%, non-condensing 95°F (35 °C) at a water vapour... -
Page 28: Safety Information - Warnings And Cautions
SAFETY INFORMATION - WARNINGS AND CAUTIONS Indicates an imminently hazardous situation which, if DANGER not avoided, will result in death or serious injury. Indicates a potentially hazardous situation which, if not WARNING avoided, could result in death or serious injury. Indicates a potentially hazardous situation which, if not CAUTION avoided, may result in minor or moderate injury. -
Page 29: General Precautions
GENERAL PRECAUTIONS • TOC, it’s parts or accessories do not contain known phthalates which are classified as carcinogenic, mutagenic or toxic. • TOC, it’s parts and accessories are intended for use by a single patient and should be cleaned/disinfected before use on a new patient. Note: The nasal cannula cannot be cleaned and should be disposed of. - Page 30 WARNING • The Nasal Cannula is intended for single patient use only. Use on more than one patient may cause cross contamination. • Use of accessories or replacement parts not listed in this User Manual may cause adverse effects to basic safety or essential performance of the TOC. •...
- Page 31 WARNING (continued) • Before each use, verify all connections are tight. • To ensure receiving the therapeutic amount of oxygen delivery according to your medical condition, the TOC must be used with the specific combination of parts and accessories that were in place when your settings were determined. •...
-
Page 32: Guidance And Manufacturer'sdeclaration - Electromagnetic Immunity
GUIDANCE and MANUFACTURER’S DECLARATION - ELECTROMAGNETIC IMMUNITY The TOC is intended for use in the electromagnetic environment specified below. The user of the TOC should make sure it is used in such an environ- ment. Immunity Test IEC 60601 Compliance Electromagnetic Test Level Level... - Page 33 Voltage dips, <5% U (>95% <5% U (>95% Mains power quality should be that of a typical short dip in U ) for dip in U ) for commercial or hospital environment. If the interruptions 0.5 cycle 0.5 cycle user of the [ME EQUIPMENT or ME SYSTEM] requires continued operation during power mains voltage 40% U...
-
Page 34: Disposal Of Toc And Accessories
Returned products require a Returned Goods Authorization (RGA) number, contact Precision Medical, Inc. All returns must be packaged in sealed containers to prevent damage. Precision Medical, Inc. will not be responsible for goods damaged in transit. Refer to Precision Medical, Inc. Return Policy available on the Internet, www.precisionmedical.com. -
Page 35: Limited Warranty And Limitation Of Liability
(3) years from date of shipment Battery 180 days from date of shipment Precision Medical, Inc. is NOT responsible for normal wear and tear, or any neglect or abuse of the product. The customer is responsible for the shipping costs of repairs to Precision Medical, Inc. -
Page 36: Declaration Of Conformity
For Declaration of Conformity see our website: http://www.precisionmedical.com/documentation Precision Medical, Inc. 300 Held Drive Northampton PA 18067, USA Emergo Europe (European Office) Prinsessegracht 20 2514 AP The Hague The Netherlands Phone: +31 (0) 70.345.8570 Fax: +31 (0) 70.346.7299 508217rev3 1/19 Printed in USA...
Need help?
Do you have a question about the EasyPulse PM4400 Series and is the answer not in the manual?
Questions and answers