Table of Contents
Advertisement
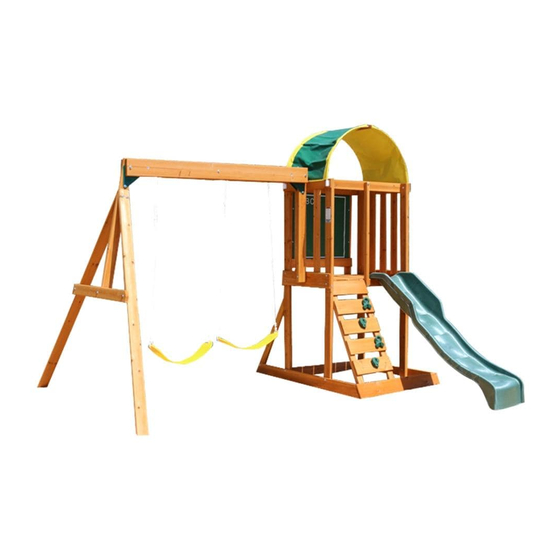
A I N S L E Y O U T D O O R P L A Y S E T – 0 0 4 0 0
INSTALLATION AND OPERATING INSTRUCTIONS
6.8m
3.1m
2.7m
F O R O U T D O O R D O M E S T I C U S E O N L Y
Olympisch Stadion 29
1076DE Amsterdam
The Netherlands
Email: europecustomerservice@kidkraft.com
Phone: +31 20 305 8620 M-F from 09:00 to 17:30
(GMT+1)
For online parts replacement visit https://parts.kidkraft.eu/
WARNING
them to any future owner of this play system. Manufacturer contact information provided below.
OBSTACLE FREE SAFETY ZONE - 6.8m x 8.5m area requires Protective Surfacing. See page 3.
MAXIMUM VERTICAL FALL HEIGHT - 1.8m
8.5m
CAPACITY - 6 Users Maximum, Ages 3 to 10; Weight Limit 110 lbs. (49.9 kg) per child.
RESIDENTIAL HOME USE ONLY. Not intended for public areas such as schools, churches, nurseries,
day cares or parks.
WARNING! Only for domestic use.
To reduce the risk of serious injury or death, you must read and follow
these instructions. Keep and refer to these instructions often and give
Table of Contents
Warnings And Safe Play Instructions . . . . . . . . . . .pg. 2
Protective Surfacing Guidelines . . . . . . . . . . . . . . . .pg. 3
Instructions For Proper Maintenance . . . . . . . . . . .pg. 4
About Our Wood – Limited Warranty . . . . . . . . . .pg. 5
Keys To Assembly Success . . . . . . . . . . . . . . . . . . . . . .pg. 6
Part ID . . . . . . . . . . . . . . . . . . . . . . . . . . . . . . . . . . . . . . . . . .pg. 7
9400400E
4 - 8 Hrs
Two person
assembly
Rev 10/25/2017
Advertisement
Table of Contents

Related Manuals for KidKraft 00400


Summary of Contents for KidKraft 00400
- Page 1 Part ID ......... .pg. 7 Email: europecustomerservice@kidkraft.com Phone: +31 20 305 8620 M-F from 09:00 to 17:30 (GMT+1) For online parts replacement visit https://parts.kidkraft.eu/ 9400400E Rev 10/25/2017...
- Page 2 Cool hot slide and rides with water and wipe Do not allow children to go down slide head first or dry prior to using. run up slide. europecustomerservice@kidkraft.com...
- Page 3 Denotes Use Zone with Protective Surfacing 6 ft. 6 ft. Denotes Use Zone with Protective Surfacing 6 ft. 6 ft. 6 ft. Use Zone for Single-Axis Swings Use Zone for Multi-Axis Swings From the CPSC Outdoor Home Playground Safety Handbook. At www.cpsc.gov/CPSCPUB/PUBS/324.pdf europecustomerservice@kidkraft.com...
- Page 4 (See Protective Surfacing, page 3) If you dispose of your play set: Please disassemble and dispose of your unit so that it does not create any unreasonable hazards at the time it is discarded. Be sure to follow your local waste ordinances. europecustomerservice@kidkraft.com...
- Page 5 About Our Wood KidKraft Netherlands B.V. uses only premium playset lumber, ensuring the safest product for your children’s use. Although we take great care in selecting the best quality lumber available, wood is still a product of nature and susceptible to weathering which can change the appearance of your set.
- Page 6 Insert the hex bolt through lock washer first then flat washer then hole. Because the assemblies need to be squared do not completely tighten until instructed. Pay close attention to diameter of the bolts. 5/16” is slightly larger than 1/4”. europecustomerservice@kidkraft.com...
- Page 7 europecustomerservice@kidkraft.com...
- Page 8 europecustomerservice@kidkraft.com...
- Page 9 3640359 Box 1 (1) Lower Diagonal 2 x 3 x 37" 0369 3640369 Box 1 (1) SW Top 1 x 4 x 26-7/8" 1748 3641748 Box 1 (2) SW Post 2 x 4 x 79-1/2" 1749 3641749 Box 1 europecustomerservice@kidkraft.com...
- Page 10 1759 3641759 Box 1 (1) Floor 1 x 6 x 26-7/8" 1760 3641760 Box 1 (1) Side Joist 2 x 2 x 34-3/4" 3641761 Box 1 1761 (1) Floor Back 5/4 x 4 x 38-5/8" 1762 3641762 Box 1 europecustomerservice@kidkraft.com...
- Page 11 1X 3391267 (2pk) Canopy Tube 1/2" x 67" 1X 3790690 1X 3200184 Swing Hanger Triangle Plate (4pk) Covers (4Pk) Green 2X 3724937 1X 3310140 1X 3320550 (4pk) Short Swing -Yellow 40" High Rail Slide Canopy Tube Holder -White Green europecustomerservice@kidkraft.com...
- Page 12 5/16" Lock Washer - 5/16" Flat Washer - 5/16" T-Nut 9277312 (4) Hex Bolt 5/16 x 4" 9277340 5/16" Lock Washer - 5/16" Flat Washer - 5/16" T-Nut (5) Hex Bolt 5/16 x 4 1/2" 9277342 5/16" Lock Washer - 5/16" Flat Washer - 5/16" T-Nut europecustomerservice@kidkraft.com...
- Page 13 (16) Pan Screw #8 x 1" (9264510) (38) (13) 1/4" Lock Washer 5/16" Lock Washer (9253200) (9253300) (14) Pan Screw #12 x 2" (9264620) (41) (17) (38) (13) 1/4" Flat Washer 5/16" Flat Washer 1/4" T-Nut 5/16" T-Nut (9251200) (9251300) (9285200) (9285300) europecustomerservice@kidkraft.com...
- Page 14 • Each step indicates which bolts and/or screws you will need for assembly, as well as any flat washers, lock washers, t-nuts or lock nuts. For Parts Replacement: • Use our Online form https://parts.kidkraft.eu • Email us at europecustomerservice@kidkraft.com • Call us at +31 20 305 8620 Read the assembly manual completely, paying special attention to EN71 and ASTM warnings;...
- Page 15 5/16 x 1-1/2” Hex Bolt CE SW Beam Front 2 x 6 x 69-1/2” 1773 (5/16” lock washer, 5/16” flat washer and 5/16” t-nut) 1 x Triangle Plates (pkg of 4) CE SW Beam Back 2 x 6 x 69-1/2” 1772 1/4 x 5-1/2” Hex Bolt (1/4” lock washer, 1/4” flat washer and 1/4” t-nut) europecustomerservice@kidkraft.com...
- Page 16 Hardware Wood Parts 5/16 x 4” Hex Bolt SW Post 2 x 4 x 79-1/2” 1749 (5/16” lock washer, 5/16” flat washer, and 5/16” t-nut) SW Upright 2 x 4 x 44” 1756 5/16 x 4-1/2” Hex Bolt SW Support 5/4 x 4 x 40-1/2” 1755 (5/16” lock washer, 5/16” flat washer, and 5/16” t-nut) europecustomerservice@kidkraft.com...
- Page 17 Fig. 3.2 1772 Fig. 3.4 Fig. 3.3 Side with Overhang Hardware Wood Parts 1/4 x 4-1/4” Hex Bolt SW Rail Block 2 x 4 x 5-3/8” 4919 (1/4” lock washer, 1/4” flat washer, 1/4” t-nut) 5/16 x 4-1/2” Hex Bolt (5/16” lock washer, 5/16” flat washer, 5/16” t-nut) 5/16 x 2” Hex Bolt (5/16” flat washer x 2, 5/16” lock nut) europecustomerservice@kidkraft.com...
- Page 18 SW Ground 1 x 5 x 60-1/4” 1770 5/16 x 4” Hex Bolt SW Floor 1 x 6 x 26-7/8” 1759 (5/16” lock washer, 5/16” flat washer, 5/16” t-nut) Lower Diagonal 2 x 3 x 37” 0369 1 x 1/4 x 3” Lag Screw (with 1/4” flat washer) Wall Mount 2 x 4 x 40-3/4” 1757 europecustomerservice@kidkraft.com...
- Page 19 1/4 x 2” Hex Bolt Ground Side 1 x 5 x 42-1/4” (1/4” lock washer, 1/4” flat washer, 1/4” t-nut) 1769 Floor 1 x 6 x 26-7/8” 1760 #8 x 1-1/2” Wood Screw Corner Block 2 x 3 x 4-1/2” 1766 Top End 1 x 4 x 26-7/8” 1753 europecustomerservice@kidkraft.com...
- Page 20 1771 1771 Parts removed for clarity 1764 1759 Notice hole towards bottom Wood Parts Hardware Floor Front 2 x 3 x 38-1/2” 1/4 x 4-3/4” Hex Bolt 1764 (1/4” lock washer, 1/4” flat washer, 1/4” t-nut) Top Front 1 x 4 x 38-1/2” 1752 4 x #12 x 2” Pan Screw (with 3/16” flat washer) europecustomerservice@kidkraft.com...
- Page 21 Fig. 7.4 1770 1765 1770 Hardware Wood Parts #8 x 2-1/2” Wood Screw Corner Block 2 x 3 x 4-1/2” 1766 Rock Rail 2 x 3 x 42-3/4” #8 x 1-1/2” Wood Screw 1765 #8 x 1-3/4” Wood Screw europecustomerservice@kidkraft.com...
- Page 22 (fig. 8.1) 1752 1752 1751 1764 1751 1764 Fig. 8.1 Wood Parts Hardware Centre Divider 2 x 2 x 38” 1751 1/4 x 2” Hex Bolt (1/4” lock washer, 1/4” flat washer, 1/4” t-nut) 1/4 x 2-3/4” Hex Bolt (1/4” lock washer, 1/4” flat washer, 1/4” t-nut) europecustomerservice@kidkraft.com...
- Page 23 2 (S4) #8 x 3” Wood Screws per side. (fig. 9.1, 9.2 & 9.3) Fig. 9.2 1764 Fig. 9.1 1771 0312 1764 1771 Flush to outside edge Fig. 9.3 0312 1771 Hardware Wood Parts #8 x 3” Wood Screw Gusset 2 x 3 x 16” 0312 europecustomerservice@kidkraft.com...
- Page 24 B: Make sure (1767) Lower Front is level and then attach to (1765) Rock Rail with 2 (S15) #8 x 1-3/4” Screws. (fig. 10.1) Fig. 10.1 1769 1765 Notice hole orientation towards top 1766 1767 1767 Flush to top Fig. 10.2 Hardware Wood Parts Lower Front 1 x 6 x 39-3/4” #8 x 1-3/4” Wood Screw 1767 europecustomerservice@kidkraft.com...
- Page 25 (1762) Floor Back. Bolts to be installed on (1761) Side Joist side and screws installed from (1762) Floor Back side. Fig. 11.1 1761 1762 Hardware Wood Parts Side Joist 2 x 2 x 34-3/4” 2 x #12 x 2 Pan Screw (with 3/16” flat washer) 1761 Floor Back 5/4 x 4 x 38-5/8” 1762 1/4 x 2-1/2” Hex Bolt (1/4” lock washer, 1/4” flat washer, 1/4” t-nut) europecustomerservice@kidkraft.com...
- Page 26 Floor Back Assembly Back Fig. 12.3 1768 Hardware Wood Parts 2 x #12 x 2” Pan Screw (with 3/16” flat washer) 1 x Floor Back Assembly (from Step 11) 1/4 x 3” Lag Screw (1/4” flat washer) Lower Back 1 x 5 x 38-1/2” 1768 1/4 x 4-1/2” Hex Bolt (1/4” lock washer, 1/4” flat washer, 1/4” t-nut) europecustomerservice@kidkraft.com...
- Page 27 1771 1762 1762 1771 Fig. 12.7 Hardware Wood Parts 4 x #12 x 2” Pan Screw (with 3/16” flat washer) Top Back 1 x 4 x 38-1/2” 1758 1/4 x 1-1/2” Hex Bolt Front Divider 1 x 4 x 38” 0359 (1/4” lock washer, 1/4” flat washer, 1/4” t-nut) 1/4 x 1-1/4” Pan Bolt (1/4” lock washer, 1/4” flat washer, 1/4” t-nut) europecustomerservice@kidkraft.com...
- Page 28 0359 0359 0359 Fig. 13.4 1754 Fig. 13.3 0359 3” 0359 1762 1754 Other Parts Hardware Wood Parts 1 x Chalk Wall Tarp 10 x #8 x 1/2 Pan Screw (with #8 flat washer) Lower Back Wall 1 x 4 x 31-1/2” 1754 #8 x 1-1/8 Wood Screw europecustomerservice@kidkraft.com...
- Page 29 (1763) Floor Joist is installed with the 1-3/8” side facing up. (fig. 14.1 & 14.2) Fig. 14.2 1757 1759 3-1/8” 1-3/8” 1763 Fig. 14.1 1759 1760 1760 3-1/8” 1763 Fig. 14.3 Wood Parts Hardware Floor Joist 5/4 x 2 x 38-1/2” 1763 #8 x 3” Wood Screw europecustomerservice@kidkraft.com...
- Page 30 Wood Parts 35 x #8 x 1-1/2” Wood Screw Floor Board 1 x 6 x 23-1/2” 1776 CE Gap Board 1 x 6 x 23-1/2” 1774 #8 x 2-1/2” Wood Screw Corner Block 2 x 3 x 4-1/2” 1766 europecustomerservice@kidkraft.com...
- Page 31 Digging or driving stakes can be dangerous if you do not check first for underground wiring, cables or gas lines. Fig. 16.1 Floor boards were removed for clarity 1771 1771 0318 1770 0318 Wood Parts Hardware Ground Stake 1 1/4 x 1 1/2 x 14” 0318 #8 x 2-1/2” Wood Screw europecustomerservice@kidkraft.com...
- Page 32 3“ Fig. 17.1 1771 0304 1774 2-1/2“ 1771 x 4 per board 0304 Fig. 17.4 Fig. 17.3 1771 1774 1“ Wood Parts Hardware CE Floor Board 1 x 4 x 32-1/2” 20 x #8 x 1-1/8” Wood Screw 0304 europecustomerservice@kidkraft.com...
- Page 33 Tube holder Fig. 18.3 3/4” Fig. 18.4 1748 5/8” x 4 per corner 1753 Other Parts Hardware Wood Parts Canopy 16 x #8 x 1” Pan Screw Tarp Support 1 x 2 x 26-7/8” 1750 Canopy Tube Canopy Tube Holder europecustomerservice@kidkraft.com...
- Page 34 Canopy Roof to (1748) SW Top and (1753) Top End with 4 (S5) #8 x 1/2” Pan Screws (with #8 flat wash- er) per board. Be sure to re-tighten bolt in (1757) Wall Mount. (fig. 18.5) Fig. 18.5 x 4 per side 1748 1753 Hardware 8 x #8 x 1/2” Pan Screw (#8 flat washer) europecustomerservice@kidkraft.com...
- Page 35 20 x #8 x 1-1/2” Wood Screw CE Rock Board B 1 x 6 x 17” 1777 #8 x 1-3/4” Wood Screw CE Access Board 1 x 6 x 17” 1779 Rock Rail 2 x 3 x 42-3/4” 1765 europecustomerservice@kidkraft.com...
- Page 36 B: Pre-drill 1/8” pilot holes and attach slide to fort through the floor boards and into (1764) Floor Front using 2 (S7) #12 x 2” Pan Screws. (fig. 20.1 & 20.2) 1771 1751 Fig. 20.1 WARNING Slide must be tight to (1771) Post Fig. 20.2 1764 Other Parts Hardware 1 x Slide #12 x 2” Pan Screw europecustomerservice@kidkraft.com...
- Page 37 1 (G8) 5/16 x 2” Hex Bolt (with 2 flat washers and 1 lock nut) as shown in fig. 21.1 & 21.2. Fig. 21.1 Fig. 21.2 Lock washer T-nut Flat washer 1757 Lock nut Flat washer Hardware 5/16 x 4-1/2” Hex Bolt (5/16” lock washer, 5/16” flat washer, 5/16” t-nut) 5/16 x 2” Hex Bolt (5/16” flat washer x2, 5/16” lock nut) europecustomerservice@kidkraft.com...
- Page 38 10-1/2” into ground. Digging or driving stakes can be dangerous if you do not check first for underground wiring, cables or gas lines. Fig. 22.1 Fig. 22.2 1749 0318 10-1/2” Wood Parts Hardware Ground Stake 1 1/4 x 1 1/2 x 14” 0318 #8 x 2-1/2” Wood Screw europecustomerservice@kidkraft.com...
- Page 39 2 Belt swings Fig. 23.5 Other Parts Other Parts Other Parts 2 x Belt Swing 2 x Belt Swing 2 x Belt Swing 4 x Swing Hanger Cover 4 x Swing Hanger Cover 4 x Swing Hanger Cover europecustomerservice@kidkraft.com...
- Page 40 NOTES europecustomerservice@kidkraft.com...
Need help?
Do you have a question about the 00400 and is the answer not in the manual?
Questions and answers