Advertisement
Available languages
Available languages
Quick Links
MISSING SOMETHING? / BESOIN DE PIÈCES
DE RECHANGE ? / ¿TE FALTA ALGO? /
FEHLT ETWAS? / MANCA QUALCOSA?
USA/CANADA
parts.KidKraft.com
Welcome to the KidKraft family
We do our very best to ensure accuracy in every order, but occasionally we miss something. That's why
our warranty covers every single part of your new product for 90 days after purchase. If you are missing
parts or find any damage, it's easy to order replacements at parts.KidKraft.com in the US and
parts.kidkraft.eu in Europe. You can also review your warranty, download assembly instructions and more
by visiting KidKraft.com.
Bienvenue dans famille Kidkraft
Nous faisons de notre mieux pour assurer l'exactitude dans chaque commande, mais parfois nous
manquons quelque chose. C'est pourquoi notre garantie couvre chaque partie de votre nouveau
produit pendant 90 jours après l'achat. S'il vous manque des pièces ou si vous, c'est facile de
commander des pièces de rechange chez parts.KidKraft.com aux États-Unis et parts.kidkraft.eu en
Europe. Vous pouvez également consulter votre garantie, télécharger les instructions d'assemblage et
plus encore en visitant KidKraft.com.
Bienvenido a la Familia Kidkraft
Hacemos nuestro mejor esfuerzo para asegurar la precisión en cada orden, pero a veces se nos olvida
algo. Por este motivo, nuestra garantía cubre cada parte de su nuevo producto por los próximos 90 días
después de su compra. Si a le falta alguna parte o si consigue algún daño en el producto, es muy
sencillo solicitar un remplazo en parts.KidKraft.com en los Estados Unidos y en parts.kidkraft.eu en
Europa. También puede revisar su garantía, descargar instrucciones de ensamblaje y mucho más
visitando KidKraft.com.
Willkommen zu KidKraft Family
Wir geben unser Bestes, bei jeder Bestellung sicherzustellen, dass höchste Sorgfalt geboten wird, aber
vereinzelt kann es vorkommen, dass wir etwas übersehen. Aus diesem Grund deckt unsere Garantie jedes
einzelne Teil Ihres neuen Produkts für die Dauer von 90 Tagen nach Erwerb ab. Sie können ganz einfach
Ersatzteile bei parts.KidKraft.com in den USA und parts.KidKraft.eu in Europa bestellen, sollten Teile fehlen
oder Beschädigungen vorliegen. Besuchen Sie KidKraft.com, um unter anderem die Garantie einzusehen
und Aufbauanleitungen herunterzuladen.
Benvenuti nella famiglia KidKraft
Facciamo del nostro meglio per garantire la precisione in ogni ordine, ma ogni tanto qualcosa può
sfuggire. Ecco perché la nostra garanzia copre ogni singola parte del nuovo prodotto per 90 giorni dopo
l'acquisto. In caso di parti mancanti o se si riscontrano danni, basta semplicemente richiedere la
sostituzione su parts.KidKraft.com negli Stati Uniti e parts.kidkraft.eu in Europa. È anche possibile
controllare la garanzia, scaricare le istruzioni di montaggio e altro ancora visitando KidKraft.com.
Batch Code
Code de lot
Código De Lote
Chargennummer
Numero del lotto:
EUROPEAN REGIONS
parts.KidKraft.eu
AUSTRALIA
parts.KidKraft.au
Advertisement

Related Manuals for KidKraft Forestview II Playhouse


Summary of Contents for KidKraft Forestview II Playhouse
- Page 1 90 days after purchase. If you are missing parts or find any damage, it’s easy to order replacements at parts.KidKraft.com in the US and parts.kidkraft.eu in Europe. You can also review your warranty, download assembly instructions and more by visiting KidKraft.com.
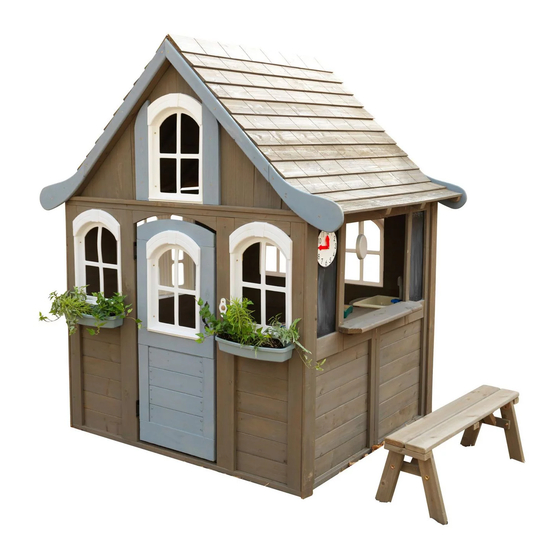
- Page 2 FORESTVIEW II PLAYHOUSE - 20098 INSTALLATION AND OPERATING INSTRUCTIONS To reduce the risk of serious injury or death, you must read and follow these WARNING instructions. Keep and refer to these instructions often and give them to any future owner of this play set. Manufacturer contact information provided below.
- Page 3 Instructions for Proper Maintenance Your KidKraft Play System is designed and constructed of quality materials with your child’s safety in mind. As with all outdoor products used by children, it will weather and wear. To maximize the enjoyment, safety and life of your Playhouse, it is important that you, the owner, properly maintain it.
- Page 4 Keys to Assembly Success Tools Required • Carpenters Level • Standard or Cordless Drill • Safety Glasses • • Carpenters Square • Pencil • Adult Helpers • Part Identification Key On each page, you will find the parts and quantities required to complete the assembly step illustrated on that page.
- Page 5 5 Year Limited Warranty KidKraft warrants that this product is free from defect in materials and workmanship for a period of one year from the original date of purchase. In addition, lumber is warranted for 5 years against structural failure due to rot and insect damage.
- Page 6 Battery Instruction and Warranty This device complies with Part 15 of the FCC Rules. Operation is subject to the following two conditions: (1) This device may not cause harmful interference, and (2) this device must accept any interference received, including interference that may cause undesired operation. NOTE: This equipment has been tested and found to comply with the limits for a Class B digital device, pursuant to part 15 of the FCC Rules.
- Page 7 ( 206") 123.13cm 3 - 5 heures ( 48.48”) ASSEMBLAGE À DEUX POUR UTILISATION FAMILIALE EXTÉRIEURE SEULEMENT KidKraft, Inc. KidKraft Netherlands BV 4630 Olin Road Olympisch Stadion 8 Dallas, Texas 75244 USA 1076 DE Amsterdam customerservice@kidkraft.com Pays-Bas canadacustomerservice@kidkraft.com europecustomerservice@kidkraft.com 1.800.933.0771 +31 20 305 8620 L-V au 09h00 à...
- Page 8 Avertissements et instructions de jeu sécuri SUPERVISION CONTINUE D’UN ADULTE REQUISE. La plupart des blessures graves et des décès sur les équipements de terrain de jeu ont lieu lorsque les enfants sont laissés sans surveillance ! Nos produits sont conçus pour répondre aux normes de sécurité obligatoires et volontaires.
- Page 9 Trucs pour un assemblage réussi Outils requis • Niveau de menuisier • Lunettes de protection • Marteau à fourche • Perceuse régulière ou sans fil • Équerre de menuisier • Crayon • Adultes pour aider • Ruban à mesure Identification des pièces 2 X 1 Sur chaque page, vous trouverez les pièces et les quantités requises pour compléter...
- Page 10 Les produits KidKraft ont été conçus dans une optique de sécurité et de qualité. Toute modi cation faite au produit original pourrait endommager l’intégrité structurelle de l’unité et engendrer des bris et de potentielles blessures.
- Page 11 Instructions sur la batterie et garantie Cet appareil est conforme à la Partie 15 des règles FCC. Le fonctionnement est sujet aux deux conditions suivantes: (1) Cet appareil ne doit pas générer d’interférences nuisibles, et (2) cet appareil doit accepter toute interférence reçue, incluant l’interférence qui pourrait causer un fonctionnement inadéquat.
- Page 12 3 - 5 Hrs 123.13cm ( 48.48”) MONTAJE ENTRE DOS PERSONAS SOLO PARA USO DOMÉSTICO EN JARDINES RESIDENCIALES KidKraft, Inc. KidKraft Netherlands BV 4630 Olin Road Olympisch Stadion 8 Dallas, Texas 75244, Estados Unidos 1076 DE Ámsterdam customerservice@kidkraft.com Países Bajos canadacustomerservice@kidkraft.com europecustomerservice@kidkraft.com...
- Page 13 Advertencias e Instrucciones de Seguridad SE REQUIERE LA SUPERVISIÓN PERMANENTE DE UN ADULTO. ¡La mayoría de los accidentes graves y muertes que se producen en los juegos de jardín ocurren cuando los niños no son vigilados por un adulto! Nuestros productos están diseñados para cumplir con las normas de seguridad obligatorias y voluntarias.
- Page 14 Claves para un montaje exitoso Herramientas necesarias • Nivel de carpintero • Antiparras • Martillo • Taladro estándar o • Escuadra de carpintero • Ayudantes adultos • Cinta métrica inalámbrico • Lápiz Claves para identificar las piezas 2 X 1 En cada página encontrará...
- Page 15 Garantía Limitada por 5 Años KidKraft garantiza que este producto no contiene defectos en sus materiales ni mano de obra por un período de un año a partir de la fecha de compra original. Además, la madera tiene garantía por 5 años contra fallas estruc- turales por putrefacción y daños causados por insectos.
- Page 16 Instrucciones sobre las baterías - Garantía Este dispositivo cumple con el Art. 15 de las Reglas de la FCC. Su operación está sujeta a las siguientes condiciones: (1) Este dispositivo no podrá causar interferencias nocivas, y (2) este dispositivo deberá aceptar cualquier interferencia que reciba, incluso aquella que pueda afectar su funcionamiento.
- Page 17 Bitte bewahren Sie diese Informationen gut auf, damit Sie später 524 cm 3 - 5 Std. ( 206") 123.13cm ( 48.48”) MONTAGE ZWEI PERSONEN KidKraft, Inc. KidKraft Netherlands BV 4630 Olin Road Olympisch Stadion 8 Dallas, Texas 75244, USA 1076 DE Amsterdam customerservice@kidkraft.com Niederlande canadacustomerservice@kidkraft.com europecustomerservice@kidkraft.com +1 800 933 0771 +31 20 305 8620 Mo–Fr von 9:00 bis 17:30 Uhr...
- Page 18 Warnungen und sichere Spielanleitungen MONTINUIERLICHE AUFSICHT DURCH ERWACHSENE ERFORDERLICH. Die meisten Verletzungen und Todesfälle passierten an der Spielplatzanlage dann, wenn Kinder unbeaufsichtigt waren! Unsere Produkte sind so konzipiert, dass sie die vorgeschriebenen undfreiwilligen Sicherheitsstandards erfüllen. Das Einhalten aller Warnungen und Empfehlungen dieser Anleitungen wird die Gefahr von Verletzungen oder Todesfällen bei Kindern verringern, die diesen Spielplatz benutzen.
- Page 19 Tipps für einen erfolgreichen Aufbau Benötigtes Werkzeug • Wasserwaage • Klauenhammer • Standard- oder Akkubohrer • Schutzbrille • Winkelmaß • Metermaß • Bleistift • Hilfe anderer Erwachsener Teileidentifikation 2 X 1 Auf jeder Seite sind die Teile und die Stückzahl aufgeführt, die für den entsprechenden Schritt benötigt werden.
- Page 20 5 Jahre beschränkte Garantie KidKraft garantiert für einen Zeitraum von einem Jahr ab dem Kaufdatum, dass dieses Produkt frei von Fehlern in der Verarbeitung, im Design oder von Materialfehlern ist. Zusätzlich gibt es für das Holz eine 5-jährigeGarantie gegen Struk- turfehler aufgrund von Schäden durch Fäulnis und Insekten.
- Page 21 Anleitung für die Batterie und Garantie Dieses Gerät erfüllt die Anforderungen in Teil 15 der FCC-Vorschriften. Für den Betrieb gelten die folgenden zwei Bedingungen: (1) Das Gerät darf keine schädlichen Interferenzen verursachen und (2) das Gerät muss empfangene Interferenzen aufnehmen können, auch wenn diese zu Betriebsstörungen führen. HINWEIS: Dieses Gerät wurde geprüft und hält die Grenzen für ein Digitalgerät der Klasse B gemäß...
- Page 22 123.13cm ( 48.48”) 3 - 5 ore DUE PERSONE PER IL MONTAGGIO SOLO PER USO DOMESTICO ALL'APERTO KidKraft, Inc. KidKraft Netherlands BV 4630 Olin Road Olympisch Stadion 8 Dallas, Texas 75244 Stati Uniti 1076 DE Amsterdam customerservice@kidkraft.com Paesi Bassi canadacustomerservice@kidkraft.com europecustomerservice@kidkraft.com...
- Page 23 Avvertenze e istruzioni per giocare in sicurezza DA UTILIZZARSI SOTTO LA CONTINUA SUPERVISIONE DEGLI ADULTI. La maggior parte degli incidenti e delle morti di bambini su attrezzature da gioco si è veri cata in assenza di supervisione da parte di un adulto! I nostri prodotti sono ideati al ne di soddisfare standard di sicurezza obbligatori e facoltativi.
- Page 24 Elementi per un montaggio perfetto Attrezzi necessari • • • • Livella da falegname Trapano avvitatore standard Occhiali protettivi Martello a granchio o a batteria • • • Squadra da falegname Metro a nastro Aiutanti adulti • Matita Elementi per l'identificazione delle parti 2 X 1 In ciascuna pagina vengono indicate le parti e quantità...
- Page 25 Garanzia limitata di 5 anni KidKraft garantisce che il prodotto in questione è privo di difetti di materiale e lavorazione per un periodo di un anno a partire dalla data originale di acquisto. Inoltre, i legni sono garantiti 5 anni per danni strutturali dovuti a decomposizione e danni causati da insetti.
- Page 26 Istruzioni e garanzia della batteria Questo dispositivo è conforme alla parte 15 delle norme FCC. L’operazione è soggetta alle seguenti due condizioni: (1) Questo dispositivo non può causare interferenze dannose e (2) questo dispositivo deve accettare qualsiasi interferenza ricevuta, incluse quelle che potrebbero causare un funzionamento indesiderato. NOTA: Questa apparecchiatura è...
- Page 27 3 x 4 8 x 5 4 x 3 14 x 2 13 x 2 19 x 2 4449-BK 4458-BK 4453-DVGY 5943-WT 4457-WT 4455-GN 4463-BK 4450-SMGY 4454-BK 4459-BN 4451-SMGY 4456-TB 4448-644 4452-SMGY Parts and Hardware Pièces et matériel Partes y Piezas Para Instalación Teile und Befestigungsmaterial Parti e componenti meccanici...
- Page 28 x 76 32 mm 25 mm x 51 x 49 x 10 44 mm 28 mm 9 mm x 44 38 mm 62 mm 42 mm x 78 16 mm Parts and Hardware All hardware dimensions are approximate. Pièces et matériel Toutes les dimensions du matériel Partes y Piezas Para Instalación sont approximatives.
- Page 29 Step Étape Paso Schritt Fase Open frame all the way so all corners are at 90 degrees. Ouvrez le cadre jusqu'au bout pour que tous les coins soient à 90 degrés. Abra el marco por completo de modo que las esquinas queden a 90 grados. Öffnen Sie den Rahmen ganz, sodass alle Ecken 90°-Winkel bilden.
- Page 30 Step Étape Paso 8 x C Schritt Fase Flush Aligné A ras Bündig A filo Flush Aligné A ras Bündig A filo Flush Aligné A ras Bündig A filo...
- Page 31 Step Do not use this hole, leave it until future step Étape Ne vous servez pas de ce trou, oubliez-le jusqu'à la prochaine étape Paso 8 x C No use este orificio, resérvelo para más adelante Schritt Diese Bohrung nicht verwenden, wird in einem späteren Schritt benötigt Fase Non utilizzare questo foro, lasciarlo per una fase successiva Note Hole Orientation...
- Page 32 Step Étape Paso 8 x B Schritt Fase Flush Aligné A ras Centered Bündig Centré A filo Centrado Zentriert Centrato Centered Centré Centrado Zentriert Flush / Aligné / A ras / Bündig / A filo Centrato Step 4458-BK Étape 1-3/64” Paso 2 x F 26.6mm...
- Page 33 Step 4458-BK Étape Paso 2 x F Schritt 1-3/64” Fase 26.6mm 4458-BK 17-7/8” 454mm Step 4459-BN-b Note: 4459-BN-b is flush with door edge Étape Remarque : 4459-BN-b est aligné avec le bord de la porte Paso 2 x F Nota: 4459-BN-b está a ras del borde de la puerta Schritt Hinweis: 4459-BN-b liegt bündig an der Türkante an Fase...
- Page 34 Step Étape Paso 4459-BN-a Schritt Fase 2 x H Important: Use a hand held screw driver and DO NOT over tighten. 4459-BN-a Important : Utiliser un tournevis manuel et ne PAS TROP serrer. Importante: Use un destornillador de mano y no atornille en exceso. Wichtig: Verwenden Sie einen Schrauben- zieher und achten Sie darauf, die Schrau- ben NICHT zu fest anzuziehen.
- Page 35 Step 4456-TB-a Étape Paso Schritt Fase 4456-TB-a 2 x H Step Étape Paso Schritt Fase 4456-TB-a 4456-TB-a...
- Page 36 Step 4456-TB-b Étape Paso 2 x F Schritt Fase 4456-TB-b 4456-TB-b Step 4455-GN Étape Paso 2 x F Schritt Fase 4455-GN-a 1-9/16” 40mm 4455-GN-b...
- Page 37 Step Étape Paso 2 x B Schritt Fase Step Étape Paso 4 x B Schritt Fase Flush / Aligné / A ras / Bündig / A filo Centered Centré Centrado Zentriert Centrato...
- Page 38 Step 2 x B Étape Paso Schritt Fase Step 4449-BK Étape Paso 12 x F Schritt 4449-BK Fase 4449-BK...
- Page 39 Step Étape Paso Schritt Fase 10 x C 1/2” 12.7mm Flush Aligné A ras Bündig A filo Step Étape Paso Schritt Fase 1 x B 2 x D Tight Serré Ajustado Eng anliegend Serrato...
- Page 40 Step 4 x A Étape Paso Schritt Fase 2 x B Step Étape 2 x D Paso Schritt Fase...
- Page 41 Step Étape Paso Schritt Fase 21 x H Tight Serré Flush Flush Ajustado Aligné Aligné Eng anliegend A ras A ras Serrato Bündig Bündig A filo A filo...
- Page 42 Step 4453-DVGY Étape 4454-BK Paso Schritt 8 x I Fase 10 x N 4453-DVGY-b 4453-DVGY-c 4453-DVGY-d 4453-DVGY-a 4454-BK...
- Page 43 Step 4463-BK Étape 4452-SMGY Paso 4451-SMGY Schritt Fase 4450-SMGY 2 x F 4463-BK 4452-SMGY 4450-SMGY 4451-SMGY Step Étape Tuck under siding overhang Paso Placer sous la saillie latérale Schritt Introducir debajo del voladizo de revestimiento Fase 4 x C Unter den Überhang des Dachbretts schieben Infilato sotto la sporgenza laterale Flush Aligné...
- Page 44 Step Tuck under siding overhang Étape Paso Placer sous la saillie latérale Schritt Introducir debajo del voladizo de revestimiento Fase 4 x C Unter den Überhang des Dachbretts schieben Infilato sotto la sporgenza laterale Flush Aligné A ras Bündig A filo 2 x J Step Étape...
- Page 45 Step Étape Paso Schritt Fase 2 x D Flush Aligné A ras Bündig A filo Step 12 x B Étape Paso Schritt Fase Flush Aligné A ras Bündig A filo Flush Aligné A ras Bündig A filo Flush Aligné A ras Bündig Important: Failure to make sure the bottom of the Joists and (18) Roof Sides are flush will A filo...
- Page 46 Step Make sure assembly is square before proceeding in this Step. Étape Assurez-vous que l'assemblage est bien droit avant de réaliser cette étape. Paso Asegúrese de que el montaje esté en perpendicular antes de pasar a este paso. Schritt Prüfen Sie, dass die Bauteile sich im rechten Winkel zueinander befinden, bevor Sie mit diesem Schritt fortfahren. Fase Prima di procedere in questo passaggio, accertarsi che l’assemblato sia in squadra.
- Page 47 Step 4 x C Étape Paso Schritt Fase Important! Inside View Step Étape Important ! Vue intérieure Paso ¡Importante! Vista interior Schritt Wichtig! Innenansicht Fase Importante! Vista dall'interno 36 x A Start Here and assemble down Commencez ici et assemblez vers le bas Empezar aquí...
- Page 48 Step Important! Inside View Étape Important ! Vue intérieure Paso ¡Importante! Vista interior Schritt Fase Wichtig! Innenansicht Importante! Vista dall'interno 36 x A Start Here and assemble down Commencez ici et assemblez vers le bas Empezar aquí y continuar hacia abajo Hier beginnen und nach unten hin weitermachen Iniziare da qui e assemblare verso il basso Important! Inside View...
- Page 49 Step Étape Paso 6 x H Tight Schritt Serré Fase Ajustado Eng anliegend Serrato Tight Serré Ajustado Eng anliegend Serrato Step Étape Paso 6 x H Schritt Fase Flush Aligné A ras Bündig A filo...
- Page 50 Step Étape Tight Paso Serré 6 x H Schritt Ajustado Fase Eng anliegend Serrato Tight Serré Ajustado Eng anliegend Serrato 8 x B Step Étape Paso Schritt Fase...
- Page 51 Step 8 x B Étape Paso Schritt Fase Step 4457-WT-a Étape Paso 4 x F Schritt Fase 4457-WT-a...
- Page 52 Step Step 4457-WT-b Étape Étape Paso Paso 10 x F Schritt Schritt Fase Fase Inside View Vue intérieure Vista interior Innenansicht Vista dall'interno 4457-WT-b 4457-WT-b 4457-WT-b...
- Page 53 Step 4457-WT-c Étape Paso 8 x F Schritt Fase 4457-WT-c 4457-WT-c Inside View Vue intérieure Vista interior Innenansicht Vista dall'interno Step 5943-WT Étape Paso 12 x F Schritt Fase 5943-WT...
- Page 54 Step 5943-WT Étape Paso 16 x F Schritt Fase 5943-WT Step 4448-644 Étape Paso 4 x G Schritt Fase 4448-644...
- Page 55 Step Étape Paso 4 x M Schritt Fase Step Étape Paso Schritt Fase 4 x E Step Étape 4 x K Paso 4 x L Schritt Fase 4 x B Step Étape Paso Schritt Fase...
Need help?
Do you have a question about the Forestview II Playhouse and is the answer not in the manual?
Questions and answers
We are building a platform for underneath the KidKraft Forestview ll playhouse. What are the bottom dimensions of the Playhouse? Just need to know what size to build the platform underneath thank you.