
Related Manuals for nvent Raychem C25-100-METAL


Summary of Contents for nvent Raychem C25-100-METAL
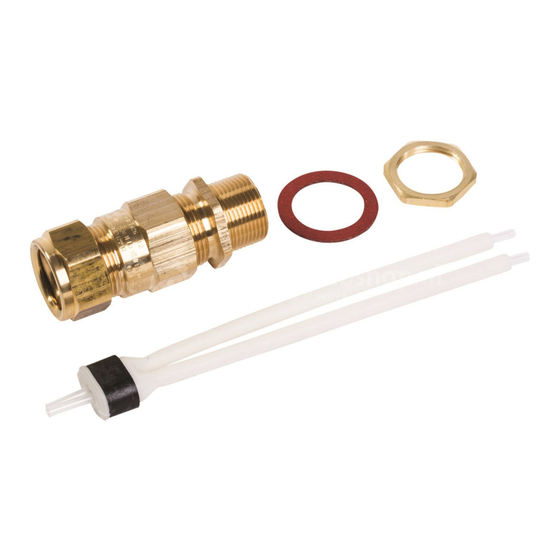
- Page 1 C25-100-METAL C3/4-100-METAL Connection kit Anschlussgarnitur Kit de connexion Подсоединительный набор...
- Page 2 C1-Core Seal изолирующая манжета для жил С1 QTVR 2 | nVent.com...
- Page 3 | 3...
- Page 4 Ex eb IIC Gb Ex tb IIIC Db TC RU C-BE.Mю62.B.02853 1 Ex e IIC Installation instruction for connection kits nVent RAYCHEM C25-100- METAL and C3/4-100-METAL. For use with all RAYCHEM BTV-, QTVR-, XTV-, KTV-, VPL- and FHP-heating cables. Before installing this product, read the installation instructions completely.
- Page 5 Ex eb IIC Gb Ex tb IIIC Db TC RU C-BE.Mю62.B.02853 1 Ex e IIC Montageanleitung für Anschlussgarnituren nVent RAYCHEM C25-100- METAL und C3/4-100-METAL. Verwendbar für alle RAYCHEM BTV-, QTVR-, XTV-, KTV-, VPL- und FHP-Heizleitungen. Lesen Sie die Montageanleitung sorgfältig und vollständig bevor Sie mit der Montage beginnen.
- Page 6 Ex eb IIC Gb Ex tb IIIC Db TC RU C-BE.Mю62.B.02853 1 Ex e IIC Instructions d’installation pour les kits de connexion nVent RAYCHEM C25-100-METAL et C3/4-100-METAL. Utilisable avec les rubans chauffants autorégulants BTV, QTVR, XTV, KTV, VPL et FHP. Cette notice d’installation doit être lue en entier avant de réaliser la mise en oeuvre du...
- Page 7 TC RU C-BE.Mю62.B.02853 1 Ex e IIC Инструкция по монтажу подсоединительных наборов nVent RAYCHEM C25-100-METAL и C3/4-100-METAL. Наборы предназначены для использования со всеми греющими кабелями RAYCHEM BTV, QTVR, XTV, KTV, VPL и FHP. Перед началом монтажа внимательно прочтите данную инструкцию.
- Page 8 Heizband. FRANÇAIS Positionner les composants et le joint du presse-étoupe sur le ruban chauffant dans l’ordre indiqué. РУССКИЙ Поместите компоненты сальника и уплотнительную втулку на греющий кабель в указанном на иллюстрации порядке. ≥ 300 mm 8 | nVent.com...
- Page 9 BTV, QTVR, XTV, KTV, FHP, VPL 240 mm BTV, QTVR, XTV, KTV, FHP, VPL 20 mm BTV, QTVR, XTV, KTV, FHP, VPL 165 mm nVent.com | 9...
- Page 10 BTV, QTVR, XTV, KTV, FHP BTV, QTVR & FHP KTV & XTV BTV, QTVR, XTV, KTV, FHP 10 | nVent.com...
- Page 11 165 mm 40 mm nVent.com | 11...
- Page 12 оплетку поверх конуса и поместите фиксирующее кольцо поверх оплетки и конуса. Прикрутите среднюю часть узла к корпусу ввода (без уплотнительной втулки) и затяните с помощью двух гаечных ключей, чтобы надежно зафиксировать оплетку между конусом и фиксирующим кольцом. 12 | nVent.com...
- Page 13 Replacer le corps du presse-étoupe. РУССКИЙ Развинтите собранный узел средней части и кабельного ввода, снимите корпус ввода и поместите нейлоновое компрессионное кольцо и уплотнительную втулку на внутреннюю оболочку. Поместите корпус ввода на место. nVent.com | 13...
- Page 14 BTV, QTVR, XTV, KTV, FHP, VPL 15 mm BTV, QTVR, XTV, KTV, FHP, VPL BTV, QTVR, XTV, KTV, FHP, VPL 14 | nVent.com...
- Page 15 Entfernen Sie die Montage-Röhrchen und stecken Sie sie zurück in den Plastik-Beutel. FRANÇAIS Enlever les tubes de guidage et les ranger dans le sachet plastique de l’embout d’étanchéité. РУССКИЙ Удалите трубки и поместите их в пластиковый пакет из-под герметика. nVent.com | 15...
- Page 16 Trim bus wires. For length X see table. DEUTSCH Kürzen Sie die Kupferleiter entsprechend der Länge X in der Tabelle. FRANÇAIS Dénuder les fils de conducteurs. Pour la longueur (X), voir le tableau ci-dessus. РУССКИЙ Обрежьте жилы. Необходимая длина очищенных жил (Х) указана в таблице. 16 | nVent.com...
- Page 17 Проденьте подготовленный конец греющего кабеля с изолирующей манжетой через ввод соединительной коробки. Ввинтите корпус сальника в соединительную коробку. Для C25-100-METAL перед этим убедитесь, что уплотнительное кольцо находится на месте (для неметаллических соединительных коробок с внутренней пластиной заземления используйте контргайку). nVent.com | 17...
- Page 18 FRANÇAIS Placer le joint dans le corps du presse-étoupe, s’assurer qu’il est bien positionné et serrer le contre-écrou soigneusement. РУССКИЙ Разместите уплотнительную втулку в корпусе сальника, убедившись, что она установлена прямо, и надежно затяните среднюю часть узла. 18 | nVent.com...
- Page 19 Le corps du presse-étoupe doit être mis à la terre à l’aide de la plaque de terre ou équivalent. РУССКИЙ Вставьте уплотнительную втулку для внешнего сальника и закрутите контргайку. Подсоедините жилы к соответствующим клеммам. Сальник должен быть заземлен с помощью пластины заземления или эквивалентного устройства. nVent.com | 19...
- Page 20 Fax +36 1 253 7618 saleshu@nvent.com nVent.com ©2018 nVent. All nVent marks and logos are owned or licensed by nVent Services GmbH or its affiliates. All other trademarks are the property of their respective owners. nVent reserves the right to change specifications without notice.
Need help?
Do you have a question about the Raychem C25-100-METAL and is the answer not in the manual?
Questions and answers