Table of Contents
Advertisement
Quick Links
Advertisement
Table of Contents

Related Manuals for zortrax Apoller


Summary of Contents for zortrax Apoller
- Page 1 Device User Guide Apoller...
-
Page 2: Table Of Contents
Navigating through the Menu Light Signals and Operating Modes Adding the Solvent Changing the Solvent Starting the Process Preparing for Transport Materials Prone to Smoothing Process in the Zortrax Apoller Basic Maintenance Support and Troubleshooting Error Messages Specification Recycling Certification... -
Page 3: Introduction
©2019, Zortrax S.A. All rights reserved. All trade names, logos and trademarks mentioned in the following document are registered trademarks of Zortrax and are subject to legal protection... -
Page 4: General Safety Information
- check it periodically for proper functioning to avoid potential failures. Turn off the device once the process is finished. ©2019, Zortrax S.A. All rights reserved. All trade names, logos and trademarks mentioned in the following document are registered trademarks of Zortrax and are subject to legal protection... - Page 5 ISO 80079-36:2016-07 Explosive atmospheres - Part 36: Non-electrical equipment for explosive atmospheres - Basic method and requirements ©2019, Zortrax S.A. All rights reserved. All trade names, logos and trademarks mentioned in the following document are registered trademarks of Zortrax and are subject to legal protection...
- Page 6 IIA (propane). ©2019, Zortrax S.A. All rights reserved. All trade names, logos and trademarks mentioned in the following document are registered trademarks of Zortrax and are subject to legal protection...
-
Page 7: Workplace Health And Safety
Note: The restrictions of the liquid’s use are included in this User Guide. The Zortrax Apoller does not pose a threat to health and safety of people when: properly installed and maintained, and used according to its intended purpose (following this User Guide) or under foreseeable conditions. - Page 8 The platform is made of glass, therefore, be particularly careful during the assembly and disassembly process. ©2019, Zortrax S.A. All rights reserved. All trade names, logos and trademarks mentioned in the following document are registered trademarks of Zortrax and are subject to legal protection...
- Page 9 Repairs of the device can only be carried out by the Manufacturer or the Manufacturer’s Authorized Service. Safe Storage and Transport Guide Zortrax devices must be stores between 0 and 35° C [32 - 95° F]. The storage space should be free of moisture and other extreme conditions. Transport Instructions: When stacking several devices on a pallet, follow the instructions on the packaging.
-
Page 10: Additional Safety Information
- It is strictly prohibited to repair the device independently. ©2019, Zortrax S.A. All rights reserved. All trade names, logos and trademarks mentioned in the following document are registered trademarks of Zortrax and are subject to legal protection... -
Page 11: Learn More About The Zortrax Apoller
Once the smoothing process is successfully finished, the models are ready for use. ©2019, Zortrax S.A. All rights reserved. All trade names, logos and trademarks mentioned in the following document are registered trademarks of Zortrax and are subject to legal protection... -
Page 12: What's In The Box
What’s in the Box ©2019, Zortrax S.A. All rights reserved. All trade names, logos and trademarks mentioned in the following document are registered trademarks of Zortrax and are subject to legal protection... -
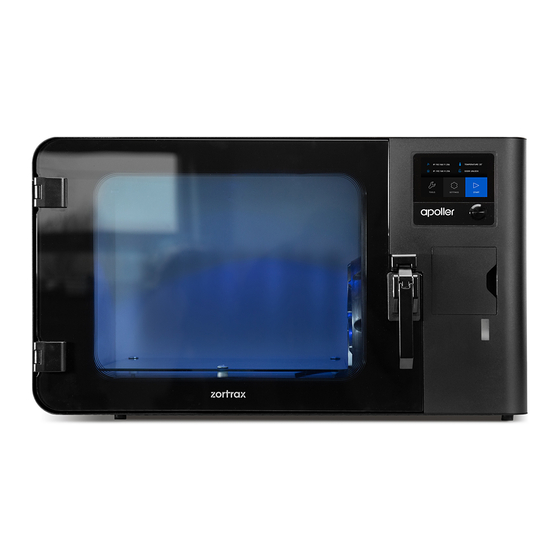
Page 13: Main Components
Main Components 1. Front view (closed) 2. Front view (open) ©2019, Zortrax S.A. All rights reserved. All trade names, logos and trademarks mentioned in the following document are registered trademarks of Zortrax and are subject to legal protection... -
Page 14: Zortrax Apoller Technology Glossary
The model and the support structures are created using the same material. ©2019, Zortrax S.A. All rights reserved. All trade names, logos and trademarks mentioned in the following document are registered trademarks of Zortrax and are subject to legal protection... - Page 15 PLATFORM integral part of Zortrax Apoller on which a user places models that will be subjected to post-processing. The platform can easily be removed as well as inserted back into the device.
- Page 16 STARTER KIT a set of tools and protective materials useful while working with the Zortrax Apoller. Each device is delivered with the full starter set, so that handling or maintaining the machine becomes easier and more effective.
-
Page 17: First Use Preparations
1. Open the box and remove the metal grid and brochures. 2. Remove the upper and side cushioning. ©2019, Zortrax S.A. All rights reserved. All trade names, logos and trademarks mentioned in the following document are registered trademarks of Zortrax and are subject to legal protection... - Page 18 3. Take the device out of the box. 4. Remove the foil. ©2019, Zortrax S.A. All rights reserved. All trade names, logos and trademarks mentioned in the following document are registered trademarks of Zortrax and are subject to legal protection...
- Page 19 Service. Do not pull the chamber door handle or attempt to remove the the blockage. ©2019, Zortrax S.A. All rights reserved. All trade names, logos and trademarks mentioned in the following document are registered trademarks of Zortrax and are subject to legal protection...
- Page 20 7. Remove the Starter Kit with the platform from the chamber. 8. Remove the plug from the drain tube. ©2019, Zortrax S.A. All rights reserved. All trade names, logos and trademarks mentioned in the following document are registered trademarks of Zortrax and are subject to legal protection...
- Page 21 10. Open the filler cover (A) and unscrew the filler cap (B). Wear safety glasses and gloves. ©2019, Zortrax S.A. All rights reserved. All trade names, logos and trademarks mentioned in the following document are registered trademarks of Zortrax and are subject to legal protection...
- Page 22 12. Tightly screw the filler cap. Make sure the cap is properly attached, and then tightened (A). Close the filler cover (B). ©2019, Zortrax S.A. All rights reserved. All trade names, logos and trademarks mentioned in the following document are registered trademarks of Zortrax and are subject to legal protection...
- Page 23 14. Slide the grid on the back pins (A) and move it back (B)*. ©2019, Zortrax S.A. All rights reserved. All trade names, logos and trademarks mentioned in the following document are registered trademarks of Zortrax and are subject to legal protection...
- Page 24 *The steps with grid installation are optional. Use only the original grid and hooks. ©2019, Zortrax S.A. All rights reserved. All trade names, logos and trademarks mentioned in the following document are registered trademarks of Zortrax and are subject to legal protection...
- Page 25 ©2019, Zortrax S.A. All rights reserved. All trade names, logos and trademarks mentioned in the following document are registered trademarks of Zortrax and are subject to legal protection...
- Page 26 19. You have finished the set-up. Your device is ready to work. ©2019, Zortrax S.A. All rights reserved. All trade names, logos and trademarks mentioned in the following document are registered trademarks of Zortrax and are subject to legal protection...
-
Page 27: Navigating Through The Menu
EMPTY SOLVENT SYSTEM and VENTILATE CHAMBER. Follow the instructions displayed on the screen during these procedures. ©2019, Zortrax S.A. All rights reserved. All trade names, logos and trademarks mentioned in the following document are registered trademarks of Zortrax and are subject to legal protection... - Page 28 The device will mark the solvent type recommended for the previously selected material. ©2019, Zortrax S.A. All rights reserved. All trade names, logos and trademarks mentioned in the following document are registered trademarks of Zortrax and are subject to legal protection...
- Page 29 While carrying out these procedures, observe all safety rules and follow the instructions displayed on the screen. ©2019, Zortrax S.A. All rights reserved. All trade names, logos and trademarks mentioned in the following document are registered trademarks of Zortrax and are subject to legal protection...
-
Page 30: Light Signals And Operating Modes
• Green - the end of the process • Red - error ©2019, Zortrax S.A. All rights reserved. All trade names, logos and trademarks mentioned in the following document are registered trademarks of Zortrax and are subject to legal protection... -
Page 31: Adding The Solvent
Tightly close the solvent container and put it in a safe place. ©2019, Zortrax S.A. All rights reserved. All trade names, logos and trademarks mentioned in the following document are registered trademarks of Zortrax and are subject to legal protection... - Page 32 3. Tightly screw the filler cap. Make sure the cap is properly attached, and then tightened (A). Close the filler cover (B). ©2019, Zortrax S.A. All rights reserved. All trade names, logos and trademarks mentioned in the following document are registered trademarks of Zortrax and are subject to legal protection...
-
Page 33: Changing The Solvent
2. Prepare the wash bottle delivered with the device. Squeeze it and put its nozzle in the solvent tank. Rele- ase the bottle to retract as much solvent as possible. ©2019, Zortrax S.A. All rights reserved. All trade names, logos and trademarks mentioned in the following document are registered trademarks of Zortrax and are subject to legal protection... - Page 34 (B). 4. Open the chamber door (A) and remove the platform (B). ©2019, Zortrax S.A. All rights reserved. All trade names, logos and trademarks mentioned in the following document are registered trademarks of Zortrax and are subject to legal protection...
- Page 35 6. Retract as much solvent as possible and select Done on the touchscreen. ©2019, Zortrax S.A. All rights reserved. All trade names, logos and trademarks mentioned in the following document are registered trademarks of Zortrax and are subject to legal protection...
- Page 36 8. Place the platform back on the pins inside the chamber (A). Close the chamber door (B). ©2019, Zortrax S.A. All rights reserved. All trade names, logos and trademarks mentioned in the following document are registered trademarks of Zortrax and are subject to legal protection...
- Page 37 Tightly close the solvent container and put it in a safe place. ©2019, Zortrax S.A. All rights reserved. All trade names, logos and trademarks mentioned in the following document are registered trademarks of Zortrax and are subject to legal protection...
- Page 38 11. Tightly screw the filler cap. Make sure the cap is properly attached, and then tightened (A). Close the filler cover (B). ©2019, Zortrax S.A. All rights reserved. All trade names, logos and trademarks mentioned in the following document are registered trademarks of Zortrax and are subject to legal protection...
-
Page 39: Starting The Process
You can also suspend the models on the metal grid using hooks delivered with the device. ©2019, Zortrax S.A. All rights reserved. All trade names, logos and trademarks mentioned in the following document are registered trademarks of Zortrax and are subject to legal protection... - Page 40 Inspect the chamber door gasket. If it’s necessary, clean it. d. Close the door. ©2019, Zortrax S.A. All rights reserved. All trade names, logos and trademarks mentioned in the following document are registered trademarks of Zortrax and are subject to legal protection...
- Page 41 Close the filler cover. f. Plug in the power cable. ©2019, Zortrax S.A. All rights reserved. All trade names, logos and trademarks mentioned in the following document are registered trademarks of Zortrax and are subject to legal protection...
- Page 42 8. Main condensation. 9. Completing the process, unblocking the chamber door, venting the chamber. ©2019, Zortrax S.A. All rights reserved. All trade names, logos and trademarks mentioned in the following document are registered trademarks of Zortrax and are subject to legal protection...
- Page 43 Open the door in such a way to avoid inhaling vapors from the chamber. ©2019, Zortrax S.A. All rights reserved. All trade names, logos and trademarks mentioned in the following document are registered trademarks of Zortrax and are subject to legal protection...
- Page 44 The device cannot start the next smoothing process until its components are cooled to room temperature. ©2019, Zortrax S.A. All rights reserved. All trade names, logos and trademarks mentioned in the following document are registered trademarks of Zortrax and are subject to legal protection...
-
Page 45: Preparing For Transport
2. Prepare the wash bottle delivered with the device. Squeeze it and put its nozzle in the solvent tank. Rele- ase the bottle to retract as much solvent as possible. ©2019, Zortrax S.A. All rights reserved. All trade names, logos and trademarks mentioned in the following document are registered trademarks of Zortrax and are subject to legal protection... - Page 46 4. Open the chamber door (A) and remove the platform (B). Place the platform in the protective foam. ©2019, Zortrax S.A. All rights reserved. All trade names, logos and trademarks mentioned in the following document are registered trademarks of Zortrax and are subject to legal protection...
- Page 47 6. Retract as much solvent as possible and select Done on the touchscreen. ©2019, Zortrax S.A. All rights reserved. All trade names, logos and trademarks mentioned in the following document are registered trademarks of Zortrax and are subject to legal protection...
- Page 48 8. Place the protective foam with the platform inside the chamber (A). Close the door (B). ©2019, Zortrax S.A. All rights reserved. All trade names, logos and trademarks mentioned in the following document are registered trademarks of Zortrax and are subject to legal protection...
- Page 49 9. Wrap the device in foil. 10. Put the device in the box. ©2019, Zortrax S.A. All rights reserved. All trade names, logos and trademarks mentioned in the following document are registered trademarks of Zortrax and are subject to legal protection...
- Page 50 11. Place the side and upper cushioning. 12. Close and tape the box. ©2019, Zortrax S.A. All rights reserved. All trade names, logos and trademarks mentioned in the following document are registered trademarks of Zortrax and are subject to legal protection...
-
Page 51: Materials Prone To Smoothing Process In The Zortrax Apoller
Z-HIPS No reaction Glossy finish, layers on vertical surfaces are invisible ©2019, Zortrax S.A. All rights reserved. All trade names, logos and trademarks mentioned in the following document are registered trademarks of Zortrax and are subject to legal protection... -
Page 52: Basic Maintenance
Some parts require maintenance before each process and some every few hundred working hours. Basic maintenance of the Zortrax Apoller device is not complicated and does not take too much time. - Page 53 - chemical or degre- asing substance, - safety glasses ©2019, Zortrax S.A. All rights reserved. All trade names, logos and trademarks mentioned in the following document are registered trademarks of Zortrax and are subject to legal protection...
- Page 54 - compulsory test of the whole liquid and vapor circulation system’s tight- ness. ©2019, Zortrax S.A. All rights reserved. All trade names, logos and trademarks mentioned in the following document are registered trademarks of Zortrax and are subject to legal protection...
-
Page 55: Support And Troubleshooting
- The problem arises from inadequate settings when preparing a model for 3D printing. ©2019, Zortrax S.A. All rights reserved. All trade names, logos and trademarks mentioned in the following document are registered trademarks of Zortrax and are subject to legal protection... -
Page 56: Error Messages
Whenever there is a technical issue caused by a hardware failure, negligence or inappropriate use of the Zortrax Apoller device, the firmware immediately displays an error message on the screen. The following list explains all error messages and provides potential causes and sug- gested solutions. - Page 57 Contact Zortrax Support Cen- iled. ter through the support form: https://support.zortrax.com/ support-form/. ©2019, Zortrax S.A. All rights reserved. All trade names, logos and trademarks mentioned in the following document are registered trademarks of Zortrax and are subject to legal protection...
- Page 58 Zortrax Support Center thro- ugh the support form: https:// support.zortrax.com/support- -form/. ©2019, Zortrax S.A. All rights reserved. All trade names, logos and trademarks mentioned in the following document are registered trademarks of Zortrax and are subject to legal protection...
-
Page 59: Specification
Z-ABS, Z-ULTRAT, Z-ULTRAT Plus, Z-ASA Pro, Z-HIPS External materials ABS, ASA, HIPS ©2019, Zortrax S.A. All rights reserved. All trade names, logos and trademarks mentioned in the following document are registered trademarks of Zortrax and are subject to legal protection... - Page 60 24 V DC @ 14 A, 500 W Maximum power consumption 1500 W ©2019, Zortrax S.A. All rights reserved. All trade names, logos and trademarks mentioned in the following document are registered trademarks of Zortrax and are subject to legal protection...
-
Page 61: Recycling
In case of questions, contact the Manufacturer through the support form available at: http://support.zortrax.com/support-form/. ©2019, Zortrax S.A. All rights reserved. All trade names, logos and trademarks mentioned in the following document are registered trademarks of Zortrax and are subject to legal protection... - Page 62 ©2019 Zortrax S.A. All rights reserved.
Need help?
Do you have a question about the Apoller and is the answer not in the manual?
Questions and answers