
Related Manuals for Kramer TBUS-3US-22


Summary of Contents for Kramer TBUS-3US-22
- Page 1 USER MANUAL MODEL: TBUS-3US-22 Table Connection Bus P/N: 2900-300952 Rev 1 www.KramerAV.com...
-
Page 2: Table Of Contents
Overview Typical Applications Defining the TBUS-3US-22 Table Connection Bus Installing the TBUS-3US-22 Cutting an Opening in the Table Inserting the TBUS-3US-22 through the Cut-out Opening Replacing the Blank Insert Inserting the Pass-through Cables Connecting to the TBUS-3US-22 Technical Specifications TBUS-3US-22 – Introduction... -
Page 3: Introduction
Kramer Electronics Ltd. Introduction Welcome to Kramer Electronics! Since 1981, Kramer Electronics has been providing a world of unique, creative, and affordable solutions to the vast range of problems that confront the video, audio, presentation, and broadcasting professional on a daily basis. In recent years, we have... -
Page 4: Overview
European Advanced Recycling Network (EARN) and will cover any costs of treatment, recycling and recovery of waste Kramer Electronics branded equipment on arrival at the EARN facility. For details of Kramer’s recycling arrangements in your particular country go to our recycling pages at www.kramerav.com/support/recycling. -
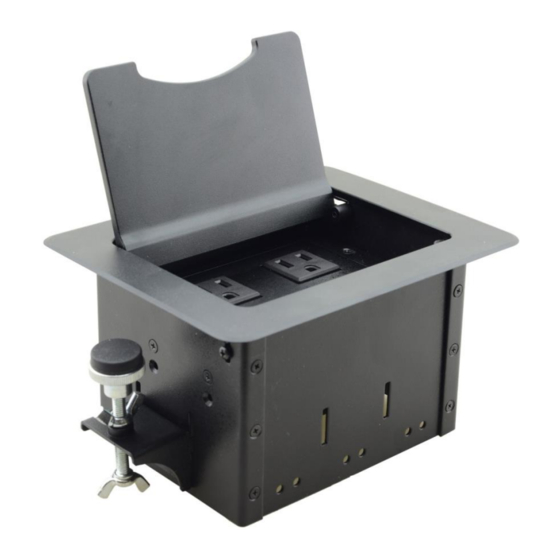
Page 5: Defining The Tbus-3Us-22 Table Connection Bus
Kramer Electronics Ltd. Defining the TBUS-3US-22 Table Connection Bus This section defines the TBUS-3US-22. Figure 1: Defining the Parts of the TBUS-3US-22 Table Connection Bus Feature Function Black/Clear Anodized Includes an opening for cable pass-through; covers the inner frame, Sandblast Textured Lid leaving the table surface neat and tidy. - Page 6 Connect to a US power consuming device. Split Pass-through Bracket with Use for passing through cables. Grommet Blank Single Insert Can be replaced with Kramer passive wall plates or connector modules for interfacing A/V type signals. TBUS-3US-22 – Defining the TBUS-3US-22 Table Connection Bus...
-
Page 7: Installing The Tbus-3Us-22
8. Cutting an Opening in the Table The cut-out template defines the surface you have to cut out to install your TBUS-3US-22. The thickness of the table should be 76mm (3”) or less. To cut an opening in a table: 1. -
Page 8: Inserting The Tbus-3Us-22 Through The Cut-Out Opening
TBUS-3US-22 housing. Beware of the sharp edge! 2. Carefully insert the unit into the prepared opening. Figure 4: Inserting TBUS-3US-22 into the Table Opening 3. Take the mounting clamps under the table and place them into the support clamp slits on both sides of the unit. -
Page 9: Replacing The Blank Insert
1. Unscrew the two screws that fasten the blank plate to the inner frame and remove the blank plate. 2. Place the required Kramer insert over the opening, insert the two screws to fix the Kramer insert in place, and tighten them. Inserting the Pass-through Cables To insert the pass through cables (for example, to connect to a laptop): 1. -
Page 10: Connecting To The Tbus-3Us-22
Kramer Electronics Ltd. Connecting to the TBUS-3US-22 You can connect the following devices to the TBUS-3US-22. Figure 6: Connecting TBUS-3US-22 TBUS-3US-22 – Installing the TBUS-3US-22... -
Page 11: Technical Specifications
Kramer Electronics Ltd. Technical Specifications Ports 2 US Power Sockets For powering devices Inserts 1 Single Blank For replacing with Kramer inserts 1 Pass-through Single For passing cables from beneath the table Power Consumption 125V AC, 50/60Hz, 5A max Fuse Rating T 6.3A 250V... - Page 12 What Kramer Electronics Will Do Kramer Electronics will, at its sole option, provide one of the following three remedies to whatever extent it shall deem necessary to satisfy a proper claim under this limited warranty: Elect to repair or facilitate the repair of any defective parts within a reasonable period of time, free of any charge for the necessary parts and labor to complete the repair and restore this product to its proper operating condition.
- Page 13 SAFETY WARNING Disconnect the unit from the power supply before opening and servicing For the latest information on our products and a list of Kramer distributors, visit our Web site where updates to this user manual may be found. We welcome your questions, comments, and feedback.
Need help?
Do you have a question about the TBUS-3US-22 and is the answer not in the manual?
Questions and answers