
Related Manuals for Victrola VTA-800B


Summary of Contents for Victrola VTA-800B
- Page 1 MODEL: VTA-800B 5-IN-1 TURNTABLE Instruction Manual PLEASE READ THIS INSTRUCTION MANUAL CAREFULLY BEFORE USEAND KEEP IT FOR FUTURE REFERENCE.
-
Page 2: Important Safety Instructions
CAUTION RISK OF ELECTRIC SHOCK DO NOT OPEN AVERTISENT: RISQUE DE CHOC ÉLECTRIQUE – NE PAS OUVRIR. - This lightning flash with arrowhead symbol within an equilateral triangle is intended to alert the user to the presence of non-insulated “dangerous voltage” within the product’s enclosure that may be of sufficient magnitude to constitute a risk of electric shock. - Warning: To reduce the risk of electric shock, do not remove cover (or back) as there are no user-serviceable parts inside. Refer servicing to qualified personnel. - The exclamation point within an equilateral triangle is intended to alert the user to the presence of important operating and maintenance instructions in the literature accompanying the appliance. - Page 3 -This lightning flash with arrowhead symbol within an equilateral triangle is intended to alert the user to the presence of non-insulated “dangerous voltage” within the product’s enclosure that may be of sufficient magnitude to constitute a risk of electric shock. -Warning: To reduce the risk of electric shock, do not remove cover (or back) as there are no user-serviceable parts inside.
-
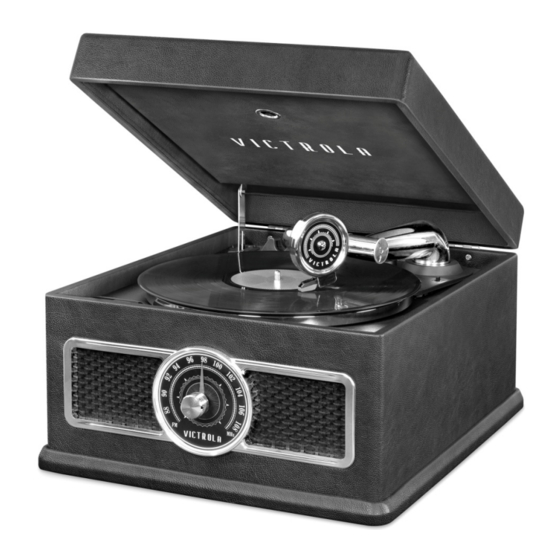
Page 4: Product Overview
Product Overview Control Panel (Overhead View) LCD Display PREVIOUS TRACK In CD Mode, press once to skip to the previous track. Press and hold to rewind. In BT Mode, press to select track (Note: This button will not work in PHONO, Radio, AUX mode) STOP Press to stop playback or cancel the program setting. - Page 5 Left Side View 14. DISC TRAY Rear View 15. LINE-OUT Jacks For amplifier device with RCA auxiliary input sockets, insert the white and red plugs on the RCA cable into the unit. Insert the opposite end into the amplifier device. Be sure to connect the white plug to the white jack and the red plug to the red jack.
-
Page 6: Stereo Speakers
Front View 17. RADIO TUNER KNOB In FM mode, turn to tune to desired station. 18. STEREO SPEAKERS 19. LED Backlight Inside View 20. Record Storage Stores about 5 records. - Page 7 Parts of the Turntable Turntable Speed Selector 45 RPM Adaptor Tone Arm Before use, completely loosen the fixed rope on the tone arm and lift the tone arm up. Tone Arm Holder...
-
Page 8: Setup / Basic Operation
Setup / Basic Operation Setup 1. Remove white protective needle cover by gently pulling towards front of unit. 2. Remove any packaging materials from the unit. 3. Connect the AC power cord to a wall outlet. Note: - It is strongly recommended that this product should be operated only from the type of power source indicated on the marking label. - Page 9 CD Operation 1. Press the FUNC Button until the LCD Display indicates “CD --”. (Note: When no disc is inserted, “disc” will appear on the display.) 2. Press the OPEN/CLOSE button. (Note: This button only works in CD mode.) 3. Place a disc on the tray with the printed label face up. 4.
-
Page 10: Radio Operation
2. From your external device, go to the Bluetooth Settings Menu and ensure that Bluetooth is turned on. Then select “VTA-800B” once it appears in the menu. (If a window asks for a password, fill in “0000” then press “OK” on your external device). - Page 11 Handling Vinyl Records Do not touch the record’s grooves. Only handle records by the edges or the label with clean hands. Touching the • record surface will cause your record’s quality to deteriorate. To clean a record, use a soft anti-static cloth to gently wipe the record surface. •...
-
Page 12: Specifications
Specifications GENERAL Power Requirements AC 120 V~60 Hz Power Consumption x 9.8” (248mm) x 17.95” (456mm) Dimensions (W x H x D) Approx. 14.6” (370mm) Weight Approx. 22lbs (10 AMPLIFIER Output Power 5 W + 5 W Frequency Response 60 to 20,000 Hz SPEAKER SYSTEM Type 2-way... -
Page 13: Troubleshooting Guide
Troubleshooting Guide Symptom Possible Cause Solution Unit will not power on. Unit is unplugged. Connect the unit to the AC • • • power supply. No sound output from The volume level is set too low. Adjust the volume. • •... -
Page 14: Fcc Statement
FCC Statement This device complies with Part 15 of the FCC Rules. Operation is subject to the following two conditions: (1) This device may not cause harmful interference, and (2) this device must accept any interference received, including interference that may cause undesired operation. NOTE: This equipment has been tested and found to comply with the limits for a Class B digital device, pursuant to Part 15 of the FCC Rules. -
Page 15: California Prop 65 Warning
IC Statement This device complies with RSS247 of Industry Canada. Cet appareil se conforme à RSS247 de Canada d'Industrie. This device complies with Industry Canada license-exempt RSS standard(s). Operation is subject to the following two conditions: (1) this device may not cause interference, and (2) thisdevice must accept any interference, including interference that may cause undesired operation ofthe device. -
Page 16: Warranty
God or attempted repair by an unauthorized service agent. To obtain service, the purchaser MUST present an original sales receipt / proof of purchase. Please contact us at www.victrola.com to request an RMA (Return Material Authorization) number to return products for service or replacement. Returns without an RMA number on the package will be refused and returned to sender.
Need help?
Do you have a question about the VTA-800B and is the answer not in the manual?
Questions and answers