Siemens Sinamics G120 Operating Instructions Manual
Smart access
Hide thumbs
Also See for Sinamics G120:
- List manual (1256 pages) ,
- Manual (732 pages) ,
- Operating instructions manual (550 pages)
Table of Contents
Advertisement
SINAMICS
SINAMICS G120 Smart Access
Operating Instructions
04/2018
A5E43332487
Fundamental safety
___________________
instructions
___________________
Product overview
___________________
Installing
___________________
Accessing the Web pages
___________________
Standard Web pages
___________________
Upgrading
___________________
Additional information
1
2
3
4
5
6
7
Advertisement
Table of Contents

Related Manuals for Siemens Sinamics G120


Summary of Contents for Siemens Sinamics G120
- Page 1 Fundamental safety ___________________ instructions ___________________ Product overview ___________________ SINAMICS Installing ___________________ Accessing the Web pages SINAMICS G120 Smart Access ___________________ Standard Web pages ___________________ Upgrading Operating Instructions ___________________ Additional information 04/2018 A5E43332487...
- Page 2 Note the following: WARNING Siemens products may only be used for the applications described in the catalog and in the relevant technical documentation. If products and components from other manufacturers are used, these must be recommended or approved by Siemens. Proper transport, storage, installation, assembly, commissioning, operation and maintenance are required to ensure that the products operate safely and without any problems.
-
Page 3: Table Of Contents
Synchronizing the time......................23 5.2.4 Upgrading ..........................23 5.2.5 Viewing additional information ....................24 5.2.6 Restarting the SINAMICS G120 Smart Access ..............24 Inverter identification ....................... 25 Quick commissioning ......................25 Parameters ..........................34 JOG ............................39 Monitoring ..........................42 Diagnostics .......................... - Page 4 Table of contents Additional information..........................57 Overview of the user documentation ..................57 Product support ........................57 Technical specifications ......................58 SINAMICS G120 Smart Access Operating Instructions, 04/2018, A5E43332487...
-
Page 5: Fundamental Safety Instructions
As the user you yourself are responsible for ensuring that the products described are operated correctly. Application examples do not relieve you of your responsibility for safe handling when using, installing, operating and maintaining the equipment. SINAMICS G120 Smart Access Operating Instructions, 04/2018, A5E43332487... -
Page 6: Industrial Security
Siemens’ products and solutions undergo continuous development to make them more secure. Siemens strongly recommends that product updates are applied as soon as they are available and that the latest product versions are used. Use of product versions that are no longer supported, and failure to apply the latest updates may increase customer’s exposure... -
Page 7: Product Overview
RS232 interface and allows Web-based access to the inverter from a connected device (a conventional PC with a wireless network adapter installed, a tablet, or a smart phone). Note SINAMICS G120 Smart Access is only for commissioning and thus cannot be used with the inverter permanently. Supported inverters... - Page 8 Firefox version 58.0.2 or later • Siemens recommends that you use the Web browsers listed above to achieve optimum Web browsing performance. Supported minimum resolution The SINAMICS G120 Smart Access displays the pages in a format and size compatible with the device you use to access the Web pages.
-
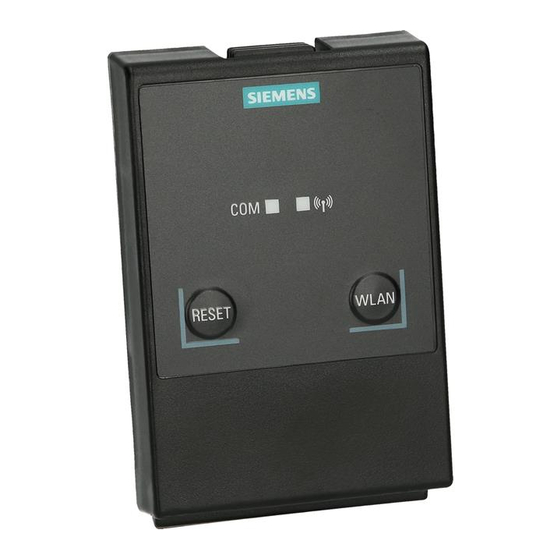
Page 9: Layout And Functions
Button Function Reset Holding down the button for more than three seconds when the SINAMICS G120 Smart Access is in • power-on state resets the Wi-Fi configuration of the SINAMICS G120 Smart Access to factory defaults. Holding down the button when the SINAMICS G120 Smart Access is in power-off state and powering on •... - Page 10 Product overview 2.2 Layout and functions SINAMICS G120 Smart Access Operating Instructions, 04/2018, A5E43332487...
-
Page 11: Installing
The SINAMICS G120 Smart Access has no internal power supply and derives its power directly from the inverter through the RS232 interface. Any configuration data stored on the SINAMICS G120 Smart Access is saved to its memory which does not require power to retain the data. - Page 12 SINAMICS G120 Smart Access does not support door mounting. Note To reduce human exposure to radio frequency electromagnetic fields, maintain a minimum distance of 2 cm between your body and the SINAMICS G120 Smart Access when it is operational. SINAMICS G120 Smart Access...
-
Page 13: Accessing The Web Pages
Accessing the Web pages You can access the SINAMICS G120 Web pages from a PC or a mobile device that connects to the SINAMICS G120 Smart Access. Establishing the wireless network connection NOTICE Equipment malfunctions as a result of unauthorized access to the inverter Hacker attack can result in unauthorized access to the inverter through the SINAMICS G120 Smart Access. - Page 14 Certification Authorities”. 4. Select "OK > Next > Finish" to complete the certificate installation. Now you are able to access the SINAMICS G120 Web pages via the SINAMICS G120 Smart Access. Installing on iOS-based mobile devices 1. As iOS devices do not support directly downloading files, use a non-iOS device to enter the certificate download Web site (https://support.industry.siemens.com/cs/ww/en/ps/13225) and download the file "G120...
- Page 15 4. Select "Settings > General > About > Certificate Trust Settings" to enable full trust for the root certificate "G120 Smart Access 2018". Now you are able to access the SINAMICS G120 Web pages via the SINAMICS G120 Smart Access. SINAMICS G120 Smart Access...
- Page 16 4.1 Establishing the wireless network connection Establishing initial wireless network connection 1. After you have fitted the SINAMICS G120 Smart Access to the inverter, power on the inverter and then hold down the WLAN button (> 3 s) to enable the Wi-Fi connection of the module.
- Page 17 After your confirmation of the new password entry, the module restarts automatically. 7. Select the wireless network SSID of the SINAMICS G120 Smart Access and then enter the new Wi-Fi password to launch the connection.
-
Page 18: Accessing The Web
● The standard Web pages use JavaScript. If your Web browser settings have disabled JavaScript, enable them first. ● When accessing the SINAMICS G120 Web pages from a mobile device, do not use the landscape mode. SINAMICS G120 Smart Access... -
Page 19: Standard Web Pages
Optional Web access settings (Page 20) ⑬ Inverter data identification (Page 25) ⑭ Support information (Page 54) Note The Web page illustrations from this chapter forward represent only the standard PC Web page appearance. SINAMICS G120 Smart Access Operating Instructions, 04/2018, A5E43332487... -
Page 20: Viewing Connection Status
● Inverter time synchronization with the connected device (Page 23) ● Web application and firmware version upgrade (Page 23) ● Viewing additional information of the SINAMICS G120 Smart Access (Page 24) ● Restarting the SINAMICS G120 Smart Access (Page 24) -
Page 21: Configuring Wi-Fi
If you do not want to use the factory default Wi-Fi settings, you can change Wi-Fi configuration in the following dialog box: The new Wi-Fi configuration takes effect only after the SINAMICS G120 Smart Access is restarted. Wi-Fi SSID (Service Set Identifier) Default SSID: G120 smart access_xxxxxx ("xxxxxx"... -
Page 22: Changing The Display Language
You can select a desired strength with the slider. Resetting Wi-Fi configuration When the SINAMICS G120 Smart Access is in power-on state, holding down the reset button for more than three seconds resets the Wi-Fi configuration of the SINAMICS G120 Smart Access to factory defaults. -
Page 23: Synchronizing The Time
PC/mobile device to record the occurrence time of inverter faults/alarms. After you enable synchronization, the inverter receives the time of the day from the connected PC/mobile device. Note Only SINAMICS G120 CU230P-2 supports this function. 5.2.4 Upgrading Upgrading includes conventional upgrading and basic upgrading. For detailed information, see Section "Upgrading (Page 55)". -
Page 24: Viewing Additional Information
Access: 5.2.6 Restarting the SINAMICS G120 Smart Access You can use this function to restart the SINAMICS G120 Smart Access. After the SINAMICS G120 Smart Access is restarted, reconnect your PC/mobile device to the module and refresh the Web application. -
Page 25: Inverter Identification
Note that the green check mark indicates the completed step, the pencil symbol indicates the current step, and the circle symbol indicates the to-be-completed step. SINAMICS G120 Smart Access Operating Instructions, 04/2018, A5E43332487... - Page 26 After you confirm that the factory resetting is successfully complete, the Web page advances to the application class selection dialog automatically. – Select modification of the existing settings. The Web page then advances to the application class selection dialog automatically. SINAMICS G120 Smart Access Operating Instructions, 04/2018, A5E43332487...
- Page 27 3. Select an application class according to the particular inverter connected. If required, click relevant application class to expand the detailed description. If "Expert" is selected, you can select your control mode of the inverter. SINAMICS G120 Smart Access Operating Instructions, 04/2018, A5E43332487...
- Page 28 Standard Web pages 5.4 Quick commissioning 4. Enter necessary motor data: SINAMICS G120 Smart Access Operating Instructions, 04/2018, A5E43332487...
- Page 29 – Automatic data input is applicable only for 1LE1 induction motors, 1PC1 induction motors, 1PH8 induction motors and 1FP1 reluctance motors. The 87 Hz option is only indicated if you selected IEC as the motor standard and delta as the connection type. SINAMICS G120 Smart Access Operating Instructions, 04/2018, A5E43332487...
- Page 30 Standard Web pages 5.4 Quick commissioning 5. Select the default setting for the interfaces of the inverter that is suitable for your application. SINAMICS G120 Smart Access Operating Instructions, 04/2018, A5E43332487...
- Page 31 – OFF3 ramp-down time sets the ramp-down time from the maximum speed down to zero speed for the OFF3 command. SINAMICS G120 Smart Access Operating Instructions, 04/2018, A5E43332487...
- Page 32 Standard Web pages 5.4 Quick commissioning 7. Select the desired technological application. Depending on the selected application class, the technological application list deviates from the list below: SINAMICS G120 Smart Access Operating Instructions, 04/2018, A5E43332487...
- Page 33 . The motor accelerates to the currently set setpoint after the motor data identification. 9. The quick commissioning completes when the following window appears. You can select to go to the JOG page immediately or later. SINAMICS G120 Smart Access Operating Instructions, 04/2018, A5E43332487...
-
Page 34: Parameters
You can open the parameters Web page by selecting the parameters icon from either the home page or the navigation sidebar. ① ④ Searching parameters Editing parameters ② ⑤ Filtering parameters by group Resetting parameters ③ ⑥ Adding parameters to "my parameters" group Saving parameters SINAMICS G120 Smart Access Operating Instructions, 04/2018, A5E43332487... - Page 35 The figure below shows different methods for editing parameters. Note that when editing a BICO parameter (example: P0771[0]), you can use the on-screen numeric keypad to quickly navigate to the parameter values that start with the number(s) you enter. SINAMICS G120 Smart Access Operating Instructions, 04/2018, A5E43332487...
- Page 36 Filtering parameters You can view and set parameters in the target parameter group. ① ③ Complete list of all visible parameters User-defined parameters ② ④ List of all modified parameters Other parameter groups SINAMICS G120 Smart Access Operating Instructions, 04/2018, A5E43332487...
- Page 37 If you desire to add certain parameters (including any specific indexed parameters) to "my parameters" group, proceed as the example below: Note that all successfully added parameters will go to the following parameter group: SINAMICS G120 Smart Access Operating Instructions, 04/2018, A5E43332487...
- Page 38 You can select to reset all parameters to either user default settings or factory settings. Saving parameters to non-volatile memory You can select to save all parameter settings to the non-volatile memory as either standard parameter set or user default settings. SINAMICS G120 Smart Access Operating Instructions, 04/2018, A5E43332487...
-
Page 39: Jog
Run the motor in JOG or HAND mode (default mode: JOG). Note that if desired, you can also test the motor rotation direction with the correspond- ① ② ing button (" "). The page shows the currently selected rotation direction (" "). SINAMICS G120 Smart Access Operating Instructions, 04/2018, A5E43332487... - Page 40 Standard Web pages 5.6 JOG ① • Press the desired button (" ") to run the motor in JOG mode: • Proceed as follows to run the motor in HAND mode: SINAMICS G120 Smart Access Operating Instructions, 04/2018, A5E43332487...
- Page 41 Before returning the control, make sure that there is no inverter output and the motor has stopped. Note If the Wi-Fi connection is lost during motor test run, you must re-establish the wireless network connection. SINAMICS G120 Smart Access Operating Instructions, 04/2018, A5E43332487...
-
Page 42: Monitoring
● Faults/alarms ● I/O status ● Status bits Meaning of fault/alarm icons Fault and alarm icons are shown in the upper-right corner of the SINAMICS G120 Web page. See the following example for possible icon display: Fault icons ① No active faults ②... - Page 43 Displays the active faults and alarms only Displays all faults and alarms Note: SINAMICS G120 Smart Access does not read the updates of active faults or alarms from the inverter until you collapse the currently expanded fault/alarm. For more information about the maximum number of faults/alarms that can be recorded, see r0947/r2110.
- Page 44 CO/BO: CU digital output status r0752[0...n] Actual analog input value [V] or [mA] r0774[0...1] Actual analog output value [V] or [mA] P0756[0...n] Type of analog input P0776[0...1] Type of analog output SINAMICS G120 Smart Access Operating Instructions, 04/2018, A5E43332487...
-
Page 45: Backup And Restore
The backup process backs up all parameters of access levels up to 3 and allows you to back up a maximum of 20 files to SINAMICS G120 Smart Access. In case of any further backup attempt, a message appears prompting you to delete some of the existing backup files. - Page 46 5.9 Backup and restore Operating sequence Proceed as follows to back up the parameter file to SINAMICS G120 Smart Access. Character restrictions for the file name: maximum 30 characters which are limited to A- Z, a-z, 0-9, _, -, (, ), dot, or space. If the name for the new backup file already exists, a message prompts asking you whether you want to overwrite the existing file or cancel the backup process.
-
Page 47: Restoring
You can use the restore Web page to upload, download, delete, and/or restore the selected file (*.bin file). Note The restoring process restores all parameters of access levels up to 3. Uploading an existing file (recommended on PC) Downloading an existing file (recommended on PC) SINAMICS G120 Smart Access Operating Instructions, 04/2018, A5E43332487... - Page 48 Standard Web pages 5.9 Backup and restore Deleting the selected file Restoring the selected file Proceed as follows to start restoring process. SINAMICS G120 Smart Access Operating Instructions, 04/2018, A5E43332487...
-
Page 49: Saving As Xml
The saving process saves all parameters of access levels up to 3 and allows you to save a maximum of 20 files to SINAMICS G120 Smart Access. In case of any further saving attempt, a message appears prompting you to delete some of the existing XML files. - Page 50 The generating process completes when the following window appears. If the Web page indicates that the generation fails, you can select to generate again. Note that you can select to download the file to your local drive (recommended on PC). SINAMICS G120 Smart Access Operating Instructions, 04/2018, A5E43332487...
- Page 51 Standard Web pages 5.9 Backup and restore Downloading an existing file (recommended on PC) Deleting the selected file SINAMICS G120 Smart Access Operating Instructions, 04/2018, A5E43332487...
-
Page 52: Transferring
Proceed as follows to transfer the standard parameter sets to SD card. The transferring process completes when the following window appears. If the Web page indicates that the transfer fails, you can select to transfer again. SINAMICS G120 Smart Access Operating Instructions, 04/2018, A5E43332487... - Page 53 Note To safely remove the SD card, click "safely remove" on the transfer Web page after the transferring process has completed. SINAMICS G120 Smart Access Operating Instructions, 04/2018, A5E43332487...
-
Page 54: Support
● Telephone number - left blank at the factory and can be edited by the OEM user ● E-mail address - left blank at the factory and can be edited by the OEM user ● Web site for Siemens Industry Online Support Viewing the support information... -
Page 55: Upgrading
Upgrading Upgrading on the SINAMICS G120 Web page upgrades the firmware version of the SINAMICS G120 Smart Access. Two upgrading methods are available: ● Conventional upgrading ● Basic upgrading (applicable when conventional upgrading fails) Conventional upgrading Download the target upgrade file (*.bin file) from the following Web site to your local drive (recommended on PC): https://support.industry.siemens.com/cs/ww/en/ps/13225... - Page 56 Upgrading Restart the SINAMICS G120 Smart Access. Note that if you do not click "Restart G120 Smart Access now", the SINAMICS G120 Smart Access will restart automatically after the 10-second countdown time has elapsed. Clear the browser cache. Refresh your Web application.
-
Page 57: Additional Information
Additional information Overview of the user documentation ● SINAMICS G120 Smart Access Operating Instructions (https://support.industry.siemens.com/cs/ww/en/ps/13225/man) Commissioning, parameterizing, and maintaining the inverter with SINAMICS G120 Smart Access (this manual) ● SINAMICS G120 Smart Access Product Information (https://support.industry.siemens.com/cs/ww/en/ps/13225/man) Paper sheet that ships with SINAMICS G120 Smart Access... -
Page 58: Technical Specifications
EIRP means effective isotropic radiated power. Changes or modifications made to this device not expressly approved by SIEMENS may void the FCC authorization to operate this device. This device complies with part 15 of the FCC Rules. Operation is subject to the following two condi- tions: (1) This device may not cause harmful interference, and (2) this device must accept any interference received, in- cluding interference that may cause undesired operation.
Need help?
Do you have a question about the Sinamics G120 and is the answer not in the manual?
Questions and answers