Table of Contents
Advertisement
Quick Links
HCC1000ABS, HMC1000ABS, HCC1400ABS, HMC1400ABS,
HCC1000WBS, HMC1000WBS, HCC1400WBS, HMC1400WBS,
HCE1000ABS, HME1000ABS, HCE1400ABS, HME1400ABS,
HCE1000WBS, HME1000WBS, HCE1400WBS, HME1400WBS
(See model number confi gurator on page 2 for details.)
Order parts online
www.follettice.com
™
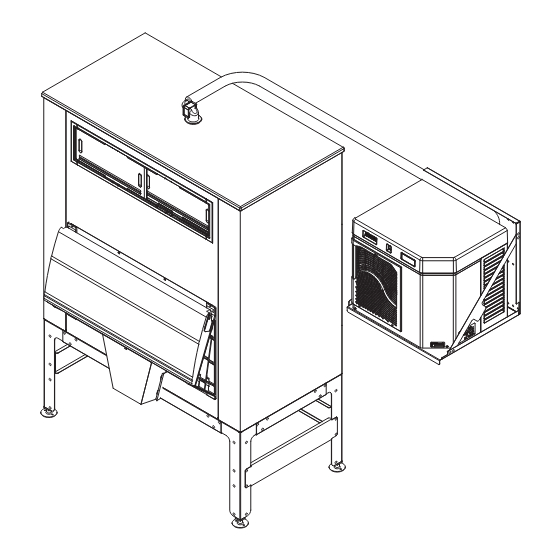
Horizon
Ice Machine Models with RIDE
Installation Instructions for Ice Storage Bins
801 Church Lane • Easton, PA 18040, USA
Toll free (877) 612-5086 • +1 (610) 252-7301
www.follettice.com
™
Technology
self-contained
208264
208264
Stock Module Identification Plate
Stock Module Identification Plate
Module No.
Module No.
Product
Product
Service No.
Service No.
00159889R07
Advertisement
Table of Contents

Related Manuals for Follett HCC1000ABS


Summary of Contents for Follett HCC1000ABS
- Page 1 ™ Horizon Ice Machine Models with RIDE Technology Installation Instructions for Ice Storage Bins HCC1000ABS, HMC1000ABS, HCC1400ABS, HMC1400ABS, HCC1000WBS, HMC1000WBS, HCC1400WBS, HMC1400WBS, HCE1000ABS, HME1000ABS, HCE1400ABS, HME1400ABS, HCE1000WBS, HME1000WBS, HCE1400WBS, HME1400WBS (See model number confi gurator on page 2 for details.) Order parts online www.follettice.com...
- Page 2 Chewblet ® Ice Machine Model Number Configurations 1400 Icemaker Voltage Series Condenser Application Configuration MC Maestro™ C 208-230/60/1 (icemaking head) 400 up to A Air-cooled, self-contained V Vision™ S RIDE™ Self-contained only. 454 lbs Chewblet ® W Water-cooled, self-contained H Harmony™ (RIDE remote D 115/60/1 (icemaking head) (206kg)
- Page 3 Read and complete the following 8 installation steps Unpack Site preparation Bin preparation Louvered docking assembly External connection Ice transport tube Internal connection Front cover BIN • RIDE Technology self-contained...
- Page 4 Unpack Carefully unpack and inspect the contents of your Follett ice machine. Unpack ice machine ➊ ➋ ➌ ➍ 1/2" 1/2" ➎ ➏ BIN • RIDE Technology self-contained...
-
Page 5: Site Preparation
Potable water supply • 10-70 psi (69-483kpa) • 45 to 90 F (7 to 32 C) • Follett recommends the use of an in-line water fi ltration system (#00130286) ➌ Condenser water supply for water-cooled systems • 10 psi min.; 150 psi max. (69kpa min.; 1034kpa max.) •... - Page 6 Bin preparation Prepare the bin Bin top preparation Bin top preparation ➋ ➊ ➌ ➊ ➊ • Remove protective tape from gaskets • Apply gaskets ➋ • Install shuttle actuator through dispenser top and secure with locking nut ➌ BIN • RIDE Technology self-contained...
- Page 7 Louvered docking assembly Install the louvered docking assembly. WARNING • Docking station must be secured in accordance with these instructions to ensure ice machine stability. • Ventilation openings in the louvered docking station should be clear of obstruction Wall bracket accessory Machine stand accessory •...
-
Page 8: Ice Transport Tube
Ice transport tube Install the ice transport tube. Ice transport tube installation Hot Water 160 F (71 C) 1/4˝ (6,4mm) 1' (0,3m) Ice transport tube tips ➊ • Insulate entire length of ice transport tube ➋ • Secure ice transport tube as needed to prevent dips and traps from forming. -
Page 9: External Connections
External connections Connect utilities to louvered docking assembly. Air-cooled ice machines only Water-cooled ice machines only ➌ ➋ ➍ ➋ ➊ ➊ • Remove access panel if necessary • Remove access panel if necessary ➊. ➊ • Install drain line •... -
Page 10: Internal Connections
Internal connections Connect louvered docking assembly to ice machine. CAUTION • Plug must be accessible after fi nal installation. • H_E1400A/W 230/50/1 requires a 20A circuit (4.00 mm wire) Air-cooled ice machines – follow steps 7.1 through 7.4. Ice transport tube Potable water line ➊... - Page 11 Water-cooled ice machines – follow steps 7.5 through 7.10. Cooling lines Ice transport tube ➋ ➊ • Install ice machine cooling water lines to • Slide ice machine into louvered docking ➊ louvered docking assembly assembly • Insert ice transport tube into coupling and ➋...
- Page 12 7.10 Power cord Power cord • Remove twist tie • Position plate into opening and secure with supplied screw • Carefully pass plug thru opening and plug into wall outlet BIN • RIDE Technology self-contained...
-
Page 13: Front Cover
Front cover Install front cover to ice machine. Water-cooled ice machines only ➋ ➊ • Slide ice machine cover over machine ensuring that tabs on back of cover slip under louvers on back of louvered ➊ docking assembly • Insert and tighten two screws through cover and into louvered docking assembly ➋... - Page 14 Long tube run recommendations max. 2 ft (0,6m) 1/4" (6,4mm) 1' (0,3m) ➊ • Pitch ice transport tube to allow melt water to drain towards ice machine ➋ • Secure insulated ice transport tube at least every 2 ft (0,6m) to prevent dips or traps BIN •...
- Page 15 BIN • RIDE Technology self-contained...
- Page 16 Horizon, Maestro, Harmony, Ice Manager, SafeCLEAN, Sani-Sponge, RIDE and Vision are trademarks of Follett Corporation. Chewblet is a registered trademark of Follett Corporation, registered in the US. 801 Church Lane • Easton, PA 18040, USA 00159889R07 Toll free (877) 612-5086 • +1 (610) 252-7301 3/12 www.follettice.com...
Need help?
Do you have a question about the HCC1000ABS and is the answer not in the manual?
Questions and answers