Table of Contents
Advertisement
Quick Links
Advertisement
Table of Contents

Related Manuals for Timeguard TRT047N


Summary of Contents for Timeguard TRT047N
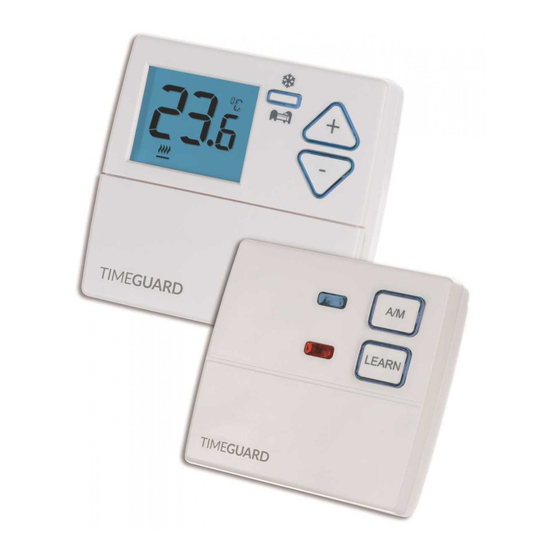
- Page 1 Wireless Digital Room Thermostat with Night Set-Back Model: TRT047N...
-
Page 2: General Information
1. General Information These instructions should be read carefully and retained for further reference and maintenance. 2. Safety • Before installation or maintenance, ensure the mains supply to the thermostat is switched off and the circuit supply fuses are removed or the circuit breaker turned off. - Page 3 Transmitter • Batteries: 2x 1.5V AA • Operating Temperature Range: 0°C to +40°C • Set Temperature Range: 10°C to 30°C • Temperature Swing Adjuster: +/- 0.5°C or 1.0°C set by DIP switch • PID Adjustment: ON or OFF set by DIP switch •...
-
Page 4: Installation
Transmitter • The TRT047N Transmitter must be sited where it will not be influenced by heat sources, for example above a radiator or a television or a refrigerator/freezer or in direct sunlight or subjected to draughts. - Page 5 5.7 To reinstall the unit onto the wall plate, rst ensure the wall plate retaining screws are loosened enough to clear the TRT047N receiver body, then engage the top of the TRT047N receiver onto the wall plate retaining tabs, and push rmly downwards and then upwards.
- Page 6 5.13 To reinstall the unit onto the wall plate, first ensure the wall plate retaining screws are loosened enough to clear the TRT047N transmitter body, then engage the top of the TRT047N transmitter onto the wall plate retaining tabs, and push firmly downwards and then upwards.
-
Page 7: Connection Diagram
6. Connection Diagram Connect the 230V 50Hz mains supply and load cables to the terminal block which are marked as follows; Connections to boiler Note: Check boiler instructions before connecting 230V AC 50Hz Supply Supply MAINS SUPPLY Neutral Live 230V 50Hz Mains Supply Live Supply (Brown or Red) to Neutral Supply (Blue or Black) to A ‘Loop Terminal’... - Page 8 The boiler type can be set to either 3CYC (Gas) or 6CYC (Oil), using the DIP switches on the rear of the unit. Press the reset button after changing. TRT047N Rear of Transmitter DIP switch for PID setting DIP switch for...
-
Page 9: Pairing The Devices
8. Pairing the Devices • Make sure you have selected the desired DIP switch settings located on the back of the transmitter. • Press the reset button of on the front of the transmitter, and connect the power to the receiver. Press the Reset button located beneath the drop down flap... - Page 10 • On the transmitter, press and hold both the + and Frost/Night Set-back buttons at the same time until the flashing blue Learn/Manual light goes off. This should take approximately 3 seconds. • The transmitter and receiver are now paired.
-
Page 11: Operation
9. Operation • The default set temperature is 22°C. Adjusting Set Temperature • Use the +/- setting buttons to change the set temperature. • The set temperature will flash while the change is being made. • The set temperature change will be made in 0.5 degree increments, and the +/- button surround and display light will illuminate upon setting. -
Page 12: Frost Protection Mode
The Red output ON light will illuminate indicating it is demanding heat Frost Protection Mode • Press the Frost/Night set-back button on the transmitter and hold for 3 seconds, the button surround and display light will illuminate. • The frost symbol will appear and continuously flash on the screen. The set temperature will change to 5°C. - Page 13 Night Set Back Mode • The night set back reduces the set temperature by 4°C for a set amount of hours. This can be set between 1 and 9 hours. • Press the Frost/Night set-back button once on the transmitter to activate, the button surround and display light will illuminate.
-
Page 14: Battery Low Indicator
• When the correct number of hours is selected, the display will time out 3 seconds after the last button is pressed. The display will then alternate every 2.5 seconds between the number of hours of night set back remaining, and the current room temperature. The Night set back bed symbol will flash continuously whilst active. -
Page 15: Year Guarantee
020 8450 0515. Note: A proof of purchase is required in all cases. For all eligible replacements (where agreed by Timeguard) the customer is responsible for all shipping/postage charges outside of the UK. All shipping costs... - Page 16 If you experience problems, do not immediately return the unit to the store. Telephone the Timeguard Customer Helpline; HELPLINE 020 8450 0515 or email helpline @ timeguard.com Qualified Customer Support Co-ordinators will be on-line to assist in resolving your query.
Need help?
Do you have a question about the TRT047N and is the answer not in the manual?
Questions and answers
how to reset my timer It has six time frames but I only need two, to come on in the morning and to go to a lower temperature after 3 hours. I do not know how to send image
The Timeguard TRT047N allows you to use the Night Set Back Mode to reduce the temperature after a set period. To achieve two time frames—one for morning activation and a lower temperature after three hours—follow these steps:
1. Set the desired morning activation temperature on the device.
2. Activate Night Set Back Mode:
- Press the Frost/Night Set Back button once.
- The button surround and display light will illuminate.
- The display will show "1 hour" flashing.
3. Adjust the duration:
- Use the +/- buttons to set the Night Set Back duration to 3 hours.
- The display will time out after 3 seconds of inactivity.
4. Confirm activation:
- The display will alternate every 2.5 seconds between the remaining Night Set Back time and the current room temperature.
- The Night Set Back bed symbol will continuously flash while active.
5. Cancel if needed:
- Press the Frost/Night Set Back button once again to disable the function.
This setup ensures that after three hours, the temperature is reduced by 4°C.
This answer is automatically generated