Advertisement
Advertisement
Table of Contents

Subscribe to Our Youtube Channel
Related Manuals for Timeguard TRT037N


Summary of Contents for Timeguard TRT037N
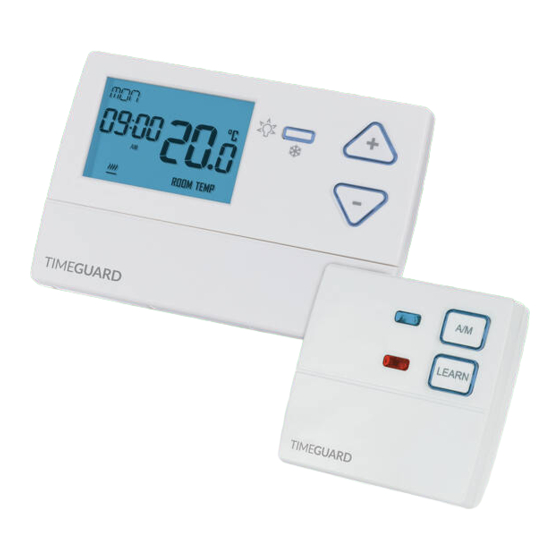
- Page 1 Wireless 7 Day Programmable Room Thermostat Model: TRT037N...
-
Page 2: General Information
1. General Information These instructions should be read carefully and retained for further reference and maintenance. 2. Safety • Before installation or maintenance, ensure the mains supply to the programmable room thermostat is switched off and the circuit supply fuses are removed or the circuit breaker turned off. •... - Page 3 Transmitter • Batteries: 2x 1.5V AA • Operating Temperature Range: 0°C to +40°C • Set Temperature Range: 10°C to 35°C • Temperature Swing Adjuster: +/- 0.5°C or 1.0°C set by DIP switch • Optimum Start Time (OST) Adjustment: ON or OFF set by DIP switch •...
-
Page 4: Installation
4. Siting Receiver • The TRT037N Receiver should be mounted close to the items it will be controlling i.e. boiler, control valves and pump. • It should be mounted in a position where its control buttons and indicator lights can be easily accessed. - Page 5 5.7 To reinstall the unit onto the wall plate, rst ensure the wall plate retaining screws are loosened enough to clear the TRT037N receiver body, then engage the top of the TRT037N receiver onto the wall plate retaining tabs, and push rmly downwards and then upwards.
- Page 6 5.13 To reinstall the unit onto the wall plate, first ensure the wall plate retaining screws are loosened enough to clear the TRT037N transmitter body, then engage the top of the TRT037N transmitter onto the wall plate retaining tabs, and push firmly downwards and then upwards.
- Page 7 Transmitter Wall Plate Alternate mounting holes Retaining tabs Mounting holes Wall plate retaining screws...
-
Page 8: Connection Diagram
6. Connection Diagram Connect the 230V 50Hz mains supply and load cables to the terminal block which are marked as follows; Connections to boiler Note: Check boiler instructions before connecting 230V AC 50Hz Supply Supply MAINS SUPPLY Neutral Live 230V 50Hz Mains Supply Live Supply (Brown or Red) to Neutral Supply (Blue or Black) to A ‘Loop Terminal’... - Page 9 DIP switches on the rear of the unit. When set to the ON position, the heating will turn on 20 minutes earlier, for every 1°c below your chosen set point. A reset will be required after changing the DIP switch positions. TRT037N Rear of Transmitter DIP switch for OST setting DIP switch for temperature...
-
Page 10: Pairing The Devices
8. Pairing the Devices • Make sure you have selected the desired DIP switch settings located on the back of the transmitter. • Press the reset button of on the front of the transmitter, and connect the power to the receiver. Press the Reset button located beneath the drop down flap •... - Page 11 • Press and hold the Learn button on the front of the receiver for 10 seconds until the blue Learn/Manual light starts flashing, the button surrounds will illuminate. The blue Learn/Manual light will start to flash Press and hold the Learn button for 10 seconds •...
-
Page 12: Setting The Time And Date
9. Setting the Time and Date • To set/alter the time and date at any time, press and hold the Select button for 3 seconds. The display light will illuminate. The hour will flash • The hour will to flash, use the Up/Down (+/-) arrow buttons to alter the hour and press the Select button once to confirm. - Page 13 Start time/temperature period, and so on. The closest you can get to turning the TRT037N programmable thermostat OFF, will be to set the selected period(s) to 10°C, this way the heating will not turn ON unless the temperature drops below these set points.
- Page 14 • The Copy function can be used to duplicate Start time/temperature periods, as detailed further in the instructions (read the instructions in full before you begin). 10.1 To programme or modify the time/temperature periods, press and hold the Set button for 3 seconds to enter the programming entry mode. The display light will illuminate Press and hold the Set button for 3 seconds to enter programming mode.
- Page 15 Use the Up/Down arrow Use the Select The hour will flash buttons to change the hour button to confirm 10.4 The minutes will flash, use the Up/Down arrow button to choose the minutes and press the Select button once to confirm. 10.5 The temperature will flash, use the Up/Down arrows to choose the temperature (the temperature increments are in 0.5°...
- Page 16 10.10 From the main screen, press and hold the Set button for 3 seconds, so the day of the week you have programmed is flashing e.g. Mon (or if you are already in the programming screen, press the Set button once so the day flashes).
- Page 17 • The display light will also time out after 15 seconds after the last button is pressed. • The Set button can be pressed three times to exit the date and time entry at any stage. 11. Programme Modes Frost Protection Mode •...
- Page 18 The blue Learn/Manual Press the A/M light will illuminate button once • Press the Learn button to turn the output ON and OFF, the red output light illuminate when calling for heat. Press the Learn button The Red output light to turn the output ON will illuminate when and OFF manually...
-
Page 19: Year Guarantee
020 8450 0515. Note: A proof of purchase is required in all cases. For all eligible replacements (where agreed by Timeguard) the customer is responsible for all shipping/postage charges outside of the UK. All shipping costs... - Page 20 If you experience problems, do not immediately return the unit to the store. Telephone the Timeguard Customer Helpline; HELPLINE 020 8450 0515 or email helpline @ timeguard.com Qualified Customer Support Co-ordinators will be on-line to assist in resolving your query.
Need help?
Do you have a question about the TRT037N and is the answer not in the manual?
Questions and answers