Innovative Technology NV9 Spectral Quick Start Manual
Hide thumbs
Also See for NV9 Spectral:
- User manual (64 pages) ,
- User manual (55 pages) ,
- User manual (64 pages)
Table of Contents
Advertisement
Quick Links
Advertisement
Table of Contents

Subscribe to Our Youtube Channel
Related Manuals for Innovative Technology NV9 Spectral


Summary of Contents for Innovative Technology NV9 Spectral
- Page 1 Doc:PA02093 Version: 1...
-
Page 2: Table Of Contents
NV9 Spectral Quick Start Guide << Back to Contents Document Name: NV9 Spectral Quick Start Guide Document Version: Date of Release: TABLE OF CONTENTS DOCUMENT INTRODUCTION ........................3 ........................... 3 ELATED OCUMENTS ..........................3 ANUAL MENDMENTS ..............................3 OPYRIGHT ............................3... - Page 3 NV9 Spectral Quick Start Guide << Back to Contents SOFTWARE INSTALLATION AND CONFIGURATION ................21 ............................21 NTRODUCTION ..........................21 OFTWARE OWNLOADS ..............................21 RIVERS ......................21 ATASET IRMWARE ROGRAMMING 6.4.1 Validator Manager........................21 6.4.1.1 General Description ..........................21 6.4.1.2 System Requirements .........................
-
Page 4: Document Introduction
Authorized Reseller, and extending for the length of time stipulated by Innovative Technology Ltd. A list of Innovative Technology Ltd offices can be found in every section of this manual set. If the product proves defective within the applicable warranty period, Innovative Technology Ltd will repair or replace the product. -
Page 5: Product Safety Information
<< Back to Contents indirect damages arising out the installation, maintenance, use, performance, failure or interruption of an Innovative Technology Ltd product, however caused. 1.5 Product Safety Information Throughout this user manual, attention should be drawn to key safety points when using or maintaining the product. - Page 6 NV9 Spectral Quick Start Guide << Back to Contents Safety Notice! Read before using this product! Safety Notice - Warning. Ensure power is removed before allowing access to the inside of this product. Ensure any static build up is discharged before allowing access to any part of this product or media contained.
-
Page 7: Product Introduction
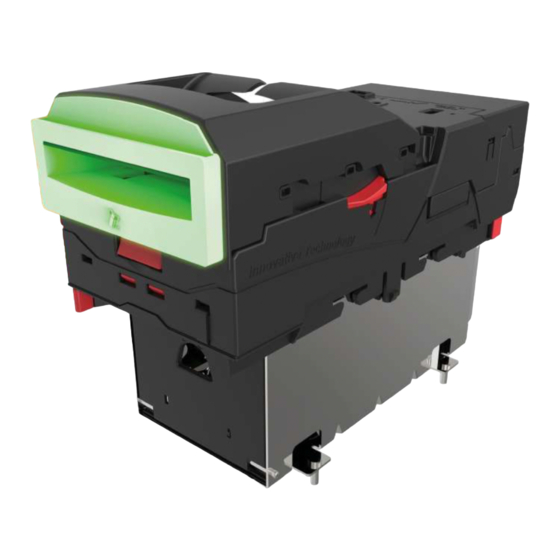
2 PRODUCT INTRODUCTION 2.1 General Description The NV9 Spectral is a highly secure and technologically advanced banknote validator, offering casino level security at a mid-range price. State of the art spectral sensors provide high resolution imaging, scanning 1.28 million data points to authenticate the validity of notes. -
Page 8: Interface Connectors
2.4.1 Interface The connector is a 16-pin socket used to interface the NV9 Spectral to the host machine. The 16-pin socket is hidden within the housing assembly, the housing assembly will need to be opened before accessing the socket. The initial step will be to push the release catch and thereafter to lift the top half of the housing assembly in the upward direction. -
Page 9: Configuration And Fault Codes
NV9 Spectral Quick Start Guide << Back to Contents The pin numbering of the socket is shown below: Information Description Power is required regardless of connection Serial Data Out (Tx) type. Serial Data In (Rx) USB Data + USB Data - Power is always required on pins 15 and 16 of the 16-way connector. -
Page 10: Configuration Button Functionality
2.5.1.1 Bezel flash counts The NV9 Spectral Validator leaves the factory preset to at least one currency and one interface so that it is ready for immediate installation. The dataset and interface used are shown on the label fixed to the top of the validator head. -
Page 11: Bezel Options
NV9 Spectral Quick Start Guide << Back to Contents 2.7 Bezel Options ITL Part Number Description Details http://innovative- technology.com/shop/bezels/nv9-standard- PA00189 NV9 USB Standard Bezel (82mm) horizontal-bezel-detail http://innovative- technology.com/shop/bezels/nv9-vertical-up- PA00190 NV9 USB Vertical Up Snout Bezel(82mm) snout-bezel-detail http://innovative- PA00188 NV9 USB Vertical Up Bezel (82mm) technology.com/shop/bezels/nv9-vertical-up-... -
Page 12: Technical Data
NV9 Spectral Quick Start Guide << Back to Contents 3 TECHNICAL DATA 3.1 Dimensions 3.2 Weight • Validator =1.05 KG • Bezel (standard) = 0.10 KG • Cashbox (slide on) =0.57 KG • Combined =1.72 KG 3.3 Environmental Requirements Environment... -
Page 13: Supply Currents
2.5 A 3.4.3 Power Supply Guidance The NV9 Spectral requires a stable 12 V DC / 3 A power supply. Please check the power requirements of the host machine and other peripherals to dimension a suitable power environment for the machine setup. -
Page 14: Mechanical Installation
4 MECHANICAL INSTALLATION 4.1 Power Supply It is vital that the NV9 Spectral is connected to a power supply being able to provide the required power environment. A weak power supply causes malfunctioning of the NV9 Spectral such like note rejects or missing credits. If the NV9 Spectral is used as a fitting replacement for an older model or product it is recommended to check the power supply specifications of the machine. -
Page 15: Bezel Mounting
NV9 Spectral Quick Start Guide << Back to Contents 4.3 Bezel Mounting 4.3.1 Bezel Removal 1. Bezel release catch • The bezel is removed by pushing the red bezel latches down on both sides of the validator downwards, and sliding the bezel away from the bezel latches. -
Page 16: Bezel Fitting
NV9 Spectral Quick Start Guide << Back to Contents 4.3.2 Bezel Fitting 1. Positioning the bezel for fitting • When fitting the bezel onto the validator ensure that it sits in place such that it is ready to push down into place, then push down the bezel. -
Page 17: Cashbox Mounting
NV9 Spectral Quick Start Guide << Back to Contents 4.4 Cashbox Mounting 4.4.1 Cashbox Removal • To remove the cashbox, push the release catch away from the unit and pull the cashbox forwards. Copyright © Innovative Technology Ltd 2018 Doc:PA02093... -
Page 18: Maintenance And Cleaning
<< Back to Contents 5 MAINTENANCE AND CLEANING 5.1 Introduction Depending upon the environment the NV9 Spectral is running in it may require cleaning, belt changing or note path clearing. 5.2 Cleaning the NV9 Spectral Disconnect the power BEFORE carrying out any cleaning operations to avoid the risk of causing damage to the validator. -
Page 19: Lozenge Removal And Cleaning
NV9 Spectral Quick Start Guide << Back to Contents 5.2.3 Lozenge removal and cleaning 1. Locking clip removal • The lozenge is secured into place via a locking clip. To remove the lozenge the locking clip must be removed. Ensure that the cashbox has been removed initially to gain access to the locking pin on the underside of the main housing assembly. - Page 20 NV9 Spectral Quick Start Guide << Back to Contents 2. Detaching the lozenge from the housing assembly • The Lozenge assembly is secured into place via the latches attached to the lozenge, pushing the lozenge latch (both, Left and right) forwards will release the Lozenge out of the housing assembly.
-
Page 21: Lozenge Fitting
NV9 Spectral Quick Start Guide << Back to Contents 5.2.4 Lozenge fitting 1. Placing the lozenge into place • When placing the lozenge back into the housing assembly, ensure that the lozenge is secured into the grooves of the rear side of the housing assembly, then simply push down the lozenge. -
Page 22: Software Installation And Configuration
6 SOFTWARE INSTALLATION AND CONFIGURATION 6.1 Introduction The NV9 Spectral leaves the factory pre-programmed with the latest dataset and firmware files. However, it is important to ensure that the device is kept up to date with the latest dataset and firmware. This section will provide a brief overview of the various update possibilities with the NV9 Spectral. -
Page 23: Hardware Setup
Once the unit has been switched to SSP, open Validator Manager and click detect devices. This will scan all active com ports for a unit, if the NV9 Spectral fails to connect, please ensure the correct drivers are installed and the unit is in SSP. -
Page 24: Micro Sd Card Logging
Programming Complete. 6.5 Micro SD card logging The NV9 Spectral takes advantage of a micro SD card for data logging (class 4 SD card). The micro SD card slot can be found on the exterior side of the housing assembly after the bezel has been removed, please see image below. ensure there are three files present before inserting the SD card into the slot, the three files are as follows, hsdata, nv9sl, valaudit. -
Page 25: Appendix
NV9 Spectral Quick Start Guide << Back to Contents 7 APPENDIX 7.1 Cable Drawings 7.1.1 CN214 Copyright © Innovative Technology Ltd 2018 Doc:PA02093 Version: 1 Page 24 of 26... -
Page 26: Cn174
NV9 Spectral Quick Start Guide << Back to Contents 7.1.2 CN174 Copyright © Innovative Technology Ltd 2018 Doc:PA02093 Version: 1 Page 25 of 26... -
Page 27: Cn392
NV9 Spectral Quick Start Guide << Back to Contents 7.1.3 CN392 Copyright © Innovative Technology Ltd 2018 Doc:PA02093 Version: 1 Page 26 of 26...
Need help?
Do you have a question about the NV9 Spectral and is the answer not in the manual?
Questions and answers