Table of Contents
Advertisement
Advertisement
Chapters
Table of Contents

Subscribe to Our Youtube Channel
Related Manuals for Innovative Technology NV9 USB


Summary of Contents for Innovative Technology NV9 USB
- Page 1 NV9 USB MANUAL SET INTRODUCTION...
- Page 2 NV9 USB Manual Set - Introduction MANUAL AMENDMENTS Document Base Details Spec. Used Issue Receipt Comments Date Date GA550-1 29/02/11 17/05/11 GA138 01/11/10 22/01/11 GA959 29/03/11 29/07/11 Amendment Details Rev. Date Amendment Details Issued by 13/04/12 Revised First Issue Copyright © Innovative Technology Ltd 2013...
- Page 3 NV9 USB Manual Set - Introduction NV9 USB MANUAL SET - INTRODUCTION COPYRIGHT LIMITED WARRANTY PRODUCT SAFETY INFORMATION INTRODUCTION FEATURES TYPICAL APPLICATIONS STRUCTURE OF THIS MANUAL SET WHICH SECTION IS RELEVANT TO ME? MAIN HEADQUARTERS Innovative Technology Ltd Derker Street – Oldham – England - OL1 4EQ Tel: +44 161 626 9999 Fax: +44 161 620 2090 E-mail: support@innovative-technology.co.uk...
- Page 4 Authorized Reseller, and extending for the length of time stipulated by Innovative Technology Ltd. A list of Innovative Technology Ltd offices can be found in every section of this manual set. If the product proves defective within the applicable warranty period, Innovative Technology Ltd will repair or replace the product.
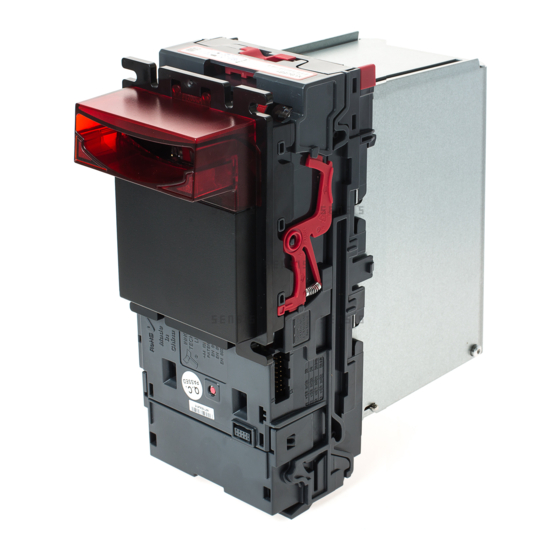
- Page 5 (as shown below): Removable bezel NV9 USB validator head Cashbox The NV9 USB validator is a device that can accept, validate and store 300 or 600 bank notes of mixed denominations. NV9 USB NV9 USB NV9 USB Rear View Side View...
- Page 6 Secure encrypted protocol available for communication TYPICAL APPLICATIONS The NV9 USB validator can be used in a variety of situations where high security and high volume bank note acceptance and validation are needed. Some typical applications are: AWP and SWP applications ...
- Page 7 – Typically used by a field service engineer who is maintaining the product. – This section contains the essential information that the field service engineer needs to clean, maintain and fault find an NV9 USB validator that is installed in a host machine. ITL Software Support Guide: ...
- Page 8 – Design engineers who are designing a host machine cabinet, or looking to integrate the NV9 USB validator into an existing cabinet. – This section contains the all the mechanical and electrical information a designer needs to effectively integrate the NV9 USB validator into a host machine. Software Implementation Guide: ...
- Page 9 SECTION NV9 USB MANUAL SET QUICK START CONFIGURATION GUIDE...
-
Page 10: Table Of Contents
NV9 USB Manual Set – Section 1 NV9 USB MANUAL SET – SECTION 1 QUICK START AND CONFIGURATION GUIDE Assembly Bezel Removal and Refitting: Interfacing Configuration Connector and Pinouts Programming Technical Specifications NV9 USB Bezel Flash Codes Fault Finding 1.10 Frequently Asked Questions Copyright ©... -
Page 11: Nv9 Usb Manual Set - Section 1
Validator compatibility. product (NV2 – NV5). Assembly Installing the NV9 USB is a simple operation; the validator can be installed vertically or horizontally, depending on the type of cashbox fitted or orientation needed: If the validator is fitted with a clip-on cashbox, then the... - Page 12 NV9 USB Manual Set – Section 1 The cashbox is attached to the validator by locating and sliding until the cashbox is clipped securely If the validator is fitted with a slide-on cashbox, then the validator can be mounted HORIZONTALLY or...
- Page 13 NV9 USB Manual Set – Section 1 The cashbox housing is mounted in the host machine with the NV9 USB mounted on top. The cashbox is then slid into the housing until it is securely clipped. If the validator is fitted with...
-
Page 14: Bezel Removal And Refitting
NV9 USB Manual Set – Section 1 There are many variants of bezel and cashbox type Information available for the NV9 USB validator. Please check the ITL website (www.innovative-technology.co.uk) for Check website for options. up to date information on the options available. -
Page 15: Interfacing
Interfacing The connector needed to set up and interface the NV9 USB Validator is easily accessible on the side of the unit: Interface Socket Copyright © Innovative Technology Ltd 2012... -
Page 16: Configuration
NV9 USB Manual Set – Section 1 Configuration The NV9 USB does not use DIP switches to configure the unit – configuration and setting is carried out by using a Configuration Button mounted on top of the unit: Configuration Button... -
Page 17: Connector And Pinouts
16 way connector. regardless of connection type. The connector is a 16 pin socket used to interface the NV9 USB to the host machine. The pin numbering of the socket is shown below, as well as an overview of the socket connections:... -
Page 18: Programming
NV9 USB Manual Set – Section 1 To use a USB connection with the NV9 USB, a USB cable fitted with a 16 way connector on one end (ITL Part Number CN00392) should be used. The CN00392 cable fits into the 16 way connector and allows high speed programming and serial communications when used in SSP, ccTalk and SIO modes. -
Page 19: Technical Specifications
NV9 USB Manual Set – Section 1 Technical Specifications The full technical specifications for the NV9 USB Validator can be found in Section 6, Appendix B of this manual set. A brief summary is given here: DC Voltage Minimum Nominal... -
Page 20: Nv9 Usb Bezel Flash Codes
The NV9 USB Validator has inbuilt fault detection facilities. If there is a configuration or other error the NV9 USB front bezel will flash in a particular sequence; a summary of the Bezel Flash Codes for the NV9 USB is shown below:... -
Page 21: Fault Finding
NV9 USB Manual Set – Section 1 Fault Finding Please use this flow chart with the Flash Codes in the previous sub-section as an aid to help resolve any configuration or start up problems you might have after installing the NV9 USB validator... - Page 22 NV9 USB Manual Set – Section 1 Check and clean the note path (see Section 2 of this manual set). Foreign objects in note path Check drive belts are fitted correctly and that there is no debris underneath the belts.
-
Page 23: 1.10 Frequently Asked Questions
1.10 Frequently Asked Questions a. Why are there no DIP switches on the unit? The NV9 USB has no dipswitches. Configuring the unit is carried out using a configuration button mounted on top of the unit – see subsection 1.3 of this manual for more information. - Page 24 Tel: +44 161 626 9999 Fax: +44 161 620 2090 E-mail: support@innovative-technology.co.uk Web site: www.innovative-technology.co.uk BRAZIL suporte@bellis-technology.com.br CHINA support@innovative-technology.co.uk GERMANY supportDE@innovative-technology.eu SPAIN supportES@innovative-technology.eu UNITED KINGDOM support@innovative-technology.co.uk UNITED STATES OF AMERICA supportusa@bellis-technology.com REST OF THE WORLD support@innovative-technology.co.uk Copyright © Innovative Technology Ltd 2012 GA550-2...
- Page 25 SECTION NV9 USB MANUAL SET FIELD SERVICE MANUAL...
- Page 26 NV9 USB Manual Set – Section 2 NV9 USB MANUAL SET – SECTION 2 FIELD SERVICE MANUAL Cleaning Fault Finding - Flash Codes Technical Specifications Fault Finding Flow Chart Frequently Asked Questions Spare Parts Copyright © Innovative Technology Ltd 2012...
-
Page 27: Nv9 Usb Manual Set - Section 2
This section contains the essential information that the field engineer needs to clean, maintain and fault find an NV9 USB Validator that is installed in a host machine. The NV9 USB Validator has been designed to minimise any problems or performance variations over time. - Page 28 NV9 USB Manual Set – Section 2 Note path Lozenge release catch Lozenge Drive belts Note stacker Cash box spring plate Note path Cashbox Unless stated otherwise, you should disconnect WARNING! the power BEFORE carrying out any cleaning operations to avoid the risk of causing damage Disconnect power BEFORE to the validator.
- Page 29 NV9 USB Manual Set – Section 2 Front sensors Optical sensor Start sensor Rear sensor Optical sensor Examine the note paths, lozenge and note stacker for any dirt or debris, and carefully clear and wipe the surfaces of the note paths and lozenge with a soft lint free cloth that has been dampened with a water and mild detergent solution (i.e.
- Page 30 NV9 USB Manual Set – Section 2 When cleaning the recessed front sensor, use a Caution! small soft brush or cotton bud – do not use Be careful cleaning sensors. anything sharp or abrasive. Cleaning the belts is a simple operation. Ensure the validator is enabled (i.e. bezel lights are illuminated), then remove the bezel: b.
- Page 31 NV9 USB Manual Set – Section 2 Insert a piece of paper, which is narrower than the width between the two belts, in the centre of the note path to activate the drive motor Use a lint free...
- Page 32 NV9 USB Manual Set – Section 2 If the belts are worn or damaged, they should be replaced (ITL part number FD00106). This is a simple procedure, and is carried out as follows: Do not attempt to disassemble the validator WARNING! head –...
-
Page 33: Fault Finding - Flash Codes
The NV9 USB Validator has inbuilt fault detection facilities. If there is a configuration or other error the NV9 USB front bezel will flash in a particular sequence; a summary of the Bezel Flash Codes for the NV9 USB is shown below:... -
Page 34: Technical Specifications
NV9 USB Manual Set – Section 2 Technical Specifications The full technical specifications for the NV9 USB Validator can be found in Section 6, Appendix B of this manual set. A brief summary is given here: DC Voltage Minimum Nominal... -
Page 35: Fault Finding Flow Chart
NV9 USB Manual Set – Section 2 Fault Finding Flow Chart Please use this flow chart with the Flash Codes in subsection 2.2 as an aid to help resolve any configuration or start up problems you might have after installing the NV9... - Page 36 NV9 USB Manual Set – Section 2 Check and clean the note path (see subsection 2.1 of this manual). Foreign objects in note path Check drive belts are fitted correctly and that there is no debris underneath the belts. Check voltage and current supplied to the validator are...
-
Page 37: Frequently Asked Questions
Frequently Asked Questions a. Why are there no DIP switches on the unit? The NV9 USB has no dipswitches. Configuring the unit is carried out using a configuration button mounted on top of the unit – see Section 1, subsection 1.3 of this manual set for more information. -
Page 38: Spare Parts
Full details of the interface cable connector pinouts, connector types / makes and other related information can be found in Section 4 of this manual set. The user can obtain the following parts for the NV9 USB validator: ITL Part Number... - Page 39 NV9 USB Manual Set – Section 2 Bezels ITL Part Description Number Vertical Upstack Bezel PA00188 Assembly PA00189 Horizontal Bezel Assembly Vertical Upstack Extended PA00190 Snout Bezel Assembly Vertical Downstack PA00191 Extended Snout Bezel Assembly 66mm Vertical Upstack No image available...
- Page 40 NV9 USB Manual Set – Section 2 Horizontal Bezel Assembly PA00896 (NV11) Cashboxes Clip-on Cashbox PA00185 Assembly (300C) Locking Cashbox PA00186 Assembly (300L) Copyright © Innovative Technology Ltd 2012 GA550-2...
- Page 41 NV9 USB Manual Set – Section 2 Slide-on Cashbox PA00192 Assembly (300S) Clip-on Cashbox PA00193 Assembly (600C) Slide-on Cashbox PA00194 Assembly (600S) Copyright © Innovative Technology Ltd 2012 GA550-2...
- Page 42 PA00898 Assembly (NV11) There are many variants of bezel and cashbox type Information available for the NV9 USB validator. Please check the ITL website (www.innovative-technology.co.uk) for Check website for options. up to date information on the options available. Drive Belts...
- Page 43 Tel: +44 161 626 9999 Fax: +44 161 620 2090 E-mail: support@innovative-technology.co.uk Web site: www.innovative-technology.co.uk BRAZIL suporte@bellis-technology.com.br CHINA support@innovative-technology.co.uk GERMANY supportDE@innovative-technology.eu SPAIN supportES@innovative-technology.eu UNITED KINGDOM support@innovative-technology.co.uk UNITED STATES OF AMERICA supportusa@bellis-technology.com REST OF THE WORLD support@innovative-technology.co.uk Copyright © Innovative Technology Ltd 2012 GA550-2...
Need help?
Do you have a question about the NV9 USB and is the answer not in the manual?
Questions and answers