
Related Manuals for Technogym Selection Low Row


Summary of Contents for Technogym Selection Low Row
- Page 1 S E L E C T I O N T H E S T R E N G T H E V O L U T I O N Low Row User manual All equipment...
-
Page 2: Table Of Contents
Contents Identification of the manufacturer and equipment ......3 Description of the equipment ............4 Technical data ................... 5 Fitting the number holder ..............6 Safety devices and warnings ............7 Place of installation ................9 Lifting and moving the equipment ........... 10 Adjusting the equipment .............. -
Page 3: Identification Of The Manufacturer And Equipment
Identification of the manufacturer and equipment The equipment and manufacturer identification plate, placed on the frame on the side opposite the padded rest, gives the following details: A Manufacturer's name and address B CE Mark C Serial number D Maximum user weight E Equipment classification F Consultation of user manual required Low Row... -
Page 4: Description Of The Equipment
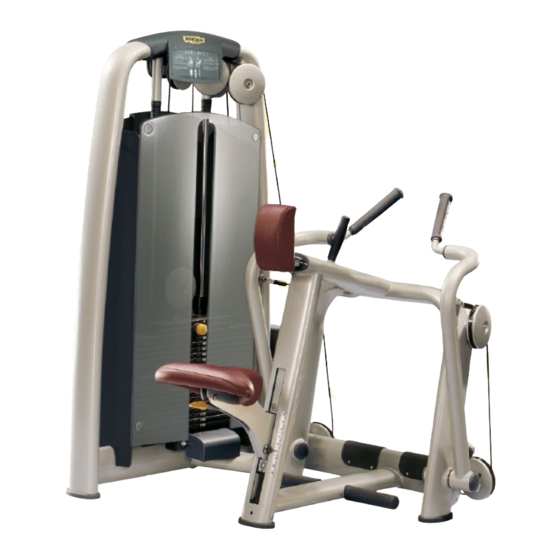
Description of the equipment A Seat: where the user sits to perform the exercise. Its position can be adjusted using lever (G). B Levers: operated by the user by means of handgrips (H). C Weight stack: the levers (B), operated by the user, move the weights along two guides by means of a cable. Pin (I) is used to select the load and adjust the level of intensity of the exercise. -
Page 5: Technical Data
Technical data 1485 mm (59") 1055 mm 1226 mm (42") (48") 236 kg (520 lb) 278 kg (612 lb) 95 kg (190 lb) 130 kg (260 lb) Low Row... -
Page 6: Fitting The Number Holder
Fitting the number holder The number holder must be installed immediately underneath the top: standing facing the equipment, attach the number holder on the left, on the cover of guide rail (A). Find the place where the two screws (B) are to be inserted. Attach the number holder using the two screws;... -
Page 7: Safety Devices And Warnings
Safety devices and warnings The maximum user weight is 180 kg. The equipment has no sharp corners. All parts which come into contact with the user's body are suitably protected with rubber coverings or padding. The outside of the weight stack is covered by a protective panel. Pay particular attention to the parts of the equipment with labels indicating “BEWARE OF CRUSHING”. - Page 8 Safety devices and warnings WARNINGS Attention must be paid to the labels attached to the equipment, as they provide information about possible risks and hazards. We recommend immediately replacing the labels when they become damaged or difficult to read. Low Row...
-
Page 9: Place Of Installation
Place of installation To ensure safe, comfortable and effective use of the equipment, the place of installation must comply with certain specific requirements; in particular, before choosing where to install the equipment we recommend that you check that the following conditions are available: a temperature between +10°C and +25°C;... -
Page 10: Lifting And Moving The Equipment
Lifting and moving the equipment Use the castors (optional) to move the equipment. WARNING Move the equipment very carefully, because it may become unstable and tip over. The wheels for moving the equipment snap on underneath the feet of the equipment, after it has been raised, and are held in place by the special straps. - Page 11 Lifting and moving the equipment Proceeding in the same way, lift the equipment from the seat side and insert the castors. Lastly, lift the equipment again, remove the safety wedges and place the wheels on the floor. WARNINGS When moving the equipment, push it only from the weight stack side, and not from the other sides.
- Page 12 Lifting and moving the equipment To facilitate passage through narrow doorways, transport and handling, it is possible to remove the seat: operate lever (B) and completely lower the seat (C); remove one of the three screws (D) and screw it into the hole behind the tube (E) of the seat;...
-
Page 13: Adjusting The Equipment
Adjusting the equipment After the equipment has been positioned on the floor, check that it is level. An adjuster screw, clearly indicated by two embossed arrows, is supplied for this purpose under feet (A). Raise the equipment and adjust the screw until the equipment is level. WARNING Given the weight of the equipment, we recommend that it should always be lifted by more than one person. -
Page 14: Routine Maintenance
Call the Technogym Technical Support Service for instructions on any maintenance operations not described in this manual. Low Row... -
Page 15: Replacing The Padded Parts
Replacing the padded parts If any of the padding shows signs of wear, especially in the interests of hygiene, we recommend replacing them completely. To replace the seat loosen the screws on the side opposite to the padding. Handgrips may be removed after unscrewing the screws (A). To replace the chest pad loosen the screws (B) on the side opposite to the padding. -
Page 16: Replacing The Cable
Replacing the cable Cables must always be replaced at the first sign of wear, even if only the outer rubber protection is worn. To replace the cable, proceed as follows: remove the protective panel covering the weight stack, following the instructions found in the paragraph headed Removing the front weight stack panel;... - Page 17 10 mm (1/2 inch) thickness from the weight stack. refit the protective panel on the weight stack WARNINGS Carefully check the state of the cables once a month. ALWAYS use cables supplied directly by Technogym. Low Row...
-
Page 18: Adjusting Cable Tension
Adjusting cable tension To take up some of the slack in the weight stack cable proceed as follows: remove the front protective panel on the weight stack; use an Allen key (A) and an open spanner (B); loosen nut (C) securing screw (D) by half a turn in an anticlockwise direction; simultaneously turn both housings of the pulley, clockwise to tighten the cable or anticlockwise to loosen it;... -
Page 19: Removing The Front Weight Stack Panel
Removing the front weight stack panel The front protective panel on the weight stack is fixed to the frame by eight screws. To remove the panel, you must: unscrew the four screws (A); unscrew the four screws (B) while holding the panel with one hand; remove the panel. -
Page 20: Technical Service
When contacting the Technogym Technical Support Service, please specify the following details: equipment model, date of purchase, serial number, precise description of the problem. WARNING Any operations carried out by persons not authorized by Technogym on the equipment will invalidate the warranty. Low Row... -
Page 21: Storage
Storage If the equipment is not expected to be used for a prolonged period, we recommend storing it: in a clean and dry place, covered with a cloth to protect it from dust; in an environment with a temperature between +10°C and +25°C and humidity between 20% and 90%. Use the original packing materials, to better preserve the equipment. -
Page 22: Disposal
Disposal It is always good practise to ensure that the equipment can never constitute a hazard; therefore do not leave the equipment where children may play with it. Do not dump the equipment in the environment, or in public areas or private areas accessible to the public. The equipment is made from recyclable materials such as steel, aluminium and plastic, which must be disposed of in the manner prescribed by the urban refuse collection regulations in force, by firms specialised in urban and environmental hygiene. -
Page 23: Using The Equipment
Using the equipment Sit facing the handgrips. Pull up lever (A) under the back of the seat to adjust the height so that the chest pad (B) is halfway up your breastbone. Body weight is sufficient to lower the seat; to raise it, on the contrary, you must stand up. - Page 24 Using the equipment Pull with both arms simultaneously until they are fully bent, then extend both arms at the same time. Maintain a smooth controlled speed; we recommend a slower speed during the return phase than during the approach phase. In the return movement of the last repetition, stand up and let go of the handgrips, lowering the load down slowly.
Need help?
Do you have a question about the Selection Low Row and is the answer not in the manual?
Questions and answers
I need the mounting manual,because the adjustable seat isnt working and i have to take it appart to fix it