Strobel 560-11 Operating Instructions Manual
Hide thumbs
Also See for 560-11:
- Mechanic's instructions (40 pages) ,
- Mechanic's instructions (56 pages)

Related Manuals for Strobel 560-11


Summary of Contents for Strobel 560-11
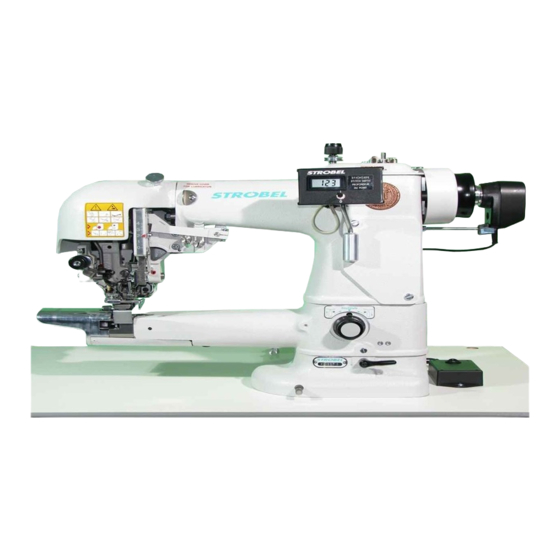
- Page 1 For the professional user Operating Instructions Für den professionellen Anwender Betriebsanleitung Class: 560-11, -21 Klasse: Model: Ausführung: Dated: Stand: S p e z i a l m a s c h i n e n G m b H...
- Page 2 The sign of quality ou find the Strobel trademark on every Strobel machine leaving our works. And with good reason. This symbol is a guarantee of the high quality of our products. Quality which creates trust – trust in our technology, our service and, not least of all, in our good name.
- Page 3 Justify your trust. If you wish to profit from the performance and efficiency of your Strobel machine as long as possible, exact handling and thorough care is necessary. For this reason we kindly request that you read the operating instructions closely.
-
Page 5: Table Of Contents
Operating instructions STROBEL series 560 Contents General notes on safety .................... 3 General ........................5 Operating instructions ..................5 Class identification, serial number and orientation of the machine ....5 Range of application and intended use ............5 Technical Data ....................6 Installation and putting into service ................ - Page 6 Operating the machine .................... 18 Switching on (Fig. 1) ..................18 Inserting and removing the material (Fig. 9) ..........18 Sewing ......................19 5.3.1 Sewing process (Fig. 9) ..............19 Failures ......................20 Machine maintenance ..................... 22 Variable sewing tools ....................22 Optional extras ......................
-
Page 7: General Notes On Safety
General notes on safety Every person in charge of setting up, operating, servicing and repairing the machine must first read and understand the operating instructions and particularly the safety instructions before starting up the machine. Failure to comply with the following safety instructions can lead to bodily injury or damage to the machine. - Page 8 14. Warning instructions given in the operating instructions that pertain to especially dangerous parts of the machine must be indicated at these positions using a safety symbol. Warning instructions given in the operating instructions that pertain to special injury hazards for operating personnel or technicians must be indicated at these positions using a safety symbol.
-
Page 9: General
Range of application and intended use Class 560-11, -21 Automatic single thread blindstitch spot tacking machine for attaching woven labels, as well as for attaching linings, hems, trouser turn-ups and seams. -
Page 10: Technical Data
Needle size Thread polyester continuous filament Thread size 120/2 Air pressure 6 bar Average air consumption Cl. 560-11 290 l/h Cl. 560-21 380 l/h Required space (m) 0.6 x 1.06 Noise: medium noise level at a speed of n = 1200 min... -
Page 11: Installation And Putting Into Service
Installation and putting into service Unpacking the machine The machines of series 560-11 and -21 are supplied as complete units with stands only. The Reel stand and another machine accessories located into the packaging. Make sure that all accessories have been unpacked before throwing away any packing material. - Page 12 Fig. 1 Class 560-11 BA_560_A4_180619_en...
- Page 13 Class 560-21 BA_560_A4_180619_en...
-
Page 14: Sense Of Rotation
Sense of rotation The correct sense of rotation of the hand wheel is clockwise in line of vision on the hand wheel. Motor drive via Toothed belts 3.4.1 Mounting the toothed belt (Fig. 2) C a u t i o n ! Danger of injury! To mount the tooth-belt, switch off the machine electrically and pull out the power plug. -
Page 15: Tensioning The V-Belt (Fig. 3)
3.4.2 Tensioning the V-belt (Fig. 3) C a u t i o n ! Danger of injury! To check the tooth-belt's tension, switch off the machine electrically and pull out the power plug. Press the motor pedal then to make sure that the machine is really at stand still. -
Page 16: Positioning The Machine (Fig. 4)
3.4.3 Positioning the machine (Fig. 4) C A U T I O N ! Danger of injury! Danger of pulling in parts of clothing and of hair and danger of crushing fingers and stitching fingers with needles! When checking positions with switched-on machine keep fingers and hands away from moving parts. -
Page 17: Instructions For Use
Instructions for use Needles and threads The sewing quality can be influenced to a considerable extent by choosing the most suitable needles and threads for the material to be sewn. It is recommended to use checked GROZ-BECKERT needles system 1717 VRUE only. -
Page 18: Threading And Thread Course
Fig. 5 Threading and thread course ATTENTION! Danger of bodily injuries! Switch off machine electrically and confirm that the machine is really in standstill position by operating the treadle for the motor control before threading. Fig. 7 shows the correct threading. Pull monofile threads once (Fig. -
Page 19: Thread Tension (Upper Thread Tension)
Fig. 7 Thread tension (upper thread tension) Depending on thread quality, nature and thickness of the thread and the fabric the thread tension is set by means of upper tension nut (1) ( Fig. 7). 4.4.1 Setting the thread length at the beginning of the seam (lower thread tension) By turning lower tension nut (1) ( Fig. -
Page 20: Stitch Depth
4.5.1 Setting the stitch depth Class 560-11 only The adjusting knob for the stitch depth setting is situated on the left hand side on the front side of the lower arm (Fig. 1). -
Page 21: Digital Stitch Depth Display (Optional Extra) (Fig. 8)
Digital stitch depth display (optional extra) (Fig. 8) Class 560-11 only If a digital stitch depth display is mounted, the plunger height is indicated digitally, thus facilitating the work considerably, especially when the material thickness changes frequently, because the required plunger height can be reset easily. -
Page 22: Operating The Machine
Operating the machine The machine is lifted pneumatically. The sewing program is executed automatically. A T T E N T I O N ! Danger of bodily injuries! Please observe the sewing range carefully during sewing. Otherwise danger of finger bruises and needle throughstitches. -
Page 23: Sewing
Sewing 5.3.1 Sewing process (Fig. 9) By means of the treadle the sewing program is controlled in two steps. 1st step: plunger moves upwards to the needle plate (can be lowered again by heeling the treadle) 2nd step: automatic sewing program as follows: 1. -
Page 24: Failures
Failures A T T E N T I O N ! Danger of bodily injuries! Switch off machine electrically and confirm that the machine is really in standstill position by operating the treadle for the motor control. Remove the needle. Otherwise danger of finger bruises and needle throughstitches. - Page 25 Unsufficient knotting of the threads may happen when: Possible Reasons: the needle has reached its lower cusp point but the loop is still on the looper back Solutions: repolish the looper back by means of a diamond file and an abrasive cloth ...
-
Page 26: Machine Maintenance
Machine maintenance A T T E N T I O N ! Danger of bodily injuries! Switch off machine electrically and confirm that the machine is really in standstill position by operating the treadle for the motor control. Otherwise danger of bodily injuries by bruises and needle throughstitches. - Page 27 Cl. 560-11, -21 Optional extra Standard Needle plate 6 mm opening 8 mm opening 380.0271 380.0270 Standard Optional extra Plunger 181.0129 181.0130 for leather only Material under 300 gram 250 – 700 gram Seam BA_560_A4_180619_en...
- Page 28 Cl. 560-11, -21 Optional extra Optional extra Needle plate 10 mm opening 4,5 mm opening 280.0279 380.0272 for woven labels Standard Optional extra Plunger 181.0129 181.0130 for leather only Material More than 500 gram Seam BA_560_A4_180619_en...
-
Page 29: Optional Extras
Optional extras Class 560-11 only 298.0498 Digital stitch depth display Classes 560-11 and -21 213.0104 Round working plate Ø130 mm Special version for joining peak lapel BA_560_A4_180619_en... - Page 31 Und wir können noch mehr für Sie tun! Unser Lieferprogramm bietet für jede Branche und jegliche Anforderung genau die richtige Problemlösung. And we can do a lot more for you! Our range offers the correct problem solution for every branch and for all requirements. Für die Bekleidungs- Für die Schuh- Für die Polster-...
- Page 32 Then phone, write or simply come and see us. You can have further information about our products at any time, or experience the Strobel machines live in our show room. We’re looking forward to meeting you! Spe zi a l ma s c hine n G m bH...
Need help?
Do you have a question about the 560-11 and is the answer not in the manual?
Questions and answers