
Related Manuals for ePropulsion SPIRIT 1.0 Series


Summary of Contents for ePropulsion SPIRIT 1.0 Series
- Page 1 SPIRIT 1.0 USER MANUAL March, 2018 Version 1.3 Copyright © 2014-2018 ePropulsion All Rights Reserved...
- Page 3 Thanks for choosing ePropulsioin products, your trust and support in our company are sincerely appreciated. We are dedicated to providing high- performance electric outboards, as well as thrusters, reliable lithium batteries and accessories. Welcome to visit www.epropulsion.com and contact us if you have any concerns.
-
Page 4: Using This Manual
By using this product, you hereby agree that you have fully read and understood all the contents of this manual. ePropulsion accepts no liability for any damage or injury caused by operations that contradict this manual. -
Page 5: Product Identification
Product Identification Below figure indicates the position of the product label on which the serial number locates. Please record the serial number for access to maintenance or other after-sale services. Model: SPIRIT Battery Type: Lithium-ion Rated Capacity: 1018Wh Rated Voltage: 40.7V Temperature Range: Charging: 0℃~45℃(32℉~113℉)... -
Page 6: Table Of Contents
Table of Contents Acknowledgement ..................1 Using this manual ..................2 Symbols ......................2 Product Identification ................... 3 Table of Contents ..................4 1 Product Overview ..................6 1.1 In the Package ................... 6 1.2 Parts and Diagram ..................8 1.3 Specifications .................... - Page 7 7 Trim Angle Adjusting.................3 1 8 Propeller Assembly ...................3 3 9 Anti-grounding Mode ................3 4 10 Maintenance ....................3 6 10.1 Notes .......................3 6 10.2 Propeller Maintenance ................3 6 10.3 Replacing the Anode ................3 7 10.4 Maintenance Time Table .................3 7 11 Transportation and Storage ..............3 9 11.1 Transportation ..................3 9 11.2 Placement .......................40...
-
Page 8: Product Overview
1 Product Overview SPIRIT 1.0 is designed to be an integrated electric outboard with high overall efficiency and long cruising duration. The power of SPIRIT 1.0 is equivalent to a 3hp petrol outboard but works quieter. With detachable battery and foldable tiller, it’s easy to carry and store. - Page 9 1 set Warranty Card Save the ePropulsion original package for the outboard storage. Other accessories mentioned in this user manual need to be purchased by users from ePropulsion authorized dealers. There are currently three types of official chargers for SPIRIT Battery. The one included in the package is Standard Charger.
-
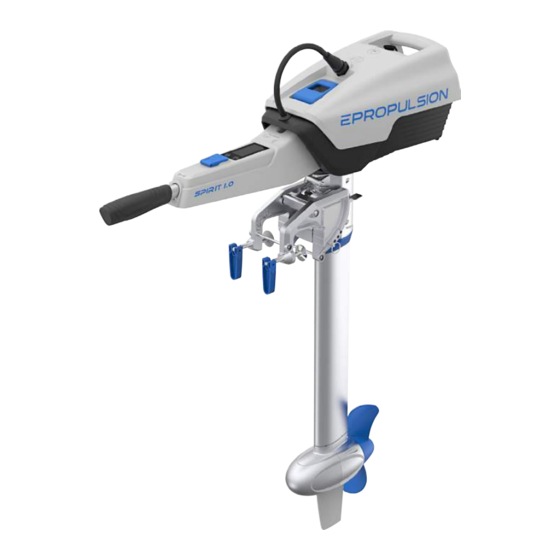
Page 10: Parts And Diagram
1.2 Parts and Diagram Battery Handle Power Port Charging Port Charging Indicator Power Cable Battery Lock Screen Panel Battery Pack (built in Li -po Kill Switch batteries and BMS) Throttle Handle Case Trim Release Lever Throttle Rubber Handle Clamp Tightening Handle Bracket Clamp Trim Pin Beaching Pin... -
Page 11: Specifications
1.3 Specifications SPIRIT 1.0-L / SPIRIT 1.0-S Type Electric Maximum Input Power Rated Current 24.6A Comparable Petrol Outboard Maximum Overall Efficiency Rated Rotation Speed 1200rpm Steering Tiller control 10.9Kg / 24lbs (S) Weight (without battery) 11.2Kg / 24.7lbs (L) 884mm×275mm×1042mm (S) / 1167mm (L) Dimension (L×W×H) 34.8''×10.8''×41'' (S) / 45.9'' (L) 625mm / 24.6'' (S) - Page 12 SPIRIT Battery Charging Time ~ 6Hr Cycle Life ≥500 cycles (80% of Rated Capacity) Charging: 0°C ~ 45°C (32°F ~ 113°F) Temperature Range Discharging: -20°C ~ 60°C (-4°F ~ 140°F) Dimension (L×W×H) 416mm×275mm×202mm Weight 8.5Kg / 18.7bls SPIRIT Battery Charger Output Power 180W Output Voltage...
-
Page 13: Declaration Of Conformity
Object of the Declaration: Product: SPIRIT 1.0R Model: SPIRIT 1.0-S, SPIRIT 1.0-L, SPIRIT 1.0-XS, SPIRIT 1.0P, SPIRIT 1.0C Company Name: Dongguan ePropulsion Intelligence Technology Limited Address: Room 202, Bldg.17A, Headquarter No.1, 4th XinZhu Road, SongShan Lake District, Dong Guan, Guang Dong, China... -
Page 14: Important Notes Before Start
2 Important Notes before Start The SPIRIT 1.0 electric outboard motor is designed to offer clean propulsion and excellent experience on water. For safety reasons, please read the following instructions and notes before using this product. By using this product you hereby: 1) agree to these notes and instructions;... -
Page 15: Battery
To keep electric connectors in good condition, please spray the connectors about every 3 months with contact spray. To store the outboard motor, put the machine in original ePropulsion package and keep it in a dry and ventilated place without direct sun exposure. - Page 16 Never discharge the battery below 33V. Store the battery in dry environment. Charge the battery immediately after full discharge. Before long time storage, ensure the battery charge level is 60% around, store the battery in 18°C ~ 28°C (64.4°F ~ 82.4°F) ambient temperature.
-
Page 17: Installation
3 Installation Step1: Hang the motor on the transom on the motor holder and tighten the two clamp handles. Figure 3-1 Figure 3-2 Ensure to mount the outboard on the centerline of your boat. If the boat shape is asymmetric, please consult your dealer to get proper solution. Center line Figure 3-3 The mounting height of the outboard affects the running speed seriously. - Page 18 it will lead to efficiency and running speed reducing. Mount the outboard and ensure the top of propeller is ≥150mm below the bottom of the boat. Usually, if 400mm≥transom height≥300mm, it’s recommended to select a short shaft SPIRIT, while if 500mm≥transom height≥400mm, it’s recommended to select a long shaft SPIRIT.
- Page 19 Slot Block Figure 3-5 Step3: Plug the power cable in the power port and tighten the connector. Figure 3-6 Figure 3-7 Make sure the power cable connector and socket are dr y before connecting to avoid short-circuit. Please spray and clean the connectors about every 3 months with contact spray.
-
Page 20: Operation
4 Operation 4.1 Checklist before Start 1. Check and ensure the battery has enough power. 2. Ensure the outboard is correctly and firmly installed on the boat. 3. Ensure the propeller is correctly and firmly installed on the outboard. 4. Ensure the battery is correctly and firmly installed on the outboard. 5. - Page 21 Figure 4-2 For safety consideration, always attach the lanyard of kill switch to your wrist or life vest, so that the outboard will be stopped in the emergency situation of falling. The kill switch has magnetic field, keep it 50cm/20inch away from pacemakers and other medical implants.
-
Page 22: Stopping
Forward Backward NEUTRAL Figure 4-4 4.3 Stopping The outboard can be stopped in one of the following four ways. NEUTRAL • Turn throttle to neutral position. • Remove the Kill Switch. • Switch off the power button. • Disconnect the power cable. -
Page 23: Tiller Adjustment
In normal operating procedure, it’s recommended to stop the outboard as following steps. Rotate the throttle to neutral position. Wait until the outboard stops, then remove the kill switch from tiller. Press and hold (≥2secs) the "POWER" button to power off the system. Tilt the outboard out of water and uninstall it from boat according to your requirement. - Page 24 Pulling up the tiller Figure 4-5 Folding the tiller Draw the tiller along axial direction to the limit then the tiller can be folded down. Step1: pulling outwards Step2: folding Figure 4-6 Rotate the clamping bracket by 90° before folding down the tiller to avoid interference.
-
Page 25: Tilting Up The Outboard Motor
4.5 Tilting up the Outboard Motor Toggle up the Trim Release Lever once, then take the battery handle to tilt up the outboard motor to a maximum height. After a "click" sound, release the battery handle and the outboard will stay at a position of 75° trim angle. Hold the battery handle and toggle up the Trim Release Lever once again, users can lay down the outboard gently to the original position in water. -
Page 26: Fixing The Steering Direction
4.6 Fixing the Steering Direction Before attaching the battery, inserting the Steering Lock Pin into the hole indicated in Figure 4-9 can fix the steering direction, and the rotation of tiller on horizontal level will be disabled. Use the pin if necessary. Insert the Steering Steering direction fixed in front. -
Page 27: Lcd Display
5 LCD Display The LCD display screen will display realtime status of the outboard or deliver warning messages during operation. 5.1 Display introduction Indicating: Low battery Set throttle to zero position indicator Battery capacity indicator Battery voltage Battery remaining time at current speed Warning: Error has occurred Motor power... - Page 28 Icon Function This icon will display when the battery is running low. This icon shows the state of battery charge, the solid circular section indicates the percentage ratio of the residual battery. e.g. 60% battery reserved All the 10 blocks will be blinking when the remaining battery is less than 5%.
-
Page 29: Error Codes And Solutions
5.2 Error codes and solutions When the outboard is running in abnormal conditions or malfunctioning, a warning message will display with an error code. The table below will help you get a solution. Code Description Solution Stop the motor and wait until the error message Motor Over disappears. - Page 30 4. Rotate the throttle backward to full power position and press "SELECT" button, the display will return to normal and the calibration is completed. If you are not using an ePropulsion charger, please Charger Fault change an ePropulsion charger. If this condition persists, please contact your dealer.
-
Page 31: Battery Charging
6 Battery Charging Charge the battery when the state of battery level is low or empty. It’s recommended to charge the battery after detaching it from the outboard though it’s allowed to operate and charge the outboard simultaneously. Step1: Power off the outboard first. Then disconnect the power cable and detach from the power port. - Page 32 Indicator Normal Status Description Charger The charger has been plugged into the Solid green light indicator power socket and it works well. Charging Solid red light The battery is being charged. status Solid blue light The battery has been fully charged. indicator Abnormal Indicator...
-
Page 33: Trim Angle Adjusting
7 Trim Angle Adjusting SPIRIT 1.0 has four trim angle options including 21°, 14°, 7° and 0°. The trim angle should be adjusted according to the boat type and the running speed to achieve higher efficiency. It is recommended to try different trim angles at your desired running speed to achieve the best performance. - Page 34 Step3: Select a desired trim angle and inser t the trim pin into the corresponding position, attach the pull ring to fix the trim pin. Step3: Put the trim pin into the desired position. Figure 7-3 Step4: Pull the trim release lever again to lay down the outboard motor, and the outboard motor will stay at the desired trim angle.
-
Page 35: Propeller Assembly
8 Propeller Assembly The outboard performance is seriously affected by the type of propeller. Users can select a proper propeller according to different application conditions. For a larger load boat and a low running speed, a lower-pitch propeller is more suitable. -
Page 36: Anti-Grounding Mode
9 Anti-grounding Mode When the boat runs in shallow water or in complicated underwater conditions, it may meet grounding dangers. Setting the outboard to anti-grounding mode will protect the outboard motor from damage if the outboard hits submerged reefs or rocks. In anti-grounding mode, the underwater part of the outboard is flexible in tilting direction and the motor will automatically tilt up if it hits something underwater. - Page 37 Step2: Release the beaching pin and the trim release lever will stay at the position shown in the figure below. And then the anti-grounding mode is activated. Figure 9-3 To inactivate the anti-grounding mode Pull the beaching pin again and make the trim release lever return to horizontal position, the anti-grounding protection will be disabled and the outboard will work in normal state.
-
Page 38: Maintenance
Disconnect the battery from outboard before maintenance. Conduct the maintenance under instructions of professional experts or your dealer. Only use ePropulsion original components for replacement and maintenance. 10.2 Propeller Maintenance Ensure the battery is disconnected before each check, as a rotating propeller is dangerous. -
Page 39: Replacing The Anode
10.3 Replacing the Anode Please refer to the figure below to replace a new anode if necessary. Anode Figure 10-1 10.4 Maintenance Time Table Regularly maintained in proper manner and used in normal condition, the outboard can work at its optimal state. The following table shows a general maintenance frequency, which however may vary according to operating conditions. - Page 40 Greasing Map Right Left Greasing as the right side...
-
Page 41: Transportation And Storage
11 Transportation and Storage 11.1 Transportation For long distance transport, please use the ePropulsion original package to pack the outboard before transportation Figure 11-1 Figure 11-2 The Li-ion batteries higher than 100Wh are not allowed in the aircraft. The Li-ion batteries are classified under Class 9 (dangerous goods - see Lithium Battery Guidance Document IATA 2015 Revision 1 –... -
Page 42: Placement
If your outboard is going to be stored for more than 2 months, it’s advised to have the outboard cleaned, checked prior to storage. It’s recommended to pack the outboard with ePropulsion original package for storage. Take adequate damping-absorber for protection before transport and storage. -
Page 43: Emergency Situations
1. Stop the outboard immediately. 2. Check the propeller and other components before you start the motor again. 3. Return to the nearest harbor or beach. 4. If the motor is damaged, find your dealer or ePropulsion service center for help. 12.2 Sodden Outboard If the outboard is sodden, stop it immediately and disconnect the battery. -
Page 44: Warranty
13 Warranty The ePropulsion limited warranty is provided for the first end purchaser of an ePropulsion product. Consumers are entitled to a free repair or replacement of defective parts or parts which do not conform with the sales contract. This warranty operates in addition to your statutory rights under your local consumer law. -
Page 45: Out Of Warranty
Free warrenty is not transferable and will not be reissued. Within the limits of the applicable laws, the warranty policies of ePropulsion may update without prior notice. The latest version is available at our website www.epropulsion.com. - Page 46 6. In case your warranty claim be rejected, an estimated repair charge with round trip delivery cost will be sent for confirmation. ePropulsion authorized ser vice point will conduct maintenance accordingly only after your confirmation.
- Page 48 Thanks for reading this user manual. If you have any concerns or find any problems while reading, please don't hesitate to contact us. We are delighted to offer service for you. ePropulsion Innovation (HK) Ltd. Website: www.epropulsion.com Email: service@epropulsion.com...
Need help?
Do you have a question about the SPIRIT 1.0 Series and is the answer not in the manual?
Questions and answers