Table of Contents
Advertisement
Advertisement
Table of Contents

Subscribe to Our Youtube Channel
Related Manuals for Belling GTG60


Summary of Contents for Belling GTG60
- Page 1 Belling GTG / GHU 60 & 75 Date: 06/09/18...
- Page 2 NZ - New Zealand DE - Germany NL - Netherlands AU - Australia ES - Spain To contact Belling about your appliance, please call: Customer Care Helpline Warranty Registration 0344 815 3746 0800 952 1068 in case of difficulty within the UK...
- Page 3 INTRODUCTION This user guide book is designed to help you through each step of owning your new product. Please read it carefully before you start using your appliance, as we have endeavored to answer as many questions as possible, and provide you with as much support as we can. General information, spares and service information is available from our website.
- Page 4 SAFETY WARNING • Children less than 8 years of age shall be kept away unless continuously supervised. This appliance can be used by children aged from 8 years and above and persons with reduced physical sensory or mental capabilities or lack of experience and knowledge if they have been given supervision or instruction concerning the use of the appliance in a safe way and understand the hazards involved.
- Page 5 • Always switch off your appliance and allow it to cool down before you clean any part of it. • Although every care has been taken to ensure this appliance has no sharp edges. We recommend that you wear protective gloves when installing and moving this appliance.
- Page 6 • Other Safety Advice • There is a risk of electric shock, so always make sure you have turned off and unplugged your appliance. • The appliance must never be disconnected from the mains supply during use, as this will seriously affect the safety and performance, particularly in relation to surface temperatures becoming hot and gas operated parts not working efficiently.
-
Page 7: Using Your Appliance
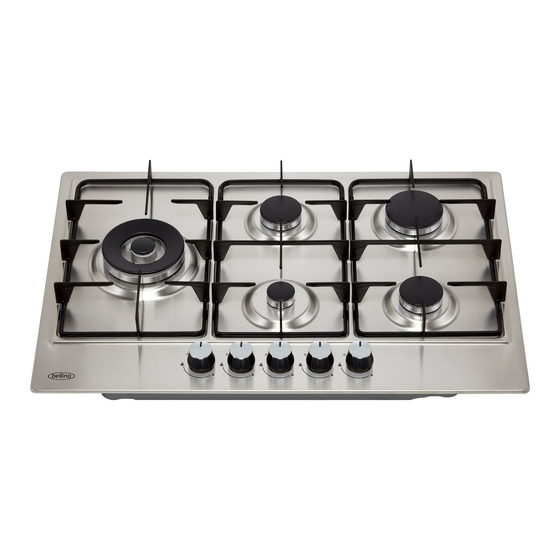
USING YOUR APPLIANCE Getting to know your product Note: Your appliance layout may differ depending on the model. BEL GTG60C Blk BEL GTG75C Blk Semi Semi Rapid Semi Auxiliary Semi Auxiliary BEL GHU602GC Sta BEL GHU75GC Sta Semi Rapid Semi - Rapid Auxiliary Semi - Rapid Semi... - Page 8 Control panel GTG60C / GHU602GC Cook zones Control panel GTG75C Cook zones Control panel GHU75GC Cook zones...
- Page 9 The following symbols will appear on the control knob, next to each other: Ignition position • The minimum setting is at the end of the anti-clockwise rotation of the control handle. • All operation positions must be selected between the maximum and minimum position. •...
- Page 10 Pan sizes required Pans Burners min. max. 200mm 260mm Rapid 180mm 220mm Semi-Rapid 180mm 200mm Auxiliary 120mm 180mm Warning: Do not allow cooking vessels to overlap cooking zones. Accessories Worktop installation Worktop seal / moisture Screws for worktop Seal (2) brackets (4) control seal (4) brackets (4)
-
Page 11: Troubleshooting
Trouble shooting • Repairs should be performed by a licensed technician only. Improper repair may result in considerable danger to you and others. • However, some minor problems can be resolved as follows: Problem Probable cause Solution No Spark. Check the electricity supply. The burner caps and skirts are not No ignition Assemble them correctly. -
Page 12: Cleaning Your Appliance
CLEANING YOUR APPLIANCE Do’s Note: Always switch off your appliance and allow it to cool down before you clean any part of it. Note: Please take extra care when cleaning over the symbols on the control panel, as this can lead to them fading. -
Page 13: Installation
Installation • It is the law that all gas appliances are installed by competent persons in accordance with the current edition of the Gas Safety Installation and Use Regulations. • It is in your interest and that of safety to ensure compliance with the law. •... -
Page 14: Installing The Appliance
Installing the appliance This appliance is to be built into a worktop cutout, 600mm deep, providing the following minimum distances are allowed; • The edges of the hob must be a minimum distance of 65mm from rear wall and 200mm from side wall. - Page 15 With Steel hob To prevent leakage of liquid between the frame of the hob and the worktop, put the insulating seal provided in position before assembly. 1. Install the product into the worktop cut-out and use a pencil to draw a line along the product outer edges. 2.
-
Page 16: Gas Connection
Gas Connection • This appliance must be installed and connected in accordance with installation regulations in force in the country in which the appliance is to be used. • This appliance is supplied to run on LPG and natural gas. Conversion for use on LPG and natural gases must only be undertaken by a qualified person. -
Page 17: Lpg Conversion
LPG conversion • Take the precautions on the operations and adjustment to be carried out when converting from one gas to another. • All work must be carried out by a qualified technician. • Before you begin, turn off the gas and electricity supply to the appliance. 1. - Page 18 Please keep this handbook for future reference, or for anyone else who may use the appliance.
-
Page 20: Technical Data
TECHNICAL DATA Gas hob Burner Rapid Semi-Rapid Auxiliary Category Gas Type Rated Power 1.75 (kW) Rated Flow (g/h) G30/G31 28-30/37 mbar Injector 0.96 0.87 0.66 0.50 Diameter(mm) Natural Gas Injector I2H/I2E/I2E+ 1.44 1.30 1.00 0.78 20 mbar Diameter(mm) G30/G31 Injector 0.96 0.87 0.66...
Need help?
Do you have a question about the GTG60 and is the answer not in the manual?
Questions and answers