Table of Contents
Advertisement
Quick Links
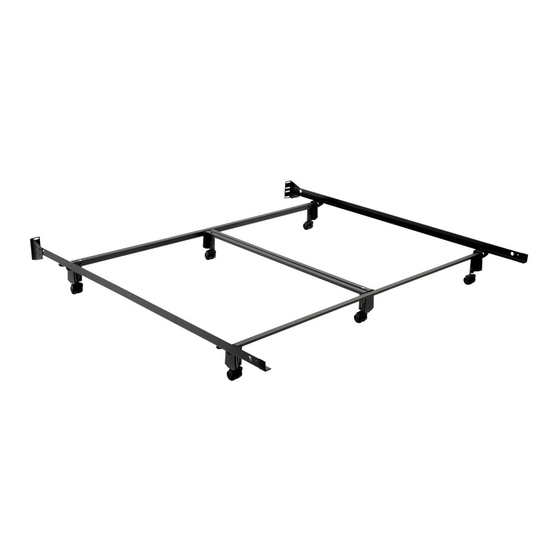
Figure 1
CROSS
ARM
Figure 2
(For 6-legged
frames only.)
CROSS ARM
CENTER LEG
SIDE RAIL
Figure 3
(For 5-legged
frames only.)
CROSS
SUPPORT
Figure 4
ROUND LEG
PLASTIC INSERT
GLIDE
EXTENSION
GLIDE BASE
ASSEMBLY INSTRUCTIONS
SIDE RAIL
Step 1
Assemble CROSS ARMS to SIDE RAILS as shown in Figure 1.
END CAP
(For headboard-only
& no-headboard
Step 2
style frames.)
Slide END CAPS onto SIDE RAILS. Warning: End caps must be placed over ends of
side rails to avoid serious injury.
Step 3
Make sure CENTER LEG is positioned toward the middle of the bed as shown in Figure 2
and slide CENTER SUPPORT in place.
SIDE RAIL
Step 4
Align one end of the CROSS SUPPORT with the slot in the center of one of the SIDE
RAILS. Make sure that the SPRING CLIP snaps in place. Swing other end of CROSS
SUPPORT until SPRING CLIP locks in place as detailed in Figure 3.
CENTER
SUPPORT
Step 5
Tap PLASTIC INSERT into ROUND LEG. Snap GLIDE BASE onto GLIDE EXTENSION.
Tap glide assembly into PLASTIC INSERT. See Figure 4.
CENTER LEG
Step 6
CROSS ARM
Snap GLIDE BASE onto GLIDE EXTENSION. Install glide assembly as shown in Figure
5, making sure that the LEG fits into the notch on top of glide.
SPRING CLIP
Step 7
Install rollers as shown in Figure 6. Locking rollers, if provided should be placed on the
SIDE RAIL
corners at the foot of the bed.
Figure 5
LEG
Notch
GLIDE
EXTENSION
GLIDE
BASE
INST-A-MATIC
For headboard-only and no-headboard style frames:
For 6-legged frames:
For 5-legged frames:
For frames with round center legs:
For frames with glides:
For frames with rollers:
WARNING: When attaching this frame to a headboard
with narrow posts, it is recommended that any excess
bolt be cut after attachment. See Figure 7.
Figure 6
Notch
ROLLER
Figure 7
CUT
OFF
DATE
99300859
DWG. NO.
11-8-05
DO NOT SCALE DRAWING
SHEET 1 OF 1
Advertisement
Table of Contents

Related Manuals for Leggett & Platt INST-A-MATIC


Summary of Contents for Leggett & Platt INST-A-MATIC
- Page 1 INST-A-MATIC Figure 1 ASSEMBLY INSTRUCTIONS SIDE RAIL Step 1 Assemble CROSS ARMS to SIDE RAILS as shown in Figure 1. CROSS END CAP (For headboard-only & no-headboard Step 2 For headboard-only and no-headboard style frames: style frames.) Slide END CAPS onto SIDE RAILS. Warning: End caps must be placed over ends of side rails to avoid serious injury.
- Page 2 GL10 ASSEMBLY INSTRUCTIONS For Inst-A-Matic Bedframes: Step 1: Insert stem of GLIDE EXTENSION into leg of bedframe and place BASE onto GLIDE EXTENSION as shown in Figure 1. Step 2: Make sure that the notch of the GLIDE EXTENSION is turned so that the leg of the bedframe is properly GLIDE inserted as detailed in Figure 2.
Need help?
Do you have a question about the INST-A-MATIC and is the answer not in the manual?
Questions and answers