Table of Contents
Advertisement
Advertisement
Table of Contents

Related Manuals for Fukuda Denshi LX-8000 Series


Summary of Contents for Fukuda Denshi LX-8000 Series
-
Page 3: Safety Precautions
Precaution from Fukuda Denshi Fukuda Denshi is responsible for the safety, reliability, and performance of its equipment only if; Maintenance, modifications, and repairs are carried out by authorized personnel. Components are used in accordance with Fukuda Denshi operating instructions. - Page 4 Intended Use of this Equipment This equipment is designed for the following <Intended Use>. <Intended Use> This equipment is intended for measuring parameters of ECG, respiration in surgery room, ICU, ward, emergency room in the medical facility and transmitting the measured data by wireless network to the central monitor continuously.
-
Page 5: Graphic Symbol
Graphic Symbol The following symbols are used for this equipment. LX-8100 Symbols indicated on the main unit Symbol Description Warning (indicated in yellow) Follow operating instructions (Warning); (indicated in blue) Indicates that the failure to follow operating instructions could place the patient or operator at risk. Type CF Applied Part with Defibrillation-Proof Indicates that the degree of protection against electric shock is Type CF Applied Part with defibrillation-proof. - Page 6 LX-8100 Symbols displayed on the display screen Symbol Description Synchronized Mark This mark flashes synchronizing to the heartbeat. Indicates the remaining battery level.
-
Page 7: Precautions For Safe Operation Of Medical Electrical Equipment
Precautions for Safe Operation of Medical Electrical Equipment Cautions described here are regarding the general instructions for safety use to the patient and the users. As for cautions about the LX-8100, please refer to the following pages. CAUTION Users should have a thorough knowledge of the operation before using this equipment. -
Page 8: Non-Explosion Proof
If the equipment is damaged and in need of repair, ensure patient safety by immediately turning the equipment off and remove the electrodes and/or probe from the patient. Users should not attempt service. Label the unit “OUT OF ORDER” and contact Fukuda Denshi representative. Do not disassemble or remodel the eqipment. -
Page 9: Precautions About Magnetic Resonance Imaging (Mri)
Precautions about Magnetic Resonance Imaging (MRI) WARNING Do not operate this equipment in magnetic resonance imaging (MRI) environments. When conducting MRI test, remove the electrodes and sensors connected to the patient (test subject). The local heating caused by the induced electromotive force may cause burn injury to the patient (subject). -
Page 10: Defibrillation Safety
Defibrillation Safety WARNING Use only the lead cable specified by Fukuda Denshi when defibrillating. If used by unspecified lead cable, the equipment may be damaged, resulting in a safety hazard. When using the defibrillator, keep away from the electrodes or medicament applied to the patient chest. -
Page 11: Precautions About The Lx-8100
Precautions about the LX-8100 WARNING Do not connect cables not authorized by Fukuda Denshi to any I/O connector. If done so by mistake, the LX-8100 cannot deliver its maximum performance and may be damaged, resulting in a safety hazard. Do not use this equipment with multiple patients simultaneously. -
Page 12: Precautions About Ecg
Precautions about ECG CAUTION When removing electrodes from the patient, remove them carefully and slowly. Do not apply excessive force to remove them. Otherwise, it may damage the skin. If any electrodes get detached from the patient after being connected to the lead cable and the patient monitor, pay attention that the metal part of the electrode does not get in touch with any metal parts of the bed or any conductive parts. -
Page 13: Precautions About Accessories And Optional Accessories
Precautions about Accessories and Optional Accessories WARNING Use only the accessories such as disposable electrodes and electrode codes specified by Fukuda Denshi. Otherwise, this equipment cannot deliver its maximum performance and may be damaged, resulting in a safety hazard. CAUTION Do not reuse disposable products. -
Page 14: Precautions For Use Of Medical Telemeter
Precautions for Use of Medical Telemeter WARNING The LX-8100 transmitter must not be co-located or operated in conjunction with any other antenna or transmitter. This equipment complies with FCC/IC radiation exposure limits set forth for an uncontrolled environment and meets the FCC radio frequency (RF) Exposure Guidelines and RSS-102 of the IC radio frequency (RF) Exposure rules. - Page 15 CAUTION For management, make sure to follow the precautions below. The Institution should appoint a person (hereinafter referred to as the “Coordinator”) to manage the wireless channels for the whole Institution. The Coordinator must be selected from people who understand the characteristics and functionality of telemetry systems, and are skilled in operating telemetry.
-
Page 16: Electromagnetic Compatibility
Electromagnetic Compatibility This equipment complies with IEC 60601-1-2 (2014), safety standard regarding the electromagnetic distrubances of medical electrical equipment. To ensure maximum performance against the electromagnetic distrubances, make sure to follow the precautions for installation and usage described in this manual. - Page 17 CAUTION If this equipment is installed close to, or stacked with other equipment, malfunction may occur. Make sure to verify that the equipments operate properly in a used location. Use of accessories, probes, or cables other than specified may cause increase in electromagnetic emission or decrease in electromagnetic immunity resulting in malfunction of the equipment.
-
Page 18: Emc Guidance
EMC Guidance This equipment complies with IEC 60601-1-2 (2014). However, if portable transmitter or wireless LAN equipment is used extremely nearby, the electromagnetic influence may largely exceed the compliance level and may cause unexpected phenomenon such as noise interference on the waveform, etc. - Page 19 Compliance to the Electromagnetic Immunity The LX-8100 is intended for use in the electromagnetic environment specified below. The customer or the user of the LX-8100 should assure that it is used in such an environment. Basic EMC standard or Immunity test levels test method Electrostatic discharge 8kV contact...
-
Page 20: Contact
Contact If you need more information, please contact the following. Fukuda Denshi Co., Ltd., Head Office 3-39-4 Hongo, Bunkyo-ku, Tokyo, Japan Tel: +81-3-5684-1455 Fax: +81-3-3814-1222 E-mail: info@fukuda.co.jp Home Page: http://www.fukuda.com Sales Representative Write the name, address, phone, fax number of your local sales representative. -
Page 21: Table Of Contents
Contents Safety Precautions ..................... i Precaution from Fukuda Denshi ..............i Intended Use of this Equipment ............... ii Graphic Symbol ..................iii Precautions for Safe Operation of Medical Electrical Equipment ..... v Non-Explosion Proof ................vi Precautions about Magnetic Resonance Imaging (MRI) ......vii Electrosurgery Safety ................ - Page 22 Pressing the EVENT button ..............37 8. Other Setting Items ..................39 Changing the Time Constant .............. 40 Changing the Detection Sensitivity of the Pacemaker Pulse ....40 Changing QRS Detection ..............41 Changing the Respiration Detection Signal ON/OFF ......42 Changing the display Brightness ............
-
Page 23: General Description
1. General Description The LX-8100 is a telemetry transmitter designed to measure the ECG and respiration waveform with a “AA” size (“LR6” size) alkaline battery. Information such as ECG measurements, respiration waveform, battery level, and the conditions of the ECG electrodes are displayed on the front panel. ECG lead selection is available using the two buttons (ENTER and ) on the front panel (In case of using a 3-electrode lead cable or a 5-electrode chest... - Page 24 1. General Description...
-
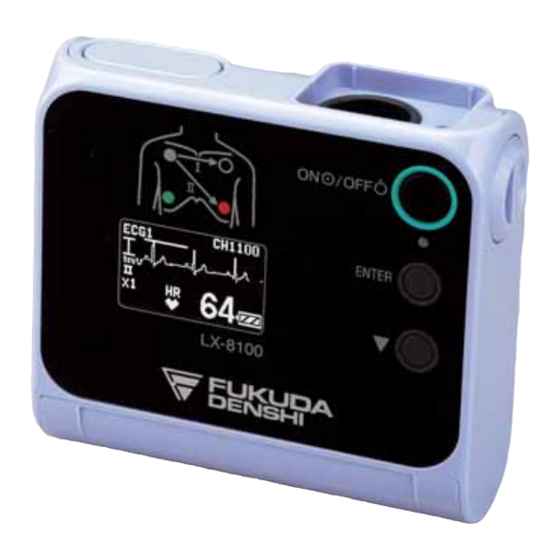
Page 25: Names Of Parts And Their Functions
2. Names of Parts and Their Functions ECG/RESP Input Connector Connects the ECG lead cable to measure ECG and respiration waveform. EVENT Button Refer to “Safety Transmits EVENT Information Precautions in this manual’s preface” Electrode Position Label Power Switch Indicates standard ECG Turns ON/OFF the power electrode position. - Page 26 2. Names of Parts and Their Functions Refer to “Safety Precautions” in this manual’s preface. Battery Compartment Lid Open/Close Lever To open/close the battery compartment lid, slide this lever up/down. Battery Lid Lock Button Unlocks the battery compartment lid. Strap Hole Attaches the strap.
-
Page 27: Preparation
3. Preparation (1) Installing the Battery The LX-8100 functions with an “AA” size (“LR6” size) alkaline battery. Use the battery specified by Fukuda Denshi. Use a new AA” size (“LR6” size) alkaline battery. Specified types of batteries Type Product Manufacturer Operation time “AA”... - Page 28 CAUTION Use alkaline battery (AA) specified by Fukuda Denshi. Do not replace the batteries with wet hands. In case of storing the used or unused batteries, make sure that the terminals are not touching other batteries or metal parts.
- Page 29 3. Preparation Unlock and open the battery compartment lid by sliding the open/close lever towards OPEN while pressing the lock button. Install a new battery according to the polarity indication inside the battery compartment. After installing the battery, lock the battery compartment lid by sliding the open/close lever towards CLOSE while pressing over “PUSH”...
- Page 30 3. Preparation Make sure that the battery compartment lid is locked. (If you can still see red, then it is not locked properly.) CAUTION Make sure that any foreign particles, such as hairs, are not held on the battery compartment lid and dust is not adhered to the edge of the lid to prevent water entering into the battery compartment area.
-
Page 31: Operating Power Switch
3. Preparation (2) Operating Power Switch Turning the power switch to “ON” Press the power switch. Display screen turns ON and measurement starts. Regarding the display screen, refer to page 19. The display screen automatically turns itself OFF by following the setting. After the power is turned ON, make sure to check the remaining battery level on the display screen. - Page 32 3. Preparation...
-
Page 33: Ecg Monitoring
5-electrode Hook Type +Chest (1CH) WARNING Use only the specified lead cable by Fukuda Denshi. Otherwise, proper monitoring may not be performed, and also it may fail defibrillation or cause a malfunction of the equipment when the equipment is used with a... - Page 34 4. ECG Monitoring The relations between the attached electrode positions and lead method are as follows. Attach the electrodes to monitor proper waveform. For 3-electrode lead cable Black White (LA) (RA) (LL) Limb leads Standard Limb leads can be selected from lead I, lead II, or lead III under the setting of the equipment.
- Page 35 4. ECG Monitoring For 5-electrode (Chest) lead cable Black White (LA) (RA) Brown Green (LL) (RL) Limb Lead +Chest One limb lead and one chest lead (Brown) measurements are available. Standard Limb leads can be selected from lead I, lead II, or lead III under the setting of the equipment.
-
Page 36: Attaching The Electrodes
4. ECG Monitoring Attaching the Electrodes CAUTION Always use the same type of electrodes. If different types of electrodes are used at the same time, the difference between the polarization potential from each electrode may interfere with monitoring. Do not reuse the disposable electrodes. It is intended for single patient use only. -
Page 37: Connecting The Ecg Lead Cable To The Lx-8100
4. ECG Monitoring Connecting the ECG Lead Cable to the LX-8100 Insert the ECG lead cable firmly into the ECG/RESP input connector matching the transmitter’s connector guide and the direction of the notched part on the connector. ECG Lead cable... - Page 38 Time constant of this equipment is shorter than Fukuda Denshi monitors (direct ECG connection). Therefore, there is a difference in the ST measurement value between them. Pay attention to the difference when monitoring a patient from a transmitter or a monitor.
-
Page 39: Respiration Monitoring
If such event occurs, please disconnect the cardiac monitoring and diagnostic equipment, or follow the procedures described in the operation manual of the pacemaker. (For more details, contact FUKUDA DENSHI personnel, your institution’s professionals, or your pacemaker distributors.) Reference “Minute Ventilation Rate-Adaptive Pacemakers”... - Page 40 5. Respiration Monitoring...
-
Page 41: Measurement
6. Measurement Turn ON the power and the measurement starts. Starting Screen When the power is turned ON, the channel number configured on the LX-8100 is displayed at the top of the display. Make sure whether the channel number on the display matches the channel number indicated on the label of the LX-8100 and the channel number configured on the receiving monitor. - Page 42 6. Measurement Display Switch The screen can be switched to the other selected screen such as to ECG/RESP. The screen automatically turns itself OFF by following the setting if no operation is done. To restart the display, refer to “7. Operation Restarting the display”.
-
Page 43: Battery Level Check
6. Measurement Battery Level Check Check the battery level on the waveform display screen. Battery Remaining Battery Level Symbol Full Getting low, but still available Nearly empty Replace the battery. A message that prompts the battery check appears on the screen of the receiving monitor. -
Page 44: Waveform Display
6. Measurement Waveform Display ECG Display Screen (1) ECG1 waveform, heart rate, pacemaker marker, remaining battery level, and electrode check message are displayed. The screen automatically turns itself OFF by following the setting if no operation is done. To restart the display, refer to “7. Operation Restarting the display”. - Page 45 6. Measurement Displays the heart rate. is displayed in synchronization with the heart rate. Displays the detection marker when a pacemaker pulse is detected. Indicates the measuring lead. CAUTION The ECG waveform size setting displayed on the display does not interact with the one displayed on the screen of the receiving monitor.
- Page 46 6. Measurement Indicates the remaining battery level. For details of the battery level, refer to page 21. Displays the electrode check. “Electrode?” message appears when an ECG electrode is detached. Displays the speaker mark when Sync. Tone setting is active. For details, refer to “7.
- Page 47 6. Measurement ECG Display Screen (2) ECG2 waveform, heart rate, pacemaker marker, remaining battery level, and electrode check message are displayed. NOTE If a 3-electrode lead cable is used, this screen will not appear. The screen automatically turns itself OFF by following the setting if no operation is done.
- Page 48 6. Measurement Displays the heart rate. is displayed in synchronization with the heart rate. Displays the detection marker when a pacemaker pulse is detected. Indicates the measuring lead. CAUTION The ECG waveform size setting displayed on the display does not interact with the one displayed on the screen of the receiving monitor.
- Page 49 6. Measurement Displays the electrode check. “Electrode?” message appears when an ECG electrode is detached. Displays the speaker mark when Sync. Tone setting is active. For details, refer to “7. Operation Changing Setup”.
- Page 50 6. Measurement Respiration Display Screen Respiration waveform, respiration rate, remaining battery level, and electrode check message are displayed. The screen automatically turns itself OFF by following the setting if no operation is done. To restart the display, refer to “7. Operation Restarting the display”.
- Page 51 6. Measurement Displays the respiration rate. CAUTION The ECG waveform size setting displayed on the display does not interact with the one displayed on the screen of the receiving monitor. If the ECG waveform size displayed on the screen of the receiving monitor is changed, follow the instruction in the operation manual of the receiving monitor.
- Page 52 6. Measurement...
-
Page 53: Operation
7. Operation Changing Setup ECG Display Screen (1) In the ECG display screen (1), the ECG waveform size and lead displayed on the display of the LX-8100 can be changed and the Synchronized Tone can be set up. Setting Method How to enter the setup mode: Press and hold the ENTER... - Page 54 7. Operation CAUTION The ECG waveform size setting displayed on the display of the LX-8100 does not interact with the one displayed on the screen of the receiving monitor. To change the waveform size of the receiving monitor, follow the instruction in the operation manual of the receiving monitor.
- Page 55 7. Operation ECG Display Screen (2) In the ECG display screen (2), the ECG waveform size displayed on the display of the LX-8100 can be changed and the synchronized tone can be set Setting Method How to enter the setup mode. Press and hold the ENTER button for 2 seconds in the ECG display screen...
- Page 56 7. Operation Returning to ECG display screen (2) Press the button to highlight the “Back”. Press the ENTER button to return to the ECG display screen (2). CAUTION Do not operate the LX-8100 with the setup screen open because it may lead to an unintended operation and cause setting changes.
- Page 57 7. Operation Respiration Display Screen In the respiration display screen, the respiration waveform size displayed on the display of the LX-8100 can be changed. Setting Method How to enter the setup mode: Press and hold the ENTER button for 2 seconds in the respiration display screen.
- Page 58 7. Operation Returning to the Respiration Display Screen Press the button to highlight the “Back”. Press the “Back” to return to the Respiration Display Screen. CAUTION Do not operate the LX-8100 with the setup screen open because it may lead to an unintended operation and cause setting changes. Make sure to press the “Back”...
-
Page 59: Restarting The Display
7. Operation Restarting the display The display automatically turns itself OFF after the preprogrammed duration if no operation is done. Press the ENTER button or press and hold the button to restart the display. The starting screen with the telemetry channel number appears, and then the waveform display screen appears. - Page 60 7. Operation...
-
Page 61: Other Setting Items
8. Other Setting Items The following settings are available for the LX-8100 depending on the use and condition of the patient. For details of the settings, contact our service representative. Items Selection Default Backup Time Constant 0.4 sec, 0.1 sec 0.4 sec Detection Sensitivity of Low, Mid, High... -
Page 62: Changing The Time Constant
AC frequency, by changing the time constant to “0.1 second” the monitoring may become relatively stable. For details of the setting, contact your local Fukuda Denshi service representative. CAUTION When changing the time constant to “0.1 seconds”, the lower frequency... -
Page 63: Changing Qrs Detection
AC frequency. The “Low” setting decreases the detection sensitivity. Therefore, it cannot detect the pacemaker pulse specified in IEC 60601-2-27 standard. For details of the setting, contact your local Fukuda Denshi service representative. CAUTION The display screen in normal use does not indicate the setting status of the pacemaker pulse detection. -
Page 64: Changing The Respiration Detection Signal On/Off
If such event occurs, change the setting to “OFF” to prevent an occurrence of erroneous pacing rate. For details of the setting, contact your local Fukuda Denshi service representative. CAUTION The respiration waveform cannot be measured if the setting of the respiration detection signal is turned “OFF”. -
Page 65: Changing Sound On/Off
When the sound setting is “ON”, Alarm will generate in the following situation. ECG Lead Off The default setting is “ON”. Alarm will not generate with Display OFF status. For details of the setting, contact your local Fukuda Denshi service representative. - Page 66 8. Other Setting Items...
-
Page 67: Changing The Transmitter Channel And Group Id
The LX-8100 is a transmitter of PLL synthesizer type, and its transmitter channel can be programmed. It can be set up with an arbitrary channel among the channels assigned by the Telemetry Laws (according to each country). For details of the setting, contact your local Fukuda Denshi service representative. WARNING If the transmitter channel is changed, follow the instruction by the person in charge of the radio telemetry channel in your facility. - Page 68 9. Changing the Transmitter Channel and Group ID...
-
Page 69: Troubleshooting
10. Troubleshooting List of Displayed messages Transmitter (Main Unit) Message Cause Solution Failed to transmit Contact your local Fukuda waveform and Denshi service value. representative. Faulty EEPROM. Failed to initialize CPU. Faulty Speaker. - Page 70 10. Troubleshootimg Message Cause Solution Electrode is off. Check the electrode condition. Character string displayed, such as LA, depends on the detached electrode position...
- Page 71 10. Troubleshootimg Troubleshooting Make sure of the following. However, if there is no improvement in the phenomenon, contact your local Fukuda Denshi service representative. Transmitter (main unit) Phenomenon Cause Solution Nothing is displayed No battery or wrong Install the battery correctly.
- Page 72 10. Troubleshootimg Phenomenon Cause Solution “ELECTRODE?” Lead cable is off. Check the connection message is displayed. between the lead cable and the LX-8100. Check the connection between the lead cable and the electrode. Faulty Lead cable. Replace the ECG cable with a new one.
-
Page 73: In Case Of Dropping The Lx-8100 Into Water
10. Troubleshootimg In Case of Dropping the LX-8100 into Water In case of dropping the LX-8100 into water containing disinfectant, pick up the LX-8100 quickly from it. Rinse it well with running water, and dry it thoroughly with a soft cloth CAUTION Do not use a dryer. - Page 74 10. Troubleshootimg...
-
Page 75: Cleaning And Disinfection
11. Cleaning and Disinfection The cleaning and disinfection of the LX-8100 and ECG lead cable shall be performed as follows. CAUTION Do not sterilize the LX-8100 and ECG lead cable in any manners, such as radioactive rays, steam, or ethylene oxide. Cleaning Clean the LX-8100 using a squeezed gauze or an absorbent cotton cloth dampened with alcohol or a neutral cleanser. -
Page 76: Cleaning The Ecg Lead Cable
11. Cleaning and Disinfection Cleaning the ECG lead cable After using the cable, clean it with neutral detergent or 70% isopropyl alcohol. CAUTION Do not use thinner, toluene, or other organic solvents to clean the cables. Do not pull the cable and do not hold the connector part when cleaning. -
Page 77: Maintenance And Inspection
Periodic maintenance may be performed by the medical institution or by a third party by concluding a “Maintenance Contract”. For more details, contact your local Fukuda Denshi service representative. Perform Periodic check using the “Periodic Check List”. The periodic check should be performed once a year. - Page 78 Daily Check List Inspected Date Inspected by Location Device Type LX-8100 S/No. Date of Purchase Items Details Criteria Judgment Visually check for any damage, No abnormality should be Appearance cracks, chip, peeled label, and found. loosen screw on the housing. Visually check for the ring No damage, kink, floating, condition of the battery...
- Page 79 12. Maintenance and Inspection Periodic Check The periodic maintenance check is intended to check the medical equipment used daily in a medical institution to prevent failures and accidents and to ensure safety and reliability. The check procedures are described for daily and periodic checks. Each check item must be performed according to the described check procedure.
- Page 80 12. Maintenance and Inspection Check Item Check Procedure Criteria 3 Display, Operation, Record Labels Visually check the labels, Should be clean, clear caution labels, etc. and firmly attached. Operation, Check by operating the Should operate Switches and switches and keys. properly.
- Page 81 12. Maintenance and Inspection ECG Sensitivity With comprehensive tester, Wave form size on the apply 1mV voltage and receiving monitor measure the displayed should be within 0mm amplitude. 10% at sensitivity1. According to test procedure of IEC 60601-2-27:2011 201.12.1.101.1 Heart Rate With ECG simulator, test For reference Accuracy*...
- Page 82 12. Maintenance and Inspection Check Item Check Procedure Criteria 5 Respiration Respiration With comprehensive tester or The amplitude Waveform reference respiration signal displayed on the Sensitivity generator, input sinusoidal receiving monitor waveform of 0.5Hz with base screen should be resistance of 1.5k /1 within 10 mm ±...
- Page 83 12. Maintenance and Inspection Check Item Check Procedure Criteria Leakage current Measure the leakage current Leakage current when when external when external voltage is external voltage is voltage is applied to the patient applied to the patient applied to the connection in the Type F connection in the Type patient...
- Page 84 12. Maintenance and Inspection Periodic Check List...
-
Page 85: Repairing The Equipment
12. Maintenance and Inspection Repairing the Equipment This equipment is basically repaired at Fukuda Denshi factory. If detailed information about the repair is needed, contact Fukuda Denshi. On-site repair is possible for the following parts. Replacing the battery compartment Lid Unit CAUTION Make sure to replace the parts correctly. - Page 86 12. Maintenance and Inspection Tools Phillips screwdriver (#0) Assembly and Disassembly Follow the procedure below to remove the battery compartment lid unit. 1. Remove the label. Label 2. Remove the 2 installation screws then remove the battery compartment lid unit. Installation screw...
- Page 87 12. Maintenance and Inspection Follow the procedure below to attach the battery compartment lid unit. 1. Set the battery compartment lid unit adjusting to the front case. 2. Secure the battery compartment lid unit with new 2 installation screws. Make sure that the screws are securely tightened. Installation screw...
- Page 88 12. Maintenance and Inspection 3. Make sure that the battery compartment lid unit opens/closes smoothly. 4. Attach the label firmly aligning with the groove of the battery compartment lid unit. Label Groove...
-
Page 89: Standard And Optional Accessories
13 . Standard and Optional Accessories WARNING Use only the accessories specified by Fukuda Denshi for the LX-8100. Otherwise, the LX-8100 cannot deliver its maximum performance and may be damaged, resulting in a safety hazard. CAUTION For quality improvement, specifications are subject to change without prior notice. -
Page 90: Optional Accessories
13. Standard and Optional Accessories Optional Accessories The following optional accessories are available for the LX-8100. Purchase them as required. LX-8100 Lead cables Item Model Type Remarks ECG Clip Type Lead 3-electrode (White, Black, CMT-01CTH-0.8DA Cable Red) ECG Clip Type Lead 4-electrode (White, Black, CMT-02CTH-0.8DA Cable... -
Page 91: Specification
6 days with MX1500 (DURACELL) Conditions: ECG measurement, RESP measurement, Set as Initial setting, operating temperature 23 C Operation mode: Continuous operation *Continuous operating time is assumed when using a new ”AA” size (“LR6”size) Alkaline battery specified by Fukuda Denshi. - Page 92 14. Specification Particular Standard: IEC 60601-2-27:2011 (Medical electrical equipment - Part 2-27: Particular requirements for the basic safety and essential performance of electrocardiographic monitoring equipment) *Suitable when using DS-8900 System (Central Monitor) and LW-7080(Central Telemetry Receiver). Numbers of Lead 3-electrode, 4-electrode, or 5-electrode Electrode: (Limb+Chest) lead cable Numbers of Input Channel:1CH (3-electrode) or 2CH...
- Page 93 14. Specification Lead-off Detection 100 nA and below Current: Tall T-wave Rejection 1.2 mV T-wave can be removed when tested Capability: according to IEC 60601-2-27 Average of Heart Rate: HR measured from 6 seconds of heartbeat for setting QRS width: wide, and 4 seconds of heartbeat for setting QRS width: narrow.
- Page 94 14. Specification Respiration (Impedance Method) Accuracy of Sensitivity: 10 mm/1 ± 2 mm (When standard Impedance is 480 .) Resp. Display Range: 0, 4 Bpm to 150 Bpm Display Error of ±3 Bpm Respiration Rate: Measured Current of Below 100 A (42kHz) Respiration: Transmission Method Modulation Mode:...
-
Page 95: Displays
14. Specification Displays The following displays are shown on the display of the LX-8100. Display Description Displayed after turning on the power. Automatically moves onto the channel display screen. Starting Screen Displays the transmitter channel after turning on the power and also when Channel Display refreshing the screen. - Page 96 14. Specification Display Description Error Message: If messages are not cleared, contact your local Fukuda Denshi service representative. Displayed when the transmitter is faulty Telemeter Error Displayed when the EEPROM is faulty EEPROM Error Displayed when the CPU is faulty CPU Error when the speaker is faulty.
-
Page 97: Details Of The "Electrode" Message
14. Specification Details of the “Electrode” Message The following “Electrode?” messages are displayed on the display depending on the selected lead cable and lead. 3-electrode lead 3-electrode lead 3-electrode lead Check cable cable cable Position Lead I display Lead II display Lead III display Several Position... -
Page 98: List Of Setup Items
14. Specification List of Setup Items Followings are the items that can be set up in the LX-8100. Items Selection Default Backup ECG Lead I, II, III Display Size of ECG (1) ×1, ×1/2 ×1 Display Size of ECG (2) ×1, ×1/2 ×1 Display Size of...
Need help?
Do you have a question about the LX-8000 Series and is the answer not in the manual?
Questions and answers