
Subscribe to Our Youtube Channel
Related Manuals for Hypercom SmartICE


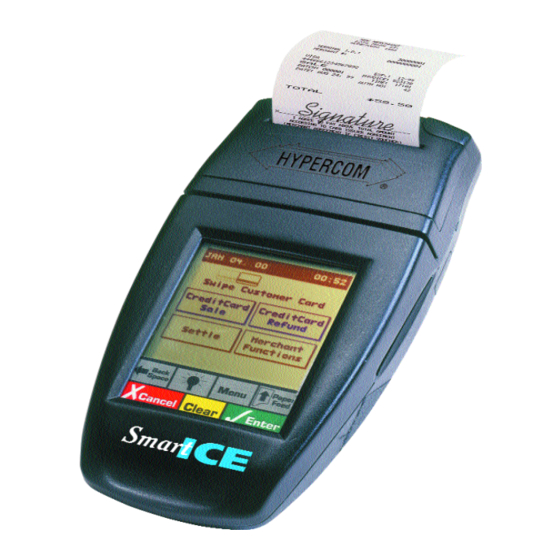
Summary of Contents for Hypercom SmartICE
- Page 1 Consulting Research Training Certification Testing Since 1981 Exhibit 9 SmartICE/CDPD Point of Sale Device Hypercom FCC ID: NVA010164-005A User’s Manual ©APREL Project No.: HYPB-SMARTICE-CDPD-3365 January 2000...
- Page 2 SmartICE Hardware and Installation Manual Version 1.0 January 26, 2000...
- Page 3 Corporation. NOTICE Hypercom Corporation reserves the right to make changes to the publication at any time and without notice. The information furnished in this publication by Hypercom Corporation is believed to be accurate and reliable; however, Hypercom Corporation assumes no responsibility for its use. Any error in identifying or reflecting any proprietary marks or notices is inadvertent and unintentional.
- Page 4 · If this device (equipment) is used in a residential area, it may cause unacceptable interference to radio and TV reception requiring the operator to take whatever steps necessary to correct the interference. · Repair work on this device (equipment) must by done by Hypercom Corporation or an authorized repair station...
-
Page 5: Table Of Contents
Term-Master ................1-6 940264-001 Hypercom Corporation... - Page 6 Installing the SmartICE Paper Roll........
- Page 7 940264-001 Hypercom Corporation...
- Page 9 SmartICE under panel connections........
-
Page 11: Introduction
Introduction This manual, SmartICE Hardware and Installation Manual , is a comprehensive guide to working with the Hypercom SmartICE Terminal. Document Organization This book is designed to provide you with information relevant to Hypercom equipment. This book is divided into two chapters:... -
Page 12: Procedures
AUTION A caution advises users that a negative result such as a loss of data may occur if they do not follow the instructions provided. SmartICE Hardware and Installation Manual 940264-001... -
Page 13: Chapter 1 Equipment Information
Terminal Information The Hypercom SmartICE terminal is a fully functional terminal that supports draft capture, check verification and guarantee, authorization, and debit. When communication with the host is interrupted, the terminals support offline transaction capture. -
Page 14: Features
Full track 1 & 2 simultaneous card Integrated PIN and signature reader capture pads Multi-host application support Optional dial, LAN, or leased- line operation Multi-tasking operating system Optional smart card support Electronic receipt capture On-screen advertising available SmartICE Hardware and Installation Manual 940264-001... -
Page 15: Terminal Connection Ports
Hypercom MiniNAC-II, NAC-1A, or NAC-6A LAN controller. PIN Pad Port The PIN pad port supports a range of PIN pads including Hypercom Models S7, S7-C, and S8. PIN encryption is according to ANSI X 9.8. The capability to generate ANSI X 9.9 Message Authentication Code (MAC) is optional. -
Page 16: Transactions And Functions
Chapter 1 Transactions and Functions The SmartICE terminal supports the full transaction set required for authorization, draft capture, debit, check verification and guarantee, proprietary cards, and mail and phone. Term-Master supports automated terminal configuration, terminal interrogation, automated program changes, and merchant installation. -
Page 17: Financial Integrity
Fast Response Times The fast response time of the SmartICE terminal is the direct result of the efficient SDLC protocol, which permits pre-dialing and message compression. At a speed of 9600 bps, EFT messages of 150 characters are transmitted in 0.8 seconds, increasing throughput four to ten times over traditional 300 bps Asynchronous terminals. -
Page 18: Networking Efficiency
PC is unattended, ensuring terminal software is automatically kept up to date. Using an optional modem, a merchant can install the SmartICE terminal through the menu- driven procedure that identifies the telephone line profile (tone or pulse, PABX access code), prompts for the telephone numbers for initialization and network management, and prompts for a unique terminal identification number with optional check digit. -
Page 19: Chapter 2 Equipment Installation
C H A P T E R Equipment Installation This chapter describes how to install the SmartICE terminal. Installing the SmartICE Terminal This chapter describes how to install the SmartICE terminal and port locations. - Page 20 Chapter 2 The SmartICE under panel connectors include power, PIN, and line ports. PIN port Line port Power port Battery pack panel Figure 2-1. SmartICE under panel connectors ARNING When using the Mobitex and CDPD version, the user must ensure that the device is not positioned in such a way as to put the side of the terminal near the antenna and above the credit card slot less than 3cm (1 1/8”) from any part of the body for a period of six minutes or more.
-
Page 21: Turning On The Terminal
Equipment Installation Turning On the Terminal The SmartICE terminal operates using a +12 Vdc power cable in conjunction with a 110-Volt grounded power receptacle. Step-by-Step To turn on the smartICE terminal: 1. Connect the +12 Vdc power cable from the AC adapter to the terminal power socket labeled PWR . -
Page 22: Installing The Smartice Paper Roll
3. Feed the paper evenly into the paper feed slot at the rear of the SmartICE terminal. 4. When the paper appears, close the paper bucket cover. The printer is now ready to print receipts. -
Page 23: Accessing The Battery Pack
Accessing the Battery Pack The SmartICE uses a lithium battery pack. Step-by-Step To access the battery pack on the SmartICE terminal: 1. Place your finger on the top portion of the Battery Pack access panel. See Figure 2-1. 2. Slide the access panel down. -
Page 24: Adjusting The Display Contrast
Chapter 2 Adjusting the Display Contrast The SmartICE uses a contrast control dial to adjust the display. Step-by-Step To adjust the contrast on the SmartICE terminal: 1. Place your finger on the Contrast Control Dial. See Figure 2-2. 2. Slide the access clockwise to darken or counter-clockwise to lighten the contrast. - Page 25 We Welcome Your Comments Please fax this page with your comments to Hypercom Corporation at 602.504.4990 Document Number: 940264-001 1. In one word, how would you describe this guide? _________________________________________ 2. How do you use this guide? I read it from beginning to end.
- Page 27 Hypercom Document Number 940264-001 SmartICE Hardware and Installation Manual, Version 1.0 Printed in the USA...
Need help?
Do you have a question about the SmartICE and is the answer not in the manual?
Questions and answers