Ipevo VZ-X Quick Start Manual
Wireless, hdmi & usb document camera
Hide thumbs
Also See for VZ-X:
- User manual (11 pages) ,
- Step-by-step manual (6 pages) ,
- Manual (4 pages)
Advertisement
Table of Contents
- 1 Table of Contents
- 2 The Basics
- 3 Getting to Know Your VZ-X
- 4 Charging VZ-X
- 5 Connecting Wirelessly to Your Devices
- 6 Connecting to Your HDMI Displays
- 7 Connecting to Your Computer Via USB
- 8 Accessing VZ-X's Advanced Settings
- 9 Resetting VZ-X
- 10 Product Safety Certification
- Download this manual
See also:
User Manual
Advertisement
Table of Contents

Subscribe to Our Youtube Channel
Related Manuals for Ipevo VZ-X


Summary of Contents for Ipevo VZ-X
- Page 1 Quick Start Guide VZ-X Wireless, HDMI & USB Document Camera Copyright© 2018 IPEVO Corp. All rights reserved...
-
Page 2: Table Of Contents
The Basics VZ-X Wireless, HDMI & USB Document Camera features three connection modes -Wi-Fi, HDMI and USB-that let you capture and stream real-time images to your computer, iOS/Android devices, TV, projector or monitor in the setup that best suits your needs. -
Page 3: Getting To Know Your Vz-X
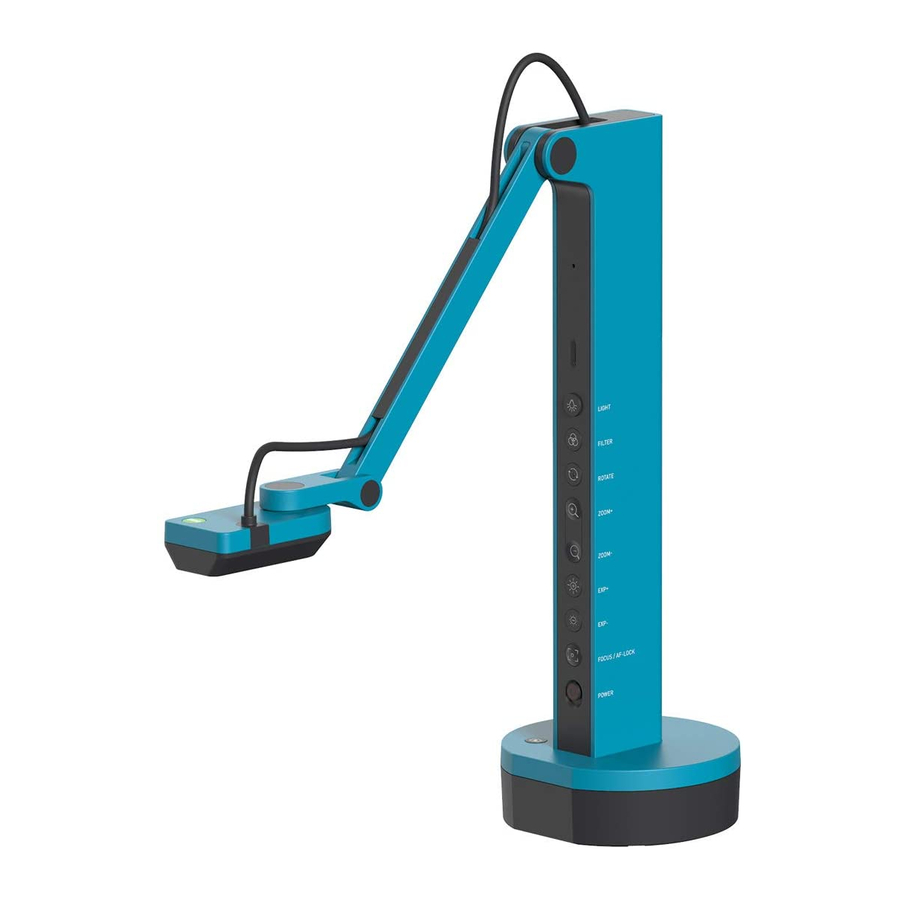
Camera 8 megapixel camera. Camera head can be swiveled for customizing orientation. Display up to 3264 x 2448 when used in USB mode with IPEVO Visualizer software. Display up to 1920 x 1080 when used in standalone HDMI mode or Wi-Fi mode (with IPEVO Visualizer software). - Page 4 Turn the built-in LED light on/off. Green indicates that VZ-X is powered on. Filter Amber indicates that VZ-X is in Wi-Fi mode. White indicates that VZ-X is in use and providing an image. Apply a video filter to the live image. Increase Exposure Rotate Rotate the live image.
- Page 5 Frequency Switch Change the frequency to 50Hz or 60Hz. Micro-USB Port Plug in the included Micro-USB cable here to: Connect VZ-X to a computer for using in USB mode. Provide power for VZ-X in HDMI mode. Charge VZ-X’s battery. HDMI Port...
- Page 6 Getting to Know Your VZ-X Battery Status Indicators Indicate the battery level or charging status. All five indicators will light up Green when VZ-X is on a full charge or has been fully recharged. Battery Check Button You can check VZ-X’s battery level by pressing this.
-
Page 7: Charging Vz-X
Charging VZ-X Please charge VZ-X before using to make sure you have sufficient battery power for your session. The steps for charging VZ-X are as below : Connect the included Micro-USB cable to the Micro-USB port of VZ-X. Next, connect the other end of the cable to a 5V/2A USB power adapter (not included). -
Page 8: Connecting Wirelessly To Your Devices
VZ-X can be used wirelessly with your iOS/Android devices (iPad & iPhone/Android Tablet & Android Phone), Mac or PC. You may want to check VZ-X’s remaining battery power by pressing the Battery Check Button before you start using it. To use it wirelessly with your... - Page 9 (3) The actual image transmission rate of VZ-X depends largely on the network environment it is used in. Having multiple wireless signals in the same environment may cause interference and a drop in the transmission rate.
-
Page 10: Connecting To Your Hdmi Displays
(not included) and then to an outlet. Note: If VZ-X is on a full charge or there’s sufficient battery power for your session, you do not need to connect VZ-X to any USB port or outlet for powering it on. -
Page 11: Connecting To Your Computer Via Usb
You can use VZ-X with your computer (Mac/PC/Chromebook) via USB. You may use it with IPEVO Visualizer or other compatible third party software. If your computer is connected to a projector, you can then project the live image from VZ-X to a large screen. To use VZ-X with your computer, please: Connect the included Micro-USB cable to the Micro-USB port of VZ-X. -
Page 12: Accessing Vz-X's Advanced Settings
In the Advanced Settings Page, you may: (i) Rename VZ-X’s SSID, change it into a hidden SSID, add a password to it, or, change VZ-X’s wireless security protocol under Settings”. (ii) Change and set VZ-X’s IP address, DHCP IP addresses and subnet mask under “System”. -
Page 13: Resetting Vz-X
Resetting VZ-X Should you need to reset VZ-X to its factory default, you can do so by: Turn VZ-X off if it is still on. Press and hold on both the Increase Exposure and Decrease Exposure buttons. Turn VZ-X on while holding down the buttons. -
Page 14: Product Safety Certification
Product Safety Certification CE Mark Warning Warning: This equipment is compliant with Class A of CISPR 32. In a residential environment this equipment may cause radio interference. Federal Communications Commission (FCC) Statement This device complies with Part 15 of the FCC Rules. Operation is subject to the following two conditions: (1) This device may not cause harmful interference, and (2) This device must accept any interference received, including interference that may cause undesired operation.
Need help?
Do you have a question about the VZ-X and is the answer not in the manual?
Questions and answers