Salda SMARTY 2R SLIMLINE Operating Instructions Manual
Smarty 2r unit
Source: salda.lt/en, vetter-lufttechnik.de
Advertisement
Available languages
Available languages
Quick Links
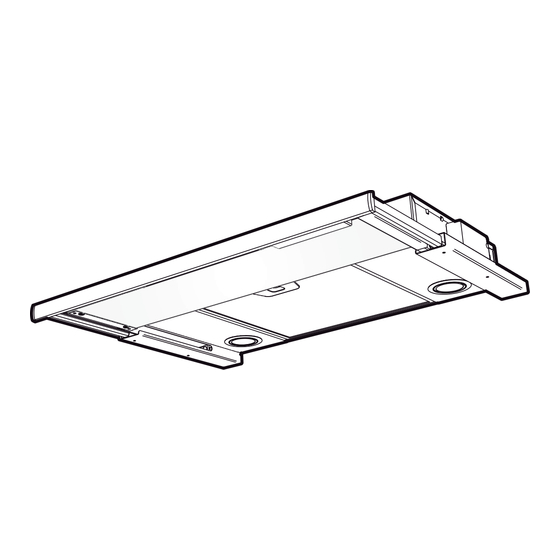
Spiskåpa till aggregat Smarty 2R
Cooker hood for Smarty 2R unit
SV Bruksanvisning
Säkerhetsföreskrifter ..................... 3
Installation ...................................... 4
Användning ..................................... 6
Service och garanti ......................... 7
EN Operating instructions
Safety Instructions ......................... 8
Installation ...................................... 9
Instructions for use ...................... 12
Service and warranty .................... 13
Advertisement

Subscribe to Our Youtube Channel
Related Manuals for Salda SMARTY 2R SLIMLINE


Summary of Contents for Salda SMARTY 2R SLIMLINE
-
Page 1: Table Of Contents
Spiskåpa till aggregat Smarty 2R Cooker hood for Smarty 2R unit SV Bruksanvisning Säkerhetsföreskrifter ..... 3 Installation ........4 Användning ........6 Service och garanti ......7 EN Operating instructions Safety Instructions ......8 Installation ........9 Instructions for use ...... 12 Service and warranty .... -
Page 3: Säkerhetsföreskrifter
SÄKERHETSFÖRESKRIFTER Läs noga igenom denna bruks- § Tillräckligt med luft måste till- och monteringsanvisning, i synner- föras rummet när produkten het säkerhetsföreskrifterna, innan används samtidigt med pro- du installerar och börjar använda dukter som använder annan produkten. energi än el-energi, t ex gas- spis, gas- eller braskaminer, Spara bruksanvisningen för senare användning eller till den som even-... -
Page 4: Installation
INSTALLATION Montering anslutningsstos med spjäll Spiskåpan är avsedd för montering under aggregat. Spiskåpan är försedd med mo- tordrivet spjäll, LED-lampor och metallt- rådsfilter. Installation, användning, skötsel, underhåll mm framgår av denna anvisning. Fig. 2 TEKNISKA UPPGIFTER Utluftdonet levereras inuti spiskåpan. Spjällaxeln A placeras i öglan under spjäl- locket, se Fig. - Page 5 Anslut nätspänningskabel och styrkabel till aggregatet, Fig. 6. Skruva fast spiskåpan i konsolen med 4st borrande skruvar, Fig. 6. Justering av utdragbar front. Fig. 4 Skruva sedan 4 st borrande skruvar i hör- nen på konsolen, Fig. 4 Fig. 7 Drag ut fronten helt.
-
Page 6: Användning
ANVÄNDNING FUNKTION STRÖMBRYTARE Fig. 11 Ta bort fettfilter genom att öppna snäppet, Fig. 10 Fig. 11. Hantera filter försiktigt, var noga A. Timerfunktion på spjäll. med att inte bocka dem. Tryck en gång. Spjället är öppet i 30 Blötlägg filtret i varmt vatten blandat med min. -
Page 7: Service Och Garanti
SERVICE OCH GARANTI Kontrollera att säkringen är hel. Prova alla funktioner för att säkerställa vad som inte fungerar. Kontakta Salda AB tel. 0470-120 25 De kan hjälpa till att åtgärda felet eller anvi- sa till närmaste servicefirma för snabb och bra service. -
Page 8: Safety Instructions
SAFETY INSTRUCTIONS Carefully read these instructions § Flambéing underneath the pro- of use and the installation guide, duct is not allowed. in particular the safety instruc- § There must be sufficient air in tions, before you install and begin the room when the hood is to using the product. -
Page 9: Installation
INSTALLATION Installing the damper. Cooker hood for mounting under unit. The cooker hood is equipped with a motorised damper, LED lamps and metal mesh filter. Installation, use, care, maintenance etc., are described in these instructions. Fig. 2 TECHNICAL INFORMATION A duct connector with damper is provided inside the hood. - Page 10 Connect the mains connection and control cable to the unit, Fig. 6. Screw the hood on the bracket with four drilling screws, Fig. 6. Adjusting the pull-out front. Fig. 4 Screw four drilling screws in the corners of the bracket, Fig. 4 Fig.
- Page 11 The front is removable to enable replace- ment with another front moulding. Undo the screws according to Fig. 9. 991.0462.217/126215/2016-06-13...
-
Page 12: Instructions For Use
INSTRUCTIONS FOR USE FUNCTION SWITCH Fig. 11 Remove the grease filter by opening the Fig. 10 snap, Fig. 11. Handle the filter gently, be A. Timer function for damper. careful not to bend them. Press once. Damper remains open for Soak the filter in a solution of warm water 30 mins. -
Page 13: Service And Warranty
SERVICE AND WARRANTY Check that the fuse is intact. Go through all the functions to check what does not work. Contact Salda AB tel. 0470-120 25 They can provide assistance with address- ing the problem or point you to the nearest service company for fast and effective service. - Page 15 991.0462.217/126215/2016-06-13...
Need help?
Do you have a question about the SMARTY 2R SLIMLINE and is the answer not in the manual?
Questions and answers