
Related Manuals for Siemens Sicore II


Summary of Contents for Siemens Sicore II
- Page 1 Sicore II Sicore II Installation and Commissioning Guide Jan 18 Issue 2 667/HB/52600/000 Unrestricted...
-
Page 2: Table Of Contents
3.2. Product Features 3.3. Product Variants and Options Product Features Description 4.1. Serial Input / Output 4.1.1. Ethernet 4.1.2. RS232 4.1.3. RS422/RS485 4.2. Digital Input / Output 4.2.1. Digital Inputs Sicore II Installation and Commissioning Guide 667/HB/52600/000 Issue 2 Unrestricted... - Page 3 Main Connector 5.6.3. Aux 1 Connector 5.6.4. Aux 2 Connector 5.6.5. WiFi Antenna Connector 5.6.6. SIM Card Connector 5.6.7. Earth Stud 5.6.8. Status LED Installation 6.1. Pre-Requisites 6.1.1. Documentation 6.1.2. Qualifications Sicore II Installation and Commissioning Guide 667/HB/52600/000 Issue 2 Unrestricted...
- Page 4 Open VPN Comms Maintenance Fault finding Appendix - Technical Specification Appendix - Part Numbers and Related Equipment Main and Aux Connecting Cables Mounting Kits Power Supplies Appendix – Human Readable Part Number Sicore II Installation and Commissioning Guide 667/HB/52600/000 Issue 2 Unrestricted...
-
Page 5: List Of Figures
Figure 11 – Aux 2 Connector Pin Arrangement Figure 11 – Sicore II Protective Label Figure 12 – Sicore II Basic Geometry – Top View – No Skew Figure 13 – Sicore II Basic Geometry – Side View Figure 14 – Sicore II Basic Geometry – Top View – With Skew Figure 15 –... - Page 6 Figure 40 – Win 7 / 10 Folder Share Figure 41 – Remote Filesystem Menu Figure 42 – Security Menu Figure 43 – Open VPN Vertificate Figure 44 – Open VPN Comms Sicore II Installation and Commissioning Guide 667/HB/52600/000 Issue 2 Unrestricted...
-
Page 7: List Of Tables
Table 4 – Table of Base Variants Table 5 – Table of Options Table 6 – Power Supply Requirements Table 7 – Siemens Approved Power Supplies Table 8 – Cable Cores Table 9 – Main Connector Pinout Table 10 – Aux 1 Connector Pinout Table 11 –... -
Page 8: Change History
Change History Change History Change History Issue Change Reference Date Formal Issue Nov 2017 Added Security Recommendations (Section 2), Appendix B and Jan 2018 Appendix C Table 1 – Change History Sicore II Installation and Commissioning Guide 667/HB/52600/000 Issue 2 Unrestricted... -
Page 9: Health And Safety Protection
Health and Safety Protection Health and Safety Protection Safety IR IR Safety Warning OPTICAL EMISSIONS OF THE SICORE II IR FLASH ARE IN EXCESS OF THE EXEMPT GROUP, VIEWER-RELATED RISKS ARE DEPENDANT UPON HOW THE PRODUCT IS INSTALLED AND USED... - Page 10 This equipment contains a rechargeable Lithium Coin Cell. This cell will last the lifetime of the equipment and is not designed to be changed. Keep the unit between 0°C and 35°C for prolonged storage. Sicore II Installation and Commissioning Guide 667/HB/52600/000 Issue 2 Unrestricted...
-
Page 11: Introduction
1. Introduction 1.1. Purpose This handbook gives details of the facilities available in the Sicore II ANPR Camera and describes the procedures for the Installation and Commissioning and provides guidance on routine Maintenance and Fault Finding: Sections 2 and 4 cover the general operation and product features. -
Page 12: Abbreviations
Global Positioning System Input / Output Infra Red Light Emitting Diode milliamps milliseconds Network Attached Storage Network Time Protocol Original Equipment Manufacturer Power Supply Unit Ready To Send Table 3 – Abbreviations Sicore II Installation and Commissioning Guide 667/HB/52600/000 Issue 2 Unrestricted... -
Page 13: Third Party Information
1.8. Secure Disposal Instructions Sicore II stores images and information that in many countries would be classed as personal data under the relevant data protection legislation, therefore it is important to decommission and/or dispose of this device carefully, removing all data and settings on the device prior to its disposal. -
Page 14: Recycling And Disposal
Whether or not the above steps are followed, if any personal data remains on any Sicore II units following their disposal, Siemens shall not be liable to compensate you or any third... -
Page 15: Security Recommendations
Where the VPN is provided by on-site communications equipment (ADSL, 4G) instead of Sicore II, care should be taken to secure access to and from the communications equipment by unauthorised personnel. This includes, but is not limited to, firewalls at the upstream communications equipment and physical security. -
Page 16: General
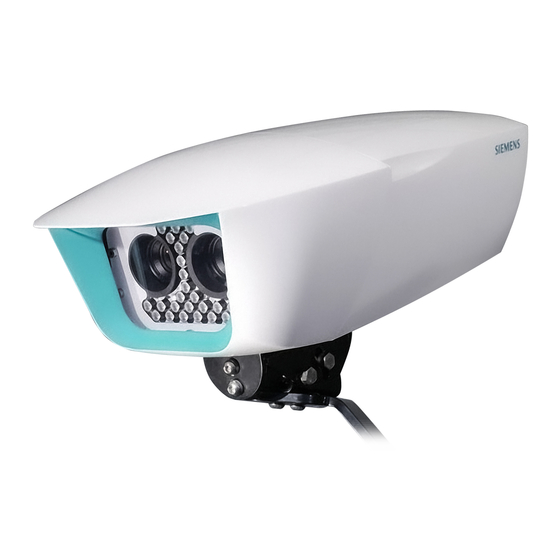
3.1. Product Overview The Siemens Sicore II camera is a development from the successful Sicore 1 and provides the next generation of image quality and performance. Sicore II is highly flexible supporting many countries of the world delivering high quality evidentially secure images. -
Page 17: Product Features
Product Features Description 3.2. Product Features The main features of the Sicore II camera are: Sleek sunshield design gives unique look to the camera High performance quad core Intel Atom processor High performance 2.3MPixel Camera(s) Built-in powerful 850nm IR illuminator with full intensity/flash duration control... -
Page 18: Product Variants And Options
Product Features Description 3.3. Product Variants and Options The Sicore II camera is available in a wide number of variants and can be factory configured with the following options: Variant Description Twin Camera – Mono/IR + Colour Overview Twin Camera – Mono/IR + Mono/IR Overview Single Camera –... -
Page 19: Product Features Description
Product Features Description 4. Product Features Description 4.1. Serial Input / Output The Sicore II camera is fitted with multiple isolated I/O ports that allow the unit to interface with many type of external equipment such as: · Serial trigger devices ·... -
Page 20: Digital Outputs
The WiFi interface is a factory fit option and allows the user to connect locally to the cameras WiFi hotspot using a WiFi device such as a Laptop, Tablet or Smart Phone. The Sicore II camera WiFi operates on 2.4GHz & 5GHz bands and has a useable range of 10-30m depending on location and ambient noise floor. -
Page 21: 4G Interface
‘view’ of the sky and not be obstructed in any way. A basic configuration process and guidance on how to check the signal strength is included in section 7.2. For a full description of this configuration refer to refer to the Sicore II Operating Instructions Handbook (Ref para. 1.3) -
Page 22: User Interface
The following sections summarize the user interface tabs available. The User Interface is described in detail in the Sicore II Operating Instructions Handbook Ref para 1.3. Basic connection and logon information can be found in section 6.8.1.4 of this document. -
Page 23: System Log
Figure 2 – Wipe System Warning Note that, although Sicore II comes out of the factory with a fixed IP address (see section 1.7), use of the ‘Wipe System’ function will reset the network configuration to DHCP mode. -
Page 24: Firmware Update
Status & Configuration / System /Upgrade. Only Software provided by Siemens Plc can be used here. Depending on the current and target version of software for the camera there can be a minimum version requirement for the upgrade. This will be confirmed when the upgrade file is applied. -
Page 25: System Components
5.1. System Block Diagram The Sicore II camera is a modular product that can be factory configured in a number of ways to suit different applications. The main components and connections of the Sicore II Camera are shown in Figure 4. The optional factory configuration parts are shown in blue. -
Page 26: Power Supply
System Components 5.2. Power Supply The Sicore II Camera requires a 24V DC Supply within the limits as detailed in Table 6 The Sicore II camera consumes approximately 25W during operation. Nominal Voltage Minimum Voltage Maximum Voltage 24V DC +10% -30% 16.8V at the camera... - Page 27 System Components Figure 5 – Pole Mounted PSU Assembly Sicore II Installation and Commissioning Guide 667/HB/52600/000 Issue 2 Unrestricted...
-
Page 28: Fuses
The camera is fitted with a small rechargeable Lithium coin cell that provides backup for the clock and tamper circuitry. This battery will last the life of the camera and is not designed to be changed by the user. Sicore II Installation and Commissioning Guide 667/HB/52600/000 Issue 2 Unrestricted... -
Page 29: Rear Panel
Earth Stud · Status LED Figure 6 – Sicore II Rear Panel The three main connectors use Canon KPTC series industrial round style connectors all with differing pin counts to ensure that there is no possibility of swapping connectors. These connectors are bayonet type and they MUST be fully locked during installation. -
Page 30: Cable Connections
Ensure the Main Cable screen is terminated to the enclosure Ground – This should be done at the cable gland entry point using a suitable screen clamp arrangement. An example arrangement is shown in Figure 8 Sicore II Installation and Commissioning Guide 667/HB/52600/000 Issue 2 Unrestricted... - Page 31 Ident (Screen not shown at front of ring for clarity) Stud Incoming Cable CETBar PLAN VIEW Wormdrive Hose Clip Earthing Band 991/4/01375/028 667/2/02348/000 Figure 8 – Example screen clamp arrangement Sicore II Installation and Commissioning Guide 667/HB/52600/000 Issue 2 Unrestricted...
-
Page 32: Main Connector
Table 9 – Main Connector Pinout MAIN connector on Sicore unit (view from mating side ) 15-way male circular connector (ITT Cannon) Connector pins, view from mating side Figure 9 – Main Connector Pin Arrangement Sicore II Installation and Commissioning Guide 667/HB/52600/000 Issue 2 Unrestricted... -
Page 33: Aux 1 Connector
The dedicated isolated ground return for the inputs is on Pin Ref. H – Functions not available with standard cables as listed in . If these functions are needed a custom cable will be required. Sicore II Installation and Commissioning Guide 667/HB/52600/000 Issue 2 Unrestricted... - Page 34 Figure 10 – Aux 1 Connector Pin Arrangement When the Aux interface connectors are not used the supplied connector covers MUST be fitted to protect the contact area from dirt and corrosion Sicore II Installation and Commissioning Guide 667/HB/52600/000 Issue 2 Unrestricted...
-
Page 35: Aux 2 Connector
Black Table 11 – Aux 2 Connector Pinout – Functions not available with standard cables as listed in . If these functions are needed a custom cable will be required. Sicore II Installation and Commissioning Guide 667/HB/52600/000 Issue 2 Unrestricted... -
Page 36: Wifi Antenna Connector
The SIM Card Connector is located behind an access panel on the rear panel of the unit when the 3G/4G modem option is ordered. This allows the Sicore II cameras SIM card to be fitted or changed while maintaining the seal integrity of the camera. Refer to the following photo sequence for fitting the SIM card. -
Page 37: Table 12 - Sim Card Fitting
Replace the SIM Card Access Panel Undo and tighten the two screws on either side. Ensure that both screws are tight to avoid any potential water ingress into the SIM card slot. Table 12 – SIM card fitting Sicore II Installation and Commissioning Guide 667/HB/52600/000 Issue 2 Unrestricted... -
Page 38: Earth Stud
The Status LED provides an indication of the following system states: · Off – No power or system failed to start · Flashing – Indicates camera is starting up · Solid on – Indicates that the camera on and running Sicore II Installation and Commissioning Guide 667/HB/52600/000 Issue 2 Unrestricted... -
Page 39: Installation
6.1. Pre-Requisites This section details pre-requisites required before undertaking any tasks on the Sicore II camera. 6.1.1. Documentation Anyone undertaking installation, commissioning and first line maintenance on the Sicore II camera will also need the Operating Instructions Handbook (see section 1.3) which provides... -
Page 40: Tools
Cabinet Access If access to the power supply or cabling is required, this may be mounted / terminated in a suitable cabinet. If using a Siemens cabinet, one or more of the following will be required to gain access. Description... -
Page 41: Preparation
Sicore II is equipped with three multi-pin connectors as described in section 5.6. The Main cable must always be fitted as this provides power to the Sicore II. Depending on the system design, one or more of the Aux connections may be used. Where no Aux connections are required, the attached sealing cap must be fitted to the unused connector(s). -
Page 42: Mounting The Sicore Ii Camera
6.5. Mounting the Sicore II Camera The Sicore II camera can be mounted in a number of ways depending on the configuration required and will require the correct mounting kit to be selected (ordered separately) Configurations covered by standard mounting kits are as follows:... -
Page 43: Table 13 - Mounting Kit Photos
A list of standard mounting kits may be found in Appendix B Section B.2 It is recommended that a lanyard, connected to the Lanyard Connection Point (see Figure 6 – Sicore II Rear Panel) is used at all times to secure the camera during installation... -
Page 44: Torque Settings
6.7. Lens Protective Label The camera is supplied with a protective label over the front lens, this must be removed prior to use. Figure 12 – Sicore II Protective Label Sicore II Installation and Commissioning Guide 667/HB/52600/000 Issue 2 Unrestricted... -
Page 45: Alignment
IR used by the camera to detect the presence of a plate. Sicore II provides a variety of lenses to cover different working distances and hence a wide range of geometries. In addition to this Sicore II has flexible operational capacity such that the installation and setup do not require precise measurement or alignment. - Page 46 Distance from Camera to Street and is a longer as the licence plate will be at a height above the road surface. Figure 13 – Sicore II Basic Geometry – Top View – No Skew Figure 14 – Sicore II Basic Geometry – Side View In most cases the camera will be mounted on a pole at the side of the road, this introduces skew, an offset from the camera to the centre of the capture zone.
- Page 47 Camera position Figure 15 – Sicore II Basic Geometry – Top View – With Skew Both skew and mounting height affect the angle of the camera to the licence plate. In practice a maximum angle of 46 Degrees should be observed to ensure consistent camera performance.
-
Page 48: Table 14 - Geometry Acronyms
Result value : Take from table (driven by height and skew) Horizontal Shift Default Value : Driven by pole position and skew to centre of capture zone Table 14 - Geometry Acronyms Sicore II Installation and Commissioning Guide 667/HB/52600/000 Issue 2 Unrestricted... -
Page 49: Table 15 - Two Lane Geometry
26.2 24.3 16.9 13.5 12.2 25.3 18.7 17.5 14.9 13.5 12.2 25.3 18.7 17.5 24.7 18.7 18.2 17.9 24.3 20.3 18.7 18.2 25.9 24.3 Table 15 – Two lane Geometry Sicore II Installation and Commissioning Guide 667/HB/52600/000 Issue 2 Unrestricted... -
Page 50: Table 16 - Three Lane Geometry
17.9 22.8 21.2 10.3 20.2 25.9 14.4 17.9 22.8 21.2 10.2 21.1 20.8 14.6 20.8 22.6 21.2 10.2 19.6 20.9 14.6 20.7 22.6 21.2 Table 16 – Three lane Geometry Sicore II Installation and Commissioning Guide 667/HB/52600/000 Issue 2 Unrestricted... - Page 51 Figure 16 – Distance D position at edge of road At this position place an object that will be visible in the Sicore II’s ANPR view (e.g. reflects IR light), it is recommended to use either a traffic cone (with reflective band) or a reflective puck (Suggested 3M road 290-W, see Figure 17) Figure 17 –...
- Page 52 The bracket arrangement may vary by installation so this section assumes a standard Sicore II Siemens bracket with pan, tilt and roll adjustment as shown in Figure 18.
- Page 53 It is safe to proceed (this will vary by Browser but usually consists of selecting a ‘proceed’ option or by confirming a ‘security exception’) Sicore II Installation and Commissioning Guide 667/HB/52600/000 Issue 2 Unrestricted...
- Page 54 Password : 249 A successful logon will result in the Home screen being displayed Figure 21 – Home Screen NOTE: Siemens strongly advise changing the username and password on Error! Reference source not found. installation – see Sections and 8.1...
- Page 55 · Log onto the Sicore II camera web interface and select the ANPR Live View page. Figure 22 – Web Interface – Top Level Menu ·...
- Page 56 Observe the ANPR reads for vehicle captures displayed on the Live View page and verify that that they are correct for a sample of around 20-30 vehicles · Ensure that the camera is locked off with all adjustments tightened. Sicore II Installation and Commissioning Guide 667/HB/52600/000 Issue 2 Unrestricted...
-
Page 57: Commissioning
On the left hand menu click on the + to expand System In the same way select Settings then Comms then DSL/Fibre The default Ethernet configuration page will be displayed: Sicore II Installation and Commissioning Guide 667/HB/52600/000 Issue 2 Unrestricted... - Page 58 Reconfigure the network on the Engineer’s PC and reconnect to the camera as described in section 6.8.1.4 Note: A warning may be displayed indicating another user is connected, this is original connection from the first IP address and can be ignored. Sicore II Installation and Commissioning Guide 667/HB/52600/000 Issue 2 Unrestricted...
-
Page 59: Gps Time Source
Commissioning 7.2. GPS Time Source Note: Alternative time synchronisation mechanisms can be configured, refer to the Sicore II Operating Instructions Handbook (Ref para. 1.3) for details. Select the top level GPS menu by navigating to : Status and Configuration / System / System Time & Date / GPS The following default menu will be displayed: Figure 26 –... - Page 60 Tick the Enable NTP box Click Save Click on Sensors which appears below the top level NTP menu This will show the default sensors menu which will include GPS as sensor ID 1 Sicore II Installation and Commissioning Guide 667/HB/52600/000 Issue 2 Unrestricted...
- Page 61 Save. The GPS signal strength and quality can be assessed by viewing two pages: Click on the + next to GPS to expand the menu and then select GPS Status Sicore II Installation and Commissioning Guide 667/HB/52600/000 Issue 2 Unrestricted...
-
Page 62: Colour Overview
The default settings for colour overview will be sufficient for the majority of install cases and do not need to be changed. For a description of all available settings refer to the Sicore II Operating Instructions Handbook (Ref para. 1.3). -
Page 63: Monochrome Overview
Status and Configuration / ANPR / Cameras / Overview The following default menu will be displayed: Figure 30 – Overview Menu Set the Overview Camera Delay entry to 500 Click Save Sicore II Installation and Commissioning Guide 667/HB/52600/000 Issue 2 Unrestricted... -
Page 64: Camera Calibration
Select the Camera Calibration menu by navigating to : Status and Configuration / ANPR / Vision / Camera Calibration The following default menu will be displayed: Figure 31 – Camera Calibration Menu Sicore II Installation and Commissioning Guide 667/HB/52600/000 Issue 2 Unrestricted... - Page 65 For a detailed description of all settings on this page refer to the Sicore II Operating Instructions Handbook (Ref para. 1.3). Sicore II Installation and Commissioning Guide...
- Page 66 Commissioning Figure 32 – Camera Calibration – Positive Skew Figure 33 – Camera Calibration – Negative Skew Sicore II Installation and Commissioning Guide 667/HB/52600/000 Issue 2 Unrestricted...
-
Page 67: Region Of Interest - Roi
Select ROI 2 from the left hand dropdown menu. Click Reset. Click four points on the screen defining the corners of the required ROI, see Figure 35. Change the ID to 2. Click Save. Sicore II Installation and Commissioning Guide 667/HB/52600/000 Issue 2 Unrestricted... - Page 68 The camera will now detect plates only within the area defined as ROI 2 and ROI 3 and will report the ID of 2 or 3 in the result record as appropriate. Sicore II Installation and Commissioning Guide 667/HB/52600/000 Issue 2 Unrestricted...
-
Page 69: Anpr Engine
Change ID1 to the primary country in which the camera is to be used with the ID2 being left (for Europe) as X_EU. Multiple nationalities (or multiple plate formats within a single country) can be configured by using the Add Row and defining each country in turn. Sicore II Installation and Commissioning Guide 667/HB/52600/000 Issue 2 Unrestricted... -
Page 70: Result Creation
Capture XML and Create ZIP File ticked which would return a single ZIP compressed for each vehicle capture. Click Save when the configuration is complete. Sicore II Installation and Commissioning Guide 667/HB/52600/000 Issue 2 Unrestricted... -
Page 71: Simple Uploader - Cifs
This is show in the following figure: Figure 39 – System Menu Assuming a Window 7 / 10 PC, create a directory, view its Properties then under the Sharing tab select Share Sicore II Installation and Commissioning Guide 667/HB/52600/000 Issue 2 Unrestricted... - Page 72 Figure 41 – Win 7 / 10 Folder Share Select the Remote Filesystem menu by navigating to : Status and Configuration / ANPR / Remote FileSystem The following default menu will be displayed: Sicore II Installation and Commissioning Guide 667/HB/52600/000 Issue 2 Unrestricted...
- Page 73 Remote Password: Password of an account with access to the configured share (for the example above the password of the account used when the share was created) Click on Save Sicore II Installation and Commissioning Guide 667/HB/52600/000 Issue 2 Unrestricted...
-
Page 74: License Installation
Commissioning 7.10. License Installation Licenses are installed onto Sicore II at the time of manufacture and are stored internally on the camera not accessible to the user. The installed licences can be viewed by navigating to : Status and Configuration / Settings / Licence System The Facilities menu will displayed the items that can be licensed and whether they have a licence installed. -
Page 75: Security
Select the Security menu by navigating to : Status and Configuration / Settings / Security The following default menu will be displayed: Figure 43 – Security Menu Change the Web Username and Web Password then click Save Sicore II Installation and Commissioning Guide 667/HB/52600/000 Issue 2 Unrestricted... -
Page 76: Vpn
Use Import Certificate to import the signed request from the previous step · Export the Certificate Authority (CA) from the certificate management tool · Use Import CA Certificate to import the CA Sicore II Installation and Commissioning Guide 667/HB/52600/000 Issue 2 Unrestricted... -
Page 77: Open Vpn Comms
Tick the Enable OpenVPN Client box · Enter the IP address of the Instation OpenVPN server in Remote Host Name · Set the Remote IP Port accordingly · click Save Sicore II Installation and Commissioning Guide 667/HB/52600/000 Issue 2 Unrestricted... -
Page 78: Maintenance
The Sicore II camera contains no user serviceable parts and is shipped from the factory as a sealed unit. If any form of service is required within the unit it should be returned to a Siemens approved service facility. -
Page 79: Fault Finding
Poor retro-reflection Poor camera alignment from number plate Incorrect IR illuminator settings, check that the default flash power and duration are set (refer to the Sicore II Operating Instructions Handbook (Ref para. 1.3)) IR illuminator failure Dirt on camera lens... -
Page 80: Table 17 - Fault Finding
Try adjusting the camera field of view to optimise road coverage (see section 7.6) Verify that the ANPR country configuration (ref section 7.7) is set correctly for the nationality of the plates being observed. Table 17 – Fault Finding Sicore II Installation and Commissioning Guide 667/HB/52600/000 Issue 2 Unrestricted... -
Page 81: A Appendix - Technical Specification
UMTS/HSPA+: Triple band, 900 (BdVIII) / 1800 (BdIII) / 2100MHz (BdI) LTE: band, 800 (Bd20) / 900 (Bd8) / 1800 (Bd3) / 2600MHz (Bd7) When fitted with the optional WiFi module the Sicore II operates in the following bands 2412 MHz – 2484 MHz 4910 MHz –... - Page 82 EN50556 Road traffic signal systems TR2522A Remote Monitoring and Control of Traffic Control Equipment via a Telecommunications Network TR2523 – Traffic Control Equipment Interfacing Specification CE Approved RoHS Compliant Sicore II Installation and Commissioning Guide 667/HB/52600/000 Issue 2 Unrestricted...
-
Page 83: B Appendix - Part Numbers And Related Equipment
Use of components other than those listed, or modifications or enhancements that have not been authorised by Siemens may invalidate the warranty and/or safety of this product. B.1 Main and Aux Connecting Cables Custom cables are available from Siemens in various lengths as shown in Table Cable Length (m) -
Page 84: Mounting Kits
Meanwell 100W IP67 605/4/08704/024 SDS150PS24B-LC XP Power 150W Open Frame 605/4/08697/024 Power Supply Manufacturer Part Number Assemblies Pole Mounted PSU Siemens 667/1/46778/000 Assembly Table 20 – Power Supply Part Numbers Sicore II Installation and Commissioning Guide 667/HB/52600/000 Issue 2 Unrestricted... -
Page 85: C Appendix - Human Readable Part Number
Human Readable Part Number Appendix – Human Readable Part Number Sicore II Installation and Commissioning Guide 667/HB/52600/000 Issue 2 Unrestricted... - Page 86 Siemens Traffic www.siemens.co.uk/traffic Siemens Mobility http://www.mobility.siemens.com/mobility Siemens Plc Subject to change without prior notice Sopers Lane Order No. 667/HB/52600/000 © Siemens Plc, 2017 Poole For more information BH17 7ER on Sicore II scan the United Kingdom QR code www.siemens.co.uk/traffic Unrestricted...
Need help?
Do you have a question about the Sicore II and is the answer not in the manual?
Questions and answers