Table of Contents
Advertisement
Quick Links
Download this manual
See also:
User Manual
Advertisement
Table of Contents

Related Manuals for 3M PL300


Summary of Contents for 3M PL300
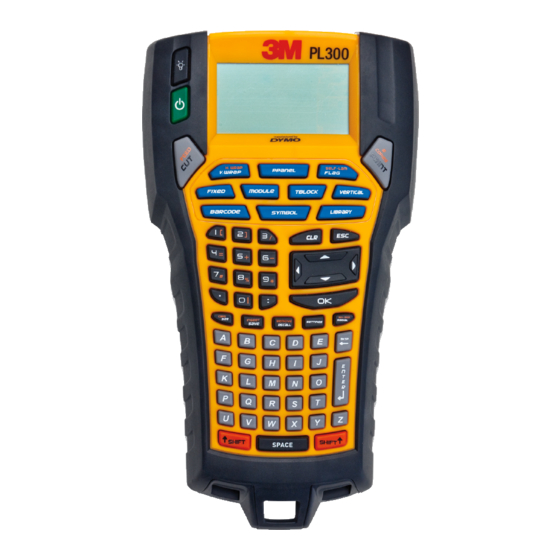
- Page 1 Portable Labeler PL300 Quick Reference Guide manufactured by:...
- Page 2 Vertical Wrap 1. Press 2. Select wire type: COAX, press 3. Enter text 4. Press...
- Page 3 Horizontal Wrap 1. Press 2. Select label length: AUTO, press 3. Enter text 4. Press...
- Page 4 Flag 1. Press 2. Select flag length: AUTO, press 3. Press 4. Select VOICE/DATA, press 5. Press L, select LAN, press 6. Press...
- Page 5 Self-Laminating 1. Press 2. Select label length: AUTO, press 3. Type text 4. Press...
-
Page 6: Electrical Panel
Electrical Panel 1. Press 2. Set number of blocks, block size, select DONE, press 3. Type text 4. Press to move to next breaker label 5. Enter text 6. Repeat steps 4 – 5 until all breakers are labeled 7. Press... -
Page 7: Patch Panel
Patch Panel 1. Press 2. Set port distance, number of ports, select DONE, press 3. Type text 4. Press 5. Select 1 to be serialized, press 6. Set increment, number of serializations, , select DONE, press press 7. Press select ALL... - Page 8 Back of Patch Panel (#1) 1. Create a Patch Panel. (see Patch Panel steps 1 – 6 on page 7) 2. Press 3. Set number of copies 7. Press...
- Page 9 Back of Patch Panel (#2) 1. Press 2. Set port distance, number of ports, select DONE, press 3. Enter text 4. Press 5. Select SIMULTANEOUS, press 6. Select 1 to be the first character to be serialized, press 7. Select 2 to be the second character to be serialized, press 8.
- Page 10 A/V Distribution Panel 1. Press 2. Set port distance, number of ports, select DONE, press 3. Enter text 4. Press one time to move to the next connector 5. Repeat steps 3 –4 until first three ports are labeled 6. Press , select insert next label to the right, press 7.
- Page 11 Module 1. Press 2. Set fuse length, number of modules, multipliers: module 1, multiplier 1, select DONE, press 3. Enter text 4. Press one time to move to the next module 5. Repeat steps 3 –4 until modules are labeled 6.
-
Page 12: Terminal Block
Terminal Block 1. Press 2. Set number of blocks, and block size, select DONE, press 3. Enter text 4. Press 5. Select 1 to be serialized, press 6. Set increment, number of serializations, press 7. Press... - Page 13 110 Terminal Block 1. Press 2. Set port distance, number of ports, select DONE, press 3. Enter text 4. Press 5. Select SIMULTANEOUS, press 6. Select the first character to be serialized, press 7. Select the second character to be to be serialized, press 8.
-
Page 14: Fixed Length
Fixed Length 1. Press 2. Set label length, press 3. Enter text 4. Press... - Page 15 Vertical 1. Press 2. Set label length, press 3. Enter text 4. Press...
-
Page 16: Quick Tips
3M Canada, London, Ont. N6A 4T1 chase. If this product is defective within the warranty period, your exclusive remedy shall be, at 3M’s option, to replace the 3M product or refund the purchase 3M Mexico S.A. de C.V. Av. Sta Fe No. 55 price of the 3M product.
Need help?
Do you have a question about the PL300 and is the answer not in the manual?
Questions and answers