Advertisement
Quick Links
TEMPERATURE INPUT UNIT
GT1-TS04T/TS04TCST
GT1-TS04P/TS04PCST
INSTRUCTION MANUAL
Thank you for purchasing this OMRON product.
This manual primarily describes precautions required in installing and
operating the digital controller. Before operating the product, read this
manual thoroughly to acquire sufficient knowledge of the product. Keep
this manual for future reference.
Industrial Automation Company
Tokyo, JAPAN
OMRON Corporation
1615913-6D
To ensure safe and correct use of this product, also read the following
manuals:
• CompoBus/D (Device net) Multiple I/O Terminal Operation Manual(Cat.
No. W348-E1-1)
The above manual can be obtained from any OMRON sales office or
dealer.
NOTICE
Items shown below are necessary for safe usage.
Please note them carefully.
(1) Never disassemble, repair or modify the product.
(2) Do not submit the product to abnormal shock. Doing so might result in
faulty operation.
(3) Do not use the product in the following places:
- Places subject to icing, condensation, dust or corrosive gas (espe-
cially sulfide gas or ammonia gas)
- Places subject to splashing liquid or oil atmosphere
- Place subject to static electricity or other forms of severe noise
(4) Fit the product to a DIN rail correctly.
(5) Separate the communication cables from power lines or high-tension
lines.
(6) Avoid connecting or disconnecting cables with the power ON. Doing so
might result in trouble or faulty operation.
(7) Keep the communication distance within specifications.
(8) Use the appointed communication cables.
(9) Locking Connector Cables
• Before turning the power ON, make sure that the connector cables
are firmly connected.
• Be sure that I/O interface connector is properly locked into place.
(10) Tightening Screws
Tighten screws to the stipulated torque to prevent faulty operation.
Torque: 0.3 to 0.5 N • m
(11) Never execute panel processing and wiring after installation to avoid
any conductive foreign substance inside the product.
Doing so may cause malfunction.
(12) Cleaning
Never use paint thinner or other solvent to clean the product. Doing so
might melt or discolor the surface. Use standard grade alcohol.
(13) Isolate Internal Power Supply that is connected to the product from I/O
Power Supply that is for load.
(14) Be sure to warm up more than 30 minutes before you use.
■ SPECIFICATIONS
● Ratings
Current
(I/O unit interface)
50mA max.
Consumption (Internal power supply)
80mA max.
Internal Circuit Power Voltage
20.4 to 26.4VDC (24VDC -15 to +10%)
Inrush Current
10A max., pulse width 1ms max.
Communication distance I/O unit interface
3m in total, 1m max. between each unit
Ambient Temperature
-10 to 55°C (no condensation)
Ambient Humidity
25 to 85% (no condensation)
Storage temperature
-25 to 65°C
Installation
Mounted in a panel
Weight
TS04P/T: 210g typ.,TS04PCST/TCST: 90g typ.
● Characteristics
Model
TS04T(CST)
TS04P(CST)
Input points
4 points
Input Type
R, S, K, J, T, L, B
Pt100, JPt100
Accuracy*1
Input Type
Accuracy
*2
(±0.3% of indication value or ±1°C,
R,S,K,J,T,B
whichever greater) ±1 digit
(±0.3% of indication value or ±0.8°C,
Pt100,JPt100
whichever greater) ±1 digit
-200.0 to 650.0°C
(±0.3% of indication value or ±0.5°C,
Pt100,JPt100
whichever greater) ±1 digit
-200.0 to 200.0°C
Conversion Cycle
250ms/4 points
Temperature Conversion Data
Binary Data
20MΩ min. (at 250VDC, across insulated circuits)
Insulation Resistance
500VAC, 1 minute, Detection Current 1 mA
Withstanding Voltage
Across I/O unit interface connector and DIN rail,
Across whole terminals and DIN rail
Across Internal Power Supply and each input
Across each input
Across I/O unit interface connector and whole terminals
* 1 Exceptions in accuracy
Accuracy
Input Type and Condition
±2°C±1 digit max.
Input Type K,T in Lower -100°C
±2°C±1 digit max.
Input Type L
±3°C±1 digit max.
Input Type R,S in Lower 200°C
Input Type B in Lower 400°C
Not defined
* 2 Measurement condition
Accuracy does not include accuracy of external
components (thermocouple, compensating lead wires, etc.)
not included on this unit.
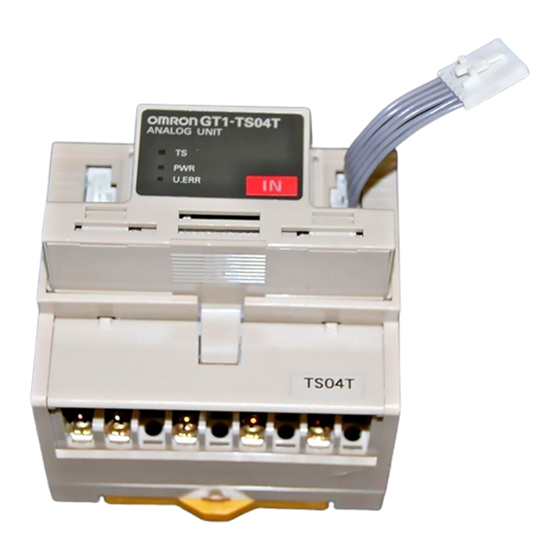
■ NOMENCLATURE
I/O unit interface
I/O unit interface
Display
Connector
Connector
DIP switch
(Side surface where
GT1−TS04P
the cassette is
ANALOG UNIT
removed from the
TS
terminal block)
PWR
U.ERR
IN
Casset
(The cassette model
names are
GT1-TS04TCST and
GT1-TS04PCST)
7
8
9
Terminal Block
DIN rail attachment hook
(Under the Cover)
■ DISPLAY
The meaning of the each LED is as follows.
LED name
LED Displaying Color
Condition
Description
TS
Green
Lit
Normal Conditions
Red
Lit
I/O unit interface error
−
Out
Standby (or Not Powered)
PWR
Green
Lit
Powered
−
Out
Not Powered
U.ERR
Red
Lit
Unit error (or Not Powered)
Out
−
Device Operational
■ DIMENSIONS (unit : mm)
● GT1-TS04
80
GT1−TS04P
ANALOG UNIT
TS
PWR
U.ERR
IN
7
8
9
■ DIN Rail Attachment
Be sure to mount on a 35mm DIN rail using the DIN rail attachment hook.
Do not install the product in places to be touched by accident to avoid mal-
function caused by static electricity.
Do not block the ventilation holes on the upper side of product to allow heat
to escape.
Be sure to have enough space around the product when installing.
Do not install the TS04T in
vertical direction as shown on
the left. If installed vertically,
the indication accuracy may
not be satisfied.
Vertical direction
■ DIP SWITCH SETTING
Rotaly DIP Switch
DIP Switch
SW
SW
1
4
0
↑ON
● Setting of DIP Switch
SW1
Set the unit
°C
*default setting
OFF
°F
ON
SW2
Set the display mode of temperature data
Normal mode
*default setting
OFF
Decimal 2 Columns display mode
ON
SW3
Keep OFF
SW4
Setting the Setting mode
OFF
DIP switch setting enable
*default setting
ON
Remote setting enable
* DIP switch setting is read only when the power is turned ON
● Setting of Rotary DIP Switch
Position of
GT1-TS04T
Rotary DIP
Input
Range
Range
Input
Switch
Type
Type
(°C)
(°F)
0
R
0 to 1700
0 to 3000
PT100
1
S
0 to 1700
0 to 3000
JPT100
2
K
-200 to 1300
-300 to 2300
PT100
3
K
0.0 to 500.0
0.0 to 900.0
JPT100
4
J
-100 to 850
-100 to 1500
5
J
0.0 to 400.0
0.0 to 750.0
6
T
-200.0 to 400.0
-300.0 to 700.0
7
L
-100 to 850
-100 to 1500
8
L
0.0 to 400.0
0.0 to 750.0
9
B
100 to 1800
300 to 3200
Model
Default Setting
GT1-TS04T(CST)
2
GT1-TS04P(CST)
0
* DIP switch setting is read only when the power is turned ON
■ WIRING
● Terminal Arrangement
80
60
・GT1-TS04T
SOURCE
Input0 NC Input1 NC Input2 NC Input3 NC
A
+
+24V
SOURCE
Input0 NC Input1 NC Input2 NC Input3 NC
B
-
+0V
1
2
3
・GT1-TS04P
SOURCE
Input0 Input0 Input1 Input1 Input2 Input2 Input3 Input3
A
+24V
A
B
SOURCE
Input0 NC Input1 NC Input2 NC Input3 NC
B
B
+0V
1
2
3
6.0mm max.
6.0mm max.
● Connecting Communications Unit and I/O unit
The product can be connected to a communications unit and other I/O units with a
connecting cable.
・Be sure to disconnect the I/O unit connecting cable after drawing out the cassette.
・Use I/O unit interface (1) when connect to a communication unit.
・Use I/O unit interface (2) when connect to another I/O unit interface (1),
use I/O unit interface (1) when connect to another I/O unit interface (2).
・A terminating connector must be at I/O unit interface (2) of the end unit.
I/O Unit Connecting cable
(attached to I/O Unit)
Communication unit
DRT1-COM
COMMUNICATION UNIT
MS
NS
TS
No.
■ Installing and drawing out the cassette
Draw out the cassette towards you while pressing its upper side. (See diagram below.)
Do not draw out the cassette while power in ON.
GT1-TS04P
Range
Range
(°C)
(°F)
-200.0 to 650.0
-300.0 to 1200.0
-200.0 to 650.0
-300.0 to 1200.0
-200.0 to 200.0
-300.0 to 380.0
Install the cassette to the right position with much care for direction. Check if the cas-
-200.0 to 200.0
-300.0 to 380.0
sette in installed properly by pulling it slightly.
Setting Impossible except above
PRECAUTIONS IN USING THE PRODUCT
When the product is used under the circumstances or environment below, ensure
adherence to limitations of the ratings and functions. Also, take countermeasures
for safety precautions such as fail-safe installations.
(1) Use under circumstances or environment which are not described in the
instruction manual.
(2) Use for nuclear power control, railway, aircraft, viecle, incinerator, medical
equipment, entertainment equipment, safety device etc...
(3) Use for applications where death or serious property damage is possible and
extensive safety precautions are required.
+
+
+
-
-
-
4
5
6
7
8
9
A
B
A
B
A
B
B
B
B
4
5
6
7
8
9
for M3
Terminating connector
I/O Unit Connecting cable
(attached to the
(attached to I/O Unit)
Communications Unit)
(1)
(2)
(1)
(2)
GT1
-
TS04P
GT1
-
TS04T
ANALOG UNIT
ANALOG UNIT
TS
TS
PWR
PWR
IN
IN
U.ERR
U.ERR
TS04P
TS04T
7
8
9
7
8
9
Advertisement

Subscribe to Our Youtube Channel
Related Manuals for Omron GT1-TS04T


Summary of Contents for Omron GT1-TS04T
- Page 1 No. W348-E1-1) 20MΩ min. (at 250VDC, across insulated circuits) ■ DIP SWITCH SETTING The above manual can be obtained from any OMRON sales office or Insulation Resistance ・Be sure to disconnect the I/O unit connecting cable after drawing out the cassette.
- Page 2 ■仕様 ■外形寸法(単位:mm) ■配線 ● GT1-TS04T/TS04P ●定格 ●端子配列 項目 仕様 ・形 GT1-TS04T の場合 温度入力ユニット 50mA以下 消費電流 (I/Oユニッ トインターフェース) GT1-TS04T/TS04TCST (内部電源) 80mA以下 SOURCE 入力0 NC 入力1 NC 入力2 NC 入力3 NC 形 +24V 内部電源電圧 20.4∼26.4V DC (24V DC -15%∼+10%) ...
Need help?
Do you have a question about the GT1-TS04T and is the answer not in the manual?
Questions and answers