
Related Manuals for Brother ADS-1250W


Summary of Contents for Brother ADS-1250W
- Page 1 Online User's Guide ADS-1200 ADS-1250W ADS-1700W © 2018 Brother Industries, Ltd. All rights reserved.
-
Page 2: Table Of Contents
Scan..............................26 Before Scanning............................27 Scan Using Bus Power Mode ........................28 Scan Using the Scan Functions on Your Brother Machine ................29 Save Scanned Documents on Your Computer................... 30 Save Scanned Documents Using Scan to Workflow Function ............31 Save Scanned Documents to a USB Flash Drive ................ - Page 3 Network Management Software and Utilities ....................82 Learn about Network Management Software and Utilities ..............83 Additional Methods of Configuring Your Brother Machine for a Wireless Network ........84 Before Configuring Your Brother Machine for a Wireless Network............. 85 Configure Your Machine for a Wireless Network Using the One-Push Method of Wi-Fi Protected ™...
- Page 4 Home > Table of Contents Replace the Separation Pad ......................181 Pack and Ship Your Brother Machine ......................183 Machine Settings..........................185 Change Machine Settings from the Control Panel ..................186 In the Event of Power Failure (Memory Storage) ................187 Change the General Settings from the Control Panel ..............
-
Page 5: Before You Use Your Brother Machine
Home > Before You Use Your Brother Machine Before You Use Your Brother Machine • Definitions of Notes • Trademarks • Important Note... -
Page 6: Definitions Of Notes
Home > Before You Use Your Brother Machine > Definitions of Notes Definitions of Notes We use the following symbols and conventions throughout this User's Guide: CAUTION indicates a potentially hazardous situation which, if not avoided, may CAUTION result in minor or moderate injuries. -
Page 7: Trademarks
Each company whose software title is mentioned in this manual has a Software License Agreement specific to its proprietary programs. Any trade names and product names of companies appearing on Brother products, related documents and any other materials are all trademarks or registered trademarks of those respective companies. -
Page 8: Important Note
Home > Before You Use Your Brother Machine > Important Note Important Note • The latest manuals are available on the Brother Solutions Center at support.brother.com/manuals. Select your model to download your model's other manuals. • Check support.brother.com for Brother driver and software updates. -
Page 9: Introduction To Your Brother Machine
Home > Introduction to Your Brother Machine Introduction to Your Brother Machine • About This Machine • Set Up Your Scanner • Control Panel Overview • Touchscreen LCD Overview • USB Port and Cable Overview... -
Page 10: About This Machine
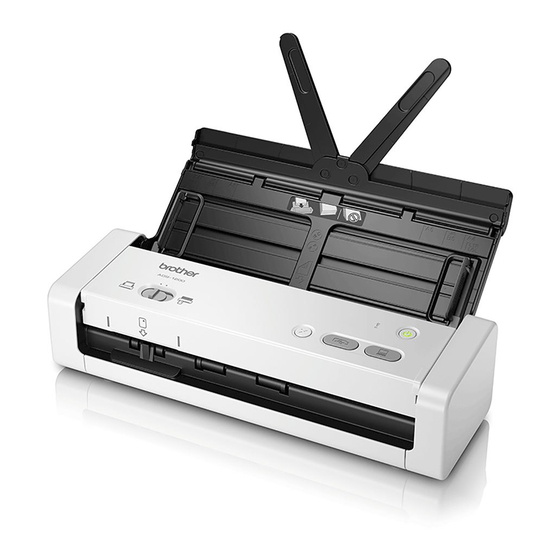
Home > Introduction to Your Brother Machine > About This Machine About This Machine 1. Document Support Arms 2. Top Cover 3. Automatic Document Feeder (ADF) 4. Paper Guides 5. Front Cover 6. Feed Selector 7. Touchscreen LCD (ADS-1700W) 8. Control Panel 9. -
Page 11: Set Up Your Scanner
Home > Introduction to Your Brother Machine > Set Up Your Scanner Set Up Your Scanner 1. Open the Top Cover (1) and push the flap of the Top Cover (2) firmly back until it sets into place. 2. Lift the Paper Guides (1) and the Document Support Arms (2). -
Page 12: Control Panel Overview
(Scan to PC) Press to scan to the computer. Install a scanning application (for example, Brother iPrint&Scan) and configure the settings within the application before scanning from the machine. (Scan to USB) Press to scan to a USB flash drive. - Page 13 (Scan to PC) Press to scan to the computer. • Install a scanning application (for example, Brother iPrint&Scan) and configure the settings within the application before scanning from the machine. • When the machine and computer are connected wirelessly, configure the Scan to PC settings using Remote Setup.
- Page 14 5. Touchscreen LCD Access the menus and options by pressing the touchscreen. 6. Feed Selector ( (ADF Mode)/ (Plastic Card Mode) ) Slide to select the scanner feed mode. Related Information • Introduction to Your Brother Machine • Add Shortcuts...
-
Page 15: Touchscreen Lcd Overview
Home > Introduction to Your Brother Machine > Touchscreen LCD Overview Touchscreen LCD Overview Related Models: ADS-1700W Home Screens There are three Home screens that you can access by pressing d or c. The following screens display the machine’s status when the machine is idle:... - Page 16 1. [to PC] Press to access the Scan to PC function. 2. [to Workflow] Press to access the Scan to Workflow function. Settings must be configured in iPrint&Scan in advance. 3. [to Network] Press to access the Scan to Network function. (Wireless Status) A four-level indicator on the Ready Mode screen displays the current wireless signal strength when using a wireless connection.
- Page 17 [Machine Info.] Press to check the machine’s information. • [Initial Setup] Press to access the [Date & Time], [Reset], and [Local Language] menus. Related Information • Introduction to Your Brother Machine • Configure Scan to Workflow Settings Using Brother iPrint&Scan...
-
Page 18: Usb Port And Cable Overview
Home > Introduction to Your Brother Machine > USB Port and Cable Overview USB Port and Cable Overview Your machine has a Micro USB port for connecting to a computer. You must purchase the correct USB cable (USB 3.0 (Micro)). This USB cable is included with some models. -
Page 19: Paper Handling
Home > Paper Handling Paper Handling • Document Specifications • Load Documents... -
Page 20: Document Specifications
Home > Paper Handling > Document Specifications Document Specifications • Acceptable Documents • Unacceptable Documents... -
Page 21: Acceptable Documents
Home > Paper Handling > Document Specifications > Acceptable Documents Acceptable Documents Do not load documents of varying page thickness or paper quality at the same time. Standard Paper Width 2 in. to 8.5 in. (51 mm to 215.9 mm) Length Single Paper: 2 in. -
Page 22: Unacceptable Documents
• The surface of the document may be damaged when scanning glossy papers such as photographs. • The damage caused by using any unacceptable documents with your Brother machine may not be covered under warranty. Related Information •... - Page 23 Home > Paper Handling > Document Specifications > Unacceptable Documents > Area Not to be Perforated Area Not to be Perforated An error may occur if your document has punched holes in the area shaded in light blue in the following figure: 1.
-
Page 24: Load Documents
Home > Paper Handling > Load Documents Load Documents The ADF can hold up to 20 pages and feeds each sheet individually. Use 20 lb (80 g/㎡) paper and always fan the pages before placing them in the ADF. IMPORTANT •... -
Page 25: Load Standard Size Documents
Home > Paper Handling > Load Documents > Load Standard Size Documents Load Standard Size Documents 1. Gently adjust the Paper Guides (1) to fit the width of your document. 2. Fan the pages several times along both the long edge and the short edge. 3. - Page 26 Related Information • Load Documents...
-
Page 27: Load Business Cards
Home > Paper Handling > Load Documents > Load Business Cards Load Business Cards 1. Gently adjust the Paper Guides (1) to fit the width of your document. 2. Slide the Feed Selector to the left and confirm that it is in ADF Mode. Place the card, face down, top edge first in the ADF between the Paper Guides until you feel it touch the inside of the machine. -
Page 28: Load A Plastic Card
Home > Paper Handling > Load Documents > Load a Plastic Card Load a Plastic Card 1. Open the Top Cover and slide the Feed Selector to the right. 2. Insert the plastic card into the Card Slot (1) face up and bottom edge first, according to the guidelines. The card is fed into the machine. -
Page 29: Load Documents Longer Than Standard Size
Home > Paper Handling > Load Documents > Load Documents Longer than Standard Size Load Documents Longer than Standard Size Make sure documents with ink or correction fluid are completely dry. 1. Gently adjust the Paper Guides (1) to fit the width of your document. 2. -
Page 30: Scan
Home > Scan Scan • Before Scanning • Scan Using Bus Power Mode • Scan Using the Scan Functions on Your Brother Machine • ® Scan from Your Computer (Windows • Scan from Your Computer (Mac) -
Page 31: Before Scanning
Make sure you have installed the scanner driver. To install the scanner driver, see the Quick Setup Guide. • If your Brother machine is connected via a USB cable, make sure the interface cable is physically secure. When using the wireless feature, make sure the scanner is turned on and is connected to the same network... -
Page 32: Scan Using Bus Power Mode
> Scan Using Bus Power Mode Scan Using Bus Power Mode Related Models: ADS-1200/ADS-1250W In Bus Power mode, the machine can be powered from a computer's USB port, allowing you to scan in locations where no AC power outlet is available. -
Page 33: Scan Using The Scan Functions On Your Brother Machine
Home > Scan > Scan Using the Scan Functions on Your Brother Machine Scan Using the Scan Functions on Your Brother Machine • Save Scanned Documents on Your Computer • Save Scanned Documents Using Scan to Workflow Function • Save Scanned Documents to a USB Flash Drive •... -
Page 34: Save Scanned Documents On Your Computer
Save Scanned Documents on Your Computer >> ADS-1200/ADS-1250W >> ADS-1700W ADS-1200/ADS-1250W Use Brother iPrint&Scan to change scan settings, such as resolution, file size or scan type. Go to your model's Downloads page on the Brother Solutions Center at support.brother.com to download the latest application. -
Page 35: Save Scanned Documents Using Scan To Workflow Function
Using Scan to Workflow Function Save Scanned Documents Using Scan to Workflow Function Related Models: ADS-1700W ® It is necessary to set up the Scan to Workflow settings using Brother iPrint&Scan (for Windows and Mac) in advance. 1. Load your document. -
Page 36: Save Scanned Documents To A Usb Flash Drive
• Windows Click Brother Utilities on your desktop, and then click the drop-down list and select your model name (if not already selected). Click Tools in the left navigation bar, and then click Remote Setup. • In the Finder menu bar, click Go > Applications > Brother > ADS1200_1250W_1700W, and then double-click the Remote Setup icon. - Page 37 3. Click OK to close the Remote Setup window. 4. Insert a USB flash drive into the machine. 5. Load your document. 6. Press (Scan to USB) on the control panel. The machine starts scanning, and then the scanned data is saved on the USB flash drive. ADS-1700W •...
- Page 38 [Edge Fill For Plastic Card] is only available when scanning from the Card Slot. 4. Press [Start]. The machine starts scanning, and then the scanned data is saved on the USB flash drive. Related Information • Scan Using the Scan Functions on Your Brother Machine...
-
Page 39: Send Scanned Data To An Email Server
Home > Scan > Scan Using the Scan Functions on Your Brother Machine > Send Scanned Data to an Email Server Send Scanned Data to an Email Server Related Models: ADS-1700W Before using this feature, you must first configure your Email Server settings using Web Based Management. - Page 40 • This Brother machine cannot receive email messages. To use the TX Verification feature, you must redirect the return notification to a different email address. Configure the email address using Web Based Management. Access Web Based Management, click the E-mail tab, click SMTP and confirm Device E-mail Address.
-
Page 41: Set Up The Address Book
Home > Scan > Scan Using the Scan Functions on Your Brother Machine > Set Up the Address Book Set Up the Address Book Related Models: ADS-1700W The Address Book feature lets you select an email address to send the scanned data directly. - Page 42 • Windows Click Brother Utilities on your desktop, and then click the drop-down list and select your model name (if not already selected). Click Tools in the left navigation bar, and then click Remote Setup. • In the Finder menu bar, click Go > Applications > Brother > ADS1200_1250W_1700W, and then double-click the Remote Setup icon.
- Page 43 Home > Scan > Scan Using the Scan Functions on Your Brother Machine > Set Up the Address Book > Register an Email Address Using Web Based Management Register an Email Address Using Web Based Management Related Models: ADS-1700W You can register up to 300 email addresses and enter a name for each address.
-
Page 44: Scan To Ftp
Home > Scan > Scan Using the Scan Functions on Your Brother Machine > Scan to FTP Scan to FTP Related Models: ADS-1700W Scan documents directly to an FTP server when you need to share the scanned information. For added convenience, configure different profiles to save your favorite Scan to FTP destinations. - Page 45 Home > Scan > Scan Using the Scan Functions on Your Brother Machine > Scan to FTP > Set up a Scan to FTP Profile Set up a Scan to FTP Profile Related Models: ADS-1700W Set up a Scan to FTP Profile to scan and upload the scanned data directly to an FTP location.
- Page 46 12. Click the Quality drop-down list, and then select a quality setting. When Auto is selected, you can adjust the detection level of color from the Auto Color detect adjust drop-down list. 13. Click the File Type drop-down list, and then select the file type you want to use for the scanned document. 14.
- Page 47 Home > Scan > Scan Using the Scan Functions on Your Brother Machine > Scan to FTP > Upload Scanned Data to an FTP Server Upload Scanned Data to an FTP Server Related Models: ADS-1700W 1. Load your document. 2. Press d or c to display [to FTP/SFTP], and press it.
-
Page 48: Scan To Sftp
Home > Scan > Scan Using the Scan Functions on Your Brother Machine > Scan to SFTP Scan to SFTP Related Models: ADS-1700W Scan documents directly to an SFTP server when you need to share the scanned information. For added convenience, configure different profiles to save your favorite Scan to SFTP destinations. - Page 49 Home > Scan > Scan Using the Scan Functions on Your Brother Machine > Scan to SFTP > Set up a Scan to SFTP Profile Set up a Scan to SFTP Profile Related Models: ADS-1700W Set up a Scan to SFTP Profile to scan and upload the scanned data directly to an SFTP location.
- Page 50 11. Do one of the following: • If you have selected Password, type the password (up to 33 characters) associated with the user name you typed in the Username field. Type the password again in the Retype password field. • If you have selected Public Key, select the authentication type from the Client Key Pair drop-down list.
- Page 51 Home > Scan > Scan Using the Scan Functions on Your Brother Machine > Scan to SFTP > Upload Scanned Data to an SFTP Server Upload Scanned Data to an SFTP Server Related Models: ADS-1700W 1. Load your document. 2. Press d or c to display [to FTP/SFTP], and press it.
-
Page 52: Scan To Network
Home > Scan > Scan Using the Scan Functions on Your Brother Machine > Scan to Network Scan to Network • Set up a Scan to Network Profile • Upload Scanned Data to a Mapped Network Drive (CIFS) Server... - Page 53 Home > Scan > Scan Using the Scan Functions on Your Brother Machine > Scan to Network > Set up a Scan to Network Profile Set up a Scan to Network Profile Related Models: ADS-1700W Set up a Scan to Network Profile to scan and upload scanned data directly to a folder on a Mapped Network Drive (CIFS) server.
- Page 54 15. Select On from the Skip Blank Page option, to remove blank pages of the document from the scanning results. 16. Click the Skip blank page sensitivity drop-down list, and then select a sensitivity level. 17. Turn On the 2-sided Scan setting to scan both sides of the document. 18.
- Page 55 Home > Scan > Scan Using the Scan Functions on Your Brother Machine > Scan to Network > Upload Scanned Data to a Mapped Network Drive (CIFS) Server Upload Scanned Data to a Mapped Network Drive (CIFS) Server Related Models: ADS-1250W/ADS-1700W To upload scanned data directly to a folder on a Mapped Network Drive (CIFS) server, you must set up a Scan to Network Profile.
-
Page 56: Web Services For Scanning On Your Network (Windows ® 7, Windows ® 8 And Windows ® 10)
Home > Scan > Scan Using the Scan Functions on Your Brother Machine > Web Services for Scanning on ® ® ® Your Network (Windows 7, Windows 8 and Windows ® ® Web Services for Scanning on Your Network (Windows 7, Windows ®... - Page 57 Make sure you have installed the Brother software and drivers. • Verify that the host computer and the Brother machine are on the same subnet, or that the router is correctly configured to pass data between the two devices. •...
- Page 58 Brother machine's LCD. Certain characters in the messages displayed on the LCD may be replaced with spaces if the language settings of your OS and your Brother machine are different. 1. Load your document. 2. Press d or c to display [WS Scan], and press it.
- Page 59 The Scan profiles... dialog box appears. 3. Select the scan profile you want to use. 4. Make sure the scanner selected in the Scanner list is a Brother machine that supports Web Services for scanning, and then click the Set as Default button.
-
Page 60: Scan Options Using The Touchscreen
Home > Scan > Scan Using the Scan Functions on Your Brother Machine > Scan Options Using the Touchscreen Scan Options Using the Touchscreen Related Models: ADS-1700W To change scan settings, press [Options]. Option Description 2-sided Scan When using 2-sided scanning, select 2-sided Scan: Long Edge so the layout of the data file’s pages matches your original. -
Page 61: Restrict Scan Functions From External Devices
Home > Scan > Scan Using the Scan Functions on Your Brother Machine > Restrict Scan Functions from External Devices Restrict Scan Functions from External Devices Related Models: ADS-1700W This feature allows you to restrict scan functions from external devices. When you restrict scan functions from external devices, an error message appears on the device and users cannot use those scan functions. -
Page 62: Scan From Your Computer (Windows ® )
> Scan from Your Computer (Windows ® Scan from Your Computer (Windows There are several ways you can use your computer to scan documents on your Brother machine. Use the software applications provided by Brother, or use your favorite scanning application. •... -
Page 63: Scan Using Nuance ™ Paperport ™ 14 Or Other Windows ® Applications
5. From the available Scanners list, select TWAIN: TW-Brother ADS-XXXXX (where ADS-XXXXX is the model name of your machine). To use the WIA driver, select the Brother driver that has "WIA" as the prefix. 6. Select the Display scanner dialog box check box in the Scan or Get Photo panel. - Page 64 8. Adjust the settings in the Scanner Setup dialog box, if needed. 9. Click the Document Size drop-down list, and then select your document size. 10. Click PreScan to preview your image and crop unwanted portions before scanning. 11. Click Start. The machine starts scanning.
- Page 65 ® ™ ™ Home > Scan > Scan from Your Computer (Windows > Scan Using Nuance PaperPort 14 or Other ® ® Windows Applications > TWAIN Driver Settings (Windows ® TWAIN Driver Settings (Windows • Note that the item names and assignable values will vary depending on the machine. •...
- Page 66 3. Scan Type Select from a range of scan color depths. • Auto Automatically detects whether the document uses color and generates a scanned image of it. For documents that mix color and black and white pages, color pages will be scanned in Color mode, while black and white pages will be scanned in Black &...
- Page 67 • Auto Deskew Set the machine to correct document skewing automatically. Auto Deskew feature is automatically set to On if you select Auto for the Document Size. (ADS-1200) Auto Deskew is not available for scanning at resolutions greater than 400 x 400 dpi. •...
- Page 68 Edge Emphasis Make the characters of the original sharper. The following items can be selected when scanning color or gray images: Color Tone Adjustment Edge Emphasis • B&W Image Quality B&W Threshold Adjustment This setting allows you to adjust the image quality when scanning in Black & White mode. Larger values increase the amount of black in the scanned image, while smaller values increase the amount of white.
-
Page 69: Scan Using Windows ® Photo Gallery Or Windows ® Fax And Scan
® ® Home > Scan > Scan from Your Computer (Windows > Scan Using Windows Photo Gallery or ® Windows Fax and Scan ® ® Scan Using Windows Photo Gallery or Windows Fax and Scan ® ® Windows Photo Gallery or Windows Fax and Scan applications are other options that you can use for scanning. - Page 70 ® • WIA Driver Settings (Windows...
- Page 71 ® ® Home > Scan > Scan from Your Computer (Windows > Scan Using Windows Photo Gallery or ® ® Windows Fax and Scan > WIA Driver Settings (Windows ® WIA Driver Settings (Windows 1. Paper source You can select Document Feeder only. 2.
- Page 72 1. Brightness Set the Brightness level by moving the slider to the right or left to lighten or darken the image. If the scanned image is too light, set a lower brightness level and scan the document again. If the image is too dark, set a higher brightness level and scan the document again.
-
Page 73: Scan Using Nuance ™ Power Pdf
® ™ Home > Scan > Scan from Your Computer (Windows > Scan Using Nuance Power PDF ™ Scan Using Nuance Power PDF ™ You can use the Nuance Power PDF application for scanning. It converts the scanned PDF data into other ®... -
Page 74: Scan Using Brother Iprint&Scan (Windows ® )
Click (Start) > All Programs > Brother iPrint&Scan. 2. If your Brother machine is not selected, click the Select your Machine button, and then follow the on-screen instructions to select your Brother machine. 3. Click the Scan icon, and then follow the on-screen instructions to scan your documents. -
Page 75: Scan From Your Computer (Mac)
> Scan from Your Computer (Mac) Scan from Your Computer (Mac) There are several ways you can use your Mac to scan documents on your Brother machine. Use the software applications provided by Brother or your favorite scanning application. •... -
Page 76: Scan Using Brother Iprint&Scan (Mac)
1. In the Finder menu bar, click Go > Applications, and then double-click the iPrint&Scan icon. The Brother iPrint&Scan screen appears. 2. If your Brother machine is not selected, click the Select your Machine button, and then follow the on-screen instructions to select your Brother machine. -
Page 77: Scan Using Twain-Compliant Applications (Mac)
Home > Scan > Scan from Your Computer (Mac) > Scan Using TWAIN-Compliant Applications (Mac) Scan Using TWAIN-Compliant Applications (Mac) You can scan using TWAIN-compliant applications. For more information about the scanning procedure, see the manual for your application. 1. Start your graphics application, and then select the scan operation. The scanner setup dialog box appears. - Page 78 Home > Scan > Scan from Your Computer (Mac) > Scan Using TWAIN-Compliant Applications (Mac) > TWAIN Driver Settings (Mac) TWAIN Driver Settings (Mac) The options and settings available vary depending on the machine. 1. Resolution Select a scanning resolution from the Resolution pop-up menu. Higher resolutions produce a finer scanned image but consume more memory and increase transfer time.
- Page 79 3. Document Size Select the exact size of your document from a selection of preset scan sizes. If you select Custom, you can specify the document size. 4. Adjust Image Click the Adjust Image button for adjusting the image. • Brightness Set the Brightness level by moving the slider to the right or left to lighten or darken the image.If the scanned image is too light, set a lower brightness level and scan the document again.
-
Page 80: Scan Using Apple Image Capture (Ica Driver)
> Scan Using Apple Image Capture (ICA Driver) Scan Using Apple Image Capture (ICA Driver) You can scan a document using the ICA driver. Download and install the ICA driver from Brother Solutions Center at support.brother.com. You can also scan directly using the Image Capture application. - Page 81 2. Select the machine from the list on the left side of the screen. If you connected the Brother machine to your Mac with a USB cable, you will see the machine in the DEVICES area. If connected via a network, you will see it in the SHARED area.
- Page 82 Home > Scan > Scan from Your Computer (Mac) > Scan Using Apple Image Capture (ICA Driver) > ICA Driver Settings ICA Driver Settings To adjust image capture settings, click Show Details. Item names and assignable values may vary depending on the machine. 1.
- Page 83 Kind Configurable Settings Color Brightness, Tint, Temperature, Saturation Black&White Brightness, Contrast Text Threshold Related Information • Scan Using Apple Image Capture (ICA Driver)
-
Page 84: Network
Home > Network Network • Supported Basic Network Features • Network Management Software and Utilities • Additional Methods of Configuring Your Brother Machine for a Wireless Network • Advanced Network Features • Technical Information for Advanced Users... -
Page 85: Supported Basic Network Features
Related Information • Network BRAdmin Light is available as a download from your model's Downloads page at support.brother.com. The default login password to manage machine settings is initpass. We recommend you change it to protect your machine from unauthorized access. -
Page 86: Network Management Software And Utilities
Home > Network > Network Management Software and Utilities Network Management Software and Utilities Configure and change your Brother machine's network settings using a management utility. • Learn about Network Management Software and Utilities... -
Page 87: Learn About Network Management Software And Utilities
) (supported models only) BRAdmin Light is a utility for the initial setup of Brother network-connected devices. This utility can search for Brother products on your network, view the status and configure the basic network settings, such as IP address. -
Page 88: Additional Methods Of Configuring Your Brother Machine For A Wireless Network
Home > Network > Additional Methods of Configuring Your Brother Machine for a Wireless Network Additional Methods of Configuring Your Brother Machine for a Wireless Network • Before Configuring Your Brother Machine for a Wireless Network • Configure Your Machine for a Wireless Network Using the One-Push Method of Wi-Fi ™... -
Page 89: Before Configuring Your Brother Machine For A Wireless Network
Internet provider. • To achieve optimum results with normal everyday document scanning, place the Brother machine as close to the wireless access point/router as possible with minimal obstructions. Large objects and walls between the two devices and interference from other electronic devices can affect the data transfer speed of your documents. -
Page 90: Configure Your Machine For A Wireless Network Using The One-Push Method Of Wi-Fi Protected Setup ™ (Wps)
You have completed the wireless network setup. To install drivers and software necessary for operating your device, go to your model's Downloads page on the Brother Solutions Center at support.brother.com. To configure additional Network Settings, use the Web Based Management. See Related Information: Access Web Based Management. -
Page 91: Configure Your Machine For A Wireless Network Using The Pin Method Of Wi-Fi Protected Setup ™ (Wps)
Home > Network > Additional Methods of Configuring Your Brother Machine for a Wireless ™ Network > Configure Your Machine for a Wireless Network Using the PIN Method of Wi-Fi Protected Setup (WPS) Configure Your Machine for a Wireless Network Using the PIN Method ™... - Page 92 You have completed the wireless network setup. To install drivers and software necessary for operating your device, go to your model's Downloads page on the Brother Solutions Center at support.brother.com. To configure additional Network Settings, use the Web Based Management. See Related Information: Access Web Based Management.
-
Page 93: Configure Your Machine For A Wireless Network Using The Machine's Control Panel Setup Wizard
You have completed the wireless network setup. To install drivers and software necessary for operating your device, go to your model's Downloads page on the Brother Solutions Center at support.brother.com. To configure additional Network Settings, use the Web Based Management. See Related Information: Access Web Based Management. - Page 94 • Access Web Based Management...
-
Page 95: Use Wi-Fi Direct
Home > Network > Additional Methods of Configuring Your Brother Machine for a Wireless Network > Use ® Wi-Fi Direct ® Use Wi-Fi Direct • Scan from Your Mobile Device Using Wi-Fi Direct • Configure Your Wi-Fi Direct Network... - Page 96 Wi-Fi Direct is one of the wireless configuration methods developed by the Wi-Fi Alliance . It allows you to ™ configure a secured wireless network between your Brother machine and a mobile device, such as an Android ® device, Windows device, iPhone, iPod touch, or iPad, without using an access point.
- Page 97 Home > Network > Additional Methods of Configuring Your Brother Machine for a Wireless Network > ® Wi-Fi Direct > Configure Your Wi-Fi Direct Network Configure Your Wi-Fi Direct Network Configure your Wi-Fi Direct network settings from your machine's control panel.
- Page 98 Method of Wi-Fi Protected Setup (WPS). To use Brother iPrint&Scan functionality in a Wi-Fi Direct network configured by one-push configuration using Wi- Fi Direct, or by PIN Method configuration using Wi-Fi Direct, the device you use to configure Wi-Fi Direct must be ™...
- Page 99 ™ • Configure Your Wi-Fi Direct Network Using the PIN Method of Wi-Fi Protected Setup (WPS)
- Page 100 Home > Network > Additional Methods of Configuring Your Brother Machine for a Wireless Network > ® Wi-Fi Direct > Configure Your Wi-Fi Direct Network > Configure Your Wi-Fi Direct Network Using the One- Push Method Configure Your Wi-Fi Direct Network Using the One-Push Method...
- Page 101 Home > Network > Additional Methods of Configuring Your Brother Machine for a Wireless Network > ® Wi-Fi Direct > Configure Your Wi-Fi Direct Network > Configure Your Wi-Fi Direct Network Using the One- ™ Push Method of Wi-Fi Protected Setup...
- Page 102 PIN displayed on your mobile device in the machine. Press [OK]. Follow the instructions. If the PIN is displayed on your Brother machine, enter the PIN in your mobile device. If your mobile device connects successfully, the machine displays [Connected]. You have completed the Wi-Fi Direct network setup.
- Page 103 Home > Network > Additional Methods of Configuring Your Brother Machine for a Wireless Network > ® Wi-Fi Direct > Configure Your Wi-Fi Direct Network > Configure Your Wi-Fi Direct Network Using the PIN ™ Method of Wi-Fi Protected Setup...
- Page 104 Home > Network > Additional Methods of Configuring Your Brother Machine for a Wireless Network > ® Wi-Fi Direct > Configure Your Wi-Fi Direct Network > Configure Your Wi-Fi Direct Network Manually Configure Your Wi-Fi Direct Network Manually Related Models: ADS-1700W If your mobile device does not support Wi-Fi Direct or WPS, you must configure a Wi-Fi Direct network manually.
-
Page 105: Use Wireless Direct
Home > Network > Additional Methods of Configuring Your Brother Machine for a Wireless Network > Use Wireless Direct Use Wireless Direct • Scan from Your Mobile Device Using Wireless Direct • Configure Your Wireless Direct Network Manually... - Page 106 Wireless Direct is one of the wireless configuration methods developed by the Wi-Fi Alliance . It allows you to ™ configure a secured wireless network between your Brother machine and a mobile device, such as an Android ® device, Windows device, iPhone, iPod touch, or iPad, without using an access point.
- Page 107 SSID and Network Key are printed on the label attached to the scanner. • To connect your scanner (used as a standalone device) to a router, a computer connection is required. Download the full driver and software package from the Brother Solutions Center at support.brother.com and follow the instructions.
-
Page 108: Advanced Network Features
Home > Network > Advanced Network Features Advanced Network Features • Synchronize Time with the SNTP Server Using Web Based Management... -
Page 109: Synchronize Time With The Sntp Server Using Web Based Management
Home > Network > Advanced Network Features > Synchronize Time with the SNTP Server Using Web Based Management Synchronize Time with the SNTP Server Using Web Based Management The Simple Network Time Protocol (SNTP) is used to synchronize the time used by the machine for authentication with the SNTP time server. - Page 110 Home > Network > Advanced Network Features > Synchronize Time with the SNTP Server Using Web Based Management > Configure Date and Time Using Web Based Management Configure Date and Time Using Web Based Management Related Models: ADS-1700W Configure the date and time to synchronize the time used by the machine with the SNTP time server. This feature is not available in some countries.
- Page 111 7. Click Submit. Related Information • Synchronize Time with the SNTP Server Using Web Based Management...
- Page 112 4. Click the Protocol menu in the left navigation bar. 5. Select the SNTP check box to activate the settings. 6. Restart your Brother machine to activate the configuration. 7. Next to the SNTP check box, click Advanced Setting and configure your settings as needed.
- Page 113 Option Description If you have a DHCP server in your network, the SNTP server will obtain the address from that server automatically. • STATIC Type the address you want to use. Primary SNTP Server Type the server address (up to 64 characters). Address The secondary SNTP server address is used as a backup to the primary Secondary SNTP Server...
-
Page 114: Technical Information For Advanced Users
Home > Network > Technical Information for Advanced Users Technical Information for Advanced Users • Wireless LAN Error Codes... -
Page 115: Wireless Lan Error Codes
Confirm the Network Name (SSID) and the Network Key (Password). If your router uses WEP encryption, enter the Network Key (Password) used as the first WEP key. Your Brother machine supports the use of the first WEP key only. Related Information •... -
Page 116: Security
Home > Security Security • Lock the Machine Settings • Network Security Features... -
Page 117: Lock The Machine Settings
Home > Security > Lock the Machine Settings Lock the Machine Settings • Setting Lock Overview... -
Page 118: Setting Lock Overview
Home > Security > Lock the Machine Settings > Setting Lock Overview Setting Lock Overview Use the Setting Lock feature to block unauthorized access to machine settings. When Setting Lock is set to On, you cannot access the machine settings without entering the password. Remote Setup will not launch when Setting Lock is set to On. - Page 119 Home > Security > Lock the Machine Settings > Setting Lock Overview > Set or Change the Setting Lock Password Set or Change the Setting Lock Password Related Models: ADS-1700W 1. Press [Settings] > [General Setup] > [Setting Lock]. To change the password, press [Settings] >...
- Page 120 Home > Security > Lock the Machine Settings > Setting Lock Overview > Turn Setting Lock On or Off Turn Setting Lock On or Off Related Models: ADS-1700W Use the Setting Lock feature to block unauthorized access to machine settings. When Setting Lock is set to On, you cannot access the machine settings without entering the password.
-
Page 121: Network Security Features
Home > Security > Network Security Features Network Security Features • Secure Function Lock 3.0 • Manage Your Network Machine Securely Using SSL/TLS • Send an Email Securely... -
Page 122: Secure Function Lock 3.0
Home > Security > Network Security Features > Secure Function Lock 3.0 Secure Function Lock 3.0 • Before Using Secure Function Lock 3.0 • Configure Secure Function Lock 3.0 Using Web Based Management • Configure Public Mode for Secure Function Lock 3.0... - Page 123 Carefully write down your password. If you forget it, you will have to reset the password stored in the machine. For more information about how to reset the password, contact Brother Customer Service. •...
- Page 124 Home > Security > Network Security Features > Secure Function Lock 3.0 > Configure Secure Function Lock 3.0 Using Web Based Management Configure Secure Function Lock 3.0 Using Web Based Management Related Models: ADS-1700W 1. Start your web browser. 2. Type "https://machine's IP address" in your browser's address bar (where "machine's IP address" is the machine's IP address).
- Page 125 Home > Security > Network Security Features > Secure Function Lock 3.0 > Configure Public Mode for Secure Function Lock 3.0 Configure Public Mode for Secure Function Lock 3.0 Related Models: ADS-1700W Use the Secure Function Lock screen to set up Public Mode, which limits the functions available to public users. Public users will not need to enter a password to access the features made available through Public Mode settings.
-
Page 126: Manage Your Network Machine Securely Using Ssl/Tls
Home > Security > Network Security Features > Manage Your Network Machine Securely Using SSL/TLS Manage Your Network Machine Securely Using SSL/TLS • Certificates and Web Based Management... - Page 127 Supported Security Certificate Features • Import and Export a CA Certificate • Manage Multiple Certificates • Create a Self-signed Certificate • ® Install the Self-signed Certificate for Windows users with Administrator Rights • Import and Export the Self-signed Certificate on your Brother Machine...
- Page 128 > Supported Security Certificate Features Supported Security Certificate Features Related Models: ADS-1700W Your Brother machine supports the use of multiple security certificates, which allows secure management, authentication, and communication with the machine. The following security certificate features can be used with the machine: •...
- Page 129 Home > Security > Network Security Features > Manage Your Network Machine Securely Using SSL/ > Certificates and Web Based Management > Import and Export a CA Certificate Import and Export a CA Certificate Related Models: ADS-1700W 1. Start your web browser. 2.
- Page 130 Home > Security > Network Security Features > Manage Your Network Machine Securely Using SSL/ > Certificates and Web Based Management > Manage Multiple Certificates Manage Multiple Certificates Related Models: ADS-1700W The multiple certificate feature allows you to use Web Based Management to manage each certificate installed on your machine.
- Page 131 Home > Security > Network Security Features > Manage Your Network Machine Securely Using SSL/ > Certificates and Web Based Management > Create a Self-signed Certificate Create a Self-signed Certificate Related Models: ADS-1700W 1. Start your web browser. 2. Type "https://machine's IP address" in your browser's address bar (where "machine's IP address" is the machine's IP address).
- Page 132 Home > Security > Network Security Features > Manage Your Network Machine Securely Using SSL/ ® > Certificates and Web Based Management > Install the Self-signed Certificate for Windows users with Administrator Rights ® Install the Self-signed Certificate for Windows users with Administrator Rights Related Models: ADS-1700W...
- Page 133 6. Click Install Certificate…. 7. When the Certificate Import Wizard appears, click Next. 8. Select Place all certificates in the following store, and then click Browse…. 9. Select Trusted Root Certification Authorities, and then click OK. 10. Click Next. 11. Click Finish. 12.
- Page 134 > Import and Export the Self-signed Certificate on your Brother Machine Import and Export the Self-signed Certificate on your Brother Machine You can store the self-signed certificates on your Brother machine and manage them by importing and exporting. • Import the Self-signed Certificate •...
- Page 135 The self-signed certificate is imported to your machine. To use SSL/TLS communication, the self-signed certificate must also be installed on your computer. For more information, contact your network administrator. Related Information • Import and Export the Self-signed Certificate on your Brother Machine...
- Page 136 8. Type the password again in the Retype password field, and then click Submit. 9. Click Save. The self-signed certificate is exported to your computer. You can also import the self-signed certificate to your computer. Related Information • Import and Export the Self-signed Certificate on your Brother Machine...
-
Page 137: Send An Email Securely
8. Follow the instructions in the dialog box to test the current settings. Sending an Email with User Authentication Your Brother machine supports the SMTP-AUTH method to send email via an email server that requires user authentication. This method prevents unauthorized users from accessing the email server. You can use Web Based Management to configure these settings. - Page 138 SSL/TLS Related Information • Network Security Features...
-
Page 139: Brother Iprint&Scan For Windows ® And Mac
® Home > Brother iPrint&Scan for Windows and Mac ® Brother iPrint&Scan for Windows and Mac • Brother iPrint&Scan Overview • Configure Scan to Workflow Settings Using Brother iPrint&Scan... -
Page 140: Brother Iprint&Scan Overview
The actual screen may differ depending on the version of the application. ® • For Windows Go to your model's Downloads page on the Brother Solutions Center at support.brother.com to download the latest application. •... -
Page 141: Configure Scan To Workflow Settings Using Brother Iprint&Scan
Default settings have been configured for scanning from the machine. In the Brother iPrint&Scan home screen, click Machine Scan Settings > Select folder..., and save where applicable. Complete the process by following the on-screen instructions. >> Create a Workflow >>... -
Page 142: Troubleshooting
• Error and Maintenance Messages • Error and Maintenance Indications • Document Jam • Card Jam • If You Are Having Difficulty with Your Machine • Check the Serial Number • Reset Your Brother Machine • Reset the Usage Counters... -
Page 143: Error And Maintenance Messages
The most common error and maintenance messages are shown in the table below. You can correct most errors and clear routine maintenance messages yourself. If you need further information, go to your model's FAQs & Troubleshooting page on the Brother Solutions Center at support.brother.com. Error Message... - Page 144 An error occurred when you used the • Restart Brother iPrint&Scan. to Workflow feature. • Restart the computer. • Brother iPrint&Scan was not installed • Update the machine's firmware. correctly. • Uninstall Brother iPrint&Scan and install it again. Feed Selector Error Feed Selector is set incorrectly.
- Page 145 Error Message Cause Action See Related Information: Upload Scanned Data to a Mapped Network Drive (CIFS) Server. No Document / Card • No document or card is loaded. • Load a document or card. • The Feed Selector is set incorrectly. See Related Information:Load Documents.
- Page 146 ® iPrint&Scan (for Windows and Mac). • Workflow was not configured correctly. See Related Information:Configure Scan to Workflow Settings Using Brother iPrint&Scan. Wrong Network Key The Network Key is incorrect. Confirm the Network Key and try again. Wrong Password The password entered in Setting Lock Enter the correct password.
- Page 147 • Configure Scan to Workflow Settings Using Brother iPrint&Scan...
-
Page 148: Error And Maintenance Indications
• Scan to PC The USB cable is not connected to the machine. Connect the USB cable. (ADS-1250W) When the machine and computer are connected wirelessly, you must configure the Scan to PC settings using Remote Setup. • Scan to USB A USB flash drive is not inserted into the machine. - Page 149 Information:Reset the Usage Counters. Replace the Separation Pad. See Related Information:Replace the Separation Pad. Clean the Sensors. See Related Information:Clean the Sensors. ® For more information about errors, check your machine’s status in Brother iPrint&Scan (for Windows Mac). Related Information • Troubleshooting •...
- Page 150 ® • Brother iPrint&Scan for Windows and Mac...
-
Page 151: Service Call Indications
If there is an error that you cannot clear yourself, the machine will indicate the need for a service call by lighting up the Power Indicator and blinking the Error Indicator as shown. Error Indicator Power Indicator If you see the service call indication shown, contact your Brother dealer or Brother Customer Service. Related Information • Error and Maintenance Indications... -
Page 152: Document Jam
Home > Troubleshooting > Document Jam Document Jam Documents can jam in the ADF unit if they are not inserted or fed correctly, if they are too long, or if multiple pages are fed at the same time (multifeed). 1. Remove any paper from the ADF that is not jammed. 2. - Page 153 Make sure your document is acceptable for the machine. Load your document correctly. Load no more than 20 pages at a time. When using long paper, to avoid a paper jam, you must select the Long Paper option from the Document Size menu.
-
Page 154: Card Jam
Home > Troubleshooting > Card Jam Card Jam Cards can jam in the Card Slot if they are not inserted or fed correctly. 1. Open the Top Cover (1) and the Front Cover (2). 2. Remove the jammed card. 3. Close the Front Cover. 4. -
Page 155: If You Are Having Difficulty With Your Machine
If You Are Having Difficulty with Your Machine You can correct most problems yourself. If you think there is a problem with your machine, check the topics below. If you need additional help, the Brother Solutions Center offers the latest FAQs & Troubleshooting tips at support.brother.com. -
Page 156: Scanning And Other Problems
Cause Suggestions TWAIN or WIA errors The TWAIN or WIA driver has not Make sure the Brother TWAIN or WIA driver is appear when starting to been selected as the primary source selected as the primary source in your scanning ®... - Page 157 The document was curled. Straighten the curled document and scan again. The Pick Up Roller cover film is Contact your Brother dealer or Brother Customer folded or removed. Service to replace the Pick Up Roller Cover. The Separation Pad is not set Make sure the Separation Pad is set correctly.
- Page 158 Make sure the Separation Pad is set correctly. correctly or the rubber part of the Separation Pad is folded. The Pick Up Roller cover film is Contact your Brother dealer or Brother Customer folded or removed. Service to replace the Pick Up Roller Cover. Cannot scan.
- Page 159 Bus Power using Bus Power Mode. then try to scan. Mode. Cannot Scan to The Scan to Workflow settings are not Configure the settings using Brother iPrint&Scan Workflow from the configured within Brother iPrint&Scan ® (for Windows and Mac).
- Page 160 If You Are Having Difficulty with Your Machine • Clean the Scanner and Rollers • Secure Function Lock 3.0 • Acceptable Documents • Card Jam • Clean the Sensors ® • Brother iPrint&Scan for Windows and Mac • Configure Scan to Workflow Settings Using Brother iPrint&Scan...
-
Page 161: Network Problems
If You Cannot Complete the Wireless Network Setup Configuration • Your Scanner Cannot Be Detected on the Network During Installation • Your Brother Machine Cannot Scan over the Network • If You Want to Check that Your Network Devices are Working Correctly... - Page 162 Brother machine or the mobile device. If you have checked and Turn your Brother machine off and back on. Then try to configure the Wi-Fi Direct tried all of the actions, but Wi-Fi Direct settings again.
- Page 163 Related Information • Network Problems...
- Page 164 The privacy separator on your Wi-Fi router may be enabled. Disable the privacy separator. Your Brother machine is placed Place your Brother machine within about 3.3 feet (1 meter) of the Wireless too far from the Wireless access access point/router when you configure the wireless network settings.
- Page 165 See the instruction manual that came with your third-party Security/Firewall Software or contact the software manufacturer. • Reinstall the driver. Your security software blocks The following port numbers are used for Brother network features: your machine's access to the • Network scanning, Remote Setup network.
- Page 166 If you have checked and tried all of the actions, but your Brother machine still cannot scan, uninstall the Brother software and drivers and reinstall them. Related Information • Network Problems • Your Scanner Cannot Be Detected on the Network During Installation •...
- Page 167 Connection Failed, ask your network administrator whether your IP address is valid or not. Check that you can "ping" the Ping the Brother machine from your computer using the IP address or the node name Brother machine from your ®...
-
Page 168: Check The Serial Number
• Windows Click Brother Utilities on your desktop, and then click the drop-down list and select your model name (if not already selected). Click Tools in the left navigation bar, and then click Remote Setup. • In the Finder menu bar, click Go > Applications > Brother > ADS1200_1250W_1700W, and then double-click the Remote Setup icon. - Page 169 Related Information • Troubleshooting...
-
Page 170: Reset Your Brother Machine
• Windows Click Brother Utilities on your desktop, and then click the drop-down list and select your model name (if not already selected). Click Tools in the left navigation bar, and then click Remote Setup. • In the Finder menu bar, click Go > Applications > Brother > ADS1200_1250W_1700W, and then double-click the Remote Setup icon. -
Page 171: Reset The Usage Counters
• Windows Click Brother Utilities on your desktop, and then click the drop-down list and select your model name (if not already selected). Click Tools in the left navigation bar, and then click Remote Setup. • In the Finder menu bar, click Go > Applications > Brother > ADS1200_1250W_1700W, and then double-click the Remote Setup icon. -
Page 172: Routine Maintenance
Home > Routine Maintenance Routine Maintenance • Clean Your Brother Machine • Replace Supplies • Pack and Ship Your Brother Machine... -
Page 173: Clean Your Brother Machine
Home > Routine Maintenance > Clean Your Brother Machine Clean Your Brother Machine • Clean the Outside of the Machine • Clean the Scanner and Rollers • Clean the Sensors... -
Page 174: Clean The Outside Of The Machine
Home > Routine Maintenance > Clean Your Brother Machine > Clean the Outside of the Machine Clean the Outside of the Machine 1. Turn off and unplug the machine from the AC power outlet. 2. Wipe the Top Cover and the Control Panel with a dry, soft, lint-free cloth to remove dust. -
Page 175: Clean The Scanner And Rollers
Home > Routine Maintenance > Clean Your Brother Machine > Clean the Scanner and Rollers Clean the Scanner and Rollers A spot of dirt or correction fluid on the glass strip may cause poor quality scans. Clean the scanner and rollers if a vertical line appears in the scanned data or if areas are missing in the scanned data. - Page 176 5. Slide the Pick Up Roller(1) to the right edge. 6. Pinch and pull the Pick Up Roller out of the machine. 7. Clean the Pick Up Roller with a soft, lint-free cloth slightly moistened with water. 8. Place the Pick Up Roller into the machine. Confirm the left and right sides of the Pick Up Roller before attaching it.
- Page 177 After the glass strip is cleaned, the the scanned sample shows a vertical line is gone. vertical line. Related Information • Clean Your Brother Machine • Error and Maintenance Indications • Document Jam • Scanning and Other Problems...
-
Page 178: Clean The Sensors
Home > Routine Maintenance > Clean Your Brother Machine > Clean the Sensors Clean the Sensors 1. Turn off and unplug the machine from the AC power outlet. 2. Open the Top Cover (1) and the Front Cover (2). 3. Wipe off the paper dust accumulated on the Document Scanning Position Sensor (1) with a soft lint-free cloth moistened with water. -
Page 179: Replace Supplies
Home > Routine Maintenance > Replace Supplies Replace Supplies • Supplies • Check Supplies Replacement Cycle • Replace the Pick Up Roller • Replace the Separation Pad... -
Page 180: Supplies
These parts are available through Brother retailers. If you cannot find the part you need and you have a Visa, MasterCard, Discover, or American Express credit card, you can order parts directly from Brother. Visit us online for a complete selection of the Brother parts and supplies that are available for purchase. -
Page 181: Check Supplies Replacement Cycle
• Windows Click Brother Utilities on your desktop, and then click the drop-down list and select your model name (if not already selected). Click Tools in the left navigation bar, and then click Remote Setup. • In the Finder menu bar, click Go > Applications > Brother > ADS1200_1250W_1700W, and then double-click the Remote Setup icon. - Page 182 If the touchscreen indications warn you to replace the Pick Up Roller, order the necessary parts and then replace the used parts with new ones. Related Information • Replace Supplies...
-
Page 183: Replace The Pick Up Roller
Home > Routine Maintenance > Replace Supplies > Replace the Pick Up Roller Replace the Pick Up Roller Your machine is equipped with a scan counter that automatically counts how many times the machine has scanned. After approximately 100,000 scans, you may have to replace the Pick Up Roller. 1. - Page 184 Confirm the left and right sides of the Pick Up Roller before attaching it. 6. Slide the Pick Up Roller(1) to the left edge while turning the Pick Up Roller. 7. Close the Pick Up Roller Cover. 8. Close the Front Cover. 9.
-
Page 185: Replace The Separation Pad
Home > Routine Maintenance > Replace Supplies > Replace the Separation Pad Replace the Separation Pad Your machine is equipped with a scan counter that automatically counts how many times the machine has scanned. After approximately 10,000 scans, you may have to replace the Separation Pad. 1. - Page 186 4. Close the Front Cover and the Top Cover. Confirm the following: • The Separation Pad Count value is 0. Related Information • Replace Supplies • Reset the Usage Counters...
-
Page 187: Pack And Ship Your Brother Machine
Home > Routine Maintenance > Pack and Ship Your Brother Machine Pack and Ship Your Brother Machine When you transport the machine, use the packing materials that came with your machine. If you do not pack the machine correctly, any damage that may occur in transit may not be covered by your warranty. - Page 188 If you are returning your machine to Brother as part of the Exchange Service, pack only the machine. Keep all the separate parts (for example: power cord) and printed materials to use with your “Exchange” machine. 4. Close the carton and tape it shut.
-
Page 189: Machine Settings
Home > Machine Settings Machine Settings • Change Machine Settings from the Control Panel • Change Machine Settings from Your Computer... -
Page 190: Change Machine Settings From The Control Panel
Home > Machine Settings > Change Machine Settings from the Control Panel Change Machine Settings from the Control Panel • In the Event of Power Failure (Memory Storage) • Change the General Settings from the Control Panel • Save Your Favorite Settings as a Shortcut... -
Page 191: In The Event Of Power Failure (Memory Storage)
Home > Machine Settings > Change Machine Settings from the Control Panel > In the Event of Power Failure (Memory Storage) In the Event of Power Failure (Memory Storage) Related Models: ADS-1700W • Your menu settings are stored permanently and, in the event of a power failure, will not be lost. •... -
Page 192: Change The General Settings From The Control Panel
Home > Machine Settings > Change Machine Settings from the Control Panel > Change the General Settings from the Control Panel Change the General Settings from the Control Panel Related Models: ADS-1700W Purpose Operation Description Adjust the LCD Backlight Brightness Adjust the brightness of the Settings >... - Page 193 Purpose Operation Description Auto Power Off will be activated when all of these conditions are met: • Auto Power Off setting is not set to Off. • The machine has been in Sleep Mode for more than the preset period. Turn the Auto Start Scan Mode On Scanning starts automatically using Settings >...
-
Page 194: Save Your Favorite Settings As A Shortcut
Home > Machine Settings > Change Machine Settings from the Control Panel > Save Your Favorite Settings as a Shortcut Save Your Favorite Settings as a Shortcut • Add Shortcuts • Change or Delete Shortcuts... - Page 195 Home > Machine Settings > Change Machine Settings from the Control Panel > Save Your Favorite Settings as a Shortcut > Add Shortcuts Add Shortcuts Related Models: ADS-1700W Use the Shortcuts feature to create Shortcuts for frequently-used operations, such as Scan to USB, Scan to Email Server, Scan to Network and Scan to FTP/SFTP.
- Page 196 Home > Machine Settings > Change Machine Settings from the Control Panel > Save Your Favorite Settings as a Shortcut > Change or Delete Shortcuts Change or Delete Shortcuts Related Models: ADS-1700W 1. Press [Settings] > [Shortcut Settings], and select the Shortcut you want to change. 2.
-
Page 197: Change Machine Settings From Your Computer
Home > Machine Settings > Change Machine Settings from Your Computer Change Machine Settings from Your Computer • Change Machine Settings Using Web Based Management • Change the Machine Settings Using Remote Setup... -
Page 198: Change Machine Settings Using Web Based Management
Home > Machine Settings > Change Machine Settings from Your Computer > Change Machine Settings Using Web Based Management Change Machine Settings Using Web Based Management • What is Web Based Management? • Access Web Based Management • Set a Login Password for Web Based Management... - Page 199 Home > Machine Settings > Change Machine Settings from Your Computer > Change Machine Settings Using Web Based Management > What is Web Based Management? What is Web Based Management? Related Models: ADS-1700W Web Based Management is a utility that uses a standard web browser to manage your machine using the Hyper Text Transfer Protocol (HTTP) or Hyper Text Transfer Protocol over Secure Socket Layer (HTTPS).
- Page 200 Home > Machine Settings > Change Machine Settings from Your Computer > Change Machine Settings Using Web Based Management > Access Web Based Management Access Web Based Management Related Models: ADS-1700W • We recommend using the HTTPS security protocol when configuring settings using Web Based Management.
- Page 201 Home > Machine Settings > Change Machine Settings from Your Computer > Change Machine Settings Using Web Based Management > Set a Login Password for Web Based Management Set a Login Password for Web Based Management Related Models: ADS-1700W We recommend setting a login password to prevent unauthorized access to Web Based Management. 1.
-
Page 202: Change The Machine Settings Using Remote Setup
The Remote Setup program lets you configure many of your Brother machine's settings from your computer. When you start Remote Setup, the settings on your Brother machine will be downloaded to your computer and displayed on your screen. If you change the settings on your computer, you can upload them directly to the machine. - Page 203 Change Machine Settings from Your Computer > Change the Machine Settings ® Using Remote Setup > Remote Setup (Windows ® Remote Setup (Windows • ® Set Up the Brother Machine Using Remote Setup (Windows • Change the General Settings Using Remote Setup...
- Page 204 Set Up the Brother Machine Using Remote Setup (Windows 1. Click Brother Utilities on your desktop, and then click the drop-down list and select your model name (if not already selected). Click Tools in the left navigation bar, and then click Remote Setup.
- Page 205 Apply Click to upload data to the machine without exiting the Remote Setup Program. 3. Click OK. • If your computer is protected by a firewall and is unable to use Remote Setup, you may need to configure the firewall settings to allow communication through port numbers 52515-52614. ®...
- Page 206 Home > Machine Settings > Change Machine Settings from Your Computer > Change the Machine Settings ® Using Remote Setup > Remote Setup (Windows > Change the General Settings Using Remote Setup Change the General Settings Using Remote Setup Purpose ®...
- Page 207 > Change Machine Settings from Your Computer > Change the Machine Settings Using Remote Setup > Remote Setup (Mac) Remote Setup (Mac) • Set Up the Brother Machine Using Remote Setup (Mac) • Change the General Settings Using Remote Setup...
- Page 208 > Set Up the Brother Machine Using Remote Setup (Mac) Set Up the Brother Machine Using Remote Setup (Mac) 1. In the Finder menu bar, click Go > Applications > Brother > ADS1200_1250W_1700W, and then double- click the Remote Setup icon.
- Page 209 Cancel Click to exit the Remote Setup Program without uploading data to the machine. Apply Click to upload data to the machine without exiting the Remote Setup Program. 4. When finished, click OK. Related Information • Remote Setup (Mac)
- Page 210 Home > Machine Settings > Change Machine Settings from Your Computer > Change the Machine Settings Using Remote Setup > Remote Setup (Mac) > Change the General Settings Using Remote Setup Change the General Settings Using Remote Setup Purpose ® Description Operation (Windows /Mac)
-
Page 211: Appendix
Home > Appendix Appendix • Specifications • Enter Text on Your Brother Machine... -
Page 212: Specifications
Specifications General Specifications Memory Capacity Standard ADS-1200: 256 MB ADS-1250W/ADS-1700W: 512 MB Power Source 100 - 120 V AC 50/60 Hz 220 - 240 V AC 50/60 Hz Touchscreen 2.8 in. (71.1 mm) TFT Color LCD Touchscreen LCD (Liquid Crystal Display) - Page 213 11.81 in. (300 mm) 8.16 in. (207.2 mm) Approx. Weights ADS-1200: 3 lb (1.36 kg) ADS-1250W: 3.02 lb (1.37 kg) ADS-1700W: 3.11 lb (1.41 kg) Temperature Operating 41 °F to 95 °F (5 °C to 35 °C) Storage 32 °F to 104 °F (0 °C to 40 °C)
- Page 214 Gray Scale 256 levels Max. Speed For detailed specifications, visit www.brother.com. For the latest driver updates for the version of macOS you are using, visit support.brother.com. Direct Scan Feature (Scan to USB) Specifications Compatible Media USB flash drive 1 Interface Interface USB 2.0 Hi Speed...
- Page 215 Supported Protocols and Security Features (ADS-1250W/ADS-1700W) Protocol (IPv4) ADS-1250W: DHCP, APIPA (Auto IP), WINS/NetBIOS name resolution, DNS Resolver, mDNS, SNMPv1/v2c, ICMP, Web Services (Scan) ADS-1700W: DHCP, APIPA (Auto IP), WINS/NetBIOS name resolution, DNS Resolver, mDNS, LLMNR responder, SMTP Client, FTP Client, CIFS Client, SNMPv1/v2c/v3, HTTP/...
- Page 216 For the latest driver updates, visit support.brother.com. All trademarks, brand and product names are property of their respective companies. Related Information • Appendix...
-
Page 217: Enter Text On Your Brother Machine
> Enter Text on Your Brother Machine Enter Text on Your Brother Machine Related Models: ADS-1700W When you must enter text on your Brother machine, a keyboard appears on the touchscreen. • The characters that are available may differ depending on your country. - Page 218 Brother International Corporation 200 Crossing Boulevard P.O. Box 6911 Bridgewater, NJ 08807-0911 USA Brother International Corporation (Canada) Ltd. 1 rue Hôtel de Ville, Dollard-des-Ormeaux, QC, Canada H9B 3H6 Visit us on the World Wide Web www.brother.com USA/CAN Version 0...
Need help?
Do you have a question about the ADS-1250W and is the answer not in the manual?
Questions and answers
how do i connect to wifi?