
Subscribe to Our Youtube Channel
Related Manuals for IWAKI PUMPS MDE Series


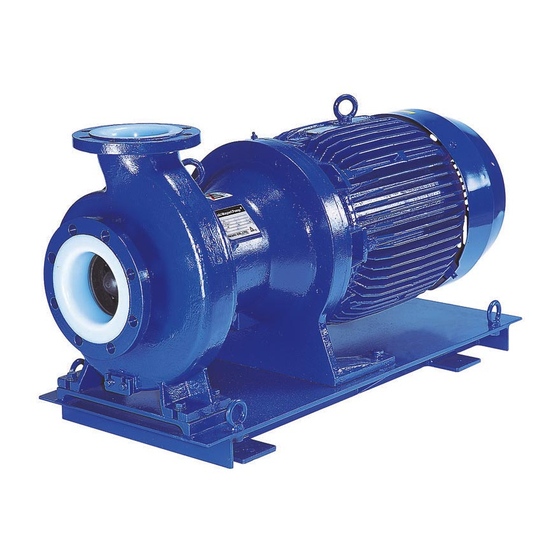
Summary of Contents for IWAKI PUMPS MDE Series
- Page 1 IWAKI Magnetic Drive Pump MDE Series (18.5~45kW-2P, 11~30kW-4P) Instruction Manual Read this manual before use of product...
-
Page 2: Table Of Contents
Thank you for selecting the Iwaki Magnetic Drive Pump type MDE. This instruction manual has been prepared to ensure correct and safe handling of the pump. Please read this manual carefully and thoroughly prior to operating the pump. Pay special attention to the "Safety Instruction to Prevent Personal Injuries", "Warning" and "Caution"... -
Page 3: Important Instructions
IMPORTANT INSTRUCTIONS Important notes and statements for safe operation, preventing physical injury, and property damage, are included on the body of the product and in the attached instruction manual. Always Observe These Safety Instructions! Safety Instruction to Prevent Personal Injuries Ignoring this message can lead to improper Warning handling resulting in death or serious injury to the... - Page 4 Safety Section WARNING ● Damaged or deteriorated tools are very dangerous. Use qualified and suitable tools only. Caution ● Use of protectors: When disassembling, assembling, and conducting maintenance or when handling a dangerous type of liquid or a liquid of unknown property, be sure to wear safety gloves, a helmet, and protective shoes.
- Page 5 Safety Section WARNING ● Do not allow toxic substances such as lubricants, solvents, or similar sub- stances to flow into the local sewage system or river systems. Do not drain hazardous liquids such as chemical solutions discharged out of the pump directly onto the ground.
- Page 6 Safety Section CAUTION ● Ventilate! Poisoning may result during an operation which involves toxic or odorous liquid. Ventilate the operating site sufficiently. Caution ● Spill-out prevention measures Appropriate protective measures should be taken against any spill-out accidents involving the operating liquid as a result of unexpected damage to the pump or the piping.
- Page 7 Safety Section CAUTION ● Do not install or store the pump in the following places. • Places where flammable gas, dust or material is used or placed. • Places where corrosive gas (chlorine gas or the like) is generated. • Places where the ambient temperature is extremely high (40 °C or higher) or Prohibited extremely low, 0 °C or lower.
-
Page 8: Outline Of Product
OUTLINE OF PRODUCT 1. Before Using Pump ......7 2. Operating Principle ......7 3. Identification Codes ......8 4. Specifications and Outer Dimensions ....... 9~10 5. Names of Parts ......11~14 - 6 -... -
Page 9: Before Using Pump
1. Before Using Pump After unpacking, check the following points to confirm that the delivered product and its accompanying parts and ele- Iwaki Magnet Pump ments are exactly what you ordered. MODEL HEAD CAPACITY (ℓ/ min) When lifting the pump please follow the procedure men- MFG.No. -
Page 10: Identification Codes
3. Identification Codes Example: MDE 65 - 200 E K V F 185 J - D 2 Nominal bore size (Suction × Discharge) 65: 80A × 65A, 80: 100A × 80A, 125: 150A × 125A Nominal Impeller size 120 ~ 250 Materials of liquid-contact parts E: ETFE Materials of bearing and spindle... -
Page 11: And Outer Dimensions
4. Specifications and Outer Dimensions ■ Outer dimensions in mm Flange mounted Motor type 4- ø27 Mass W/O Motor Output Model Motor (kW) (kg) 18.5 kW-2P 22 kW-2P 65A 80A MDE65 30 kW-2P 37 kW-2P 18.5 kW-2P 22 kW-2P 80A 100A MDE80 740 1200 230 30 kW-2P... - Page 12 ■ Outer dimensions in mm Foot mounted Motor type 4- ø23 ( ø27/37kW or more) Total Mass Motor Output Model including motor (kW) (kg) 18.5 kW-2P 22 kW-2P 230 740 1135 198 65A 80A MDE65 30 kW-2P 37 kW-2P 670 245 18.5 kW-2P 840 1250 205 22 kW-2P...
-
Page 13: Names Of Parts
5. Names of Parts ■ Flange mounted Motor type (MDE65•80) 901.8 554.1 554.3 801 901.2 908.2 100.1 412.2 412.1 922.1 901.1 550.1 554.2 400.4 901.3 554.4 370.1 903.5 400.2 400.1 554.7 550.3 901.6 Remark Remark Parts Name Q'ty Material Parts Name Q'ty Material 4 or 8... - Page 14 ■ Foot mounted Motor type (MDE65•80) 901.8 554.1 554.3 940.2 321.2 940.1 100.1 908.2 908.1 901.2 412.2 412.1 922.1 550.1 554.2 901.1 400.4 901.7 901.5 901.4 321.1 901.3 932.1 370.1 400.2 901.6 550.3 554.7 932.2 903.5 400.1 554.6 554.8 554.5 550.2 554.4 Parts Name...
- Page 15 ■ Flange mounted Motor type (MDE125) 901.8 554.1 554.3 901.2 908.2 100.1 412.2 922.1 412.1 400.4 901.1 550.1 554.2 901.6 550.3 554.7 901.3 370.1 903.5 901.13 400.2 400.1 554.4 554.13 Parts Name Q'ty Material Remark Parts Name Q'ty Material Remark 554.4 FRONT CASING ETFE+FCD400...
- Page 16 ■ Description on Main Unit Body and Label "Assemble Carefully" indicator label Parts may be pulled together by magnetic force. Take steps to ensure that your finger is not caught between the parts. (Refer to the "Maintenance" Section.) Motor nameplate Use only the power voltage specified on the nameplate.
-
Page 17: Pump Operation
PUMP OPERATION 1. Handling Instructions ....16~19 2. Installation ........20~24 3. Wiring ..........25 4. Protection ......... 25 5. Operation Step ......26~29 - 15 -... -
Page 18: Handling Instructions
1. Handling Instructions (Observe all the following instructions to prevent injuries and accidents.) Warning ● When the pumps are used to transfer the dangerous liquids mentioned as below, the pumps always must be checked and watched so that the liquids can not be leaked. The operation of the pumps leaking the liquids may result in personal injury and/or explosion, fire accidents. - Page 19 Keep the pump away from fire To prevent fire and explosions, do not place dangerous or inflammable substances near the pump. If pump is damaged Do not operate a damaged pump, otherwise there may be electricity leakage or electric shocks. No remodeling Never try to remodel the pump.
- Page 20 [11] Influence of specific gravity and viscosity of liquid on pump performance If the specific gravity or viscosity of the liquid is higher than that of pure water, the shaft power, discharge volume, and pump head may vary somewhat. The delivered pump has been prepared to meet the specifications ordered by the user.
- Page 21 [16] Operation within range of drooping head capacity curve In the case of a pump which generates a drooping head capacity curve in a low-capacity range, do not operate the pump in the section where the line droops to the left. (Refer to the standard performance curve to verify the head capacity.) If the drooping section (left side) of the head capacity curve is part of the pump operation specifications, design the piping with the following points in mind.
-
Page 22: Installation
2. Installation Installation position • I nstall the pump as close to the suction tank as possible and in the lowest position available (for flooded suc- tion). • I f the suction port of the pump is to be positioned higher than the suction tank (for suction lift), be sure to arrange for a foot valve in the priming pipe and suction pipe. * The lift head depends upon the liquid properties, temperature, and length of the suction piping. For details of the setup, consult Iwaki or your dealer. - Page 23 Example of piping 16 13 Discharge pipe (Support the pump to keep the (11) Suction pipe (pipe diameter:D) pump free of piping load.) (The horizontal section should be as short as Valve possible and there should be an ascending gra- Check valve dient of 1/100 toward the pump.) Pressure gauge...
- Page 24 ■ Suction piping The suction pipe should employ the flooded suction method if possible. The shortest and thickest pipe possible, with the minimum number of bends, should be used. Arrange a proper support under the suction pipe such as an expansion joint or the like so that the weight and thermal stress of the pipe are not applied to the pump. Attach the coupling on the suction pipe carefully so as not to allow air inside the line.
- Page 25 If the diameters of the pump suction port and the suction pipe are different, use an eccentric reducer pipe. Connect the eccentric reducer pipe so that the upper surface is level. In any case, never use a suction pipe with a diameter smaller than that of the suction port.
- Page 26 It is recommended that a gate valve be installed on the discharge pipe for the adjustment of discharge volume and for the prevention of overload onto the motor. When installing both a check valve and a gate valve, the check valve should be positioned between the pump and the gate valve. Do not fail to install a pressure gauge on the discharge piping.
-
Page 27: Wiring
Moment of suction piping Dia. of pipe (mm) Direction of load kN•m kN•m kN•m 0.95 1.33 2.30 0.72 1.00 1.76 0.47 0.68 1.18 Moment of discharge piping Dia. of pipe (mm) Direction of load kN•m kN•m kN•m 0.35 0.95 2.30 0.46 0.72 1.76... -
Page 28: Operation Step
5. Operation Step ■ Operation instructions Never operate the pump dry or with the suction-side valve (gate valve) closed. Otherwise, the inside of the pump will be damaged. In the event of cavitation, stop the pump within a minute. In addition, do not continue pump operation with air mixed into the suction side. If the magnet coupling disconnects, stop the pump within a minute. - Page 29 [10] Sound generated by pump The level of sound generated by each type of pump is shown in the table. Arrange muffling measures in accordance with the sound level. The procedure for sound measurement conforms to the EN 31201 (ISO11201). (dB) Model Sound...
- Page 30 ■ Operating Procedures Operate the pump in accordance with the following procedures. Check and operation procedure Remarks • Open/close the valves. • Suction valve: Open fully • Discharge valve: Closed fully • Prime the pump. • C heck to ensure that the pump is filled with liquid. (The pump must be filled with liquid before operation.) Make sure to discharge air from inside of the pump through air-bleeding piping.
- Page 31 ■ Stoppage Check/Operation Step Remarks Close discharge valve gradually. Do not cause sudden closure with solenoid valve, • • etc., otherwise pump may be destroyed by water hammer action which is likely in case of long dis- charge piping. Turn off the power and stop pump operation. Observe carefully whether the motor fan slowly and •...
-
Page 32: Maintenance
MAINTENANCE 1. Causes of Trouble and Troubleshooting ....31~33 2. Maintenance and Inspection ..34~36 3. Consumable Parts ......37 4. Disassembly and Assembly ..38~53 - 30 -... -
Page 33: And Troubleshooting
1. Causes of Trouble and Troubleshooting Refer to "1 causes of Trouble and Troubleshooting" Consult supplier for more information. If you find any troubles, turn off the power supply immediately. Symptom on pump Problem Causes Inspection and Measures When Discharge When Discharge Valve is Closed Valve is Opened... - Page 34 Symptom Inspection and Measures Problem Causes When Discharge When Discharge Valve is Closed Valve is Opened ● A ir is trapped in suction ○ I nspect setup condition of suc- Pointer of pipe. vacuum gauge tion pipe and modify it if neces- sary. indicates extraordinarily high value. ● I nlet section of impeller ○ D isassemble unit partially and unit is clogged with foreign...
- Page 35 Symptom Problem Cause Inspection and Measures When Discharge When Discharge Valve is Closed Valve is Opened ● V oltage is lowered. ○ C heck whether the voltage and frequency levels are adequate. ● O verload. ○ C heck whether the specific grav- ity and viscosity of liquid are Motor is over- adequate.
-
Page 36: Maintenance And Inspection
When inspection, overhauling, or repair work is necessary, stop the pump operation and contact the supplier. The overhauling and repair work for Iwaki pumps must be performed by qualified personnel who have been trained and certified by the pump supplier. User's failure to observe this instruction exempts Iwaki from the responsibility for personal injury or damage to the equipment or facility which result from its misuse. - Page 37 Inspection Timing Part Name Check Points Drive magnet unit ● Are there slide-scratches? ● Is housing fixed normally? Is hex socket set screw loose? ● Are inner perimeter of magnet and motor shaft coaxial? (Max. eccentricity: 1/l0 mm) Rear casing, ● Are there slide-scratches? Rear casing cover ●...
- Page 38 ■ Wear limit of sliding parts * Replace the parts with new ones when the dimensional difference between the inner diameter of the bearing and the outer diameter of the sleeve exceeds 1 mm, irrespective of the guideline indicated below. Name of part Upon shipment Upon replacement...
-
Page 39: Consumable Parts
3. Consumable Parts Parts listed below are consumable parts. The parts must be replaced according to the time to be replaced shown as below. When placing an order, supply the following information. Name of parts and parts code. Pump model number and manufacturing number (as indicated on the pump nameplate) Drawing number if you have received the Iwaki-approved drawing Parts code Time... -
Page 40: Disassembly And Assembly
4. Disassembly and Assembly ■ Disassembly and assembly of MDE65/80 type pump (built with a flange motor) Warning ● Wear protectors If you touch or otherwise come into contact with certain types of hazardous chemi- cal liquids, including but not limited to chemicals, you may experience serious inju- ry to those parts of the body so exposed. - Page 41 [3] Screw in the two attached bolts (M16x100) through the screw holes in the bracket (330) from the motor side to drive out the screwed split plate (337) to get the split plate separated off the bracket. Rotate the bolts alternately. When the split plate (337) is driven out sufficiently, hold the split plate and lift the motor and pump units with a crane.
- Page 42 [6] Rotate the impeller nut (922) counterclockwise to remove it. Next, remove the impeller lock nut (922.1). Then, remove the impeller (230) from the split plate and magnet capsule unit (859). CAUTION The magnet used in the pump has high magnetic power.
- Page 43 [2] Assemble the split plate (337) from the spindle side of the magnet capsule unit (859). Be careful not to scratch the sleeve (370) or the sliding surface of the bushing (540). Next, install the O ring (412.2) on the magnet capsule unit (859) and insert the impeller (230) and key (940) to the magnet capsule unit.
- Page 44 [5] Set the attached bolts (M16x100) fully into the bracket in advance. CAUTION Remove any foreign matter on the drive magnet unit. Use only the attached bolts. Otherwise, the magnet capsule may be pulled by the magnet force and damage the part. [6] Use a crane to lift the pump and the motor over the base.
-
Page 45: Disassembly And Assembly
■ Disassembly and assembly of MDE65/80 type pump (built with a coupling motor) Warning ● Wear protectors If you touch or otherwise come into contact with certain types of hazardous chemi- cal liquids, including but not limited to chemicals, you may experience serious inju- ry to those parts of the body so exposed. - Page 46 [3] Remove the hex head bolts (901.3) on the rear support (183) of the bearing housing (350). Next, remove the hex head bolts (901.8) and nuts (920) on the front cas- ing. [4] Screw in the two attached bolts (M16x100) through the screw holes in the bracket (330) to drive the screwed split plate (337) to separate it from the bracket.
- Page 47 [7] Rotate the impeller nut (922) counterclockwise to remove it. Next, remove the impeller lock nut (922.1). Then, remove the impeller (230) from the split plate and magnet capsule unit (859). CAUTION The magnet used in the pump has high magnetic power.
- Page 48 [8] Assemble the split plate (337) from the spindle side of the magnet capsule unit (859). Be careful not to scratch the sleeve (370) or the sliding surface of the bushing (540). Next, install the O ring (412.2) on the magnet capsule unit (859) and insert the impeller (230) and key (940) to the magnet capsule unit.
- Page 49 [11] Set the attached bolts (M16x100) fully into the bracket in advance. CAUTION Remove any foreign matter on the drive magnet unit. Use only the attached bolts. Otherwise, the magnet capsule may be pulled by the magnet force and damage the part. [12] Hold the bracket lifted with a crane over the base.
- Page 50 [14] Install the rear support (183) on the base (890). Then, connect the pump unit and the motor (800) by using the coupling spacer. [15] Center the coupling within the following adjustment ranges. 18.5~22kW 21.5N•m Coupling Fastening torque 30~45kW 41.5N•m [16] After centering adjustment, attach the coupling cover (681) in place.
- Page 51 ■ Disassembly and assembly of MDE125 type pump (built with a flange motor) Warning ● Wear protectors If you touch or otherwise come into contact with certain types of hazardous chemi- cal liquids, including but not limited to chemicals, you may experience serious inju- Wear protective ry to those parts of the body so exposed.
- Page 52 [3] Screw in the two attached bolts (M16x100) through the screw holes in the bracket (330) from the motor side to drive out the screwed split plate (337) to get the split plate separated off the bracket. Rotate the bolts alternately. When the split plate (337) is driven out sufficiently, hold the split plate and lift the motor and pump units with a crane.
- Page 53 [6] Rotate the impeller nut (922) counterclockwise to remove it. Next, remove the impeller lock nut (922.1). Then, remove the impeller (230) from the split plate and magnet capsule unit (859). CAUTION The magnet used in the pump has high magnetic power.
- Page 54 [2] Assemble the split plate (337) from the spindle side of the magnet capsule unit (859). Be careful not to scratch the sleeve (370) or the sliding surface of the bushing (540). Next, install the O ring (412.2) on the magnet capsule unit (859) and insert the impeller (230) and key (940) to the magnet capsule unit.
- Page 55 [5] Set the attached bolts (M16x100) fully into the bracket in advance. CAUTION Remove any foreign matter on the drive magnet unit. Use only the attached bolts. Otherwise, the magnet capsule may be pulled by the magnet force and damage the part. [6] Use a crane to lift the pump and the motor over the base.
- Page 56 IWAKI Norge AS TEL : (47)66 81 16 60 FAX : 66 81 16 61 China IWAKI Pumps (Guandong) Co., Ltd. TEL : (86)750 3866228 FAX : 750 3866278 Singapore IWAKI Singapore Pte. Ltd. TEL : (65)6316 2028 FAX : 6316 3221 China GFTZ IWAKI Engineering &...
Need help?
Do you have a question about the MDE Series and is the answer not in the manual?
Questions and answers