Fronius Selectiva 4120 Operating Instructions Manual
8 kw 220 v, 8 kw 400 v, 16 kw 400 v.
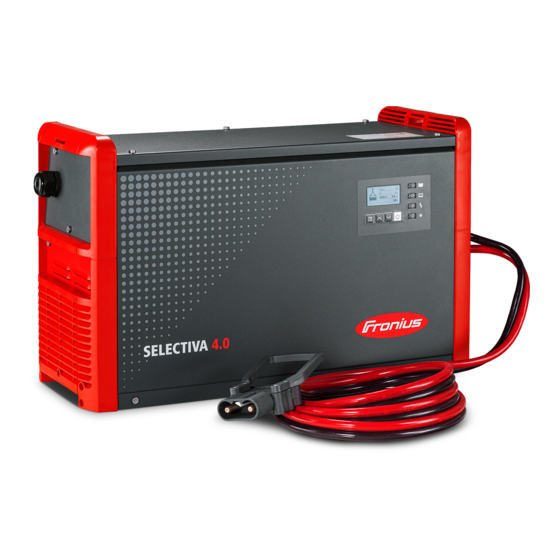
battery charging system
Hide thumbs
Also See for Selectiva 4120:
- Operating instructions manual (68 pages) ,
- Service manual (174 pages) ,
- A s s e m b l y, maintenance and operating instructions (72 pages)
Table of Contents
Advertisement
/
Perfect Charging
/ Perfect Welding / Solar Energy
8 kW 220 V
Selectiva
4120 / 4140 / 4160
8 kW 400 V
Selectiva
2100 / 2120 / 2140
2160 / 2180 / 2200
4060 / 4075 / 4090
4120 / 4140 / 4160
8040 / 8060 / 8075
8090
16 kW 400 V
Selectiva
8120 / 8140 / 8160
8180
42,0426,0151,EN 028-05122018
Operating Instructions
Battery charging system
Advertisement
Table of Contents

Subscribe to Our Youtube Channel
Related Manuals for Fronius Selectiva 4120


Summary of Contents for Fronius Selectiva 4120
- Page 1 Perfect Charging / Perfect Welding / Solar Energy Operating Instructions 8 kW 220 V Selectiva Battery charging system 4120 / 4140 / 4160 8 kW 400 V Selectiva 2100 / 2120 / 2140 2160 / 2180 / 2200 4060 / 4075 / 4090 4120 / 4140 / 4160 8040 / 8060 / 8075 8090...
- Page 3 Please also note the safety rules to ensure greater safety when using the product. Careful handling of the product will repay you with years of safe and reliable operation. These are essential prerequisites for excellent results. The latest version of the operating instructions can be found on the Fronius website www.fronius.com. Explanation of...
-
Page 5: Table Of Contents
Contents Safety rules ..............................General ..............................Proper use ............................Environmental conditions........................Mains connection ..........................Dangers from mains current and charging current ................Dangers from acid, gases and vapours ....................General information regarding the handling of batteries............... Protecting yourself and others ......................Safety measures in normal operation .................... - Page 6 Charge 80% ............................Charging not complete.......................... Charge finish............................Main charge finished..........................Common error message ........................Common error + warning ........................Signal lamp ............................Immobiliser............................Battery cooled down ..........................External air pump - electrolyte circulation ..................... Wall bracket ............................Floor bracket ............................LED strip ...............................
-
Page 7: Safety Rules
Safety rules General The device is manufactured using state-of-the-art technology and according to recognised safety standards. If used incorrectly or misused, however, it can cause: Injury or death to the operator or a third party Damage to the device and other material assets belonging to the operator Inefficient operation of the device All persons involved in commissioning, operating, maintaining and servicing the device must:... -
Page 8: Dangers From Mains Current And Charging Current
at the interface with the public grid see Technical Data In this case, the plant operator or the person using the device should check whether the device may be connected, where appropriate by discussing the matter with the power sup- ply company. -
Page 9: Protecting Yourself And Others
Protecting your- While the charger is in operation, keep all persons, especially children, out of the working self and others area. If, however, there are people in the vicinity, warn them about all the dangers (hazardous acids and gases, danger from mains and charging current, etc.), provide suitable protective equipment. -
Page 10: Maintenance And Repair
Maintenance and Under normal operating conditions, the device requires only a minimum of care and main- repair tenance. However, it is vital to observe some important points to ensure it remains in a us- able condition for many years. Before switching on, always check the mains plug and cable as well as charger leads and charging terminals for any signs of damage. -
Page 11: Copyright
either be returned to your dealer or given to one of the approved collection and recycling facilities in your area. Ignoring this European Directive may have potentially adverse af- fects on the environment and your health! Copyright Copyright of these operating instructions remains with the manufacturer. The text and illustrations are all technically correct at the time of printing. -
Page 12: General Information
General information Device concept The three-phase battery charging systems for 24 V, 48 V and 80 V batteries are fitted with intelligent charging technology. The successful Active Inverter Technology with the revo- lutionary Ri charging process adapts itself to the requirements of the battery and only charges the battery with the current that it actually needs. -
Page 13: Warning Notices On The Device
A number of safety symbols can be seen on the charger's rating plate. The safety symbols on the device must not be removed or painted over. Selectiva xxxx Part No.: 4,010,xxx www.fronius.com Ser.No.: xxxxxxxx xxxxxxxx 3~ NPE xxxV 50/60Hz AC nom. -
Page 14: Warning Notices Inside The Charger
Warning notices WARNING! inside the charger An electric shock can be fatal. The housing must never be opened by anyone other than a service technician trained by the manufacturer. The device must be disconnected from the mains before starting any work with the housing open. - Page 15 The device is tested to IP20 protection, meaning: Protection against penetration by solid foreign bodies with diameters exceeding 12.5 mm (0.49 in.) No protection against water The device can be set up and operated in dry, closed areas that comply with degree of pro- tection IP20.
-
Page 16: Wall Bracket
Risk of serious damage or injury from objects being dropped or falling over. ► Ensure that all screw connections are secure ► Must only be used with a Fronius Selectiva 8/16 kW charger ► Ensure the device is level when mounting... - Page 17 8 kW (400 V) mm (in.) 193 (7.6) 633 (24.92) 180 (7.09) (.51) 595,5 (23.44) 179 (7.05) 8 kW 220 V mm (in.) 267 (10.51) 647 (25.47) 247 (9.72) (.79) 241 (9.49) 585 (23.03)
- Page 18 16 kW 400 V mm (in.) 267 (10.51) 647 (25.47) 247 (9.72) (.79) 241 (9.49) 585 (23.03) mm (in.) 500 (19.69) 492 (19.37) 450 (17.72) 400 (15.75) 300 (11.81) 200 (7.87) (.33) 20 (.79) 7 (.28) (.24) (.79) 342 (13.46) (.24) 418 (16.46) 494 (19.45)
-
Page 19: Correct Arrangement Of The Mains/Charging Leads
Correct arrange- CAUTION! ment of the mains/charging Risk of damage to components due to overheating caused by laying the mains/ leads charging leads incorrectly. ► Lay mains/charging lead without loops ► Do not cover mains/charging lead... -
Page 20: Control Elements And Connections
Control elements and connections Controls and con- nections (10) (12) Function Position for internal electrolyte circulation option Compressed air outlet Position for internal electrolyte circulation option Air intake with air filter (12) (+) Charging lead (-) Charging lead (11) Function Position for external start/stop option or temperature-controlled charging option Position for the remote control system or 12 V charging lights options... - Page 21 (10) Mains cable (11) Control panel (12) Optional LED strip lights up in different colours depending on the state of charge, as explained in the "Control panel" section * The CAN connection area can only be accessed by removing the connection plate on the front of the device.
-
Page 22: Control Panel
Control panel Function Display Displays the current charging parameters Displays settings "Menu" key Selects the desired menu Selects the appropriate symbol to return to the previous display "Up/Down" keys Selects the desired menu item Sets the desired value "Stop/Start" key For interrupting and resuming the charging process Confirms a menu item or setting "Battery cooled down"... - Page 23 "Charge" indicator (orange) Lit: during charging Flashes: If charging has been interrupted "Battery charged" indicator (green) On steady: Charging ended Flashes every second: Charging ended. The water refill indicator has also tripped.
-
Page 24: Charging The Battery
Charging the battery Charging WARNING! Risk of serious injury or damage from escaping battery acid or explosion if faulty batteries are charged. Before charging, ensure that the battery to be charged is fully functional. WARNING! Risk of serious injury and damage from incorrect charging settings or a defective battery. -
Page 25: Interrupting Charging
The battery symbol indicates the current state of charge. The greater the number of bars that are displayed, the further advanced the charging process is. As soon as the battery is fully charged, a minute counter will appear (see figure on right). This counts the minutes since the end of charging;... -
Page 26: Stopping Charging
While the charging progress is interrupted: The "Charge" indicator (yellow) flashes To resume the charging process: Press the "Stop/Start" key again As long as a battery is connected to the charger, only the charging process can be inter- rupted and resumed using the "Stop/Start" key. Display modes can be changed using the "Menu"... - Page 27 For an optimal battery life, only disconnect the battery from the battery charging sys- tem when the blue "Battery cooled" indica- tor is showing in addition to the green indicator, in accordance with the explana- tion below. If several battery charging sys- tems are in use, first disconnect the battery which has been fully charged for the longest (the coolest).
-
Page 28: Display
Display Overview of The device has the following modes: modes Standard mode In standard mode the display shows the charging parameters Statistics mode Visualises the frequency of the device operating modes and shows the total number of charging actions. Also shows an overview of the total and average Ah produced and energy consumed per charge History mode Provides information about the parameters for all the stored charging processes... -
Page 29: Menu Selection
The charger parameters can be set individually. More information can be found in the "Configuration mode" section. Menu selection Change from standard mode to the menu selection as follows: Press and hold the "Menu" key for approx. 5 seconds Change from all other modes to the menu selection as follows: Press the "Menu"... -
Page 30: History Mode
History mode History mode provides information about the parameters for all the stored charging pro- cesses. In order to show changing or different displays, two versions of the display window are shown below: Use the "Up/Down" keys to scroll between the pages for each stored charging process Text content of the display window: Start date of charge, e.g. - Page 31 Cells: voltage (V) and number of battery cells or automatic setting of the number of cells CAUTION! Risk of damage to the battery. Only use the automatic number of cells selection function with batteries with the following nominal voltage values: 12 V and 24 V with 24 V devices 24 V and 48 V with 48 V devices The automatic selection function must not be used with deep discharged batteries.
- Page 32 You will be prompted to enter a code: The code required is "1511", and is entered as follows: Using the "Up/Down" keys, enter the first digit of the code Press the "Menu" key to move to the next digit of the code Continue to follow the procedure described above until the com- plete code has been entered Use the "Stop/Start"...
- Page 33 The procedure for navigating the configuration menu and its submenus is as follows: Use the "Up/Down" keys to select the desired menu item Use the "Stop/Start" key to confirm the menu item, and reconfirm any double-check prompt (e.g. "OK?") Use the "Up/Down" keys as necessary to choose an item e.g. "Off/ On"...
-
Page 34: Settings
The choice of settings for the "Charging settings" menu item will now be displayed: the display may vary depending on the selection made. If the "Pb-Wet" type of battery has been selected in combination with the "RI" characteristic ("Curve") as in the example here, then the title "Ah"... - Page 35 The individual selection options are explained in greater detail below: "Air Pump" electrolyte circulation (not available on Selectiva 220 V variant): The electrolyte circulation cycle is controlled by the charger's control system. A number of selection options are available for this purpose. The following settings are available for electrolyte circulation: Off: Electrolyte circulation switched off...
- Page 36 The following settings are available for temperature-controlled charging: automatic/OFF/required: automatic ... Temperature-dependent adjustment of the charging characteristic OFF ... The measured battery temperature is not taken into account required ... Charging only starts when a temperature sensor is connected Error overtemperature ON/OFF: ON ...
- Page 37 Calendar: The calendar function allows charging to be started automatically according to the follow- ing criteria: Time window in which charging may not be started if a battery is connected Time window in which charging is to be started using a defined characteristic 1 if a bat- tery is connected Time window in which charging is to be started using a defined characteristic 2 if a bat- tery is connected...
- Page 38 NOTE! Ongoing charging operations are unaffected by the set time windows. If in the ex- ample above a battery is connected at 05:45, the charge end time is governed ac- cording to need and is not interrupted by the end time specified for the set time window (06:00 in the example).
- Page 39 Special Charges: Selecting "Special Charges" allows one or more of the alternative charging types to be performed temporarily: ON: Function activated OFF: Function deactivated The "repeat" setting defines how often the alternative charging mode should be performed until the device reverts to the original charging parameters again: Setting range: 1 to 99 repetitions Disable Start Button: The charging process cannot be started using the "Stop/Start"...
-
Page 40: Additional Functions
When opportunity charging is "ON" and a battery is connected, the following appears: Figure on left: display when RI characteristic is selected Figure on right: display for other characteristics (e.g. IUI) To start opportunity charging: Use the "Up" key to select the runner symbol (1) Figure on left: "Runner symbol"... - Page 41 In conjunction with the "Temperature-controlled charging" option, a temperature value can be set here. The blue "battery cooled down" indicator will light up to signal a sufficiently- cooled battery once the temperature drops below this value. External start/stop: The following settings are available when external start/stop is selected: Start: normal ON: Charging starts when an external switch is closed and a battery is detected...
- Page 42 When a relay board has been selected, one of the following functions can be set for each of the 4 terminals (-> 1) to (-> 4), viewed from left to right: Aquamatic Signal to activate a solenoid valve, for example "Standard"...
-
Page 43: General Options
Remote control system: The contrast for the remote control system can be adjusted. at mains failure restart charging: If this option is chosen, the charging process is restarted automatically as soon as the mains supply becomes available again after a disruption to the electrical mains supply. General options A detailed explanation of the "general options"... -
Page 44: Reset Settings
The I-SPoT VIEWER software supports the visualisation and evaluation of data on the USB flash drive. The I-SPoT VIEWER software can be found online at the following ad- dress: http://www.fronius.com/i-spot. Only insert the USB flash drive when charging is not in progress or if the charging process has been interrupted. - Page 45 The logged data is saved in the same way as for the "Download" function, but is saved not in the I-SPoT VIEWER format, but as ".csv" files (Automatic folder structure for the ".csv" files: * Fronius\<device serial number>\Charges\<yyyymmdd>\<hhmmss.csv> Save events Events are saved to the USB flash drive.
-
Page 46: Status Codes
the dealer. The file must be saved on the USB flash drive as a ".txt" file in "unicode" format. The file name must be "dealer.txt". The number of characters is restricted to If a USB flash drive is connected while charging is in progress, the .csv files are saved directly to the USB flash drive. - Page 47 Status codes in the event of a battery fault Number Cause (26) Cell fault detected (27) Battery not supported (28) Battery heavily discharged - safety charging is being carried out (29) Battery is connected with reverse polarity (100) - (400) General battery fault Status codes in the event of a CAN fault Number Cause...
- Page 48 Status codes in the event of a fault in the secondary circuit Number Cause (530) No primary communication (531) Secondary EEPROM faulty (532) Microcontroller fault (537) Voltage measurement faulty (570) Secondary relay cannot be switched (571) ADC/SPI error Status codes in the event of a fault in the controller Number Cause (540)
-
Page 49: Options
Options Safety In order to connect optional components, it may be necessary to open the housing. The following warning notices must be obeyed: WARNING! An electric shock can be fatal. The housing must never be opened by anyone other than a service technician trained by the manufacturer. - Page 50 The electrolyte circulation option features an air pump integrated in the charger. This intro- duces air into the battery through capillary tubes that are provided specifically for this pur- pose. This allows intensive mixing of the electrolyte to take place. The benefit is reduced heating of the battery, and consequently longer battery-life, plus reduced water loss during charging.
-
Page 51: External Start/Stop
External start/ The external start/stop option prevents sparking if the charging plug is disconnected during stop charging. Dedicated auxiliary contacts inside the plug detect the removal of a shorting jumper in the counterpart before the main contacts have even become separated. This trig- gers an immediate stop to charging. -
Page 52: Temperature-Controlled Charging
Temperature-con- The temperature-controlled charging option always adjusts the charging voltage according trolled charging to the current temperature of the battery. This results in considerably longer battery-life, es- pecially where batteries are used in cold stores. CAN card WARNING! Risk of serious injury and damage from using the CAN card for safety-critical func- tions. -
Page 53: Aquamatic Control
Charging not complete Signal if the battery is prematurely disconnected from the charger Cumulative error Cumulative error + warning Signal Lamp Immobiliser device Refill indicator Battery Cold External air pump (electrolyte circulation) Aquamatic con- The Aquamatic control contains the controller for a solenoid valve that automatically tops trol up the water in the battery to be charged. -
Page 54: Common Error + Warning
Common error + In the same way as for the "Common error" function, the corresponding relay trips as soon warning as an error or warning is detected. Signal lamp As an alternative to the charging lights, one or more suitable lamps can be connected to the relay board to indicate the state of charge or operating status of the charger. -
Page 55: Air Filter
Air filter In dusty environments, the air filter prevents the inside of device from becoming dirty. This avoids a possible reduction in power or other problem. More detailed information can be found in the corresponding User Information. "Mobile" kit A carrying strap and handle improve the mobility of the device. RCS 3.0 remote The remote indication allows the device to be fully controlled from a distance of up to 30 m indication... -
Page 56: Technical Data
3~ NPE 220 V / 50/60 Hz Optional: 3~ PE 220 V / 50/60 Hz Mains fuse protection 32 A Minimum mains lead cross section Selectiva 4120 4 mm² (0.0062 in²) Selectiva 4140 / 4160 6 mm² (0.0093 in²) Duty cycle 100%... - Page 57 Device-specific data Device Max. AC Max. AC Nominal volt- Max. charg- current power ing current Selectiva 4120 28,5 A 9070 W 48 V 120 A 72 mOhm Selectiva 4140 29,6 A 9390 W 48 V 140 A 65 mOhm Selectiva 4160 29,9 A...
- Page 58 Selectiva 8 kW WARNING! 400 V An electric shock due to a fault current can be fatal. Nothing other than a type B residual current circuit breaker should ever be used for con- necting the device to the mains. Mains voltage (-10% / +30%) 3~ NPE 400 V / 50/60 Hz Optional: 3~ PE 400 V / 50/60 Hz...
-
Page 59: Selectiva 8 Kw 400 V
Selectiva 4075 15 A 5700 W 48 V 75 A Selectiva 4090 11 A 6800 W 48 V 90 A Selectiva 4120 14 A 8800 W 48 V 120 A Selectiva 4140 15 A 9500 W 48 V 140 A Selectiva 4160 15.5 A... - Page 60 Selectiva 16 kW WARNING! 400 V An electric shock due to a fault current can be fatal. Nothing other than a type B residual current circuit breaker should ever be used for con- necting the device to the mains. Mains voltage (-10% / +30%) 3~ NPE 400 V / 50/60 Hz Optional: 3~ PE 400 V / 50/60 Hz...
- Page 61 Device-specific data Device Max. AC Max. AC Nominal volt- Max. charg- current power ing current Selectiva 8120 24.5 A 14800 W 80 V 120 A 96 mOhm Selectiva 8140 28 A 17200 W 80 V 140 A 82 mOhm Selectiva 8160 29.5 A 18200 W 80 V 160 A...
- Page 64 Fronius Worldwide - www.fronius.com/addresses Fronius International GmbH Froniusplatz 1 A-4600 Wels E-Mail: perfect.charging@fronius.com http://www.fronius.com Under www.fronius.com/addresses you will find all addresses of our sales branches and partner firms!
Need help?
Do you have a question about the Selectiva 4120 and is the answer not in the manual?
Questions and answers