Table of Contents
Advertisement
Quick Links
Advertisement
Table of Contents

Related Manuals for Viavi FiberChek Sidewinder


Summary of Contents for Viavi FiberChek Sidewinder
- Page 1 FiberChek™ Sidewinder MPO Inspection Probe Quick Start Guide...
- Page 2 VIAVI Solutions 1-844-GO-VIAVI / 1-844- 468-4284 www.viavisolutions.com...
- Page 3 FiberChek™ Sidewinder MPO Inspection Probe Quick Start Guide Quick Start Guide: FiberChek™ Sidewinder MPO Inspection Probe Page iii Document Num. 22122621, Rev. 100 December 2017...
- Page 4 Copyright © Copyright 2017 VIAVI Solutions Inc. All rights reserved. VIAVI and the VIAVI logo are trademarks of VIAVI Solutions Inc. (“VIAVI”). All other trademarks and registered trademarks are the property of their respective owners. No part of this guide may be reproduced or transmitted, electronically or otherwise, without written permission of the publisher.
-
Page 5: Table Of Contents
Contents Chapter 1 Introduction .......................... 6 Chapter 2 Overview ..........................7 Using the Menu ........................8 Using Tips and Adapters ....................8 Chapter 3 Operation..........................11 Setting Up PASS/FAIL Analysis for Multi-fiber Connectors ........11 Creating or Editing an Optical Setting ................13 Working with Groups ....................... 16 Connecting Sidewinder to FiberChekPRO™... -
Page 6: Chapter 1 Introduction
Every time they are handled, fiber connectors must be inspected to ensure no debris or damage is present. VIAVI has made this critical task easier than ever with the FiberChek Sidewinder MPO Inspection Probe. Sidewinder’s standalone operation, color touchscreen display, and Wi-Fi connectivity allow fast, reliable maintenance of optical connector quality. -
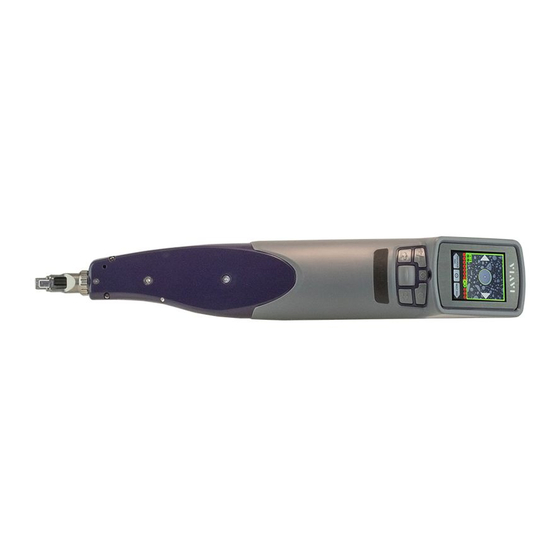
Page 7: Chapter 2 Overview
Chapter 2 Overview Touchscreen Display Speaker Power Button USB-C Interface Magnification / Action Button Return Button Pan Right Pan Left Manual Focus / Auto Focus / Navigation Control Inspection Trigger FCPT Series FCPT Series Inspection Tip Inspection Tip Quick Start Guide: FiberChek™ Sidewinder MPO Inspection Probe Page 7 Document Num. -
Page 8: Using The Menu
Chapter 2 Overview Using the Menu Many of Sidewinder’s features and settings can be found in the Menu. To access the menu, tap the touchscreen when in the Live Inspection View. If the Sidewinder is displaying an analysis result or still image, return to the Live Inspection View by pressing the Autofocus/Inspection Trigger once. - Page 9 Chapter 2 Overview To inspect a simplex fiber, follow these steps Step 1. From the Live Image mode, enter the menu by tapping the touchscreen. Step 2. Enter the Connector Setup wizard, which should be the first option in the menu. Step 3.
- Page 10 Chapter 2 Overview Figure 1 Figure 2 Figure 3 Quick Start Guide: FiberChek™ Sidewinder MPO Inspection Probe Page 10 Document Num. 22122621, Rev. 100 December 2017...
-
Page 11: Chapter 3 Operation
Chapter 3 Operation Setting up PASS/FAIL Analysis for Multi-fiber Connectors Step 1. From the Live Inspection View, tap the Touchscreen Display to enter the Menu. Step 2. Select CONNECTOR SETUP using the Manual Focus/Navigation Control, then press the Action Button. (See Figure 1) Step 3. - Page 12 Chapter 3 Operation Step 4. Select the connector configuration (number of fibers x number of rows), then press the Action Button. (See Figure 3) Step 5. Select the tip setting, then press the Action Button. (See Figure 4) Step 3. Return to the Live Inspection View by pressing the Autofocus/Inspection button.
-
Page 13: Creating Or Editing An Optical Setting
Chapter 3 Operation Creating or Editing an Optical Setting Different manufacturers of MPO connectors use different ferrule materials and different polishing processes. Because of this, MPO connectors may appear very different from one another. Sidewinder is pre-loaded with an Optical Setting suitable for most MPO connectors. For some connectors, however, you may need a custom Optical Setting. - Page 14 Chapter 3 Operation To modify an Optical Setting on the Sidewinder Step 1. For best results, pan to the leftmost fiber in the Live Image mode. Step 2. From the Live Image mode, tap the touchscreen to enter the Menu. Step 3.
- Page 15 Chapter 3 Operation Performing PASS/FAIL analysis Test: Ensure the Sidewinder is in Live mode. Press and hold the Autofocus/Inspection trigger for one second and release. Hold the Sidewinder steady in the bulkhead until you hear or see the PASS/FAIL result. •...
-
Page 16: Working With Groups
Chapter 3 Operation Working with Groups You may find it useful to collect several analysis results or still images into a group. Saving completed PASS/ FAIL results into a group makes it easy to keep track of analyses from the same job. To begin adding analyses or images to a group: Creating a new group Step 1. -
Page 17: Connecting Sidewinder To Fiberchekpro
Chapter 3 Operation Connecting Sidewinder to FiberChekPRO™ By connecting the Sidewinder to a PC, you can view inspection results on your computer, download data saved on the Sidewinder, and keep your probe’s firmware up to date. Sidewinder can connect with FiberChekPRO using a USB cable or built-in Wi-Fi. - Page 18 Warranty VIAVI warrants this equipment to be free of defects in material and workmanship for one (1) calendar year from the date of purchase. Any mishandling or unauthorized repairs will void this warranty. For additional warranty terms and conditions, see www.viavisolutions.com/terms.
- Page 19 Viavi has established a take-back processes in compliance with the EU Waste Electrical and Electronic Equipment (WEEE) Directive, 2012/19/EU, and the EU Battery Directive, 2006/66/EC. Instructions for returning waste equipment and batteries to VIAVI can be found in the WEEE section of Viavi’s Standards and Policies web page.
- Page 20 EU Radio Equipment Directive In accordance with Article 10.8 of the EU Radio Equipment Directive 2014/53/EU, the following table provides information on the frequency bands and the maximum RF transmit power of this product for sale in the EU: Frequency range (MHz) Channels used Max.
- Page 21 Doc No. 22122621 Rev. 100, December 2017 English VIAVI Solutions North America (Toll Free) 1-844-GO-VIAVI / 1-844-468-4284 Latin America +52 55 5543 6644 EMEA +49 7121 862273 APAC +1 512 201 6534 All other regions www.viavisolutions.com/contacts Email TAC@viavisolutions.com...
Need help?
Do you have a question about the FiberChek Sidewinder and is the answer not in the manual?
Questions and answers