Table of Contents
Advertisement
Quick Links
Assembly Instructions
Item# L-GZ120PST-2
Thank you for your purchase!
Caution: Carefully Read Instructions and Procedures for Safe
Operation.
Important: Please do not return this product to the store. For technical assistance on
assembly or replacement parts. Please call Sunjoy Industries at 1-866-578-6569 from 8:00
am EST to 8:00 pm PST or fax the replacement part form which is in the box to
1-740-283-3549 or Email customer.care@sunjoygroup.com for assistance.
Advertisement
Table of Contents

Related Manuals for Sunjoy L-GZ120PST-2


Summary of Contents for Sunjoy L-GZ120PST-2
-
Page 1: Assembly Instructions
Important: Please do not return this product to the store. For technical assistance on assembly or replacement parts. Please call Sunjoy Industries at 1-866-578-6569 from 8:00 am EST to 8:00 pm PST or fax the replacement part form which is in the box to... - Page 2 Safety Information WARNING When assembling and using this product, basic safety precautions should always be followed to reduce the risk of personal injury and damage to equipment. Please read all instructions before assembly and use. Some parts may contain sharp edges, wear protective gloves if necessary. At least three or more people are recommended for safe assembly.
- Page 3 Exclusions: It remains the customer's responsibility for freight and packaging charges to and from our service center. Items used for commercial, contract, or other non-residential purposes, or items damaged due to acts of nature, vandalism, misuse, or improper assembly are not covered. Corrosion or rusting of hardware is not covered.
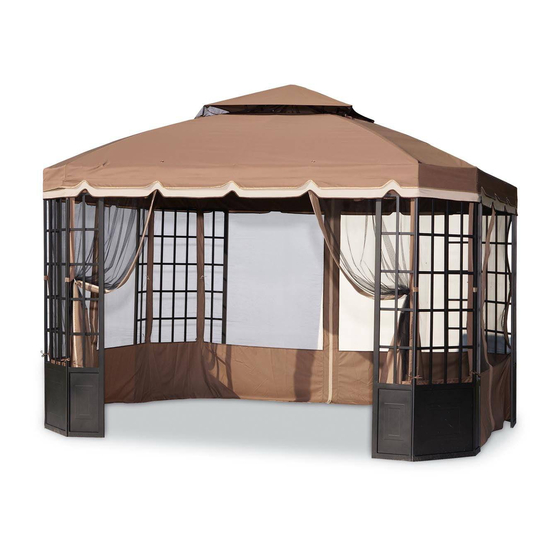
- Page 4 Package contents IMAGE DESCRIPTION QTY. Screen Screen for long side Screen for short side Big Top Connector Support Pole Support Pole Support Pole Arch beam 1 Arch beam 2 Hook Big canopy Small canopy Mosquito netting...
- Page 5 Assembly Instructions...
- Page 6 Fig.1: Insert the Screen (B) and Screen (C) into the hole of screen, then the Screen (B) and Screen (C) with rotating the sealed strip on the Screen. Fig.2: Attach and fix the Hook (J) to Big Top Connector (D). Fig.3: Assemble the Support Pole (E) and Big Top Connector (D).Please note that the Support Pole (E) should be inserted into the longer tubes.
- Page 7 Fig.8: Put the Big Canopy (K) onto the Frame first, but don’t spread it completely. Fig.9: Assemble the Small Canopy (L), fix the Mosquito Netting of Small Canopy and tie of Big Canopy together. Spread the Big Canopy (K) completely and fix it into Beam and Screen. Fig.10: Connect the Mosquito Netting to Big Screen (A), Right Screen (B) and Left Screen(C) with the Hook (EE), please note the long and short side of the...
Need help?
Do you have a question about the L-GZ120PST-2 and is the answer not in the manual?
Questions and answers