Table of Contents
Advertisement
Quick Links
Download this manual
See also:
User Manual
Advertisement
Table of Contents

Related Manuals for Viavi WFED-300AC


Summary of Contents for Viavi WFED-300AC
- Page 1 WiFi Advisor Wireless LAN Analyzer Quick Start Guide October 2015 Revision 2.0.5 OCT-2015 Technical Assistance: 1.844.GO VIAVI / 1.844.468.4284 Revision 2.0.5 TAC@viavisolutions.com...
-
Page 2: Table Of Contents
The WFED-300AC WiFi Test Device ....................6 The WiFi Advisor iOS Application Overview ..................9 Connecting the WFED-300AC to your iPad for the First Time ............12 The Device Manager .......................... 14 Registering a WFED-300AC with the WiFi Advisor iOS Application ............ 15 Un-Registering a WFED-300AC with the WiFi Advisor iOS Application .......... - Page 3 Creating a New Job............................56 Managing Jobs ............................. 60 Job Export Settings ............................62 Job Export History ............................62 Viewing Job Results ............................. 63 Troubleshooting Problems with Your WiFi Advisor ..............67 OCT-2015 Technical Assistance: 1.844.GO VIAVI / 1.844.468.4284 Revision 2.0.5 TAC@viavisolutions.com...
-
Page 4: Wifi Advisor Wireless Lan Analyzer Overview
The device is responsible for performing tests requested by the iOS WiFi Advisor iOS Application. (Note: At least one WFED-300AC test device is required for single-ended troubleshooting, and two WFED-300AC test devices are required for Site Assessment testing.) - Page 5 Figure 1: WiFi Advisor Connectivity and Use Models OCT-2015 Technical Assistance: 1.844.GO VIAVI / 1.844.468.4284 Revision 2.0.5 TAC@viavisolutions.com...
-
Page 6: The Wfed-300Ac Wifi Test Device
2. The WFED-300AC WiFi Test Device The WFED-300AC WiFi Advisor Test Device is shown below. Figure 2: WiFi Advisor Top View OCT-2015 Technical Assistance: 1.844.GO VIAVI / 1.844.468.4284 Revision 2.0.5 TAC@viavisolutions.com... - Page 7 Figure 3: WiFi Advisor Side View OCT-2015 Technical Assistance: 1.844.GO VIAVI / 1.844.468.4284 Revision 2.0.5 TAC@viavisolutions.com...
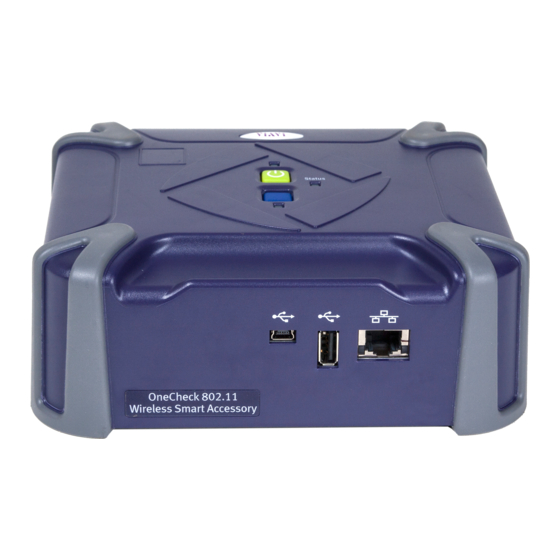
- Page 8 Figure 4: WiFi Advisor Back View OCT-2015 Technical Assistance: 1.844.GO VIAVI / 1.844.468.4284 Revision 2.0.5 TAC@viavisolutions.com...
-
Page 9: The Wifi Advisor Ios Application Overview
3. The WiFi Advisor iOS Application Overview The Application provides the following functions: Main Application – WiFi Advisor application for Site Assessment and Troubleshooting and Device Management. Figure 5: Main Application Window OCT-2015 Technical Assistance: 1.844.GO VIAVI / 1.844.468.4284 Revision 2.0.5 TAC@viavisolutions.com... - Page 10 Job Manager – For viewing and uploading of completed job files and customer PDF reports. Figure 6: Job Manager View OCT-2015 Technical Assistance: 1.844.GO VIAVI / 1.844.468.4284 Revision 2.0.5 TAC@viavisolutions.com...
- Page 11 Quick Cards – WiFi Advisor Quick Start Guide (this guide) and other helpful material. User’s Manual– WiFi Advisor User’s Guide Videos – Short “How-to” WiFi Advisor testing videos Accessories – WiFi Advisor Accessory Guide OCT-2015 Technical Assistance: 1.844.GO VIAVI / 1.844.468.4284 Revision 2.0.5 TAC@viavisolutions.com...
-
Page 12: Connecting The Wfed-300Ac To Your Ipad For The First Time
4. Connecting the WFED-300AC to your iPad for the First Time Perform the following steps to connect your WFED-300AC to your iPad. Please ensure that the WiFi Advisor iOS is installed on your iPad. Figure 7: Label Location on WFED-300AC OCT-2015 Technical Assistance: 1.844.GO VIAVI / 1.844.468.4284... - Page 13 4. Press and hold the blue button until the blue LED blinks continuously (about 5 seconds). 5. From the Bluetooth menu of the iPad, select the WFED-300AC from the list of devices to pair it with your iPad, using the serial number to confirm identification of the device.
-
Page 14: The Device Manager
Selecting the Device Management icon from the WiFi Advisor Home screen takes you to the Device Manager. In this screen you can: 1. Register WFED-300AC WiFi Advisor Test Devices for use by the WiFi Advisor iOS Application. (See “Connecting the WFED-300AC to Your iPad for the First Time” above.) 2. -
Page 15: Registering A Wfed-300Ac With The Wifi Advisor Ios Application
Figure 8: Device Manager View 5.1 Registering a WFED-300AC with the WiFi Advisor iOS Application See “Connecting the WFED-300AC to Your iPad for the First Time” above. OCT-2015 Technical Assistance: 1.844.GO VIAVI / 1.844.468.4284 Revision 2.0.5 TAC@viavisolutions.com... -
Page 16: Un-Registering A Wfed-300Ac With The Wifi Advisor Ios Application
5.2 Un-Registering a WFED-300AC with the WiFi Advisor iOS Application To unregister a registered test device, swipe from right to left on top of the listed device you wish to unregister. A red “Delete” button will appear on the right side of the display. Touch it to unregister the test device. -
Page 17: Updating Firmware For A Registered Wfed-300Ac
5.3 Updating Firmware for a Registered WFED-300AC In the upper left of the Device Manager screen, the current version of firmware stored within the iPad Application is shown under the label “Current Firmware”. This is the firmware version that will be downloaded to a registered test device when the download firmware icon for a given test device (on the right hand side of the screen) has been selected. -
Page 18: Changing The Power Off Delay For A Registered Wfed-300Ac
Figure 10: Device Manager Information 5.4 Changing the Power Off Delay for a Registered WFED-300AC The Power Off Delay values associated with each registered test device are shown within the Registered Devices section of the Device Manager screen. These values define the amount of idle time that must transpire before the test device will automatically power down. - Page 19 Touching a setting by name will change the setting for that test device. Touching outside of the dialogue box will dismiss the dialogue without changing the current setting. Figure 11: Setting Power Off Delay for WFED-300AC OCT-2015 Technical Assistance: 1.844.GO VIAVI / 1.844.468.4284 Revision 2.0.5...
-
Page 20: Using The Smartchannel Wizard
(123), by name (ABC) or by signal strength (dBm). Figure 12: The SmartChannel Wizard BSSID Selection Screen OCT-2015 Technical Assistance: 1.844.GO VIAVI / 1.844.468.4284 Revision 2.0.5 TAC@viavisolutions.com... - Page 21 “All Good” indicators and warning signs. If warnings are presented, a corresponding set of recommendations are provided to help the user improve the condition. Figure 13: The SmartChannel Wizard Summary Screen OCT-2015 Technical Assistance: 1.844.GO VIAVI / 1.844.468.4284 Revision 2.0.5 TAC@viavisolutions.com...
- Page 22 Capture a spectral snapshot for the selected BSSID’s channel(s). Users can save all accumulated results and captured data to a Job file. Job files and reports are discussed in more detail in the Job Manager section. OCT-2015 Technical Assistance: 1.844.GO VIAVI / 1.844.468.4284 Revision 2.0.5 TAC@viavisolutions.com...
-
Page 23: Wifi Troubleshooting With The Single-Ended Applications
Once a Test Device has been selected, any of the three Troubleshooting Applications can be launched by touching the appropriate element in the 3-way segment controller at the top of the screen: BSSID, Channel or Spectral. OCT-2015 Technical Assistance: 1.844.GO VIAVI / 1.844.468.4284 Revision 2.0.5 TAC@viavisolutions.com... -
Page 24: Bssid View
AP to be placed within the environment. Touching the band toggle switch in the upper left of the graph will toggle between 2.4GHz band and 5GHz band views. Figure 15: BSSID View Band Selection OCT-2015 Technical Assistance: 1.844.GO VIAVI / 1.844.468.4284 Revision 2.0.5 TAC@viavisolutions.com... - Page 25 Touching one of the channels in the list (or the SSID name in the graph view) will replace the BSSID list view with the BSSID Details view. In the BSSID details view, more detailed information for the selected BSSID is presented. Figure 16: Access Real-Time Graphs OCT-2015 Technical Assistance: 1.844.GO VIAVI / 1.844.468.4284 Revision 2.0.5 TAC@viavisolutions.com...
- Page 26 BSSID for RSSI / Noise plus Channel Utilization, or for SNR plus Channel Utilization. Touch anywhere on the screen outside of the trend graph to revert to the normal BSSID view. Figure 17: Real-Time Graphs OCT-2015 Technical Assistance: 1.844.GO VIAVI / 1.844.468.4284 Revision 2.0.5 TAC@viavisolutions.com...
-
Page 27: Channel View
BSSID’s sensed along with their channel setting, current signal strength and MAC address. The list can be ordered by channel (123), by name (ABC), or by signal strength (dBm). OCT-2015 Technical Assistance: 1.844.GO VIAVI / 1.844.468.4284 Revision 2.0.5 TAC@viavisolutions.com... - Page 28 BSSID List view to the Channel Info view for the selected channel. The Channel Info view provides more detailed information regarding the selected channel such as the channel score, the OCT-2015 Technical Assistance: 1.844.GO VIAVI / 1.844.468.4284 Revision 2.0.5 TAC@viavisolutions.com...
- Page 29 BSSID’s resident in the channel and the BSSID’s overlapping (adjacent to) the channel. Figure 19: Best Channels Recommendations OCT-2015 Technical Assistance: 1.844.GO VIAVI / 1.844.468.4284 Revision 2.0.5 TAC@viavisolutions.com...
-
Page 30: Spectral View
1. The spectral graph area, where the real-time spectral data is displayed 2. The Controls area, where the user can configure the spectrum analyzer ranges and modes 3. The BSSID List / Channel information pane OCT-2015 Technical Assistance: 1.844.GO VIAVI / 1.844.468.4284 Revision 2.0.5 TAC@viavisolutions.com... - Page 31 Spectral Analyzer. (Note that the BSSID View and Channel View must first be run in order for the BSSID and Channel Snapshots to populate in Spectral.) OCT-2015 Technical Assistance: 1.844.GO VIAVI / 1.844.468.4284 Revision 2.0.5 TAC@viavisolutions.com...
- Page 32 BSSID’s resident in the channel and the BSSID’s overlapping (adjacent to) the channel. Figure 21: Channel info in Spectral View OCT-2015 Technical Assistance: 1.844.GO VIAVI / 1.844.468.4284 Revision 2.0.5 TAC@viavisolutions.com...
- Page 33 8. World View Channel selector – touch to select the channel of interest. Changing the channel bandwidth will change how channels are represented in the World View accordingly. 9. Zigbee mask switch (2.4GHz band only) – turns the Zigbee channel mask on / off OCT-2015 Technical Assistance: 1.844.GO VIAVI / 1.844.468.4284 Revision 2.0.5 TAC@viavisolutions.com...
- Page 34 The cursor will move horizontally to the position indicated by the touch, and the cursor readout box will reflect the Frequency represented by the new cursor position in addition to the real-time and max hold signal levels at that frequency. OCT-2015 Technical Assistance: 1.844.GO VIAVI / 1.844.468.4284 Revision 2.0.5 TAC@viavisolutions.com...
- Page 35 Figure 23: Guide to the Cursor Function in Spectral View OCT-2015 Technical Assistance: 1.844.GO VIAVI / 1.844.468.4284 Revision 2.0.5 TAC@viavisolutions.com...
-
Page 36: Site Assessment Testing With The Wifi Advisor
Site Assessment. In the Site Assessment test, the user will either: 1. place one WFED-300AC Test Device in close proximity to where the Wireless Access Point / Residential Gateway will be installed, or 2. connect one WFED-300AC Test Device to the installed Wireless Access Point / Residential... - Page 37 The user then takes a second WFED-300AC Test Device along with his iPad to the location where WiFi performance is to be assessed. A test is then initiated that thoroughly evaluates WiFi performance between the two locations. When complete, the user then moves to the next location of interest and repeats the test back to the Access Point location.
-
Page 38: Configuring A Site Assessment Test
Settings pane on the left side changes as the user moves through this process. The right hand pane will also change based on the specific action that the user is taking at the moment, and as the test progresses. Figure 24: Site Assessment Application OCT-2015 Technical Assistance: 1.844.GO VIAVI / 1.844.468.4284 Revision 2.0.5 TAC@viavisolutions.com... - Page 39 Select Devices screen will appear in the right hand pane. The user is required to select either a WFED-300AC Test Device that will function as the wireless Access Point, or select “Customer Access Point” if the test is to be conducted through the customer’s Access Point to a Viavi test device attached over Ethernet.
- Page 40 A Site Assessment-capable Viavi device should then be connected to the Ethernet port of the Access Point that supports the selected WiFi network, such as a second WFED-300AC, or an ONX-580 (future). Figure 26: Wi-Fi Network Settings Option in Through the Customer AP Mode OCT-2015 Technical Assistance: 1.844.GO VIAVI / 1.844.468.4284...
- Page 41 The next task is to configure the devices and test profiles for the Site Assessment. To do this, touch the next item in the Settings Pane – “Configuration”. The Select Configuration pane appears on the right. OCT-2015 Technical Assistance: 1.844.GO VIAVI / 1.844.468.4284 Revision 2.0.5 TAC@viavisolutions.com...
- Page 42 / or the equipment you are installing into the test site. The user is asked to select a configuration that matches the choice of Access Point type: If a WFED-300AC has been selected to act as the AP in the Site Assessment test, then configurations under the heading “WiFi Advisor as AP”...
- Page 43 WiFi Advisor application has been replaced by the ability to enable / disable any profile in the configuration sequence.) When a WFED-300AC Test Device is being used as the Access Point in the Site Assessment test, pressing the “Recommend Channels” hotkey in the configuration screen will populate the Channel Settings with the best channels as determined by the WiFi Analyzer’s built in Channel Analysis...
- Page 44 Select Station Location pane on the right. If the location you desire does not exist in the pick list, select Add Location… hotkey and add the new location. OCT-2015 Technical Assistance: 1.844.GO VIAVI / 1.844.468.4284 Revision 2.0.5 TAC@viavisolutions.com...
-
Page 45: Running A Site Assessment Test
Progress pane. As the test progresses through all of the defined profiles, information about test progress will appear in the Test Sequence Details pane on the right side of the screen. As the OCT-2015 Technical Assistance: 1.844.GO VIAVI / 1.844.468.4284 Revision 2.0.5 TAC@viavisolutions.com... - Page 46 “X” based on the outcome of the profile test. Figure 31: Running a Test Sequence OCT-2015 Technical Assistance: 1.844.GO VIAVI / 1.844.468.4284 Revision 2.0.5 TAC@viavisolutions.com...
- Page 47 A location test with all profiles complete appears as follows: Figure 32: A Completed Test Sequence OCT-2015 Technical Assistance: 1.844.GO VIAVI / 1.844.468.4284 Revision 2.0.5 TAC@viavisolutions.com...
- Page 48 “Run Test at Next Location” from the Test Progress pane. Finish the test by pressing “Finish”. See section 7.5 “Completing a Site Assessment Test” below for more detail on completing out a Site Assessment test. OCT-2015 Technical Assistance: 1.844.GO VIAVI / 1.844.468.4284 Revision 2.0.5 TAC@viavisolutions.com...
-
Page 49: Viewing Site Assessment Results
While the Site Assessment test is in progress, results for any completed profile test can be viewed by touching the completed profile in the Test Progress pane. Figure 33: Viewing Profile Results OCT-2015 Technical Assistance: 1.844.GO VIAVI / 1.844.468.4284 Revision 2.0.5 TAC@viavisolutions.com... - Page 50 5. Spectral snapshots for the channel used in the test profile. Shown at both AP and Station. To return to the Site Assessment test, press the “Site Assessment” hotkey in the upper left of the screen. OCT-2015 Technical Assistance: 1.844.GO VIAVI / 1.844.468.4284 Revision 2.0.5 TAC@viavisolutions.com...
-
Page 51: Viewing Location Results
“Location Graphs” in the top left of the Test Sequence. To return to the Site Assessment test, press the “Site Assessment” hotkey in the upper left of the screen. OCT-2015 Technical Assistance: 1.844.GO VIAVI / 1.844.468.4284 Revision 2.0.5 TAC@viavisolutions.com... - Page 52 Figure 35: Accessing Location Results OCT-2015 Technical Assistance: 1.844.GO VIAVI / 1.844.468.4284 Revision 2.0.5 TAC@viavisolutions.com...
-
Page 53: Completing A Site Assessment Test
When all desired locations have been tested, the final step in the Site Assessment process is to close out the job. Select “Finish” in the Test Progress pane to close out the test. The Finish Test OCT-2015 Technical Assistance: 1.844.GO VIAVI / 1.844.468.4284 Revision 2.0.5 TAC@viavisolutions.com... -
Page 54: Job Manager
Selecting the Job Manager tab at the bottom of the WiFi Advisor iOS application launches the WiFi Advisor Job Manager. The Job Manager allows a user to specify job or work ticket related OCT-2015 Technical Assistance: 1.844.GO VIAVI / 1.844.468.4284 Revision 2.0.5 TAC@viavisolutions.com... - Page 55 1. Creating a new job in the Job Manager, filling in the job-related information, and then activating the job. New jobs are void of results, but once active, results from a Site OCT-2015 Technical Assistance: 1.844.GO VIAVI / 1.844.468.4284 Revision 2.0.5 TAC@viavisolutions.com...
-
Page 56: Creating A New Job
Save to New Job option. Once saved, the new job can be edited within the Job Manager to add the job-related information. Figure 39: Adding Data to a Job 9.1 Creating a New Job From the main Job Manager screen, select the New button. OCT-2015 Technical Assistance: 1.844.GO VIAVI / 1.844.468.4284 Revision 2.0.5 TAC@viavisolutions.com... - Page 57 In the Add Job screen, enter the job-related information. Press “Use Current Location” if your iPad is equipped with GPS and you wish to capture the current GPS coordinates with your job data. Select “Accept” to create the new job. OCT-2015 Technical Assistance: 1.844.GO VIAVI / 1.844.468.4284 Revision 2.0.5 TAC@viavisolutions.com...
- Page 58 “0” at the right hand side of the screen indicates that no results have yet been saved to this job. The job is now ready to accept results from the Site Assessment test as the Active Job. OCT-2015 Technical Assistance: 1.844.GO VIAVI / 1.844.468.4284 Revision 2.0.5 TAC@viavisolutions.com...
- Page 59 Figure 42: Active Job in the Job Manager OCT-2015 Technical Assistance: 1.844.GO VIAVI / 1.844.468.4284 Revision 2.0.5 TAC@viavisolutions.com...
-
Page 60: Managing Jobs
Export – jobs can be exported from the iPad to an external database using either FTP or HTTPS (if available) Delete – jobs can be selectively deleted from the iPad OCT-2015 Technical Assistance: 1.844.GO VIAVI / 1.844.468.4284 Revision 2.0.5 TAC@viavisolutions.com... - Page 61 Note that the available options are dependent on which jobs have been selected for action by checking the job’s corresponding checkbox on the left side of the screen. Figure 44: Selecting Jobs for Uploading. OCT-2015 Technical Assistance: 1.844.GO VIAVI / 1.844.468.4284 Revision 2.0.5 TAC@viavisolutions.com...
-
Page 62: Job Export Settings
Enter the information required to point the WiFi Advisor iOS application to your site/database. 9.4 Job Export History Touching the Export History hotkey in the bottom right of the Job Manager screen will display a history of all exported jobs. OCT-2015 Technical Assistance: 1.844.GO VIAVI / 1.844.468.4284 Revision 2.0.5 TAC@viavisolutions.com... -
Page 63: Viewing Job Results
9.5 Viewing Job Results From the main Job Manager screen, touch the name of the job that you are interested in viewing. Figure 46: Viewing Job Results in the Job Manager OCT-2015 Technical Assistance: 1.844.GO VIAVI / 1.844.468.4284 Revision 2.0.5 TAC@viavisolutions.com... - Page 64 5-way segment controller. 5. Map – displays the map view based on the GPS location saved with the job-related data. OCT-2015 Technical Assistance: 1.844.GO VIAVI / 1.844.468.4284 Revision 2.0.5 TAC@viavisolutions.com...
- Page 65 Figure 47: Navigating a Job in the Job Manager OCT-2015 Technical Assistance: 1.844.GO VIAVI / 1.844.468.4284 Revision 2.0.5 TAC@viavisolutions.com...
- Page 66 Figure 48: Detailed Test Report in the Job Manager OCT-2015 Technical Assistance: 1.844.GO VIAVI / 1.844.468.4284 Revision 2.0.5 TAC@viavisolutions.com...
-
Page 67: Troubleshooting Problems With Your Wifi Advisor
10. Troubleshooting Problems with Your WiFi Advisor Please refer to the following table if your WiFi Advisor Wireless LAN Analyzer is not performing correctly. If you still cannot solve your problem, please contact Viavi Solutions Technical Assistance: North America: 1.844.GO VIAVI (1.844.468.4284)
Need help?
Do you have a question about the WFED-300AC and is the answer not in the manual?
Questions and answers