zapco DSP-Z8 IV II Owner's Manual
Dsp-iv ii series
Hide thumbs
Also See for DSP-Z8 IV II:
- Installation and quick start manual (9 pages) ,
- Quick start manual (2 pages) ,
- Owner's manual (22 pages)

Related Manuals for zapco DSP-Z8 IV II


Summary of Contents for zapco DSP-Z8 IV II
- Page 1 DSP-IV II SERIES Owner’s Manual Before operating the unit, please read this manual throughly and retain it for future reference.
- Page 2 MISSION STATEMENT Committed to Excellence ZAPCO is dedicated to the pursuit of audio fidelity. Our prime objectives are to design and manufacture audio products of unsurpassed quality, to provide unparalleled support and service for these products and to conduct business in a manner that will enhance the quality of life for all involved.
- Page 3 -106dB (-110dB Digital). The new DSP-Z8 IV II series processing takes the IV to a whole new level. Sonically the DSP- Z8 IV II has all the qualities of the original IV with an even lower noise floor. For advanced tuning possibilities the VI II has a much-improved GUI with many important upgrades.
- Page 4 Installation The basics of car audio installation apply to both the DSP-Z8 IV II and the ADSP-Z8 IV-8. Getting Started : The very first thing you want to do when installing any electronic device into the car is to disconnect the negative battery terminal to prevent any accidents (dropping a live hot wire on a component that has been mounted to the metal of the car can destroy that expensive piece of gear you just bought).
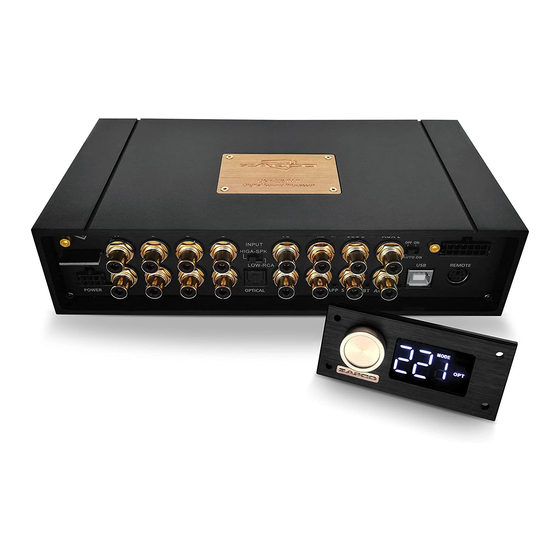
- Page 5 DSP-Z8 IV II 8 channels of RCA outputs Switch for high level/low level inputs 6 channels of RCA inputs for the MAIN source 2 channels of RCA inputs for an Auxiliary source On/Off switch for the auto-on function High level OEM input connector...
- Page 6 ADSP-Z8 IV-8 6 channels of RCA inputs for the main source 2 channels of RCA inputs for an Auxiliary source Optical port for digital input Dash remote port USB connector for PC control. The indicator lights when the USB is connected High level OEM input connector On/Off switch for the auto-on function Switch for high level/low level inputs...
- Page 7 GUI, so we will cover that first. We recommend the first setup be done by PC. In addition to the PC and Mobile controls that allow a complete system setup, the DSP-Z8 IV II units also come with an included Dash Remote.
- Page 8 The Zapco DSP-Z8 IV II Graphical User Interface (GUI) You have downloaded this preliminary manual from the web site along with the control program. If you haven’t installed the program on your computer, you should do that now. You open the compressed file and click on the installation .exe file. You will see the usual installation prompts as the program is installed.
- Page 10 Z8 IV II GUI. The password will prevent unauthorized access to your DSP settings. Make your password easy to remember. Zapco will not have access to your password so please write it down and store it someplace. After you designate a password the system will ask you for your phone number.
- Page 11 Graphical User Interface (GUI) From the top left, this GUI is designed to take you smoothly through a system set-up. At the very top of the GUI there is a FILE button with a drop-down menu. This is where you can save and Load files and memory presets.
- Page 12 CH Output column is where you choose the channel you wish to adjust. This column lists the speaker channels by position. Next to each speaker position you can use the drop-down menus to define the function of each Left and Right speaker as Full Range, Tweeter (TW), Tweeter/Mid, Woofer, Center, or Sub.
- Page 13 EQ Function Bar . This row lets you choose between GEQ (Graphic) and PEQ (Parametric) equalizers. You can also Bypass the EQ temporarily to hear the sound with and without the effects of your tuning. The Reset button resets the channel completely to return the EQ filters to flat.
- Page 14 The DSP-Z8 IV II Mobile Apps The Zapco DSP-Z8IV II apps for Android and iOS are identical and allow you to setup and tune your system with your smart phone or tablet. The goal here was to have a control system that made sense in a smaller platform but would allow the user to do everything necessary for a complete setup and tine.
- Page 15 The Channel page serves as the main system setup page. Like in the PC GUI, the Channel page will open on the locked mode and you need click to un-lock ( ) before you can set the channel (speaker) functions using the drop-down menu.
- Page 16 On the Crossover page you can customize the crossovers to fit the needs of your individual system. You have all the choices of crossover styles and slopes that the PC GUI has by using the drop-down menus in the parameter boxes of each channel. The mobile apps do not have the crossover link functions of the PC, so each channel’s crossover must be set individually.
- Page 17 Equalizer page holds the heart and the brains of the App. You can use either the Graphic or the Paragraphic EQ’s. You can link channels for equalization and from this page you can save a load presets and files. This special page warrants a quick look at each of its parts.
-
Page 18: Setting Up Your System
Setting Up Your System Before you start Make sure you have time to finish the process. You should set aside a good couple of hours to go through the process, save it all, and do some listening and re-adjusting. Make sure the installation is mechanically and electronically sound. It makes no sense to add processing to a system if you haven't provided the groundwork to let the components operate to their full potential. - Page 19 The file menu allows you to: a file that has been stored on your computer Open Save a file that you want saved on the computer lets you choose a location to save the file in** Save As Factory Setting will let you completely erase all current settings puts the current settings into a DSP Write to Device...
- Page 20 The setup This GUI is designed to take you smoothly through a system set-up, and we made some major improvements in both control and features. Each of the 10 memory presets will store the current input source and all current parameters, so the first step is to choose the input ( ) you want to use for the setup.
- Page 21 Ch. Outputs ) are listed on the left side. Channels 5 and 6 are listed as rear speakers and 7 and 8 are listed as subs but using the drop-down function menus you can make each channel be whatever is needed for your system. The choices are TW (tweeter), TW/MID (tweeter or Midrange) Woofer (woofer/MidBass), Center, Sub, Sub Left, Sub Right.
- Page 22 The vertical Link ) column in the picture below allows linking of crossovers, delay, and gain. To link the channels, you pick a channel from the Ch. Outputs column (i.e. ch. 1), then you click the channel you want to pair (i.e. ch. 2). Now the parameters you set for Ch1 will also be set for Ch2.
- Page 23 Begin phase check: R/L Balance in the middle A. Tweeters ; Click to Mute ) all channels except the tweeters. Note that tweeters are the most difficult to phase. They are the smallest drivers and are not loud. You need complete quiet.
- Page 24 Phasing the System: Setting the front stage D. Tweeters to Mids ; Now we start phasing the driver pairs to get a proper front stage. Again, from here on we change only by the pair. Mute all except the Tweeter and Midrange channels and listen to a musical track.
- Page 25 Below we lay out the EQ tuning functions. 1. GEQ : There are two types of Equalizer in the DSP-Z8 IV II GUI. The early EQs were Graphic EQs. Each band had an assigned frequency and an assigned Q factor. Q determines the shape to the filter.
- Page 26 3. Reset : Occasionally you may decide you don’t like what you’ve done to a channel. The reset button allows you to reset all the filters of a channel to 0dB. 4. Bypass : The bypass button lets you temporarily bypass the EQ of a channel to hear the channel with and without equalization for A/B comparisons.
- Page 27 What We Want to Achieve You will use the EQ graph and the Function bar above for making the EQ adjustments. Below we lay out the EQ tuning functions. Of course, there is no way to know what the response in any particular car will be.
- Page 28 A Good Response Curve This is actually a good Frequency curve. There are some small out-of-line variations (Blue circles) but they are small and you won't hear them. There is one big variation (green circle) which is the single low point, but a) Your ear is not very sensitive to drop-outs so you likely won't notice it at all, and b) Trying to equalize it will only waste power and will likely distort the frequencies on either side of it.
- Page 29 DSP-Z8 IV II Series - Technical Specifications: DSP-Z8 IV II ADSP-Z8 IV-8 DSP Processor: Cirrus Logic CS47048 Cirrus Logic CS47048 150 MHz/32 bit/48 KHz 150 MHz/32 bit/48 KHz DSP Power/Res/SF: DSP Channels: Cirrus Logic CS5368 Cirrus Logic CS5368 ADC Processor...
- Page 30 Apex, Aprilia ITALY Since 1974 zapco.com...
Need help?
Do you have a question about the DSP-Z8 IV II and is the answer not in the manual?
Questions and answers