Advertisement
A
B
H
K
J
I
L
M
N
O
Stream Joystick:
, : Selects options from streaming/recording prompts
: Returns to main status screen, start/stop recordings and broadcasts
●
(button press)
Menu Joystick:
,
: Select menu items, change status screen on main display, select characters
▲
▼
: Back, move to higher menu level
,
: Confirm selection, open selected menu
● (button press)
POWER & CONNECT
Connect power (via A/C adapter or Cubit) to the
1
power input
(F)
and video input to (C). Attach
antennas
(A)
via the threaded RP−SMA connectors.
Use the included hot shoe mount and/or
/
" screw to mount Cube to your camera, tripod mount
2
1
4
or other accessory mount, if desired(B).
Move power switch to the
ON
position (G).
3
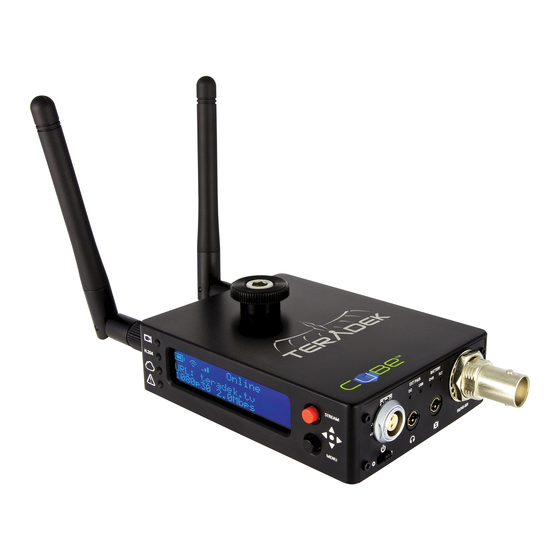
A:
Wireless Antenna
B:
Hot shoe mount &
C:
Video Input (SDI or HDMI)
D:
Line/MIC Audio Input
E:
Headphone Audio Output
f:
Power Input
G:
Power Switch
H:
Stream Joystick
I:
Menu Joystick
J:
OLED Display
K:
Status LEDs
D
C
E
F
G
P
L:
O:
Video Input
Fault/Error
M:
Status
P:
Stream Joystick
N:
Broadcast/Record
Q:
Menu Joystick
Q
CUBE'S WEB UI LOGIN
username:
password:
admin
or
Cubit
HDMI
SDI
AC adapter
NETWORK CONNECTION
MASTER MODE:
OPTION A:
Cube defaults to Master mode, which will create and
advertise its own network name (SSID). Your computer,
1
/
" screw
4
decoder, or mobile device connects directly to Cube,
with no additional network equipment required.
1. On your computer or iOS device, open your
wireless networking utility.
2. Choose your Cube from the list of WiFi devices
in your area and connect to that network.
INfRASTRuCTuRE MODE:
OPTION B:
In Infrastructure mode, Cube connects to an existing network via a wireless access point or Ethernet
connection. Infrastructure mode allows Cube to communicate with all devices on the network and is required
for streaming to the Internet. Wireless range can be greatly improved by using a wireless access point.
Connecting Cube to an existing wireless network:
1. Enter the main menu by pressing or
Select
Network Setup
with
menu with .
3. Select Mode, and then choose Infrastructure.
The Wireless mode will be set.
admin
5. Select your preferred network, (the
indicates a secured network), and the number
on the far right is the signal strength.
1
7. Choose Yes to Apply the new Network settings.
NEED MORE HELP?
1. Support forum: http://forum.teradek.com → Contains tips, information and all the latest firmware & software updates.
2. Training videos: http://vimeopro.com/teradek/cube−training−videos
TERADEK SuPPORT STAff:
Connect Cube to one other device.
WiFi CONNECTION ON MAC/PC OR iPAD
Add Cube to an existing network.
.
●
and enter the
▼
2. Select Configure.
4. From the WiFi Configuration menu, choose Scan.
6. If prompted, enter your network password. Choose
*
icon
characters with
with and , and confirm with
8. Once configured, you can view the network status
by selecting
support@teradek.com or call 888−941−2111 ext2 (Mon−fri 9am to 6pm PST)
2
and
, choose the position
▲
▼
. To cancel, press
.
●
●
Status
from the
Network Setup
menu.
Advertisement
Table of Contents

Related Manuals for Teradek Cube


Summary of Contents for Teradek Cube
-
Page 1: Network Connection
Add Cube to an existing network. OPTION B: In Infrastructure mode, Cube connects to an existing network via a wireless access point or Ethernet connection. Infrastructure mode allows Cube to communicate with all devices on the network and is required for streaming to the Internet. - Page 2 5. Click Apply. Start/stop the stream by clicking Start Broadcast on the Stream Settings page or by pressing the Stream joystick on Cube. 6. See the reference guide for additional information. DECODER SETuP: Output live video to a monitor or switcher.
Need help?
Do you have a question about the Cube and is the answer not in the manual?
Questions and answers