Table of Contents
Advertisement
Quick Links
Advertisement
Table of Contents

Related Manuals for GPI GBM 110


Summary of Contents for GPI GBM 110
-
Page 2: Table Of Contents
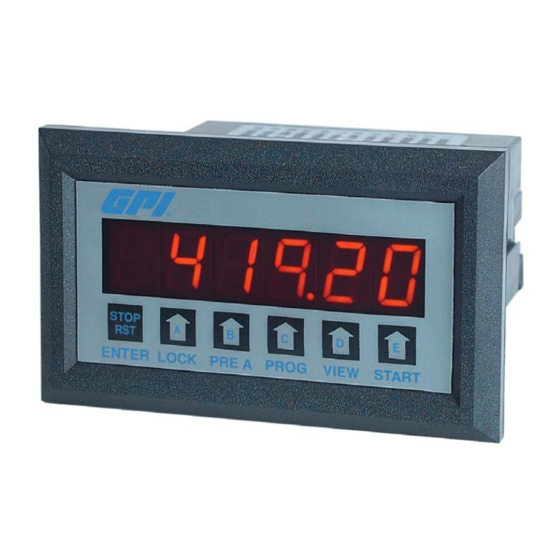
TABLE OF CONTENTS SPECIFICATIONS ..................1 MOUNTING ....................3 WIRING ..................... 4 THEORY OF OPERATION ................. 6 MILIVOLT INPUT OPTION JUMPER SELECTIONS ........7 FRONT PANEL OPERATIONS ..............8 PROGRAMMING FLOW CHART ............... 8 DEFINITIONS OF MENU PROMPTS ............9 CALCULATING SCALE FACTORS ............ - Page 3 SPECIFICATIONS (continued) Dimensions: 3.925 4.245 (99.7) (107.8) 0.587 4.437 (14.91) (112.7) 3.622 (92) Panel 2.625 1.772 (66.68) Cutout (45) CUSTOMER PANEL BEZEL Panel Thickness 0.062" (1.5) to 0.187" (4.7) max. GASKET Application STOP LOCK PRE A PROG VIEW START ENTER Flowmeter Solenoid Valve...
-
Page 4: Mounting
MOUNTING The unit is designed to be mounted with a gasket providing a water tight seal. Two mounting brackets are provided to secure the unit to the panel. A panel less than .1" may distort if the clamps are screwed too tightly. Slide the body of the unit through the rubber gasket. -
Page 5: Wiring
WIRING The rear terminal contains 12 screw terminals for connecting #14 to #28 gauge wire. The unit is controlled by a microprocessor and, therefore, an electrically "noisy" environment could cause operating problems. The input power line should not be common to power lines for motors, pumps, contactors, etc. The unit is designed to be immune from line or RF voltage interference. - Page 6 WIRING (continued) AC / DC Power Connections NOTE: Connect power only after other connections are finished. Do not touch the live AC power terminals! The unit has been de- signed with an isolated AC input. Thus, polarity is not a concern for the AC input. Connect AC power to pins 11 and 12. The chassis is plastic, therefore earth ground is not used.
-
Page 7: Theory Of Operation
THEORY OF OPERATION Batching Relay B Operation After the batcher has been programmed, it will operate Relay B can be programmed as a prewarn relay or grand as follows: total/batch counter alarm. The unit will reset to "0" (count up mode) or load Preset When Relay B is set for Prewarn, Relay B will energized A (count down mode) when RESET/STOP is activated. -
Page 8: Milivolt Input Option Jumper Selections
MILLIVOLT INPUT OPTION JUMPER SELECTIONS Millivolt Input Option Jumper Selections 20229 If the unit has the millivolt input bd.# 20229, the count input can be separately solder jumper programmed to accept either a low millivolt or 4-30 V input. Each unit shipped is programmed according to part number. -
Page 9: Front Panel Operations
FRONT PANEL OPERATIONS STOP ENTER LOCK PRE A PROG VIEW START Press to STOP / Press to "enter" Press to view or Press to cycle Press to alter- Press to Start RESET in operating LOCK code for change Preset A through PRO- nately view Rate, mode;... -
Page 10: Definitions Of Menu Prompts
DEFINITIONS OF MENU PROMPTS The following is a list of abbreviations as they appear on the display and front panel of the unit. ABBREVIATION DESCRIPTION PRE B PRESET B - This is the setpoint for Relay B. Preset B can be used as a Prewarn or Grand/Batch Total alarm. - Page 11 DEFINITIONS OF MENU PROMPTS (continued) ABBREVIATION DESCRIPTION DLY## DELAY FACTOR - The amount of time (02 to 24 sec.) the unit will "look" for valid data, before the display defaults to zero. (RATE DISPLAY ONLY) LOCK - This portion of the menu allows you to set lock functions (Lock functions apply only to front panel) 1) lock the program (Preset A is still accessible) 2) lock all (locks program &...
-
Page 12: Calculating Scale Factors
CALCULATING SCALE FACTORS The unit has a programmable scale factor to scale the input pulses. It is a 5 digit , floating decimal divider factor. The factor to enter is the number of pulses per the desired unit of measurement. The factor ranges from 0.0001 to 99999. Scale factor calculations are simple. -
Page 13: Programming
PROGRAMMING PRESS DISPLAY REMARKS STEP This section of the menu is used to set pre b Preset B value. PRGM SETTING PRESET B This is Preset B. To change, press the ##### arrow key under the digit(s) to change. Press ENTER to enter the displayed value. - Page 14 PROGRAMMING (continued) pre B PRGM STEP factor PRGM SETTING This section of the menu sets up the COUNTER counter information. count PRGM Press the PRGM key to choose RST 0 rst 0 (reset to 0, count up) or SET PR (set to set pr preset, count down), press the ENTER ENTER...
- Page 15 PROGRAMMING (continued) PRESS DISPLAY REMARKS STEP pre b PRGM SETTING factor THE RATE PRGM count PRGM rate This section of the menu is used to set up PRGM the rate information. secs Press the PRGM key to choose secs (rate mins per second), mins (rate per minute)or hours (rate per hour).
- Page 16 PROGRAMMING (continued) PRESS DISPLAY REMARKS STEP pre b PRGM SETTING factor LOCK PRGM count PRGM rate PRGM This section of the menu is used to set up the lockout type and code number. PRGM LC PG = Locks program but presets and reset are accessible.
- Page 17 PROGRAMMING (continued) PRESS DISPLAY REMARKS pre b PRGM factor STEP PRGM count SETTING PRGM rate RELAYS PRGM PRGM This section sets up the relay information. relay PRGM Press the PRGM key to choose tot (Relay B assigned to total) or PREW (Relay B assigned to prewarn).
-
Page 18: Troubleshooting Guide
TROUBLESHOOTING GUIDE PROBLEM POSSIBLE CAUSES SOLUTIONS Power is applied to unit but the display 1. AC or DC power wiring is incorrect. 1. Recheck power wiring does not light. Unit works, but occasionally the display 1. Line noise is affecting the processor 1.
Need help?
Do you have a question about the GBM 110 and is the answer not in the manual?
Questions and answers