Table of Contents
Advertisement
Quick Links
EdgeMarc 4603
Enterprise Session Border
Controller
Installation Guide
Version 1.0
water Networks / 2895 Northwestern Parkway, Santa Clara, 95051
Edgewater Networks / 2895 Northwestern Parkway, Santa Clara, CA 95051
Phone: +1 (408) 351-7200 / Email: support@edgewaternetworks.com
Phone: +1 (408) 351-7200 / Email:
Ed
support@edgewaternetworks.com
100
-
Advertisement
Table of Contents

Related Manuals for Edgewater Networks EdgeMarc 4603


Summary of Contents for Edgewater Networks EdgeMarc 4603
- Page 1 Enterprise Session Border Controller Installation Guide Version 1.0 water Networks / 2895 Northwestern Parkway, Santa Clara, 95051 Edgewater Networks / 2895 Northwestern Parkway, Santa Clara, CA 95051 Phone: +1 (408) 351-7200 / Email: support@edgewaternetworks.com Phone: +1 (408) 351-7200 / Email: support@edgewaternetworks.com...
- Page 2 EdgeMarc is a trademark of Edgewater Networks, Inc. in the United States and other countries. Any other trademarks appearing in this manual are owned by their respective companies.
-
Page 3: Table Of Contents
Back Panel ....................5 Installation ......................6 Required Tools, Materials, and Information ..........6 Step 1: Install the EdgeMarc 4603 Chassis ..........7 Rack Mount Installation ..............7 Step 2: Connect to the LAN and WAN ............8 Connecting to the LAN ..............8 Connecting to a WAN Router, Cable Modem or DSL Modem .. -
Page 4: Preface
Preface Thank you for purchasing the EdgeMarc 4603. This guide provides instructions for installing the EdgeMarc 4603 and configuring basic software settings. It is intended for network installers, network operators, and security officers. Typographic Conventions Task steps are presented in numbered lists. User inputs are displayed in boldface type and can represent either keyboard input or mouse selections in a browser window. -
Page 5: Overview
EdgeMarc 4603 Enterprise Session Border Controller The EdgeMarc 4603 combines a 24 FXS port Integrated Access Device (IAD) and multiple voice and data features into a single, easy-to-use Enterprise Session Border Controller. It provides up to four (4) integrated T1 Channel Service Units (CSU)/Data Service Units (DSU) for medium and large office connectivity. -
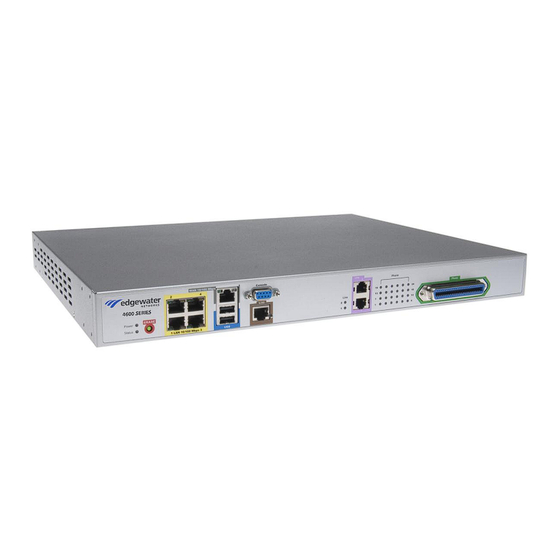
Page 6: Front Panel
H.323 traffic. It allows a single public IP address to be used for multiple VoIP clients. VoIP survivability enables continuous service during WAN link failures. Survivability can use either the FXO ports on the EdgeMarc 4603 or an external gateway. - Page 7 Caution Using the Erase button as outlined above means any configuration made to the EdgeMarc 4603 will be lost. Erasing the configuration means that IP phones installed behind the EdgeMarc 4603 will not work and Internet connectivity or network access for PCs will be down until the system is reconfigured.
-
Page 8: Back Panel
EdgeMarc 4604 Enterprise Session Border Controller Installation Guide Name Description that are used Green T1 is in sync. to connect to Yellow The destination to which data is being T1/E1 lines. transmitted has a problem with the signal it is receiving. -
Page 9: Installation
If you will be using the V.90 port to connect to the device, you must supply your own V.90 connection cable as it is not included with this device. For further instruction on connecting the device using the V.90 port, consult the Edgewater Networks VoIP Operating System (VOS) for EdgeMarc User Manual. -
Page 10: Step 1: Install The Edgemarc 4603 Chassis
Edgewater Documentation CD Regulatory, Compliance, and Safety Information 2. Place the EdgeMarc 4603 on a flat, dry surface such as a desktop, shelf or tray, or install it in a rack as described below. Rack Mount Installation You can install the EdgeMarc 4603 in a 19” rack using the rack mount kit supplied with the product. -
Page 11: Step 2: Connect To The Lan And Wan
2. Connect the other end of the cable to your computer’s Ethernet port. Connecting to a WAN Router, Cable Modem or DSL Modem 1. Connect an Ethernet cable to the Ethernet WAN port on the EdgeMarc 4603 (shown as E in the front panel diagram). -
Page 12: Procedure
EdgeMarc 4604 Enterprise Session Border Controller Installation Guide Procedure 1. Remove the left side screw:... - Page 13 EdgeMarc 4604 Enterprise Session Border Controller Installation Guide 2. Remove the cable clip: 3. Slide the cable cover to the left and remove: 4. Straighten the cable for space to tighten the right side screw:...
- Page 14 EdgeMarc 4604 Enterprise Session Border Controller Installation Guide 5. Slide the cable cover back: 6. Tighten the left side screw: 7. Reattach the cable clip:...
-
Page 15: Step 4: Connect To Power
EdgeMarc 4604 Enterprise Session Border Controller Installation Guide Installation is complete. Step 4: Connect to Power The EdgeMarc 4603 comes with an AC power cord for connecting the unit to an AC power outlet. Warning Always connect the AC power cord to an AC outlet suitable for the power supply that came with the unit in order to reduce the risk of damage to it. - Page 16 To connect the EdgeMarc 4603 to power: 1. Plug one end of the power cord into the power receptacle on the back panel of the EdgeMarc 4603 (shown as A in the back panel diagram). 2. Plug the other end into an AC power outlet.
-
Page 17: Configuring Basic Network Settings
Configuring Basic Network Settings EdgeMarc SBCs feature an easy-to-use graphical user interface that provides access to the VoIP Operating System (VOS) for EdgeMarc so you can manage settings for your deployment. This section explains how to configure basic network settings that enable the EdgeMarc device to function in your IP network. - Page 18 If the System window does not open and "message of the day" displays, select System from the Configuration menu to open the System window. Note For secure network management, change the default user name and password as described in the Edgewater Networks VOS for EdgeMarc User Manual.
-
Page 19: Configuring Basic Lan, Wan, And T1/E1 Settings
EdgeMarc 4604 Enterprise Session Border Controller Installation Guide Configuring Basic LAN, WAN, and T1/E1 Settings 1. Select Network from the VOS Configuration menu. The Network window opens: Enabling a LAN Connection 1. In the LAN Interface Settings section of the Network window, enter the IP address to be used on the local area network. -
Page 20: Enabling A Wan Connection
EdgeMarc 4604 Enterprise Session Border Controller Installation Guide 3. Click Submit to make your changes take effect now, or click Apply Later to continue making changes to the page. Your changes will not take effect until you click Submit All in the box that appears at the top of the screen: Note The LAN and WAN networks must be different subnets. -
Page 21: Enabling The T1/E1 Interface
EdgeMarc 4604 Enterprise Session Border Controller Installation Guide Enabling the T1/E1 Interface 1. In the WAN Interface IPv4 section of the Network window, select T1/E1. The T1/E1 Configuration window opens. 2. Enter the T1/E1 settings provided by your ISP. -
Page 22: Deploying The Edgemarc 4603
4. When you are ready to commit your changes, click Submit or Submit All to make your changes take effect. Deploying the EdgeMarc 4603 For details about how to configure and deploy the EdgeMarc appliance in your network, refer to the EdgeMarc VOS online help and the... -
Page 23: Specifications
Specifications WAN Ports 1x10/100 Mbps Ethernet LAN Ports 4x10/100 Mbps Ethernet (Managed VLAN Switch) T1/E1 ports USB Ports 2 (Version 2.0) V.90 Ports Analog 24 FXS Ports (50-pin female Amphenol connector) Ports Console 1 RS-232 DB9 Female Port Height 1.7” (43.18 mm) x Width 17” (431.8 mm) x Depth Dimensions 13”... -
Page 24: Warranty Information
Warranty Information Hardware Warranty For a period of one (1) year after shipment of the Product, Edgewater warrants that such Hardware will substantially conform to Edgewater’s published specifications for such Hardware on the date of order if properly used in accordance with procedures described in the documentation supplied by Edgewater. -
Page 25: Certification And Compliance
Certification and Compliance Certificates Safety UL, FCC Part 15, FCC Part 68 FCC PART 68 NOTICE 1. This equipment complies with Part 68 of the FCC rules and the requirements adopted by the ACTA. On bottom of this equipment is a label that contains, among other information, a product identifier of [US: EWRDW05B4603]. -
Page 26: Fcc Statement
In the event of equipment malfunction, all repairs should be performed by Edgewater Networks or an authorized agent. It is the responsibility of users requiring service to report the need for service to Edgewater Networks or to one of our authorized agents. Service can be facilitated through our office at: Edgewater Networks, Inc. - Page 27 Edgewater Networks, Inc. 2895 Northwestern Parkway Santa Clara, CA 95051 Phone: (408) 351-7200 info@edgewaternetworks.com...
Need help?
Do you have a question about the EdgeMarc 4603 and is the answer not in the manual?
Questions and answers