Atlona AT-HDVS-150-TX-WP Manual
Hide thumbs
Also See for AT-HDVS-150-TX-WP:
- User manual (10 pages) ,
- Installation manual (5 pages) ,
- Update instructions (2 pages)
Table of Contents
Advertisement
Quick Links
Download this manual
See also:
User Manual
Advertisement
Table of Contents

Related Manuals for Atlona AT-HDVS-150-TX-WP


Summary of Contents for Atlona AT-HDVS-150-TX-WP
- Page 1 Atlona Manuals AT-HDVS-150-TX-WP Extenders...
- Page 2 Version Information Version Release Date Notes 05/17 Updated to new manual format AT-HDVS-150-TX-WP...
- Page 3 Welcome to Atlona! Thank you for purchasing this Atlona product. We hope you enjoy it and will take an extra few moments to register your new purchase. Registration only takes a few minutes and protects this product against theft or loss. In addition, you will receive notifications of product updates and firmware.
- Page 4 Atlona requires that products returned are properly packed, preferably in the original carton, for shipping. Cartons not bearing a return authorization or case number will be refused. Atlona, at its sole discretion, reserves the right to reject any products received without advanced authorization. Authorizations can be requested by calling 1-877-536-3976 (US toll free) or 1-408- 962-0515 (US/international) or via Atlona’s website at www.atlona.com.
- Page 5 Damage, deterioration or malfunction resulting from the installation or removal of this product from any installation, any unauthorized tampering with this product, any repairs attempted by anyone unauthorized by Atlona to make such repairs, or any other cause which does not relate directly to a defect in materials and/or workmanship of this product.
- Page 6 Where shielded interface cables have been provided with the product or specified additional components or accessories elsewhere defined to be used with the installation of the product, they must be used in order to ensure compliance with FCC regulations. AT-HDVS-150-TX-WP...
-
Page 7: Table Of Contents
Table of Contents Introduction Features Package Contents Panel Description Installation Connection Instructions Connection Diagram Basic Operation Powering the Display Selecting the Input Auto Switching Passing Analog Audio Appendix Updating the Firmware Specifications Index AT-HDVS-150-TX-WP... -
Page 8: Introduction
Introduction The Atlona AT-HDVS-150-TX-WP is a 2×1 switcher and HDBaseT transmitter with an HDMI input plus a VGA input with audio. The HDVS-150-TX-WP features a US two-gang wall plate form factor. Video signals up to 1080p, plus embedded audio can be transmitted up to 230 feet (70 meters). The HDVS-150-TX-WP is designed for use with the AT-HDVS-150-RX receiver and HD scaler, and can serve as the central component of a compact, automated AV system with the convenience of automatic input selection and display control. -
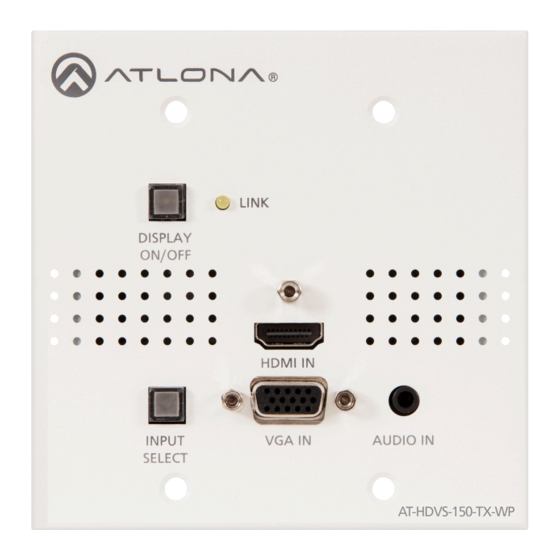
Page 9: Panel Description
Press this button to power-on the display (connected to the receiver), place it in standby mode, or control a connected display using the HDBaseT output. LINK This LED indicator will glow bright amber when a powered link exists between the AT-HDVS-150-TX-WP and a compatible receiver, such as the AT-HDVS-150-RX. HDMI IN Connect an HDMI cable from this port to an HD source. -
Page 10: Installation
This port allows two-channel analog audio to be included when the VGA IN port is selected. Refer to Passing Analog Audio (page 12) for more information. No power supply is required for the AT-HDVS-150-TX-WP. This unit will be powered over the Ethernet cable, from an HDBaseT receiver. Connection Diagram 2-gang electrical box... -
Page 11: Basic Operation
When the AT-HDVS-150-TX-WP is connected to a compatible receiver and display, press the DISPLAY ON/OFF button to toggle the display’s power state. When connected to a compatible Atlona receiver, the functionality of this button can be customized. Refer to the receiver’s User Manual for more information. -
Page 12: Auto Switching
Basic Operation Auto Switching The AT-HDVS-150-TX-WP will automatically switch to the most recently-connected or powered source. For example, if both an HDMI and VGA source are connected and then the HDMI source is disconnected, the wall plate will automatically switch to the VGA IN port. The default setting is OFF and can be set using a compatible receiver. -
Page 13: Appendix
Computer with USB port 1. Download the latest firmware from the Atlona web site. 2. Remove the AT-HDVS-150-TX-WP from the wall, or other surface, by removing the four screws from the front of the wall plate. 3. Disconnect the power to the AT-HDVS-150-TX-WP by disconnecting the Ethernet cable from the HDBaseT OUT port on the AT-HDVS-150-TX-WP. - Page 14 8. Drag-and-drop the AT-HDVS-150-TX_[version].bin firmware file to the drive. 9. After the file has been copied, disconnect the USB cable from both the computer and the AT-HDVS-150-TX-WP. 10. Reconnect the Ethernet cable to the HDBaseT OUT port on the AT-HDVS-150-TX-WP.
-
Page 15: Specifications
1080p - Feet / Meters HDMI CAT-5e / CAT-6 CAT-6a / CAT-7 Signal Bandwidth 10.2 Gbps HDCP Temperature Fahrenheit Celsius Operating 32 to 122 0 to 50 Storage -4 to 140 -20 to 60 Humidity (RH) 20% to 90%, non-condensing AT-HDVS-150-TX-WP... - Page 16 Appendix Power Consumption 18.7 W (when paired) Dimensions Inches Millimeters Wall, 2-gang Weight Pounds Kilograms Device 0.82 0.37 Certification Unit CE, FCC *4096x2160 @ 50/60 Hz and 3840x2160 @ 50/60 Hz supports 8-bit 4:2:0 choma subsampling, only. AT-HDVS-150-TX-WP...
-
Page 17: Index
Customer support Wall plate installing DISPLAY ON/OFF power button 9, 11 Warranty Faceplate removing FCC statement Features Firmware updating HDBaseT OUT port HDMI IN port Hot-Plug Detect INPUT SELECT button 9, 11 Installation LINK indicator Operating notes Panel descriptions AT-HDVS-150-TX-WP... - Page 18 • 408.962.0515 • 877.536.3976 © 2017 Atlona Inc. All rights reserved. “Atlona” and the Atlona logo are registered trademarks of Atlona Inc. All other brand names and trademarks or registered trademarks are the property of their respective owners. Pricing, specifications and availability...
Need help?
Do you have a question about the AT-HDVS-150-TX-WP and is the answer not in the manual?
Questions and answers