
Related Manuals for Inter-fab Adrenaline Slide


Summary of Contents for Inter-fab Adrenaline Slide
- Page 1 A D R E N A L I N E S L I D E ™ Assembly & Installation Instructions RIGHT TURN SLIDE LEFT TURN SLIDE ADR1-IM Rev. 4/16 (ADR-INSTALL)
-
Page 3: Table Of Contents
Step 11: Connect Water Supply System ........17 Step 12: Finishing Steps............17 Final Inspection Check List .............17 Slide Care & Maintenance............18 Paver Kit Information ............18-20 Exploded View of Adrenaline Slide ..........21 Parts List (corresponds with exploded view)......22 Hardware Kit Information ............23 Notes..................24 Inter-Fab Limited Warranty.............25... -
Page 4: Important Notices To The Installer
IMPORTANT NOTICES TO THE INSTALLER INTER-FAB HIGHLY RECOMMENDS THAT YOU READ THE ENTIRE INSTALLATION MANUAL BEFORE YOU ATTEMPT THE INSTALLATION OF THE ADRENALINE SLIDE. YOU MUST USE THE PROVIDED ANTI-SEIZE ON ALL THE BOLTS AND ALL-THREADS OR THE NUTS WILL SEIZE. -
Page 5: Intended Use Instructions
I N S T A L L A T I O N M A N U A L A D R E N A L I N E ™ S L I D E INTENDED USE INSTRUCTIONS Everyone who uses this slide must know, understand and follow these instructions The ANSI/APSP/ICC-5 2011 standard for above ground pools prohibits the use of slides or diving boards on above ground pools or on ground pools. -
Page 6: Water Safety Envelope
I N S T A L L A T I O N M A N U A L A D R E N A L I N E ™ S L I D E ADRENALINE WATER SAFETY ENVELOPE: DIAGRAM A A minimum water depth of three feet (3') under the exit (NOT TO SCALE) of the slide which increases to a depth of four feet (4'6") -
Page 7: Slide Placement & Footprint Diagrams - Left Turn
I N S T A L L A T I O N M A N U A L A D R E N A L I N E ™ S L I D E SLIDE PLACEMENT DIAGRAM & FOOTPRINT DIAGRAM drenaline Slide - Left Turn DIAGRAM D (NOT TO SCALE) -
Page 8: Slide Placement & Footprint Diagrams - Right Turn
I N S T A L L A T I O N M A N U A L A D R E N A L I N E ™ S L I D E SLIDE PLACEMENT DIAGRAM & FOOTPRINT DIAGRAM Adrenaline Slide - Right Turn DIAGRAM F (NOT TO SCALE) -
Page 9: Slide Components
I N S T A L L A T I O N M A N U A L A D R E N A L I N E ™ S L I D E ADRENALINE SLIDE COMPONENTS Left Turn Slide Flume Parts... -
Page 10: Step 1: Attach Ladder Entry Section
I N S T A L L A T I O N M A N U A L A D R E N A L I N E ™ S L I D E LIST OF REQUIRED TOOLS Tools required for assembly and installation of Adrenaline slide: NOTE: USE PROVIDED ANTI-SEIZE ON ALL BOLTS! Hammer Drill with 3/8"... -
Page 11: Step 2: Attach Handrails To Ladder & Entry Section
I N S T A L L A T I O N M A N U A L A D R E N A L I N E ™ S L I D E STEP TWO: ttach the Handrails to the Ladder and Entry Section TIP: Install the handrails as shown in Figure 4 below. - Page 12 I N S T A L L A T I O N M A N U A L A D R E N A L I N E ™ S L I D E STEP TWO: ttach the Handrails to the Ladder and Entry Section - CONT. Insert the correct length of all-thread into the nuts embedded in the handrails then attach the handrails as illustrated.
-
Page 13: Step 3: Attach Foot Pedestals To Legs
I N S T A L L A T I O N M A N U A L A D R E N A L I N E ™ S L I D E STEP TWO: ttach the Handrails to the Ladder and Entry Section - CONT. Fig. -
Page 14: Step 4: Attach Legs To Flume
I N S T A L L A T I O N M A N U A L A D R E N A L I N E ™ S L I D E STEP FOUR: ttach the Legs to the Flume Insert the top of the long leg into leg receiver of the upper flume, and the top of the short leg into the leg receiver of the lower flume. -
Page 15: Step 6: Attach Entry Section & Ladder To Flume
I N S T A L L A T I O N M A N U A L A D R E N A L I N E ™ S L I D E STEP FIVE: ssemble the Flume Sections - CONT. Using hardware kit ADR-102-SS and anti-seize, align the 5 flange holes, place flat washer over 3/8”... -
Page 16: Step 7: Position Slide Assembly On Deck
I N S T A L L A T I O N M A N U A L A D R E N A L I N E ™ S L I D E Fig. 18 STEP SEVEN: Position Slide ssembly on Deck First, set the ladder at 16˚... -
Page 17: Step 8: Anchor Slide To Deck
I N S T A L L A T I O N M A N U A L A D R E N A L I N E ™ S L I D E STEP EIGHT: nchoring the Slide to the Deck Ensure that the assembled slide is in its correct and final position on the deck. -
Page 18: Step 9: Align Flume Sections
I N S T A L L A T I O N M A N U A L A D R E N A L I N E ™ S L I D E STEP EIGHT: nchoring the Slide to the Deck - CONT. Position the entry-step assembly about 12”... -
Page 19: Step 10: Tighten Leg Receiver Through Bolts
I N S T A L L A T I O N M A N U A L A D R E N A L I N E ™ S L I D E STEP TEN: Tighten Leg Receiver Through Bolts With the slide secured to the deck and flumes aligned and tightened, tighten the six 3/8”x9- 1/2”... -
Page 20: Slide Care & Maintenance
PAVER KIT INFO – ADRENALINE When installing an Inter-Fab Adrenaline™ slide using a paver kit, you must ensure that all standard installation requirements are met. The slide must be compatible with the type of pool on the intended installation and all ANSI/NSPI-4 2007 requirements must be met. - Page 21 (3/8” MAX.) for your individual installation. You will need a 3/8” masonry bit for the Adrenaline™ slide. Inter-Fab Inc. will not be responsible for damage to pavers caused by drilling or mechanically attaching to concrete pad. Refer to paver manufacturer’s specific installation instructions before beginning.
- Page 22 I N S T A L L A T I O N M A N U A L A D R E N A L I N E ™ S L I D E Fig. 26 – Example of Step Pedestal on Concrete Pad (side view) Fig.
-
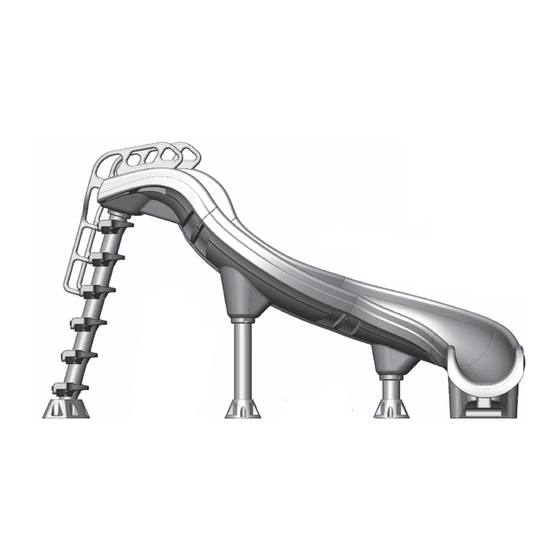
Page 23: Exploded View Of Adrenaline Slide
I N S T A L L A T I O N M A N U A L A D R E N A L I N E ™ S L I D E ADRENALINE™ SLIDE (ADR1-CR SHOWN) ADR1-IM Rev. 4/16 (ADR-INSTALL) -
Page 24: Parts List (Corresponds With Exploded View)
ADRENALINE STEP/PEDESTAL ASSEMBLY * not pictured NOTES: Check your local electrical code Adrenaline slide available in Summit Gray or Desert Tan requirements for bonding requirements. Adrenaline slide is available in a right or left turn configuration ADR1-IM Rev. 4/16 (ADR-INSTALL) -
Page 25: Hardware Kit Information
I N S T A L L A T I O N M A N U A L A D R E N A L I N E ™ S L I D E ADRENALINE™ SLIDE HARDWARE KITS (NOT TO SC LE) DR-101-SS –... -
Page 26: Notes
I N S T A L L A T I O N M A N U A L A D R E N A L I N E ™ S L I D E NOTES: ADR1-IM Rev. 4/16 (ADR-INSTALL) - Page 27 I N S T A L L A T I O N M A N U A L A D R E N A L I N E ™ S L I D E NOTES: ADR1-IM Rev. 4/16 (ADR-INSTALL)
-
Page 28: Inter-Fab Limited Warranty
Inter-Fab, Inc., and expressly does not cover any labor or reinstallation expenses related to the replacement of any and all Inter-Fab products. This limited warranty shall be the sole and exclusive remedy of irrespective of whether the claims are made in contract, tort, warranty, law, equity or by statue.
Need help?
Do you have a question about the Adrenaline Slide and is the answer not in the manual?
Questions and answers