Advertisement
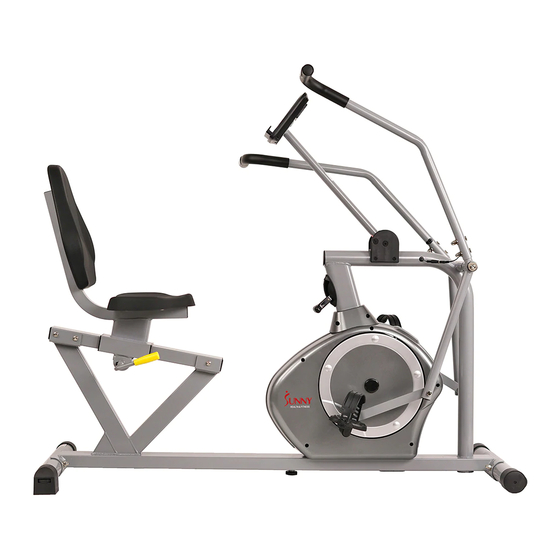
CROSS TRAINING MAGNETIC
RECUMBENT BIKE
SF-RB4708
USER MANUAL
IMPORTANT! Please retain owner's manual for maintenance and adjustment instructions.
Your satisfaction is very important to us, PLEASE DO NOT RETURN UNTIL YOU HAVE
CONTACTED US:
support@sunnyhealthfitness.com
or 1-877-90SUNNY (877-907-8669).
Advertisement
Table of Contents

Related Manuals for Sunny SF-RB4708


Summary of Contents for Sunny SF-RB4708
-
Page 1: User Manual
CROSS TRAINING MAGNETIC RECUMBENT BIKE SF-RB4708 USER MANUAL IMPORTANT! Please retain owner’s manual for maintenance and adjustment instructions. Your satisfaction is very important to us, PLEASE DO NOT RETURN UNTIL YOU HAVE CONTACTED US: support@sunnyhealthfitness.com or 1-877-90SUNNY (877-907-8669). -
Page 3: Important Safety Information
IMPORTANT SAFETY INFORMATION We thank you for choosing our product. To ensure your safety and health, please use this equipment correctly. It is important to read this entire manual before assembling and using the equipment. Safe and effective use can only be achieved if the equipment is assembled, maintained and used properly. -
Page 4: Exploded Diagram
EXPLODED DIAGRAM... -
Page 5: Hardware Package
HARDWARE PACKAGE #71 Φ12*47 1PC #9 M8*73 4PCS #59 Φ20*d8.5 4PCS #11 M8 8PCS #103 S13-14-15 1PC #12Φ19*2 4PCS #39Φ26*2 2PCS #104 S13-14 1PC #30 Φ36*Φ21*11.82PCS #105 S5 1PC #58 M8*40 4PCS #106 S6 2PCS #64 M8*70 1PC Most of the listed assembly hardware has been packaged separately, but some hardware parts have been preassembled. -
Page 6: Parts List
PARTS LIST Description Spec. Qty. Description Spec. Qty. Main Frame Square Plug 80x40x2 Seat Tube Bushing 3L/R Swing Tube 1 pr. Block Slide Rail Seat 5L/R Handlebar 1pr. Back Rest Cross Pan Head Front Stabilizer Screw D13x2xф26 Rear Stabilizer Flat Washer Adjustment 40L/R Crank... - Page 7 Extension Wire Sensor Wire Hex Bolt M5x60 Nylon Nut Hex Bolt M8xL60x120 Alloy Bushing Nylon Nut Round End Flange Nut M10x1 Round End Conical Thin Nut M10x1x H5 Adjustable Belt U Sleeve Adjustable Belt 72L/R Belt Cover 1 pr. Bolt Turn Plate Flywheel Protective...
-
Page 8: Assembly Instructions
ASSEMBLY INSTRUCTIONS STEP 1: Attach the Front Stabilizer (No. 6) and the Rear Stabilizer (No. 7) to the Main Frame (No. 1) with the 4 Square Neck Bolts (No. 9), 4 Arc Washers (No. 12) and 4 Ball Cap Nuts (No. 11). STEP 2: Remove 6 Hex Pan Head Screws (No. - Page 9 STEP 3: Remove 4 Hex Pan Head Screws (No. 14) and 4 Washers (No. 15) from the Back Rest (No. 37). Attach the Back Rest (No. 37) to the Seat Tube (No. 2) with 4 Hex Pan Head Screws (No. 14) and 4 Washers (No.
- Page 10 STEP 5: Attach the Handlebar (No. 5L/R) to the Swing Tube (No. 3L/R) with 4 Square Bolts (No. 58), 4 Arc Washers (No. 59) and 4 Ball Cap Nuts (No. 11). Connect the Pulse Wire (No. 60) with Extension Wire (No. 49). Lift Computer Tube...
- Page 11 ADJUSTMENTS & USAGE GUIDE ADJUSTING THE SADDLE POSITION To move the saddle forward or backward, while seated on the bike, put your feet on the floor. Pull the Adjustment Handle (No. 8) towards you. Move the saddle. Push the Adjustment Handle (No.
-
Page 12: Exercise Computer
EXERCISE COMPUTER BUTTONS MODE Press this button to change display or choose the window needs to be set. In monitor status, hold this button for 3 seconds to reset all values to zero. To set value of Time, Distance, Calorie and Pulse when not in scan mode RESET Press to reset Time,Distance, Calorie and Pulse. - Page 13 COUNTDOWN The functions of Time, Distance and Calorie can be set to countdown. Press MODE to select the function, then press SET to adjust the value. Make sure you are not in SCAN. Start pedaling to start the countdown. When the countdown value goes to zero, the computer will beep for 6 seconds. PULSE RATE Remark: During the process of pulse measurement, the measurement value may be higher during the first 2~3 seconds, and then will return to normal level.
Need help?
Do you have a question about the SF-RB4708 and is the answer not in the manual?
Questions and answers