Table of Contents
Advertisement
Quick Links
Advertisement
Table of Contents

Subscribe to Our Youtube Channel
Related Manuals for TPI DC580


Summary of Contents for TPI DC580
- Page 1 Digital Air Velocity Meter DC580 The Value Leader www.testproductsintl.com...
-
Page 2: Table Of Contents
LCD Overview ........Page 3 Keypad Overview ........Page 4 Probe Overview ........Page 5 Turning the DC580 on & Connecting a probe ..Page 6 Units of Measure Setup Mode ....Page 7 Duct Type and Size Setup Mode ....Page 8 Definition of Free Area ...... -
Page 3: Introduction
Thank you for purchasing TPI brand products. The TPI DC580 digital air velocity meter is a state of the art, easy to use air velocity tester designed to display air velocity, air flow, and temperature. It can be used with the TPI DC580 app to generate reports and store readings. -
Page 4: Features And Guidlines
Rubber Boot - Protects the instrument from accidental damage Display - Large 2 two line LCD display w/ backlight Magnets - Used to attach the DC580 to metal surfaces Keypad - Selects all available functions Hanger Hook Attachment Point - Used with optional boot hook (p/n A103) -
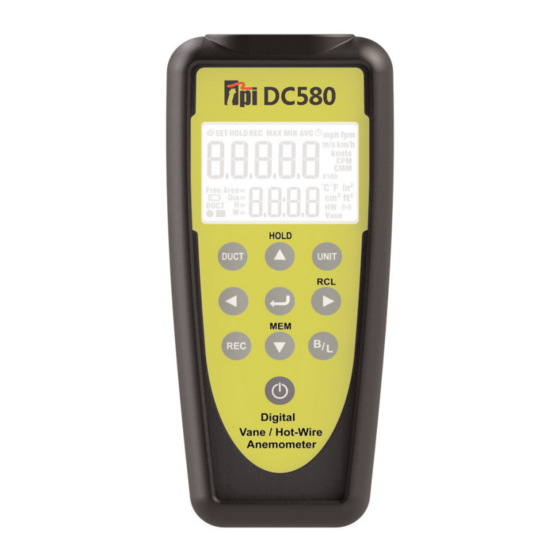
Page 5: Lcd Overview
LCD Overview Air Velocity and Air Flow Volume Display Area Temperature Display Area Indicates auto power off is active. Indicates Set up mode is active. Indicates Hold is active. Displayed readings freeze. Indicates Record mode is active. Indicates the displayed reading is the Maximum, Minimum, or Average measurement. -
Page 6: Keypad Overview
Use to decrease the parameter in setup mode menus. Use to activate and deactivate auto power off. Use to turn the DC580 on and off. (Press and hold) Use to setup duct type and size. Use to navigate left in menu mode. -
Page 7: Probe Overview
Probe Overview Hot Wire Probe (Part number A581) Hot wire probe for the DC580. This probe can be used to measure air velocity and flow inside ducts. The white dot should face into the air stream. The probe can be expanded by pulling out the sen- sor shaft enabling the probe to extend like an antenna. -
Page 8: Turning The Dc580 On & Connecting A Probe
DC580 is ready to take measurements. Slide the cover down to the open position and perform tests. Vane Probe - Connect the vane probe and the DC580 is ready to take measurements. After power is turned on and a probe is connected the DC580 is ready to take measurements. -
Page 9: Units Of Measure Setup Mode
Setup the units of measure to be used. The meter will default to these settings upon start up. These can be changed as necessary. 1. Connect a probe to the DC580. Turn the DC580 on by pressing and holding the key for more than 2 seconds. -
Page 10: Duct Type And Size Setup Mode
The units of measure used in the duct size can be set by following the steps outlined in section page 7. 1. Connect a probe to the DC580 and turn it on as outlined earlier. 2. Press the key to activate duct size entry mode. -
Page 11: Definition Of Free Area
(grille fins). Grille manufacturers publish free area specifications and this is the most accurate information to use when setting up your DC580 to measure air flow (volume). Whenever possible it is best to use free area when entering duct... -
Page 12: Taking A Measurement
Taking a Measurement 1. Insert the hot wire or vane air velocity probe into the DC580. If the hotwire probe is used make sure the sliding cover is over the air sensor. (See page 5) 2. Press and hold the key until the DC580 turns on. -
Page 13: Selecting Between Air Velocity And Volume
Selecting Between Air Velocity and Volume (Air Flow) When an air velocity is displayed on the DC580 the key can be pressed to toggle the top display between air velocity and air flow. Note: The duct size must be entered correctly for the air flow read- ing to be accurate. -
Page 14: Recalling A Stored Reading
5. Press the key to exit recall and return to normal operation. Stored information can also be sent to the DC580 App. The app will display the duct size and also provides the ability to export the data to a CSV file or send a report via email. Please see page 30... -
Page 15: Preparing To Traverse A Rectangular Duct
It is rec- ommended to do at least 12 points of measurement. There are two ways to perform this test using the DC580, Time Based Traverse and Spot Based Traverse. Time based is typically easier but both are explained in the next sections. -
Page 16: Time Based Traverse Of A Horizontal Duct
Time Based Traverse of a Horizontal Duct 1. Insert the hotwire probe into the DC580 and turn the meter on. 2. Enter the duct type and size and prepare the duct for transverse measurements as outlined on page 13. 3. Press the key. - Page 17 Time Based Traverse of a Horizontal Duct (Continued) 6. With the probe in place press the key and the DC580 will begin recording. 7. Slowly pull the probe towards the entrance point of the duct. Start with the probe all the way into the duct.
-
Page 18: Time Based Traverse Of A Horizontal Duct
The stored readings can be recalled and displayed (see page 12) or sent to the DC580 app (see page 30). Note: At any time during the traverse process when REC is dis-... -
Page 19: Point Based Traverse Of A Horizontal Duct
Point Based Traverse of a Horizontal Duct 1. Insert the hotwire probe into the DC580 and turn the meter on. 2. Enter the duct size and prepare the duct for transverse measure- ments as outlined on the previous page. 3. Press the key. - Page 20 Point Based Traverse of a Horizontal Duct (Continued) 6. With the probe in place press the key to record the reading. 7. Slowly pull the probe towards the entrance point of the duct. Stop at each point and press the key to record reading.
-
Page 21: Point Based Traverse Of A Horizontal Duct
Point Based Traverse of a Horizontal Duct (Continued) 9. Press the key to record the reading. Repeat these steps for all test holes. 10. When the duct has been completely traversed press the key to store the readings. See section page 11 on storing read- ings. -
Page 22: Preparing To Traverse A Round Duct
Preparing to Traverse a Round Duct Preparing the Duct To do a proper airflow measurement (CFM) you should do traverse readings to obtain the true average airflow through the duct. You will need to drill 2 holes at 90 degrees to each other, similar to the draw- ing below. -
Page 23: Time Based Traverse Of A Round Duct
Time Based Traverse of a Round Duct Using Time Based Traverse Record Function 1. Insert the hotwire probe into the DC580 and turn the meter on. 2. Enter the duct type and size. Prepare the duct for transverse measurements as outlined on the previous page. - Page 24 Time Based Traverse of a Round Duct (Continued) 6. With the probe in place press the key and the DC580 will begin recording. 7. Slowly pull the probe towards the entrance point of the duct. Start with the probe all the way into the duct.
- Page 25 Time Based Traverse of a Round Duct (Continued) 9. Pull the probe out and insert it into the other test hole all the way into the duct. 10. Press the key to begin recording. Repeat these steps for all test holes. 11.
-
Page 26: Point Based Traverse Of A Round Duct
Point Based Traverse of a Round Duct 1. Insert the hotwire probe into the DC580 and turn the meter on. 2. Enter the duct type and size. Prepare the duct for transverse measurements as outlined on the previous page. 3. Press the key. - Page 27 Point Based Traverse of a Round Duct (Continued) 6. With the probe in place press the key to record the reading. 7. Slowly pull the probe towards the entrance point of the duct. Stop at each point and press the key to record reading.
- Page 28 Point Based Traverse of a Round Duct (Continued) 9. Press the key to record the reading. Repeat these steps for all the other test hole. 10. When the duct has been completely traversed press the key to store the readings. See page 11 on storing readings. This will store the average air velocity, air volume, and temperature readings.
-
Page 29: Traversing A Grille
3. Traversing a Grille Using Time Based Traverse Record Function 1. Insert the vane probe into the DC580 and turn the meter on. 2. Enter the duct type and size. Remove the grille if possible or use the free area specification from the manufacturer. - Page 30 3. Traversing a Grille (Continued) 6. Slowly move the vane across the grilled towards the other end. Start 7. Stop at the last measurement point prior to removing the vane. Press the key to pause the recording. 8. Press the key to store the readings.
-
Page 31: Auto Off, Backlight, Hold And Min, Max, Avg
Activate / Deactivate Auto Power Off The DC580 always defaults to auto power off mode. When auto power off is activated the annunciator will show in the upper left corner of the display. To deactivate auto power off from normal operation mode press... -
Page 32: Bluetooth Activation & App Use
Using the DC580 App Connecting to a DC580 Download the DC580 app from the app store. 1. Insert a probe in the DC580 and turn it on. Activate Bluetooth as outlined above. 2. Open the app. The main screen will be displayed. - Page 33 Using the DC580 App (Continued) 4. Available DC580’s will be displayed. 5. Tap on an available DC580 and the app will return to the main display. From the main display many functions can be accessed. The real time Air Volume, Air Velocity, and Temperature can be displayed.
- Page 34 Tap on a memory location to see the infor- mation contained in it. (See next page) NOTE: Downloading information from the DC580 does not delete the data on the DC580. To do this either store over older data or perform a memory clear as outlined...
- Page 35 Using the DC580 App (Continued) After tapping on “Reading Mem Data” and tapping “Update All” the data stored in the DC580 will download. Tapping on a memory location will dis- play the information stored there. From here a CSV file can be created...
- Page 36 Using the DC580 App (Continued) Tap on “Customer Information” to open the Customer Info input screen. This is where your customer’s name, address, and email should be entered. The building information can also be entered as necessary. This information will be part of the CSV report generated that you can email your customer.
-
Page 37: Specifications
Specifications... -
Page 38: Battery Replacement
A583 Protective boot with magnets Battery Replacement 1. Remove the DC580 from the protective boot by prying the boot off from the bottom of the meter first. 2. Locate and loosen the battery cover screw. 3. Remove the battery cover and replace the batteries (AA x 3). -
Page 39: Troubleshooting & Care
Ensure white dot is facing into the air stream. Care & Cleaning Clean the DC580 with a soft lint free cloth. Do not attempt to clean the sen- sor. Use a mild detergent on the base unit if necessary. Do not submerse the DC580 or probes. - Page 40 Test Products International, Inc. 9615 SW Allen Blvd., Ste. 104 Beaverton, OR 97005 Tel: 503-520-9197 Fax: 503-520-1225 www.testproductsintl.com Test Products International, Ltd. 342 Bronte Road South, Unit #6 Milton Ontario Canada L9T5B7 Tel: 905-693-8558 Fax: 905-693-0888 www.tpicanada.com Test Products International Europe Ltd. Longley House International Drive Southgate Crawley West Sussex RH10 6AQ...
Need help?
Do you have a question about the DC580 and is the answer not in the manual?
Questions and answers